

Grow Celery at Home, you say? Absolutely! Imagine stepping into your kitchen and snipping fresh, crisp celery stalks straight from your own garden. No more limp, store-bought celery that’s been sitting in the crisper drawer for weeks! This isn’t just about convenience; it’s about experiencing the unparalleled flavor of homegrown produce and knowing exactly where your food comes from.
Celery, with its refreshing crunch, has a surprisingly rich history. Originating in the Mediterranean, it was initially valued more for its medicinal properties than its culinary uses. Over time, selective breeding transformed it into the crisp, juicy vegetable we know and love today. Now, you can be part of that evolution by cultivating your own celery patch!
Why should you learn this DIY trick? Because growing your own celery is easier than you think, and the rewards are immense. Not only will you have a constant supply of fresh celery for snacking, soups, and salads, but you’ll also reduce your reliance on grocery stores and minimize your environmental impact. Plus, it’s a fantastic way to connect with nature and enjoy the therapeutic benefits of gardening. I’m excited to share some simple yet effective techniques to help you successfully grow celery at home, even if you have limited space or gardening experience. Let’s get started!

Grow Your Own Delicious Bok Choy at Home: A Beginner’s Guide
Hey there, fellow gardening enthusiasts! I’m so excited to share my experience with growing bok choy at home. It’s surprisingly easy, even if you’re a complete beginner like I was. Bok choy, also known as pak choi, is a type of Chinese cabbage that’s packed with nutrients and adds a delightful crunch to stir-fries, soups, and salads. Plus, it grows relatively quickly, so you won’t have to wait forever to enjoy your harvest. Let’s dive in!
Choosing the Right Variety and Starting Seeds
Before we get our hands dirty, let’s talk about bok choy varieties and how to start those little seeds.
* Variety Selection: There are several types of bok choy, each with slightly different characteristics. Some popular choices include:
* Shanghai Bok Choy: This variety has pale green stems and spoon-shaped leaves. It’s known for its mild flavor.
* Baby Bok Choy: As the name suggests, this is a smaller version of bok choy, perfect for single servings.
* Joi Choi: This variety is heat-tolerant and slow to bolt (go to seed), making it a good choice for warmer climates.
* Mei Qing Choi: This is another baby bok choy variety that matures quickly.
I personally love Shanghai Bok Choy for its versatility, but feel free to experiment and find your favorite!
* Starting Seeds Indoors (Optional): While you can directly sow bok choy seeds into the garden, starting them indoors gives them a head start, especially if you live in a region with a short growing season.
* When to Start: Start seeds indoors about 4-6 weeks before the last expected frost.
* What You’ll Need: Seed starting trays or small pots, seed starting mix, and a spray bottle.
* How to Sow: Fill the trays or pots with seed starting mix. Moisten the mix with the spray bottle. Sow 2-3 seeds per cell or pot, about ¼ inch deep. Gently cover the seeds with more mix.
* Creating the Ideal Environment: Keep the soil consistently moist but not soggy. Place the trays or pots in a warm location (around 65-75°F) with plenty of light. A grow light is ideal, but a sunny windowsill can also work.
* Thinning Seedlings: Once the seedlings emerge (usually within a week), thin them to one plant per cell or pot by snipping off the weaker seedlings at the soil line.
Preparing the Garden Bed
Now, let’s get our garden bed ready for those bok choy plants!
* Choosing the Right Location: Bok choy thrives in a location that receives at least 4-6 hours of sunlight per day. However, in hotter climates, some afternoon shade can be beneficial to prevent bolting.
* Soil Preparation: Bok choy prefers well-drained, fertile soil with a pH between 6.0 and 7.5.
* Testing Your Soil: If you’re unsure about your soil’s pH, you can purchase a soil testing kit at your local garden center.
* Amending the Soil: Amend the soil with compost or well-rotted manure to improve drainage, fertility, and water retention. I like to add a generous amount of compost – it really makes a difference!
* Loosening the Soil: Use a garden fork or tiller to loosen the soil to a depth of at least 12 inches. This will allow the roots to grow easily.
* Creating Raised Beds (Optional): If your soil is poorly drained, consider creating raised beds. Raised beds also warm up faster in the spring, which can be advantageous.
Planting Bok Choy
Alright, the moment we’ve been waiting for – planting the bok choy!
1. Hardening Off Seedlings (If Starting Indoors): Before transplanting your seedlings outdoors, you need to “harden them off.” This process gradually acclimates them to outdoor conditions.
* The Hardening Off Process: Start by placing the seedlings outdoors in a sheltered location (like a porch or patio) for a few hours each day. Gradually increase the amount of time they spend outdoors over the course of a week. Also, gradually expose them to more sunlight and wind.
* Why It’s Important: Hardening off prevents transplant shock, which can stunt the growth of your plants.
2. Transplanting Seedlings (If Starting Indoors): Once the seedlings are hardened off, it’s time to transplant them into the garden.
* Spacing: Space the seedlings 6-8 inches apart in rows that are 12-18 inches apart. Baby bok choy varieties can be spaced closer together.
* Planting Depth: Dig a hole that is slightly larger than the root ball of the seedling. Gently remove the seedling from its container and place it in the hole. Make sure the top of the root ball is level with the surrounding soil.
* Watering: Water the seedlings thoroughly after planting.
3. Direct Sowing Seeds (If Not Starting Indoors): If you’re directly sowing seeds, sow them about ½ inch deep and 1 inch apart. Thin the seedlings to 6-8 inches apart once they emerge.
4. Succession Planting: To ensure a continuous harvest, sow seeds every 2-3 weeks. This is called succession planting.
Caring for Your Bok Choy Plants
Now that your bok choy is planted, it’s time to provide it with the care it needs to thrive.
* Watering: Bok choy needs consistent moisture to grow well. Water deeply whenever the top inch of soil feels dry. Avoid overhead watering, as this can promote fungal diseases. Drip irrigation or soaker hoses are ideal.
* Fertilizing: Bok choy is a heavy feeder, so it benefits from regular fertilization.
* Organic Options: Use a balanced organic fertilizer, such as fish emulsion or compost tea, every 2-3 weeks.
* Granular Fertilizer: You can also use a granular fertilizer, following the instructions on the package.
* Weeding: Keep the garden bed free of weeds, as they can compete with the bok choy for nutrients and water. Hand-pull weeds regularly or use a hoe to cultivate the soil.
* Mulching: Apply a layer of mulch around the plants to help retain moisture, suppress weeds, and regulate soil temperature. Straw, shredded leaves, or wood chips are all good options.
* Pest Control: Bok choy can be susceptible to certain pests, such as aphids, cabbage worms, and flea beetles.
* Aphids: These tiny insects suck the sap from plants, causing them to become weak and distorted. You can control aphids by spraying them with a strong stream of water or by using insecticidal soap.
* Cabbage Worms: These green caterpillars feed on the leaves of bok choy, leaving behind holes. You can control cabbage worms by hand-picking them off the plants or by using Bacillus thuringiensis (Bt), a natural insecticide.
* Flea Beetles: These small, jumping beetles create tiny holes in the leaves of bok choy. You can control flea beetles by covering the plants with row covers or by using insecticidal soap.
* Bolting Prevention: Bolting is when a plant prematurely flowers and goes to seed. This can happen when bok choy is exposed to hot weather or stress.
* Choose Heat-Tolerant Varieties: As mentioned earlier, some bok choy varieties are more heat-tolerant than others.
* Provide Shade: In hot weather, provide your bok choy plants with some afternoon shade.
* Water Regularly: Consistent watering can help prevent bolting.
* Harvest Early: If you see signs of bolting, harvest the bok choy immediately.
Harvesting Bok Choy
Finally, the best part – harvesting your delicious bok choy!
* When to Harvest: Bok choy is typically ready to harvest in 45-60 days from planting. You can harvest the entire plant at once or harvest individual leaves as needed.
* How to Harvest:
* Harvesting the Entire Plant: Use a sharp knife to cut the plant at the base, just above the soil line.
* Harvesting Individual Leaves: Harvest the outer leaves first, leaving the inner leaves to continue growing.
* Storage: Store bok choy in the refrigerator for up to a week. Wrap it loosely in a plastic bag or damp paper towel.
Troubleshooting
Even with the best care, you might encounter some problems while growing bok choy. Here are a few common issues and how to address them:
*
Conclusion
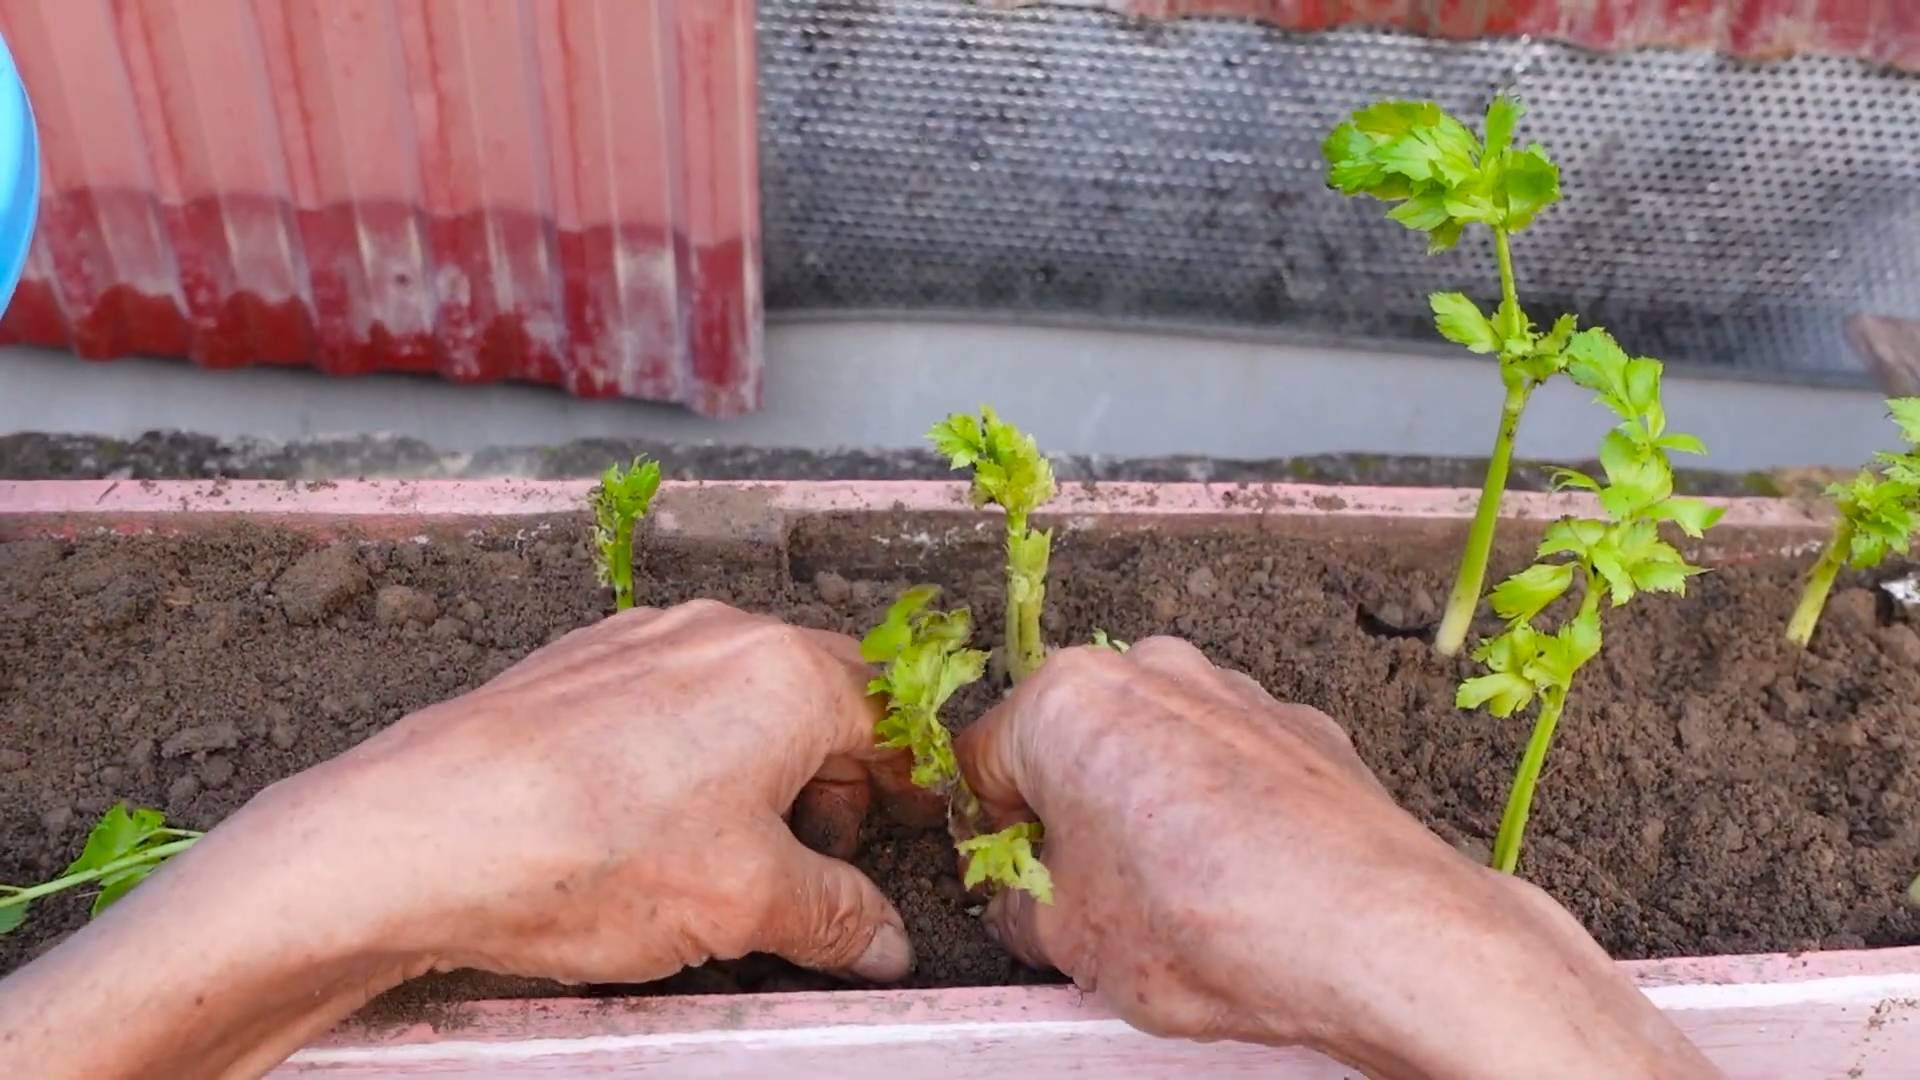
So, there you have it! Growing celery at home from scraps isn’t just a fun experiment; it’s a sustainable way to reduce food waste, enjoy fresh, flavorful celery, and impress your friends with your green thumb. It’s a surprisingly simple process that yields tangible results, transforming what would otherwise be kitchen scraps into a vibrant, thriving plant.
Why is this DIY trick a must-try? Because it’s economical, environmentally friendly, and incredibly rewarding. Think about it: you’re essentially getting free celery from something you’d normally throw away. You’re reducing your carbon footprint by minimizing trips to the grocery store and lessening the demand for commercially grown produce. And you’re connecting with nature in a small but meaningful way, witnessing the miracle of regrowth firsthand.
Beyond the basic method, there are plenty of ways to customize your celery-growing experience. Want to boost your celery’s flavor? Try amending your potting soil with compost or adding a diluted liquid fertilizer every few weeks. Experiment with different varieties of celery; some are sweeter, some are more fibrous, and some are more resistant to pests. You can even try growing your celery in a hydroponic setup for faster growth and cleaner results.
Consider companion planting. Celery thrives alongside plants like onions, garlic, and tomatoes, which can help deter pests and improve the overall health of your garden. Conversely, avoid planting celery near parsley, as they can compete for nutrients.
Don’t be discouraged if your first attempt isn’t perfect. Growing celery from scraps is a learning process, and every failure is an opportunity to refine your technique. Pay close attention to your celery’s needs, adjust your watering schedule as needed, and don’t be afraid to experiment.
We wholeheartedly encourage you to give this DIY trick a try. It’s a fantastic project for gardeners of all skill levels, and it’s a great way to introduce children to the wonders of plant propagation. Plus, imagine the satisfaction of serving a salad made with celery you grew yourself!
Once you’ve successfully grown your own celery, we’d love to hear about your experience. Share your tips, tricks, and photos in the comments below. Let’s create a community of home celery growers and inspire others to embrace this sustainable and rewarding practice. Show us your celery success! Let’s all learn together how to best grow celery at home.
Frequently Asked Questions (FAQ)
Q: How long does it take to grow celery from a base?
A: The initial regrowth from the base usually takes about a week or two. You’ll start to see small green shoots emerging from the center. After that, transplanting to soil and growing to a harvestable size can take anywhere from 2-4 months, depending on the conditions and variety. Be patient; it’s a process that requires time and care.
Q: What kind of soil is best for growing celery?
A: Celery prefers rich, well-draining soil that is high in organic matter. A good mix would be equal parts potting soil, compost, and perlite or vermiculite. The compost provides nutrients, while the perlite or vermiculite ensures good drainage. Celery needs consistent moisture, but it doesn’t like to sit in soggy soil.
Q: How much sunlight does celery need?
A: Celery needs at least 6 hours of sunlight per day to thrive. However, in very hot climates, it can benefit from some afternoon shade to prevent the leaves from scorching. If you’re growing celery indoors, place it near a sunny window or use a grow light.
Q: How often should I water my celery?
A: Celery needs consistent moisture, so water it regularly, especially during hot, dry weather. The soil should be kept consistently moist but not waterlogged. Check the soil moisture by sticking your finger about an inch deep; if it feels dry, it’s time to water. Overwatering can lead to root rot, so be mindful of drainage.
Q: What are some common problems when growing celery, and how can I fix them?
A: Some common problems include:
* **Yellowing leaves:** This can be caused by nutrient deficiencies, overwatering, or underwatering. Check the soil moisture and consider fertilizing with a balanced liquid fertilizer.
* **Pests:** Celery can be susceptible to pests like aphids, celery loopers, and spider mites. Inspect your plants regularly and treat infestations with insecticidal soap or neem oil.
* **Bolting:** This is when the celery plant prematurely goes to seed, usually due to stress from heat or lack of water. Ensure consistent watering and provide shade during hot weather.
* **Root rot:** This is caused by overwatering and poor drainage. Ensure your soil is well-draining and avoid overwatering.
Q: Can I grow celery indoors year-round?
A: Yes, you can grow celery indoors year-round, provided you have adequate light and humidity. Place your celery near a sunny window or use a grow light. You may also need to increase the humidity by misting the plant regularly or using a humidifier.
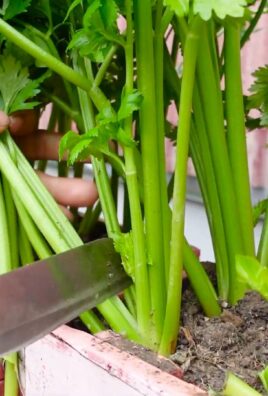
Q: How do I harvest celery?
A: You can harvest celery stalks as needed once they reach a reasonable size. Simply cut the outer stalks near the base of the plant. The inner stalks will continue to grow. Alternatively, you can harvest the entire plant by cutting it off at the base.
Q: Can I eat the leaves of the celery plant?
A: Yes, the leaves of the celery plant are edible and have a strong celery flavor. They can be used in salads, soups, stews, or as a garnish.
Q: How can I make my celery taste sweeter?
A: To encourage sweeter celery, ensure consistent watering and provide plenty of sunlight. You can also try blanching the stalks by mounding soil around them a few weeks before harvest. This will block sunlight and reduce the bitterness.
Q: Is growing celery from scraps truly sustainable?
A: Yes, growing celery from scraps is a sustainable practice because it reduces food waste, minimizes the need to purchase commercially grown celery (which requires resources for transportation and packaging), and allows you to grow your own food using minimal resources. It’s a small but meaningful step towards a more sustainable lifestyle.
Q: What are some variations I can try when growing celery?
A: Besides the basic method, you can experiment with:
* **Different celery varieties:** Try growing different varieties of celery, such as Pascal celery (a classic variety) or Chinese celery (which has a stronger flavor).
* **Hydroponics:** Grow your celery in a hydroponic system for faster growth and cleaner results.
* **Companion planting:** Plant celery alongside beneficial companion plants like onions, garlic, or tomatoes.
* **Fertilizers:** Experiment with different fertilizers to see which ones produce the best results.
Q: What if my celery base doesn’t sprout?
A: Sometimes, the celery base may not sprout. This could be due to several factors, such as the celery being too old, the water being too cold, or the base being damaged. Try again with a fresh celery base and ensure the water is at room temperature. If it still doesn’t sprout after a week or two, it may not be viable.
Q: How do I prevent celery from becoming bitter?
A: Bitterness in celery can be caused by stress, such as lack of water or extreme heat. Ensure consistent watering, provide shade during hot weather, and harvest your celery before it becomes too mature. Blanching the stalks can also help reduce bitterness.

Leave a Comment