

Cowpea garden DIY projects are a fantastic way to bring fresh, nutritious food right to your doorstep! Have you ever dreamed of strolling into your backyard and harvesting a bounty of delicious cowpeas? Well, dream no more! This article is packed with simple, effective, and budget-friendly DIY tricks and hacks that will transform your garden into a cowpea paradise.
Cowpeas, also known as black-eyed peas, have a rich history, particularly in the Southern United States, where they’ve been a staple crop for generations. They’re not just delicious; they’re also incredibly nutritious and beneficial for your soil, acting as a natural nitrogen fixer. I think that’s pretty cool!
Why should you embark on a cowpea garden DIY adventure? Because growing your own food is empowering! In today’s world, knowing where your food comes from and having control over its quality is more important than ever. Plus, let’s be honest, store-bought cowpeas just don’t compare to the flavor of freshly picked, homegrown ones. I’m going to show you how to save money, eat healthier, and connect with nature, all while enjoying the satisfaction of nurturing your own little cowpea patch. So, grab your gardening gloves, and let’s get started!
DIY Cowpea Garden: Your Guide to a Bountiful Harvest 🌱
Hello garden friends! I’m so excited to show you how to grow your very own cowpea garden. Cowpeas (also known as black-eyed peas and their relatives) are not only delicious but also highly nutritious and surprisingly easy to grow. So, let’s roll up our sleeves and get started!
What You’ll Need for Your Cowpea Garden
- Cowpea seeds (choose varieties suited to your climate)
- A sunny spot (at least 6 hours of sun daily)
- Well-drained soil
- Compost or organic fertilizer
- Garden tools: spade, rake, watering can or hose
- Trellis or support (optional, recommended for climbing varieties)
- Mulch (such as straw or wood chips)
Step-by-Step Guide: Planting Cowpeas
- Pick the right time: Cowpeas love warmth. Plant them only after the last frost when soil temps are at least 18°C (65°F). For most regions, that’s May to June. I personally wait until all risk of night frost is gone.
- Prepare the soil: Cowpeas grow best in loose, well-drained soil. Turn the soil with a spade or garden fork, removing weeds, stones, and roots.
- Enrich the soil: Mix in compost or organic fertilizer to improve drainage and boost nutrients. Homemade compost works perfectly, but store-bought compost is fine too.
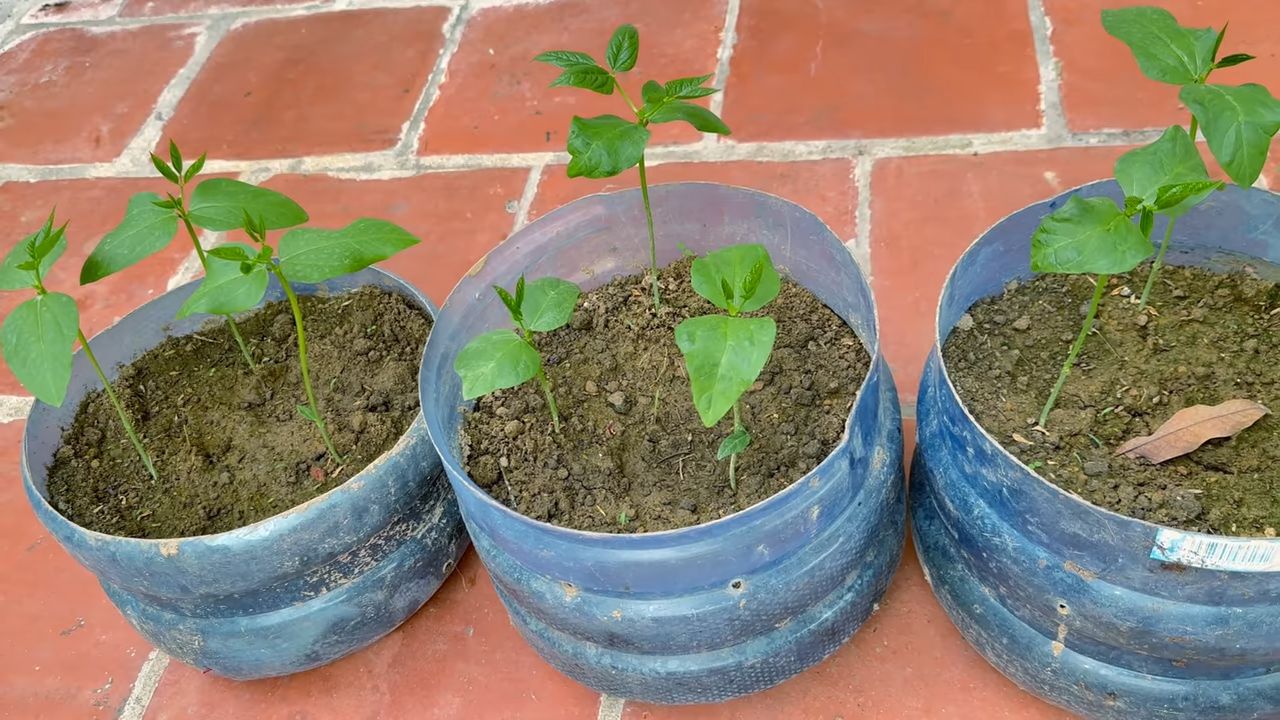
- Sowing: You can sow cowpeas directly outdoors or start them indoors.
- Direct sowing: Plant seeds 2–3 cm deep, spaced 5–10 cm apart, with rows 60–90 cm apart.
- Indoor start (optional): Sow 2–3 weeks before the last frost in small pots with seed-starting mix. Keep them moist and warm, then transplant once frost danger has passed.
- Water well: After sowing, water thoroughly. Keep soil moist (not soggy) until seeds sprout.
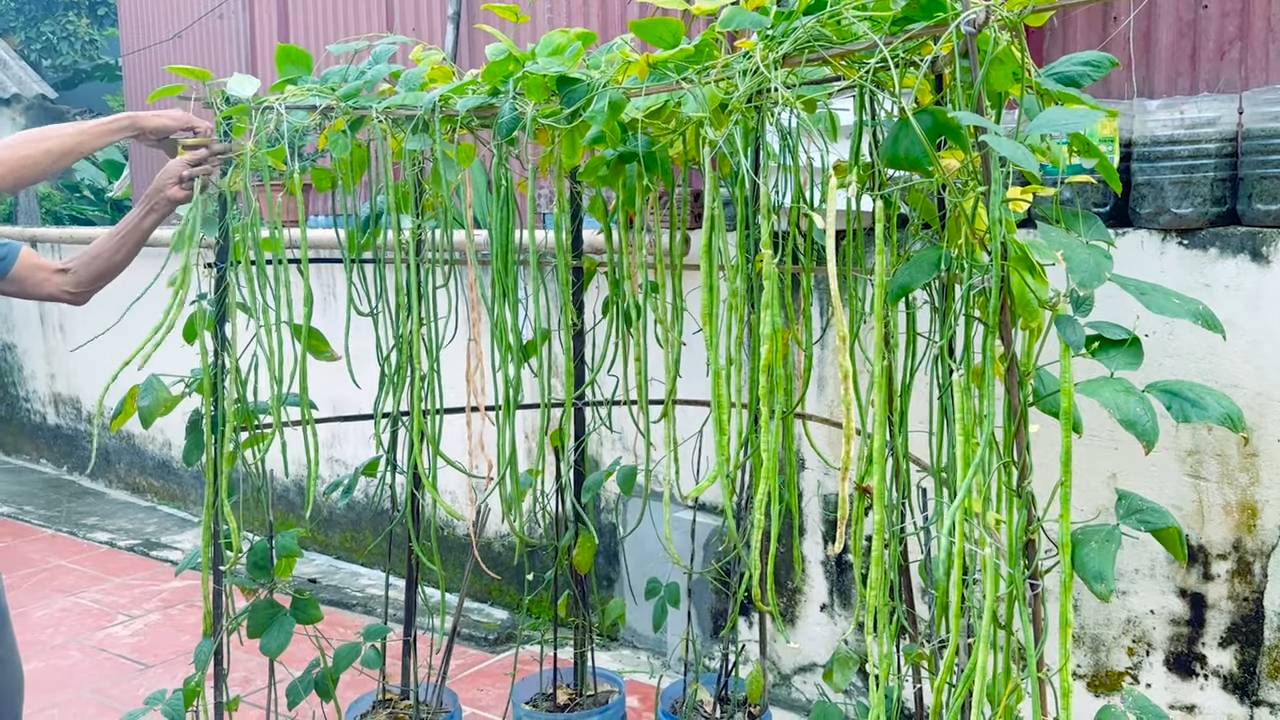
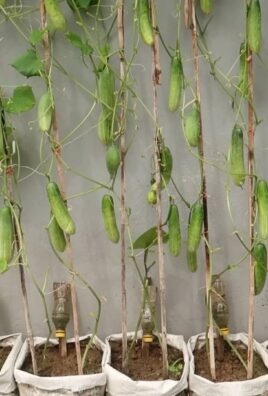
- Add support (optional): Climbing varieties love a trellis, bamboo poles, or even an old fence. I’ve had great success with simple T-posts and wire.
Caring for Your Cowpea Plants
- Watering: Keep the soil consistently moist, especially during flowering and pod formation. Water early in the day to let leaves dry and reduce disease risk.
- Weeding: Remove weeds regularly—they compete for water and nutrients.
- Mulching: A layer of straw or wood chips helps conserve moisture, suppress weeds, and regulate soil temperature.
- Fertilizing (optional): If growth looks weak, feed with organic fertilizer like compost tea or diluted fish emulsion.
- Pests & diseases: Cowpeas are usually hardy but can occasionally attract pests:
- Aphids: Spray with water or insecticidal soap.
- Bean beetles: Hand-pick them or use organic insect controls.
Harvest Time!
- When to harvest: Pick cowpeas when the pods are plump, green, and tender. If left too long, the beans inside get tough.
- How to harvest: Use scissors or a knife to snip pods off—pulling may damage the plant.
- Storage options:
- Fresh: Keep in the fridge for up to a week.
- Dried: Store in airtight containers in a cool, dry place for up to a year.
- Frozen: Blanch pods for 2–3 minutes, cool, then freeze in bags.
Recommended Varieties
- Black Eyed Peas: Classic creamy pods with the famous “eye.”
- Pinkeye Purple Hull: Purple pods with pink eyes.
- Whippoorwill: A speckled heirloom variety.
- Chinese Red Noodle: Striking red, climbing type with long pods.
Tips for Bigger Harvests
- Crop rotation: Avoid planting cowpeas in the same spot year after year to prevent disease.
- Soil testing: Check pH and nutrients if you’re unsure of soil quality.
- Observation: Check plants often—early detection makes pest and disease control easier.
- Experimentation: Try different varieties or methods to see what thrives in your garden.
Common Mistakes to Avoid
- Planting too early: Cowpeas hate cold soil—wait for warm weather.
- Crowding plants: They need space for airflow and growth.
- Inconsistent watering: Especially harmful during flowering and pod set.
- Ignoring weeds: They rob your plants of water and nutrients.
Cowpeas in the Kitchen
Cowpeas are incredibly versatile and can be enjoyed in so many dishes:
- Black-Eyed Peas with Rice: A Southern classic.
- Cowpea Salad: Fresh with herbs and veggies.
- Cowpea Soup: Hearty and flavorful.
- Stir-fried Cowpeas: Quick, simple side dish.
Growing cowpeas at home is fun, low-maintenance, and rewarding. With just a bit of care, you’ll soon enjoy a harvest of fresh, nutritious beans straight from your own garden. Happy gardening!
Conclusion
So, there you have it! Transforming your backyard into a thriving cowpea garden is not only achievable but also incredibly rewarding. We’ve explored a simple yet effective DIY trick that bypasses common gardening hurdles and sets you up for a bountiful harvest. This isn’t just about growing food; it’s about connecting with nature, understanding the life cycle of plants, and enjoying the unparalleled taste of homegrown produce.
Why is this DIY method a must-try? Because it simplifies the process, making it accessible to even the most novice gardeners. It addresses key challenges like poor soil, limited space, and pest control in a practical and cost-effective manner. Imagine stepping outside your door and picking fresh, delicious cowpeas for your next meal – a truly satisfying experience.
But the beauty of gardening lies in its adaptability. Feel free to experiment with variations on this DIY trick. For instance, if you’re short on space, consider using vertical gardening techniques. Train your cowpea vines to climb a trellis or fence, maximizing your yield in a small area. You could also explore companion planting. Marigolds, for example, are known to deter pests, while basil can improve the flavor of your cowpeas.
Another exciting variation is to experiment with different varieties of cowpeas. From the classic black-eyed peas to the long, slender asparagus beans, there’s a whole world of cowpea flavors and textures to discover. Each variety has its own unique characteristics and culinary uses, so don’t be afraid to branch out and find your favorites.
Remember to pay close attention to your plants and adjust your watering and fertilizing schedule as needed. Regular observation is key to identifying and addressing any potential problems early on. And don’t forget to document your progress! Take photos of your cowpea garden at different stages of growth. This will not only help you track your success but also provide valuable insights for future gardening endeavors.
Ultimately, this DIY cowpea garden trick is about empowering you to take control of your food source and create a sustainable and fulfilling gardening experience. It’s about embracing the challenges, celebrating the successes, and learning from the inevitable setbacks.
We wholeheartedly encourage you to give this DIY trick a try. We are confident that you’ll be amazed by the results. And most importantly, we want to hear about your experience! Share your photos, tips, and stories with us. Let’s build a community of passionate gardeners who are dedicated to growing their own food and sharing their knowledge with others. Your insights could inspire someone else to embark on their own gardening journey. So, get your hands dirty, embrace the process, and enjoy the fruits (or rather, the cowpeas) of your labor! Let’s cultivate a world where fresh, homegrown food is accessible to everyone.
Frequently Asked Questions (FAQ)
What exactly are cowpeas, and why should I grow them?
Cowpeas, also known as black-eyed peas, field peas, or southern peas, are legumes that are packed with nutrients. They are an excellent source of protein, fiber, iron, and folate. Growing your own cowpeas ensures you have access to fresh, healthy food while also reducing your carbon footprint. Plus, they taste amazing! They are incredibly versatile in the kitchen, lending themselves well to soups, stews, salads, and side dishes. Their mild, earthy flavor pairs well with a variety of seasonings and ingredients.
What kind of soil is best for growing cowpeas?
Cowpeas are relatively adaptable and can tolerate a range of soil types. However, they thrive best in well-drained soil with a pH between 6.0 and 7.0. If your soil is heavy clay, amend it with compost or other organic matter to improve drainage. Sandy soil can be improved by adding organic matter to help retain moisture. Before planting, it’s always a good idea to conduct a soil test to determine its nutrient content and pH level. This will allow you to make any necessary amendments to ensure your cowpeas have the best possible growing conditions.
How often should I water my cowpea plants?
Watering frequency depends on your climate and soil type. Generally, cowpeas need about 1 inch of water per week. Water deeply and less frequently, rather than shallowly and more often. This encourages deep root growth, which makes the plants more drought-tolerant. Check the soil moisture regularly by sticking your finger about an inch into the soil. If it feels dry, it’s time to water. Avoid overwatering, as this can lead to root rot.
What are some common pests and diseases that affect cowpeas, and how can I prevent them?
Common pests include aphids, bean beetles, and nematodes. Diseases include fungal infections like powdery mildew and root rot. To prevent pests, consider using companion planting (e.g., marigolds), introducing beneficial insects (e.g., ladybugs), and using organic pest control methods like neem oil. To prevent diseases, ensure good air circulation, avoid overwatering, and use disease-resistant varieties. Crop rotation can also help prevent soilborne diseases. Regularly inspect your plants for signs of pests or diseases and take action promptly.
How long does it take for cowpeas to mature and be ready for harvest?
Cowpeas typically mature in 60 to 90 days, depending on the variety and growing conditions. You’ll know they’re ready to harvest when the pods are plump and the peas inside are fully developed but still tender. You can harvest them as green snap peas when the pods are young and tender, or you can let them mature and dry on the vine for dried peas.
Can I grow cowpeas in containers?
Yes, you can definitely grow cowpeas in containers! Choose a large container (at least 12 inches in diameter) with good drainage. Use a well-draining potting mix and provide support for the vines to climb. Container-grown cowpeas may require more frequent watering and fertilizing than those grown in the ground.
What kind of fertilizer should I use for cowpeas?
Cowpeas are legumes, which means they can fix nitrogen from the air. Therefore, they don’t require a lot of nitrogen fertilizer. However, they do benefit from phosphorus and potassium. Use a balanced fertilizer with a lower nitrogen content (e.g., 5-10-10) or amend the soil with bone meal and wood ash. Avoid over-fertilizing, as this can lead to excessive foliage growth and reduced pod production.
How do I store cowpeas after harvesting?
If you’re harvesting green snap peas, store them in the refrigerator for up to a week. For dried peas, allow the pods to dry completely on the vine. Then, shell the peas and store them in an airtight container in a cool, dry place. Dried cowpeas can be stored for up to a year.
Can I save seeds from my cowpea plants for next year?
Yes, you can save seeds from your cowpea plants. Choose healthy, disease-free plants and allow the pods to dry completely on the vine. Shell the peas and store them in an airtight container in a cool, dry place. Be aware that if you’re growing multiple varieties of cowpeas, they may cross-pollinate, resulting in seeds that don’t produce true-to-type plants.
What are some delicious ways to cook with cowpeas?
Cowpeas are incredibly versatile and can be used in a variety of dishes. They are a staple in Southern cuisine and are often used in soups, stews, and side dishes. Some popular recipes include Hoppin’ John (cowpeas cooked with rice and bacon), black-eyed pea salad, and cowpea fritters. You can also add them to chili, pasta dishes, and vegetable curries. Don’t be afraid to experiment and create your own unique cowpea recipes!
Leave a Comment