

Dirt Free Sprout Growing: Imagine harvesting fresh, crunchy sprouts right from your kitchen counter, without ever getting your hands dirty! Sounds too good to be true? Well, get ready to be amazed because this DIY guide will unlock the secrets to growing delicious and nutritious sprouts, completely soil-free.
Sprouting, in its essence, is an ancient practice. Cultures around the world, from the Far East to the Mediterranean, have long recognized the incredible nutritional power packed within these tiny germinated seeds. Think of mung bean sprouts in Asian cuisine or alfalfa sprouts sprinkled on salads – they’re more than just garnishes; they’re concentrated sources of vitamins, minerals, and enzymes.
But let’s be honest, the thought of dealing with soil, potential messes, and the risk of contamination can deter even the most enthusiastic home cooks. That’s where this dirt free sprout growing method comes in! I’m going to show you a simple, clean, and incredibly efficient way to cultivate your own sprout garden, right in your kitchen. No more messy soil, no more complicated setups. Just pure, fresh sprouts ready to enhance your meals and boost your health. This DIY trick is perfect for busy individuals, apartment dwellers, or anyone who wants to enjoy the benefits of homegrown produce without the hassle. So, are you ready to ditch the dirt and embrace the world of clean, easy sprouting? Let’s get started!
Growing Sprouts Without Soil: A Clean & Easy DIY Guide
Hey there, fellow sprout enthusiasts! Are you tired of dealing with messy soil when growing your own sprouts? I totally get it! Soil can be a pain, attracting unwanted pests and sometimes leading to mold. That’s why I’m super excited to share my favorite method for growing delicious, nutritious sprouts – completely soil-free! This method is not only cleaner but also incredibly easy, making it perfect for beginners. Let’s dive in!
What You’ll Need
Before we get started, let’s gather all the necessary supplies. Don’t worry, you probably already have most of these lying around!
* Sprouting Seeds: Choose your favorite sprouting seeds! Some popular options include alfalfa, broccoli, radish, mung beans, lentils, and clover. Make sure you’re using seeds specifically intended for sprouting, as regular seeds might be treated with chemicals.
* Wide-Mouth Mason Jar(s): I prefer using glass mason jars because they’re easy to clean and allow you to see the sprouts growing. The size will depend on how many sprouts you want to grow at once. A quart-sized jar is a good starting point.
* Sprouting Lid or Cheesecloth & Rubber Band: You’ll need something to cover the jar while allowing air circulation and drainage. Sprouting lids are specifically designed for this purpose and are super convenient. Alternatively, you can use a piece of cheesecloth secured with a rubber band.
* Water: Clean, filtered water is essential for healthy sprout growth.
* Bowl or Tray: To hold the jar at an angle for drainage.
* Dark Location: Initially, sprouts prefer a dark environment. A cupboard or drawer works perfectly.
* Well-Lit Location (After Sprouting): Once the sprouts have germinated, they’ll need light to develop chlorophyll and turn green.
Step-by-Step Sprouting Guide
Alright, let’s get sprouting! This process is simple, but consistency is key. You’ll need to rinse and drain your sprouts regularly to prevent mold and ensure they stay fresh.
1. Soaking the Seeds:
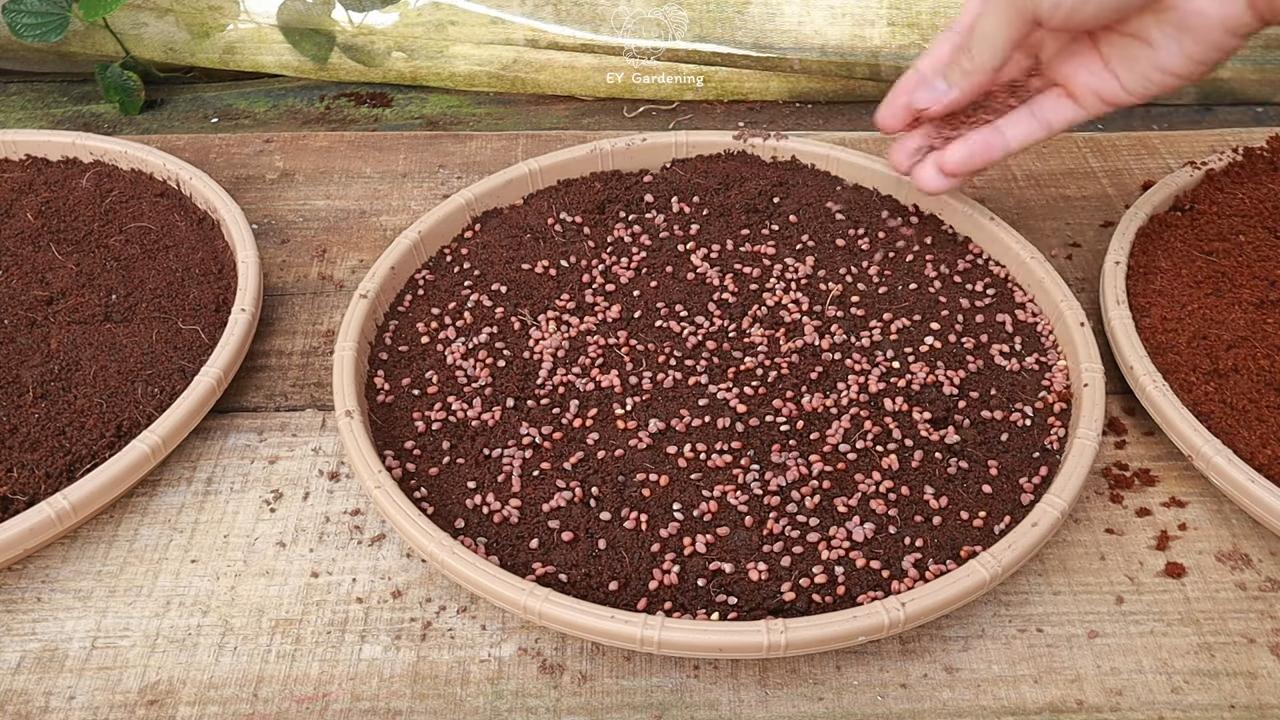
* Measure Seeds: Start by measuring out the appropriate amount of seeds for your jar. As a general rule, use 1-2 tablespoons of small seeds (like alfalfa or clover) or 1/4 – 1/2 cup of larger seeds (like mung beans or lentils) per quart-sized jar. Remember, sprouts expand significantly, so don’t overcrowd the jar!
* Rinse Seeds: Place the seeds in the mason jar and rinse them thoroughly with cool, filtered water. This removes any dust or debris.
* Add Water for Soaking: Fill the jar with plenty of cool, filtered water – about 2-3 times the volume of the seeds. This allows the seeds to fully hydrate.
* Secure the Lid: Cover the jar with your sprouting lid or cheesecloth secured with a rubber band.
* Soak Time: Let the seeds soak for the recommended time. This varies depending on the type of seed:
* Alfalfa, Clover, Broccoli, Radish: 4-8 hours
* Mung Beans, Lentils: 8-12 hours
* Larger Beans (like chickpeas): 12-24 hours
* Why Soaking is Important: Soaking softens the seed coat and initiates the germination process. It’s crucial for successful sprouting.
2. Draining and Rinsing:
* Drain the Soaking Water: After the soaking period, drain all the water from the jar through the sprouting lid or cheesecloth. Make sure to get rid of all the water; stagnant water is a breeding ground for bacteria.
* Rinse Thoroughly: Rinse the seeds with fresh, cool, filtered water. Swirl the water around to ensure all the seeds are rinsed.
* Drain Again: Drain all the rinse water completely.
* Repeat: Repeat the rinsing and draining process 2-3 times a day. This is the most important step in preventing mold and keeping your sprouts fresh. I usually do it in the morning, afternoon, and evening.
* Why Rinsing is Crucial: Rinsing provides the sprouts with the moisture they need to grow and removes any waste products. It also helps to prevent the growth of mold and bacteria.
3. Sprouting in the Dark:
* Inverted Position: After draining, invert the jar and place it at an angle in a bowl or tray. This allows any excess water to drain out and provides good air circulation.
* Dark Environment: Place the jar in a dark, well-ventilated location, such as a cupboard or drawer. Darkness encourages germination.
* Rinse Regularly: Continue rinsing and draining the sprouts 2-3 times a day, even while they’re in the dark.
* Monitor Growth: Check on your sprouts daily. You should start to see small sprouts emerging within a day or two.
* Why Darkness Initially?: Darkness mimics the natural environment of seeds underground, promoting germination.
4. Greening the Sprouts:
* Move to Light: Once the sprouts have germinated and have small tails (usually after 2-4 days), move the jar to a well-lit location, but avoid direct sunlight. Indirect sunlight or artificial light is ideal.
* Continue Rinsing: Continue rinsing and draining the sprouts 2-3 times a day.
* Chlorophyll Development: The light will encourage the sprouts to develop chlorophyll, turning them green. This process enhances their flavor and nutritional value.
* Monitor Color: The sprouts will gradually turn green over the next 1-2 days.
* Why Light is Important Now?: Light triggers the production of chlorophyll, which gives the sprouts their green color and increases their vitamin content.
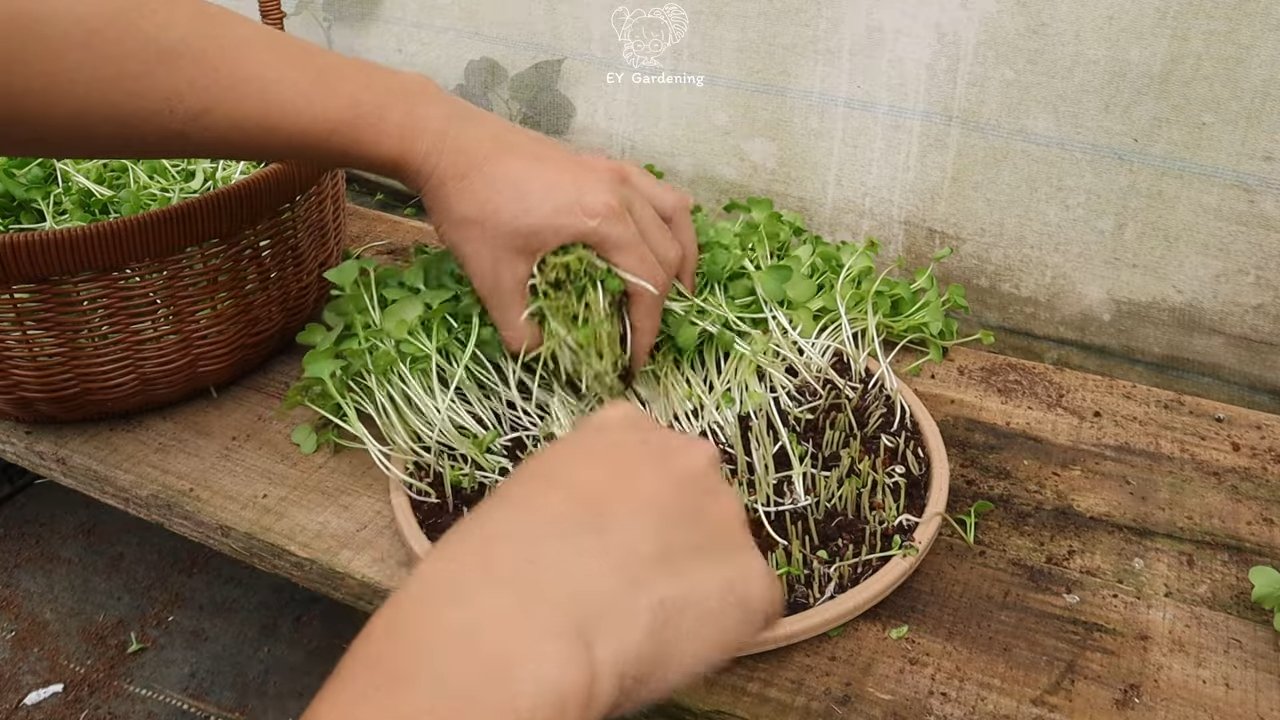
5. Harvesting and Storing:
* Harvest Time: Your sprouts are ready to harvest when they have reached your desired length and are a vibrant green color. This usually takes about 5-7 days, depending on the type of seed.
* Final Rinse: Give the sprouts a final rinse before harvesting.
* Drain Thoroughly: Drain the sprouts very well to remove any excess water. This will help them last longer in the refrigerator.
* Storage: Store the sprouts in a clean, airtight container in the refrigerator. They should last for up to a week.
* Enjoy!: Add your fresh, homegrown sprouts to salads, sandwiches, soups, smoothies, or enjoy them as a snack!
* Why Proper Storage Matters: Proper storage prevents spoilage and helps maintain the freshness and nutritional value of your sprouts.
Troubleshooting Tips
Even with the best instructions, sometimes things don’t go exactly as planned. Here are a few common issues and how to address them:
* Mold Growth: If you notice any fuzzy, white, or gray mold growing on your sprouts, it’s best to discard them. Mold is usually caused by insufficient rinsing or poor air circulation. To prevent mold, make sure you’re rinsing your sprouts thoroughly 2-3 times a day and that the jar is well-ventilated.
* Unpleasant Odor: A foul smell is another sign of bacterial growth. Discard the sprouts and start over, paying close attention to rinsing and drainage.
* Slow Germination: If your seeds aren’t germinating, make sure they’re fresh and that you’re soaking them for the correct amount of time. Also, ensure the temperature is suitable (ideally between 65-75°F).
* Uneven Growth: Uneven growth can be caused by inconsistent rinsing or uneven light exposure. Try to rinse the sprouts more thoroughly and rotate the jar regularly to ensure all the sprouts receive equal light.
Choosing the Right Seeds
The type of seeds you choose will greatly impact the flavor and texture of your sprouts. Here’s a quick guide to some popular options:
* Alfalfa: Mild, slightly sweet flavor. Great for salads and sandwiches.
* Broccoli: Slightly spicy, radish-like flavor. Packed with nutrients.
* Radish: Pungent, peppery flavor. Adds a kick to any dish.
* Mung Beans: Mild, slightly nutty flavor. Commonly used in Asian cuisine.
* Lentils: Earthy, slightly sweet flavor. A good source of protein.
* Clover: Mild, slightly sweet flavor. Similar to alfalfa.
Benefits of Growing Your Own Sprouts
Growing your own sprouts is not only easy and fun but also incredibly rewarding! Here are just a few of the benefits:
* Nutrient-Rich: Sprouts are packed with vitamins, minerals, and enzymes.
* Cost-Effective
Conclusion
So, there you have it! Growing sprouts without soil might seem like a futuristic gardening technique, but it’s surprisingly simple, incredibly rewarding, and a game-changer for anyone looking to add fresh, nutrient-packed greens to their diet. We’ve walked you through the process, highlighting the ease, cleanliness, and speed of this method.
Why is this DIY trick a must-try? Because it eliminates the mess and potential for mold growth associated with traditional soil-based sprouting. It’s faster, often yielding harvestable sprouts in just a few days. Plus, it’s a fantastic way to introduce children to the wonders of gardening and healthy eating. Imagine the satisfaction of harvesting your own crunchy, flavorful sprouts, knowing exactly where they came from and how they were grown.
But the beauty of this method lies in its adaptability. Feel free to experiment with different types of seeds. While we’ve focused on common sprouting seeds like alfalfa, broccoli, and radish, you can also try mung beans, lentils, or even quinoa. Each seed offers a unique flavor and nutritional profile, allowing you to create a diverse and exciting sprout mix.
Consider varying the sprouting container. While a mason jar with a sprouting lid is a classic choice, you can also use a plastic container with holes drilled in the lid or even a multi-tiered sprouting tray for larger batches. The key is to ensure proper drainage and air circulation.
Another variation to explore is the addition of natural sanitizers to the rinsing water. A few drops of food-grade hydrogen peroxide or a splash of apple cider vinegar can help prevent bacterial growth and keep your sprouts fresh and healthy. Just be sure to rinse them thoroughly before consuming.
And don’t forget about the light! While sprouts don’t need direct sunlight, exposing them to indirect light for a few hours each day can enhance their color and flavor. Experiment with different light levels to see what works best for your chosen seeds.
Ultimately, the best way to discover the magic of dirt-free sprout growing is to try it yourself. It’s a simple, cost-effective, and incredibly satisfying project that will transform the way you think about fresh produce.
We encourage you to embark on this sprouting adventure and share your experiences with us. What seeds did you try? What variations did you experiment with? What challenges did you encounter, and how did you overcome them? Your feedback will not only help us improve this guide but also inspire others to embrace the joys of home sprouting. So, grab some seeds, a jar, and get ready to experience the freshness and convenience of dirt-free sprout growing. You won’t be disappointed!
Frequently Asked Questions (FAQ)
What types of seeds are best for dirt-free sprouting?
The most popular seeds for dirt-free sprouting include alfalfa, broccoli, radish, clover, and mung beans. These seeds are readily available, germinate quickly, and offer a variety of flavors and textures. However, you can also experiment with other seeds like lentils, quinoa, and even some types of beans. Just be sure to use seeds specifically intended for sprouting, as some seeds sold for planting may be treated with chemicals. Avoid sprouting seeds from the nightshade family (tomatoes, peppers, eggplant) as their sprouts can be toxic.
How often should I rinse my sprouts?
Rinsing your sprouts is crucial for preventing mold and bacterial growth. Aim to rinse them at least two to three times per day, ideally in the morning, afternoon, and evening. Use cool, clean water and ensure that all the sprouts are thoroughly rinsed. After rinsing, drain the water completely to prevent them from sitting in excess moisture. In warmer climates or during humid weather, you may need to rinse them more frequently.
How long does it take for sprouts to be ready to eat?
The sprouting time varies depending on the type of seed and the environmental conditions. Generally, most sprouts are ready to eat within three to seven days. Alfalfa and radish sprouts, for example, typically sprout in about five days, while mung beans may take slightly longer. Keep an eye on your sprouts and harvest them when they have reached your desired length and flavor.
What if my sprouts start to smell bad or look moldy?
A foul odor or the presence of mold are signs that your sprouts have been contaminated and should not be consumed. Mold typically appears as fuzzy, white or gray patches on the sprouts. If you notice any of these signs, discard the entire batch of sprouts immediately. To prevent this from happening, ensure that you are rinsing your sprouts frequently and thoroughly, using clean water, and providing adequate air circulation. You can also add a few drops of food-grade hydrogen peroxide or a splash of apple cider vinegar to the rinsing water to help inhibit bacterial growth.
How do I store my sprouts after they are ready to eat?
Once your sprouts are ready to eat, rinse them one last time and drain them thoroughly. Then, store them in a clean, airtight container in the refrigerator. They should stay fresh for up to a week. To prolong their shelf life, you can line the container with a paper towel to absorb excess moisture.
Can I sprout seeds that I already have in my pantry?
While you can technically sprout some seeds from your pantry, it’s generally not recommended. Seeds intended for planting or cooking may have been treated with chemicals or may not be viable for sprouting. It’s best to use seeds specifically labeled for sprouting, as these are guaranteed to be safe and will have a higher germination rate.
What are the nutritional benefits of eating sprouts?
Sprouts are nutritional powerhouses, packed with vitamins, minerals, enzymes, and antioxidants. They are a good source of vitamins A, C, and K, as well as folate, iron, and potassium. Sprouts are also rich in fiber, which aids in digestion and promotes gut health. The sprouting process increases the bioavailability of nutrients, making them easier for your body to absorb.
Is it safe to eat raw sprouts?
While sprouts are generally safe to eat raw, there is a small risk of bacterial contamination. To minimize this risk, always purchase seeds from reputable sources, rinse your sprouts thoroughly, and store them properly. People with weakened immune systems, pregnant women, and young children should exercise extra caution and may want to cook their sprouts before eating them.
Can I use tap water for sprouting?
Yes, you can use tap water for sprouting, as long as it is safe to drink. If you are concerned about the quality of your tap water, you can use filtered water instead. Avoid using distilled water, as it lacks the minerals that sprouts need to grow.
What if my seeds don’t sprout?
If your seeds don’t sprout, there could be several reasons. The seeds may be old or not viable, the temperature may be too hot or too cold, or they may not be getting enough moisture. Try using fresh seeds, ensuring that the temperature is between 65 and 75 degrees Fahrenheit, and rinsing them regularly. If you are still having trouble, try soaking the seeds in water for a few hours before sprouting them.
Leave a Comment