

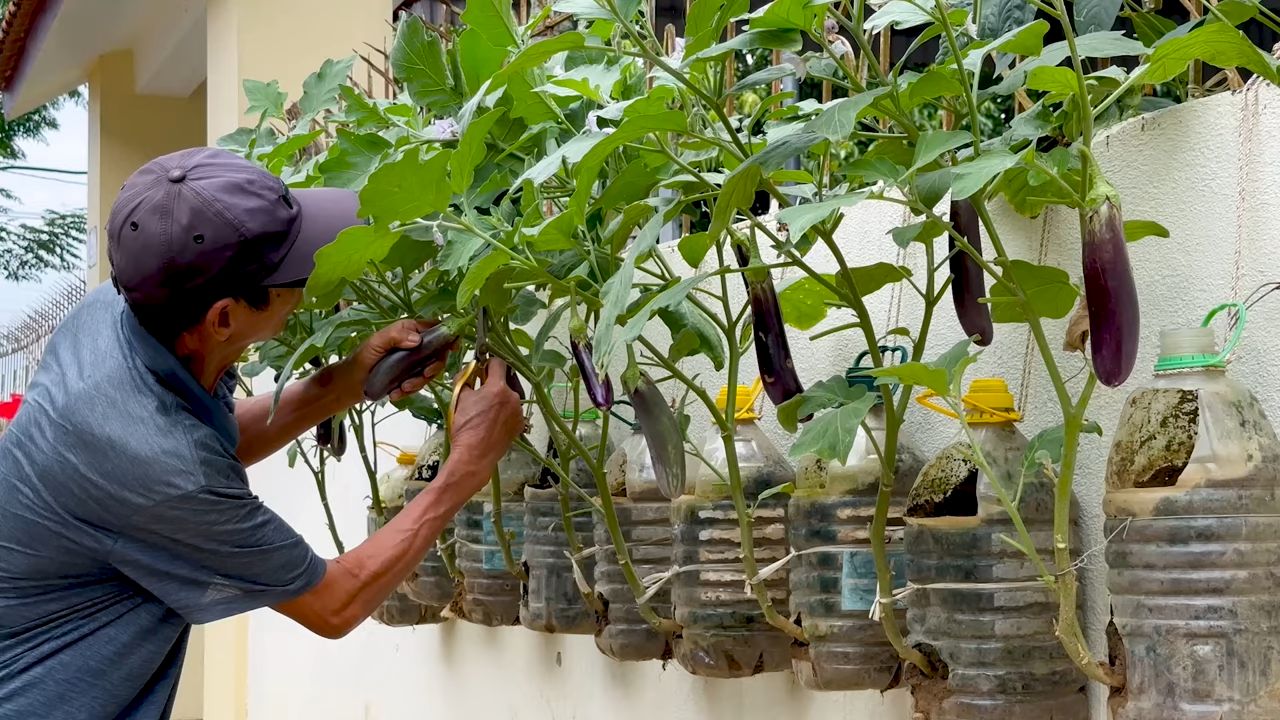
Eggplant Growing Problem Solved! Are you dreaming of plump, glossy eggplants gracing your garden, only to be met with stunted growth, pest infestations, or frustratingly small yields? I know the feeling! There’s nothing quite as disappointing as putting in the effort and not seeing the fruits (or vegetables!) of your labor. But don’t despair, fellow gardeners, because I’m here to share some game-changing DIY tricks that will help you conquer those eggplant growing challenges and finally harvest a bumper crop.
Eggplants, with their rich history tracing back to ancient Asia, have been cultivated for centuries, gracing tables with their unique flavor and versatility. From the Mediterranean moussaka to Asian stir-fries, this vibrant vegetable holds a special place in cuisines worldwide. However, successfully growing eggplants can sometimes feel like a battle against the elements and pesky critters. That’s why I’ve compiled a collection of simple, effective, and budget-friendly DIY solutions to tackle common eggplant growing problems.
Why do you need these DIY tricks? Because store-bought solutions can be expensive and often contain harsh chemicals. These methods are natural, sustainable, and empower you to take control of your garden’s health. Plus, there’s a unique satisfaction in knowing you’ve nurtured your eggplants from seed to table using your own ingenuity. So, let’s dive in and unlock the secrets to eggplant growing problem solved, one DIY hack at a time!
Auberginen-Anbau-Problem gelöst: So vermeidest du bittere Früchte und kümmerst dich richtig um deine Pflanzen!
Ich liebe Auberginen! Aber ich weiß auch, dass der Anbau dieser Schönheiten manchmal eine Herausforderung sein kann. Bittere Früchte, kümmernde Pflanzen – ich habe alles schon erlebt. Aber keine Sorge, ich habe im Laufe der Jahre ein paar Tricks gelernt, die ich gerne mit dir teilen möchte, damit auch du eine reiche und leckere Auberginen-Ernte einfahren kannst!
Die häufigsten Probleme beim Auberginen-Anbau und ihre Lösungen
Bevor wir uns in die Details stürzen, lass uns die häufigsten Probleme ansprechen, die Auberginen-Gärtner plagen:
* Bittere Früchte: Das ist wohl das häufigste Problem. Es wird oft durch Stress verursacht, wie unregelmäßiges Gießen, zu wenig Sonne oder extreme Temperaturschwankungen.
* Kümmernde Pflanzen: Dies kann auf Nährstoffmangel, Schädlinge oder Krankheiten hindeuten.
* Blütenfall: Wenn deine Auberginen viele Blüten bilden, diese aber abfallen, bevor sie Früchte tragen, kann das an unzureichender Bestäubung, zu hohen Temperaturen oder Nährstoffmangel liegen.
* Schädlinge: Blattläuse, Kartoffelkäfer und Spinnmilben lieben Auberginen.
* Krankheiten: Pilzkrankheiten wie die Verticillium-Welke können Auberginen befallen.
Schritt-für-Schritt-Anleitung für gesunde und leckere Auberginen
Hier ist meine bewährte Methode, um diese Probleme zu vermeiden und eine erfolgreiche Auberginen-Ernte zu erzielen:
1. Die richtige Sorte wählen
* Wähle eine Sorte, die für dein Klima geeignet ist. Einige Sorten sind hitzebeständiger als andere, während andere besser in kühleren Klimazonen gedeihen. Informiere dich, welche Sorten in deiner Region gut wachsen.
* Überlege dir, welche Art von Auberginen du bevorzugst. Es gibt viele verschiedene Formen, Größen und Farben. Von den klassischen, dunkelvioletten Sorten bis hin zu den länglichen, hellvioletten oder sogar weißen Sorten ist für jeden Geschmack etwas dabei.
* Achte auf die Reifezeit. Wenn du in einer Region mit kurzer Vegetationsperiode lebst, wähle eine Sorte mit einer kürzeren Reifezeit.
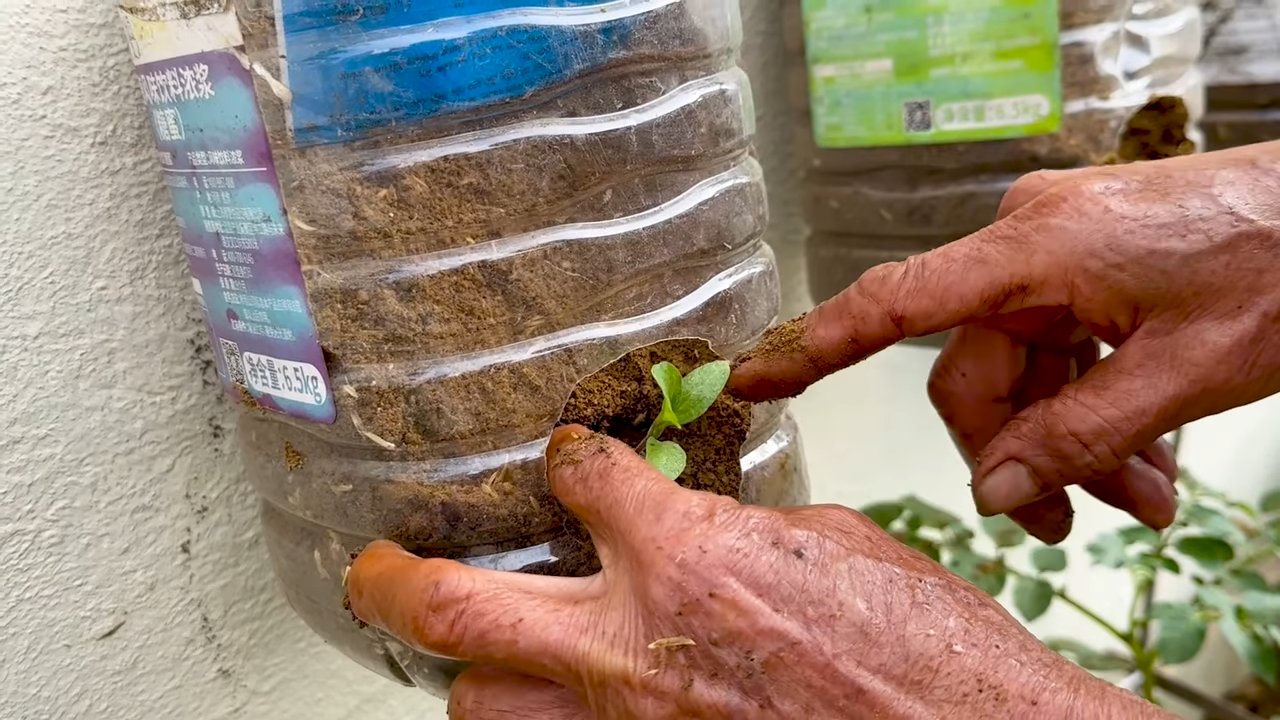
2. Die Aussaat und Anzucht
* Beginne frühzeitig mit der Anzucht. Auberginen brauchen eine lange Vegetationsperiode, daher solltest du sie am besten 6-8 Wochen vor dem letzten erwarteten Frost im Haus vorziehen.
* Verwende hochwertige Anzuchterde. Achte darauf, dass die Erde gut drainiert und nährstoffreich ist.
* Säe die Samen in kleine Töpfe oder Anzuchtschalen. Bedecke sie leicht mit Erde und halte sie feucht.
* Stelle die Anzuchtgefäße an einen warmen, hellen Ort. Auberginen brauchen viel Licht, um gut zu wachsen. Eine Pflanzenlampe kann hier sehr hilfreich sein.
* Pikiere die Sämlinge, sobald sie groß genug sind. Wenn die Sämlinge ihr erstes echtes Blattpaar entwickelt haben, kannst du sie in größere Töpfe umpflanzen.
3. Die Vorbereitung des Bodens
* Wähle einen sonnigen Standort. Auberginen brauchen mindestens 6-8 Stunden Sonne pro Tag.
* Bereite den Boden gut vor. Auberginen bevorzugen einen gut drainierten, fruchtbaren Boden mit einem pH-Wert zwischen 6,0 und 6,8.
* Reichere den Boden mit Kompost oder gut verrottetem Mist an. Das verbessert die Bodenstruktur und versorgt die Pflanzen mit wichtigen Nährstoffen.
* Lockere den Boden gründlich auf. Das erleichtert den Wurzeln das Wachstum.
4. Das Auspflanzen
* Warte, bis keine Frostgefahr mehr besteht. Auberginen sind sehr kälteempfindlich.
* Härte die Sämlinge vor dem Auspflanzen ab. Stelle sie eine Woche lang tagsüber ins Freie und hole sie nachts wieder herein. Das hilft ihnen, sich an die Bedingungen im Freien zu gewöhnen.
* Pflanze die Auberginen in einem Abstand von 45-60 cm. Das gibt ihnen genügend Platz zum Wachsen.
* Gieße die Pflanzen nach dem Auspflanzen gründlich.
5. Die richtige Pflege während der Wachstumsphase
* Gieße regelmäßig. Auberginen brauchen viel Wasser, besonders während der Fruchtbildung. Achte darauf, dass der Boden immer feucht, aber nicht nass ist. Gieße am besten morgens, damit die Blätter tagsüber abtrocknen können.
* Dünge regelmäßig. Auberginen sind Starkzehrer und brauchen regelmäßige Düngergaben. Verwende einen organischen Dünger oder einen speziellen Auberginen-Dünger.
* Mulche den Boden. Eine Mulchschicht aus Stroh, Holzhackschnitzeln oder Grasschnitt hilft, die Feuchtigkeit im Boden zu halten, Unkraut zu unterdrücken und den Boden kühl zu halten.
* Stütze die Pflanzen. Auberginen können schwer werden, besonders wenn sie viele Früchte tragen. Stütze die Pflanzen mit Stäben oder einem Rankgitter, um zu verhindern, dass sie umfallen.
* Entferne Seitentriebe. Das fördert die Fruchtbildung und sorgt für eine bessere Belüftung der Pflanze. Entferne die Seitentriebe, die zwischen dem Hauptstamm und den Blättern wachsen.
* Kontrolliere regelmäßig auf Schädlinge und Krankheiten. Je früher du Probleme erkennst, desto einfacher ist es, sie zu behandeln.
6. Die Bekämpfung von Schädlingen und Krankheiten
* Blattläuse: Sprühe die Pflanzen mit einem starken Wasserstrahl ab oder verwende eine insektizide Seife.
* Kartoffelkäfer: Sammle die Käfer und Larven ab oder verwende ein biologisches Insektizid.
* Spinnmilben: Sprühe die Pflanzen mit Wasser ab oder verwende ein Akarizid.
* Verticillium-Welke: Wähle resistente Sorten und vermeide es, Auberginen auf Flächen anzubauen, auf denen zuvor Tomaten, Kartoffeln oder Paprika angebaut wurden.
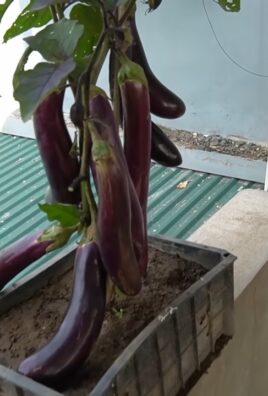
7. Die Ernte
* Ernte die Auberginen, wenn sie ihre volle Größe erreicht haben und die Haut glänzend ist. Die Früchte sollten sich fest anfühlen, aber nicht zu hart sein.
* Schneide die Auberginen mit einem scharfen Messer oder einer Gartenschere ab. Lasse einen kleinen Stiel an der Frucht.
* Ernte regelmäßig, um die Fruchtbildung anzuregen.
Zusätzliche Tipps für eine erfolgreiche Auberginen-Ernte
* Sorge für eine gute Belüftung. Auberginen brauchen eine gute Luftzirkulation, um Pilzkrankheiten vorzubeugen.
* Vermeide es, die Blätter zu benetzen. Das fördert die Ausbreitung von Pilzkrankheiten.
* Gieße am besten morgens. So haben die Blätter Zeit, tagsüber abzutrocknen.
* Entferne beschädigte oder kranke Blätter. Das verhindert die Ausbreitung von Krankheiten.
* Wechsle den Standort jedes Jahr. Das hilft, den Boden gesund zu halten und Schädlinge und Krankheiten zu vermeiden.
Warum werden meine Auberginen bitter?
Wie bereits erwähnt, ist Bitterkeit ein häufiges Problem. Hier sind einige spezifische Tipps, um dies zu vermeiden:
* Regelmäßiges Gießen: Sorge für eine gleichmäßige Bewässerung, besonders während der Fruchtbildung. Trockenstress kann zu Bitterkeit führen.
* Ausreichend Sonne: Auberginen brauchen viel Sonne. Stelle sicher, dass sie mindestens 6 Stunden direkte Sonneneinstrahlung pro Tag bekommen.
* Vermeide extreme Temperaturschwankungen: Schütze die Pflanzen vor plötzlichen Kälteeinbrüchen oder extremer Hitze.
* Ernte rechtzeitig: Überreife Auberginen
Conclusion
So, there you have it! This simple yet incredibly effective DIY trick offers a game-changing solution to common eggplant growing problems. We’ve explored how to combat blossom-end rot, deter pests, and even boost overall plant health, all with readily available materials and minimal effort. This isn’t just about saving your eggplants; it’s about empowering you to become a more confident and successful gardener.
Why is this a must-try? Because it addresses the root causes of many eggplant woes. Instead of relying on expensive and potentially harmful chemicals, this method focuses on creating a healthier environment for your plants to thrive. It’s a proactive approach that strengthens your eggplants from the inside out, making them more resilient to disease and pests. Plus, it’s incredibly satisfying to see your plants flourish as a direct result of your own ingenuity.
But don’t stop there! Feel free to experiment with variations. For example, if you’re dealing with particularly persistent pests, consider adding a few drops of neem oil to your DIY solution. Or, if your soil is lacking in certain nutrients, you can incorporate a small amount of compost tea into the mixture. The possibilities are endless! The key is to observe your plants closely and adjust the recipe as needed to meet their specific needs.
Remember, successful gardening is all about learning and adapting. This DIY trick is a fantastic starting point, but it’s just one piece of the puzzle. Continue to research, experiment, and most importantly, have fun!
We are confident that this DIY eggplant growing solution will significantly improve your harvest. We encourage you to give it a try and see the difference for yourself. Don’t be afraid to get your hands dirty and embrace the joy of growing your own food.
And most importantly, we want to hear about your experience! Share your results, tips, and variations in the comments below. Let’s create a community of eggplant enthusiasts who are passionate about growing healthy, delicious produce. Together, we can unlock the secrets to a bountiful eggplant harvest! Let us know what worked for you, what didn’t, and any modifications you made along the way. Your feedback will help other gardeners learn and grow, and it will also help us refine this DIY trick even further. So, get out there, give it a try, and let’s grow some amazing eggplants together!
Frequently Asked Questions (FAQ)
What exactly is blossom-end rot, and how does this DIY trick help prevent it?
Blossom-end rot is a common problem in eggplants (and other vegetables like tomatoes and peppers) caused by a calcium deficiency at the blossom end of the fruit. It manifests as a dark, sunken, leathery spot. While the soil might contain enough calcium, the plant may not be able to absorb it properly due to inconsistent watering, high nitrogen levels, or root damage. This DIY trick helps in several ways. First, consistent watering, which is encouraged when applying the solution, ensures that calcium can be transported to the fruit. Second, the solution itself, depending on the ingredients used, can provide a readily available source of calcium directly to the plant. Third, by promoting overall plant health, the plant is better able to absorb nutrients from the soil, including calcium.
How often should I apply this DIY solution to my eggplant plants?
The frequency of application depends on the severity of the problem and the overall health of your plants. As a general guideline, apply the solution once a week during the growing season. If you’re dealing with a particularly bad case of blossom-end rot or pest infestation, you can increase the frequency to twice a week. However, be careful not to overwater your plants. Always check the soil moisture before applying the solution. If the soil is already wet, wait a day or two before applying. Also, reduce the frequency during periods of heavy rain.
What are some alternative ingredients I can use in this DIY solution?
The beauty of this DIY trick is its flexibility. You can adapt the ingredients to suit your specific needs and available resources. For example, instead of Epsom salts, you can use bone meal as a source of calcium and phosphorus. Instead of dish soap, you can use insecticidal soap, which is specifically designed to kill pests. You can also add other beneficial ingredients, such as seaweed extract, which is rich in micronutrients and growth hormones. Experiment with different combinations to find what works best for your plants. Remember to always test a small area of the plant first before applying the solution to the entire plant.
Is this DIY solution safe for organic gardening?
Yes, this DIY solution can be safe for organic gardening, depending on the ingredients you use. Make sure to use organic dish soap and other organic ingredients. Avoid using any synthetic fertilizers or pesticides. Always read the labels carefully to ensure that the ingredients are safe for organic gardening. If you’re unsure, consult with a local gardening expert or your local agricultural extension office.
Can I use this DIY solution on other plants besides eggplants?
While this DIY solution is specifically designed for eggplants, it can also be beneficial for other plants, particularly those that are susceptible to blossom-end rot, such as tomatoes, peppers, and squash. However, it’s important to adjust the concentration of the solution accordingly. For more delicate plants, use a weaker concentration. Always test a small area of the plant first before applying the solution to the entire plant.
How do I know if this DIY solution is working?
You should start to see improvements in your plants within a week or two of applying the solution. Blossom-end rot should start to heal, and new fruits should be free of the problem. You should also notice a reduction in pest activity and an overall improvement in plant health. If you don’t see any improvements after a few weeks, you may need to adjust the recipe or frequency of application. It’s also important to rule out other potential problems, such as nutrient deficiencies or diseases.
What are some other tips for growing healthy eggplants?
In addition to this DIY trick, there are several other things you can do to ensure a successful eggplant harvest. Choose a sunny location with well-drained soil. Provide consistent watering, especially during hot, dry weather. Fertilize your plants regularly with a balanced fertilizer. Mulch around the plants to help retain moisture and suppress weeds. Prune your plants to improve air circulation and promote fruit production. And finally, be vigilant about monitoring your plants for pests and diseases. Early detection and treatment are key to preventing serious problems. Remember that growing healthy eggplants requires a holistic approach that combines good cultural practices with effective pest and disease management. This DIY eggplant growing solution is a valuable tool in your arsenal, but it’s just one piece of the puzzle.
Leave a Comment