

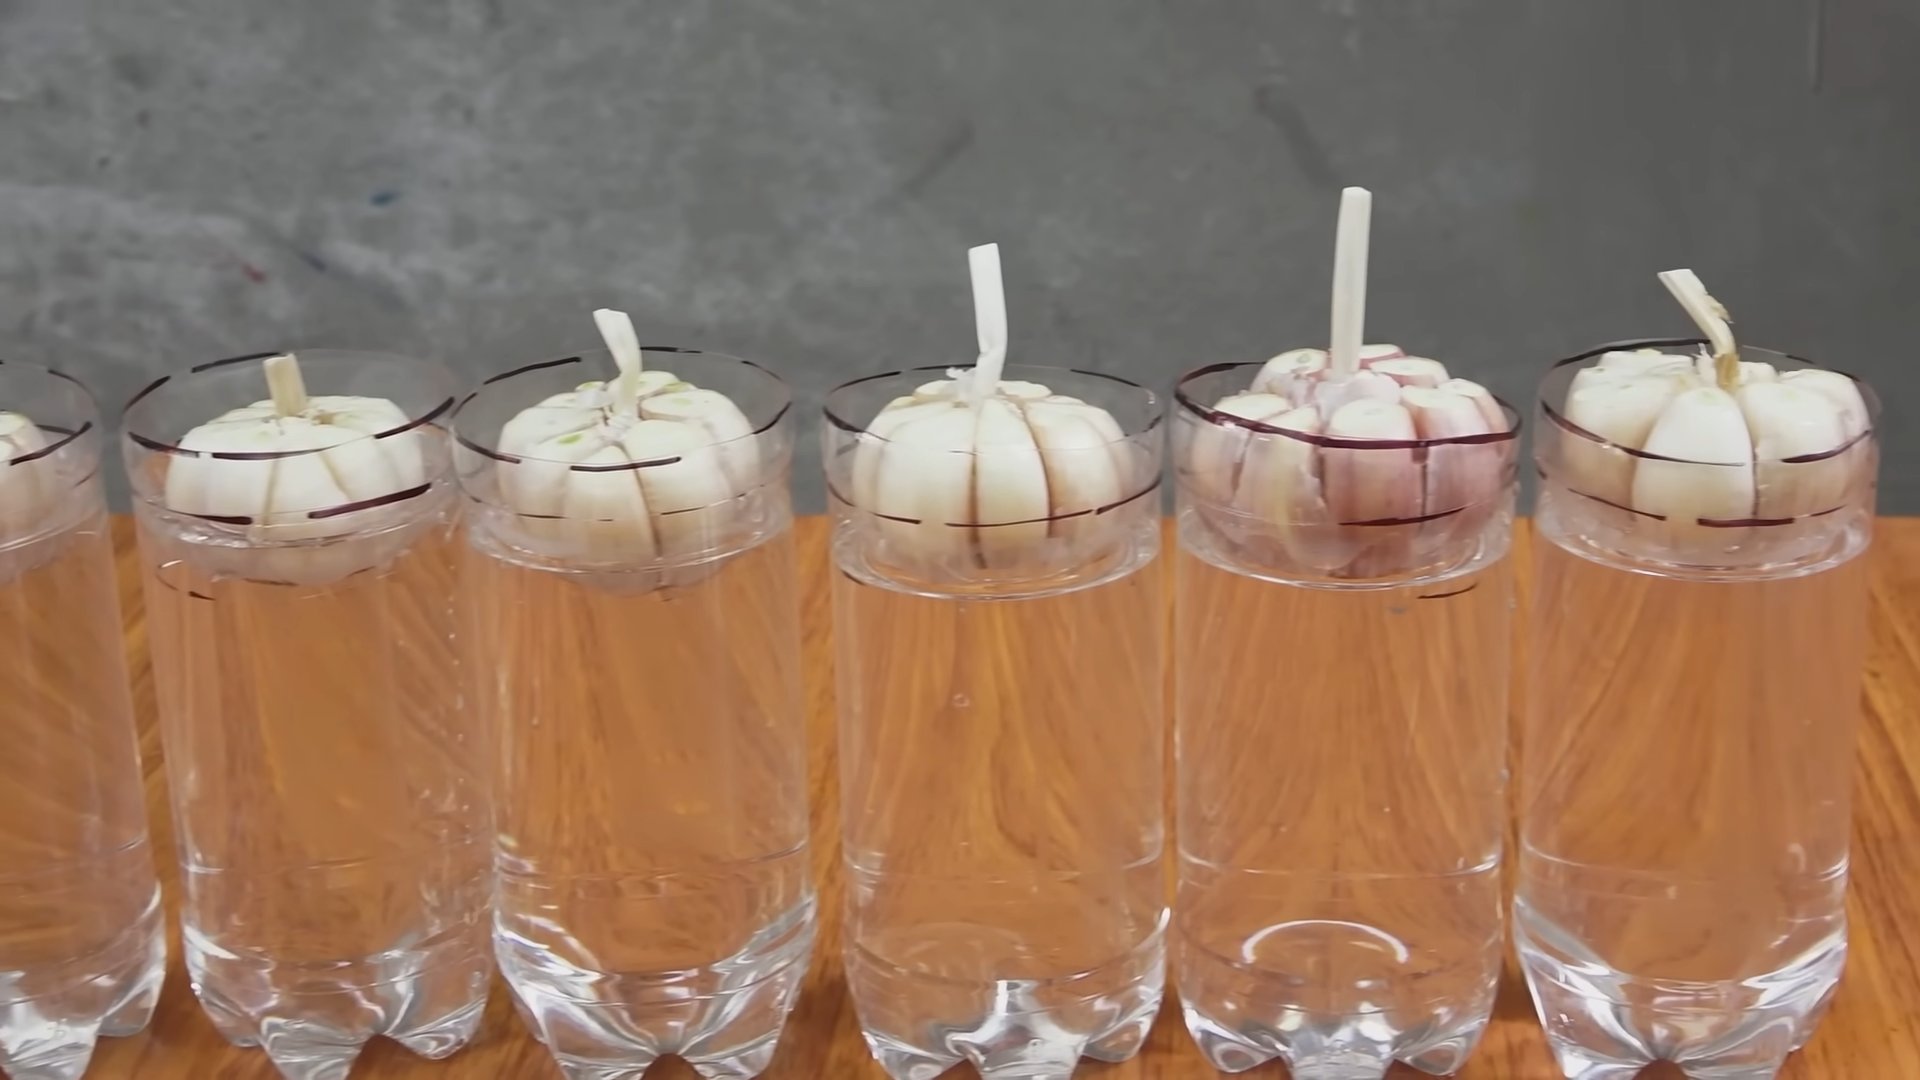
Garlic Growing in Water Bottles: Sounds a little unconventional, right? But trust me, this simple DIY trick is a game-changer for anyone who loves fresh garlic but doesn’t have a sprawling garden. I’m so excited to share this with you! For centuries, garlic has been a staple in cuisines around the world, not just for its pungent flavor but also for its purported health benefits. From ancient Egypt, where it fueled the pyramid builders, to modern-day kitchens, garlic has always held a special place.
But what if you live in an apartment, have limited space, or simply want a fun and easy way to grow your own garlic? That’s where this water bottle method comes in. Forget about tilling soil and worrying about complicated gardening techniques. This method is incredibly accessible and perfect for beginners. I’ve found that it’s a fantastic way to get a continuous supply of fresh garlic greens for salads, stir-fries, and more. Plus, it’s a great way to recycle those plastic bottles! So, if you’re ready to unlock a simple and effective way of garlic growing in water bottles, keep reading! I’m going to walk you through everything you need to know to get started.
Growing Garlic in Water Bottles: A Fun and Easy DIY Project
Hey there, fellow gardening enthusiasts! I’m super excited to share a really cool and surprisingly effective way to grow garlic – in water bottles! Yes, you read that right. This method is perfect if you’re short on space, live in an apartment, or just want a fun and unique gardening project. Plus, it’s a great way to recycle those plastic bottles!
Why Water Bottles?
Before we dive in, you might be wondering, “Why water bottles?” Well, they’re readily available, easy to work with, and provide a contained environment for your garlic to thrive. They also allow for good drainage and aeration, which are crucial for healthy garlic growth.
What You’ll Need
* Empty plastic water bottles (the 2-liter kind works best, but smaller ones can work too)
* Garlic cloves (choose organic ones from the grocery store or seed garlic from a nursery)
* Potting soil (a well-draining mix is ideal)
* Scissors or a utility knife
* Drill or nail (for drainage holes)
* Water
* Optional: Liquid fertilizer
Preparing the Water Bottles
This is a crucial step, so pay close attention! We need to create a suitable container for our garlic.
1. Clean the Bottles: Start by thoroughly cleaning your water bottles with soap and water. Remove any labels and residue. This will prevent any unwanted contaminants from affecting your garlic.
2. Cut the Bottles: Now, we need to cut the bottles to create our planters. There are a couple of ways to do this:
* Option 1 (Single Cloves): Cut the bottle in half horizontally. You’ll use the bottom half as your planter. The top half can be discarded or used for another project. This is best if you plan to plant one clove per bottle.
* Option 2 (Multiple Cloves): Cut a large rectangular window out of the side of the bottle, leaving the top and bottom intact. This creates a trough-like planter where you can plant multiple cloves. I personally prefer this method because it maximizes space.
3. Create Drainage Holes: This is super important! Garlic hates sitting in soggy soil. Use a drill or a nail to create several drainage holes in the bottom of the bottle. I usually make about 5-7 holes, depending on the size of the bottle.
4. Optional: Add a Water Reservoir: For added convenience, you can create a simple self-watering system. Cut the top half of the bottle off (if you haven’t already). Invert the top half and place it inside the bottom half, with the bottle cap on. This creates a reservoir. You’ll need to poke a hole in the bottle cap to allow water to wick up into the soil. Fill the reservoir with water, and the soil will stay consistently moist.
Planting the Garlic
Alright, now for the fun part – planting!
1. Fill the Bottles with Soil: Fill your prepared water bottle planters with potting soil, leaving about an inch of space at the top. Gently pat the soil down to remove any air pockets.
2. Prepare the Garlic Cloves: Separate the garlic bulb into individual cloves. Leave the papery skin on the cloves, as this protects them.
3. Plant the Cloves: Plant the cloves pointy-side up, about 2-3 inches deep in the soil. Space them about 4-6 inches apart if you’re planting multiple cloves in one bottle.
4. Water Thoroughly: After planting, water the soil thoroughly until water drains out of the drainage holes. This helps settle the soil and encourages root growth.
Caring for Your Garlic
Now that your garlic is planted, it’s time to provide it with the care it needs to thrive.
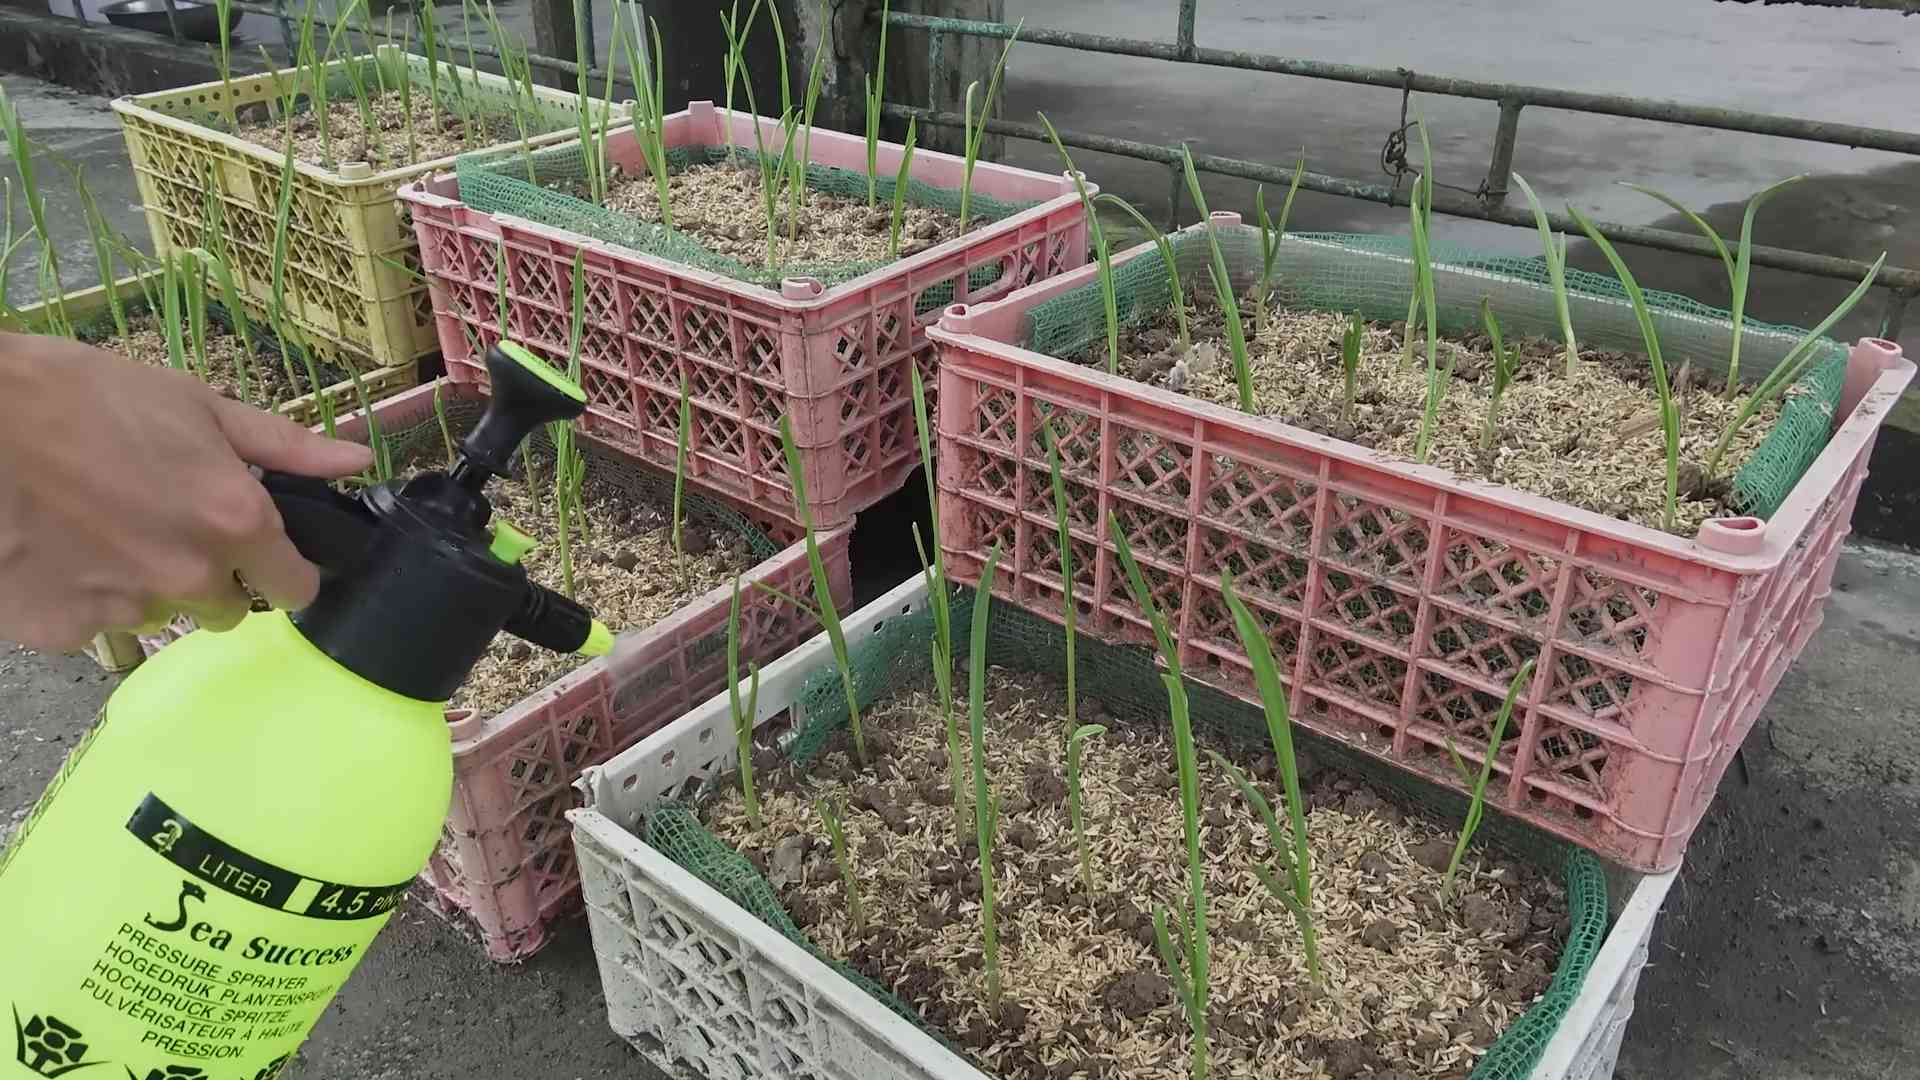
1. Sunlight: Garlic needs plenty of sunlight, so place your water bottle planters in a sunny location that receives at least 6-8 hours of direct sunlight per day. A south-facing window or balcony is ideal.
2. Watering: Water your garlic regularly, keeping the soil consistently moist but not waterlogged. Check the soil moisture by sticking your finger into the soil. If the top inch feels dry, it’s time to water. Be careful not to overwater, as this can lead to root rot. If you’re using the water reservoir method, simply refill the reservoir as needed.
3. Fertilizing: Garlic is a heavy feeder, so it benefits from regular fertilization. Use a liquid fertilizer diluted to half strength every 2-3 weeks. Look for a fertilizer that is high in nitrogen, especially during the early stages of growth.
4. Temperature: Garlic prefers cool temperatures, especially during the early stages of growth. A temperature range of 60-70°F (15-21°C) is ideal. Avoid exposing your garlic to extreme temperatures or frost.
5. Pest and Disease Control: Keep an eye out for any signs of pests or diseases. Aphids and onion thrips are common pests that can attack garlic. If you notice any pests, you can try spraying them with insecticidal soap or neem oil. Garlic is also susceptible to fungal diseases like rust and white rot. To prevent these diseases, ensure good air circulation and avoid overwatering.
Harvesting Your Garlic
The moment we’ve all been waiting for! Harvesting your homegrown garlic is incredibly rewarding.
1. When to Harvest: Garlic is typically ready to harvest in late spring or early summer, about 8-9 months after planting. The leaves will start to turn yellow and brown, and the stems will begin to fall over. This is a sign that the bulbs are mature.
2. How to Harvest: Gently loosen the soil around the garlic bulb with a trowel or fork. Carefully pull the bulb out of the soil, being careful not to damage it.
3. Curing the Garlic: After harvesting, you need to cure the garlic to dry it out and prevent it from rotting. Brush off any excess soil and leave the bulbs with their leaves attached. Tie the garlic plants together in bundles and hang them in a cool, dry, and well-ventilated place for 2-3 weeks.
4. Storing the Garlic: Once the garlic is cured, you can trim the roots and stems. Store the bulbs in a cool, dry, and dark place. Properly cured and stored garlic can last for several months.
Troubleshooting
Even with the best care, you might encounter some challenges along the way. Here are a few common problems and how to address them:
* Yellowing Leaves: This could be a sign of overwatering, underwatering, nutrient deficiency, or disease. Check the soil moisture, fertilize if necessary, and inspect the plants for any signs of pests or diseases.
* Slow Growth: This could be due to insufficient sunlight, poor soil, or cold temperatures. Make sure your garlic is getting enough sunlight, use a well-draining potting mix, and provide adequate warmth.
* Small Bulbs: This could be caused by overcrowding, insufficient fertilization, or late harvesting. Space your cloves properly, fertilize regularly, and harvest at the right time.
* Root Rot: This is usually caused by overwatering. Make sure your water bottles have adequate drainage holes and avoid overwatering.
Tips and Tricks
Here are a few extra tips and tricks to help you succeed with your water bottle garlic garden:
* Choose the Right Garlic: Softneck garlic varieties are generally better suited for warmer climates, while hardneck varieties are more cold-hardy.
* Plant in the Fall: Planting garlic in the fall allows it to establish roots before winter and produce larger bulbs in the spring.
* Mulch: Mulching around your garlic plants can help retain moisture, suppress weeds, and regulate soil temperature.
* Rotate Your Crops: Avoid planting garlic in the same spot year after year, as this can deplete the soil of nutrients and increase the risk of disease.
* Experiment: Don’t be afraid to experiment with different varieties of garlic, different types of soil, and different watering techniques. The more you experiment, the more you’ll learn about what works best for you.
Enjoy Your Homegrown Garlic!
Growing garlic in water bottles is a fun, easy, and rewarding project that anyone can do. With a little bit of care and attention, you can enjoy a bountiful harvest of delicious, homegrown garlic. So, grab some water bottles, some garlic cloves, and get planting! Happy gardening!
Conclusion
So, there you have it! Growing garlic in water bottles is more than just a quirky gardening hack; it’s a game-changer for urban gardeners, space-conscious foodies, and anyone who loves the satisfaction of nurturing their own food. This method offers a surprisingly efficient and visually appealing way to cultivate fresh garlic right in your home. Forget about vast garden plots and back-breaking labor. With a few repurposed water bottles, some soil, and a little patience, you can enjoy a continuous supply of flavorful garlic greens and eventually, plump garlic bulbs.
Why is this DIY trick a must-try? Because it’s incredibly accessible, cost-effective, and environmentally friendly. You’re upcycling materials that might otherwise end up in a landfill, reducing your carbon footprint while simultaneously growing your own food. Plus, it’s a fantastic educational project for kids, teaching them about plant life cycles and the importance of sustainable practices.
But the benefits don’t stop there. Growing garlic in water bottles allows for better control over the growing environment. You can easily move your garlic plants to optimize sunlight exposure, protect them from harsh weather conditions, and monitor their moisture levels. This level of control often leads to healthier, more robust plants and a more abundant harvest.
Ready to take your garlic growing to the next level? Consider these variations:
* Experiment with different soil types: While a standard potting mix works well, try incorporating compost or other organic matter to enrich the soil and provide your garlic with extra nutrients.
* Add companion plants: Plant herbs like basil or parsley alongside your garlic in the water bottles. These companion plants can help deter pests and improve the overall health of your garlic.
* Get creative with your water bottle design: Decorate your water bottles with paint, markers, or other embellishments to add a personal touch to your indoor garden.
* Try different garlic varieties: Explore the world of garlic beyond the standard supermarket varieties. Experiment with different types of garlic, such as softneck or hardneck, to discover your favorite flavors and growing characteristics.
The possibilities are endless! The key is to have fun and embrace the learning process. Don’t be afraid to experiment and adapt the method to suit your specific needs and preferences.
We’re confident that you’ll be amazed by the results of growing garlic in water bottles. It’s a simple, rewarding, and sustainable way to enjoy fresh, homegrown garlic all year round. So, grab some water bottles, gather your supplies, and get ready to embark on a garlic-growing adventure!
We can’t wait to hear about your experience! Share your photos, tips, and stories with us in the comments below. Let’s build a community of water bottle garlic growers and inspire others to embrace this innovative and eco-friendly gardening technique. Let us know how your garlic growing journey is going!
Frequently Asked Questions (FAQ)
What kind of garlic should I use for growing in water bottles?
You can use any type of garlic clove to grow in water bottles, but some varieties tend to perform better than others. Softneck garlic varieties, like California Early or Artichoke garlic, are generally more adaptable to different climates and growing conditions, making them a good choice for beginners. Hardneck garlic varieties, such as Rocambole or Porcelain garlic, are known for their bolder flavors and larger cloves, but they may require a bit more attention and specific growing conditions. Ultimately, the best garlic variety for you will depend on your personal preferences and the climate in your area. Experiment with different types to see which ones thrive in your water bottle garden.
How often should I water my garlic plants in water bottles?
The frequency of watering will depend on several factors, including the size of the water bottle, the type of soil you’re using, the temperature, and the humidity levels. As a general rule, you should water your garlic plants when the top inch of soil feels dry to the touch. Avoid overwatering, as this can lead to root rot. Ensure that the water bottles have adequate drainage holes to prevent water from accumulating at the bottom. During hot, dry weather, you may need to water your garlic plants more frequently. Conversely, during cool, wet weather, you may need to water them less often. Observe your plants closely and adjust your watering schedule accordingly.
How much sunlight do garlic plants need when grown in water bottles?
Garlic plants need at least six hours of direct sunlight per day to thrive. When growing garlic in water bottles indoors, place them near a sunny window that receives plenty of natural light. If you don’t have access to a sunny window, you can supplement with artificial grow lights. Position the grow lights about 6-12 inches above the plants and keep them on for 12-16 hours per day. Rotate the water bottles regularly to ensure that all sides of the plants receive adequate sunlight. Insufficient sunlight can lead to weak, leggy growth and reduced bulb size.
How long does it take to grow garlic in water bottles?
The time it takes to grow garlic in water bottles will vary depending on the variety of garlic, the growing conditions, and your climate. Generally, it takes about 6-8 months from planting the cloves to harvesting mature garlic bulbs. You can start harvesting the garlic greens (scapes) after a few weeks, once they reach a desirable size. These greens have a mild garlic flavor and can be used in salads, soups, and other dishes. The garlic bulbs will be ready for harvest when the leaves start to turn yellow and brown and begin to fall over.
Can I reuse the soil from my water bottle garlic garden?
It’s generally not recommended to reuse the soil from your water bottle garlic garden without amending it first. Garlic plants can deplete the soil of nutrients, so reusing the soil without replenishing it can lead to poor growth in subsequent plantings. To reuse the soil, remove any remaining plant debris and mix in compost, aged manure, or other organic matter to enrich the soil and restore its nutrient content. You can also add a slow-release fertilizer to provide your new garlic plants with a boost of nutrients. Alternatively, you can simply discard the old soil and start with fresh potting mix for each new planting.
What are some common problems I might encounter when growing garlic in water bottles, and how can I fix them?
Some common problems you might encounter when growing garlic in water bottles include:
* Yellowing leaves: This can be caused by overwatering, underwatering, nutrient deficiencies, or pests. Check the soil moisture levels and adjust your watering schedule accordingly. Fertilize your plants with a balanced fertilizer to address any nutrient deficiencies. Inspect your plants for pests and treat them with an appropriate insecticide or organic pest control method.
* Root rot: This is caused by overwatering and poor drainage. Ensure that your water bottles have adequate drainage holes and avoid overwatering. If you suspect root rot, remove the affected plants from the water bottles and trim away any rotten roots. Repot the plants in fresh potting mix and water sparingly.
* Pests: Garlic plants can be susceptible to pests such as aphids, spider mites, and thrips. Inspect your plants regularly for signs of infestation and treat them with an appropriate insecticide or organic pest control method. You can also try using insecticidal soap or neem oil to control pests.
* Small bulbs: This can be caused by insufficient sunlight, nutrient deficiencies, or overcrowding. Ensure that your plants receive at least six hours of direct sunlight per day. Fertilize your plants with a balanced fertilizer to provide them with the nutrients they need. Thin out your plants if they are overcrowded to allow them more space to grow.
How do I store my harvested garlic bulbs?
Once you’ve harvested your garlic bulbs, cure them for 2-3 weeks in a dry, well-ventilated place away from direct sunlight. This will help to harden the outer layers of the bulbs and prevent them from rotting. After curing, you can store your garlic bulbs in a cool, dry place, such as a pantry or basement. Properly cured and stored garlic bulbs can last for several months. Avoid storing garlic in the refrigerator, as this can cause them to sprout or become moldy.

Leave a Comment