

Growing Garlic in Water Bottles might sound a little unconventional, but trust me, it’s a game-changer for urban gardeners and anyone short on space! For centuries, garlic has been a staple in cuisines around the world, not just for its pungent flavor, but also for its purported health benefits. From ancient Egypt, where it fueled the pyramid builders, to modern kitchens where it elevates countless dishes, garlic’s importance is undeniable.
But what if you don’t have a sprawling garden to dedicate to this culinary essential? That’s where this clever DIY trick comes in. I’m going to show you how to cultivate your own fresh garlic, right in the comfort of your home, using recycled water bottles. It’s an incredibly satisfying project, and it’s perfect for beginners.
Why do you need this hack? Well, imagine having a constant supply of fresh, organic garlic at your fingertips, ready to add a burst of flavor to your meals. No more last-minute trips to the store or settling for dried-out cloves! Plus, growing garlic in water bottles is a fantastic way to reduce waste and embrace sustainable gardening practices. Let’s dive in and unlock the secrets to this simple, yet rewarding, gardening adventure!
Growing Garlic in Water Bottles: An Unexpectedly Easy DIY Guide
Hey there, fellow gardening enthusiasts! Ever thought about growing garlic indoors, especially if you’re short on space or just want a fun, quirky project? Well, I’m here to tell you it’s totally doable, and using water bottles makes it surprisingly easy and effective. I’ve been experimenting with this method for a while now, and I’m excited to share my secrets with you. Get ready to transform those empty plastic bottles into mini garlic farms!
What You’ll Need
Before we dive in, let’s gather our supplies. This is a pretty low-cost project, which is always a win in my book!
* Empty Plastic Water Bottles: The size doesn’t matter too much, but I’ve found that 1-2 liter bottles work best. You’ll need at least one per garlic clove you plan to grow.
* Garlic Cloves: Choose organic garlic from the grocery store or your local farmer’s market. Organic is important to avoid any chemical treatments that might hinder growth. Look for firm, plump cloves with no signs of mold or sprouting (although a little sprouting is okay!).
* Potting Mix: A good quality potting mix is essential for providing the nutrients your garlic needs. Avoid using garden soil, as it can be too dense and may contain pests or diseases.
* Water: Tap water is fine, but letting it sit out for 24 hours to dechlorinate is even better.
* Scissors or a Utility Knife: For cutting the water bottles. Be careful!
* Spray Bottle: For misting the soil.
* Optional: Liquid Fertilizer: A balanced liquid fertilizer can give your garlic an extra boost, but it’s not strictly necessary.
* Optional: Pebbles or Gravel: For drainage at the bottom of the bottle.
Preparing the Water Bottles
This is where the magic begins! We’re going to transform those humble water bottles into cozy little homes for our garlic.
1. Clean the Bottles: Give your water bottles a good rinse with soap and water to remove any residue. Make sure to dry them thoroughly.
2. Cut the Bottles: This is where you have a couple of options. I prefer to cut the bottle in half, creating two separate containers. You can also cut off just the top portion (the neck) of the bottle, leaving the bottom intact. If you cut the bottle in half, you’ll have two containers to use. The top half can be inverted and placed inside the bottom half to create a self-watering system (more on that later!). If you only cut off the top, you’ll have one taller container.
3. Create Drainage Holes: If you’re using the bottom half of the bottle, you’ll need to create drainage holes. Use your scissors or utility knife to poke several holes in the bottom of the bottle. This is crucial for preventing waterlogging, which can rot your garlic. If you’re using the self-watering method, you don’t need drainage holes in the bottom half, as the water will be drawn up from the reservoir.
4. Optional: Add Drainage Layer: To further improve drainage, you can add a layer of pebbles or gravel to the bottom of the bottle before adding the potting mix. This helps to prevent the soil from becoming waterlogged.
Planting the Garlic Cloves
Now for the fun part – planting the garlic!
1. Fill the Bottles with Potting Mix: Fill your prepared water bottles with potting mix, leaving about an inch of space at the top. Gently pat down the soil to remove any air pockets.
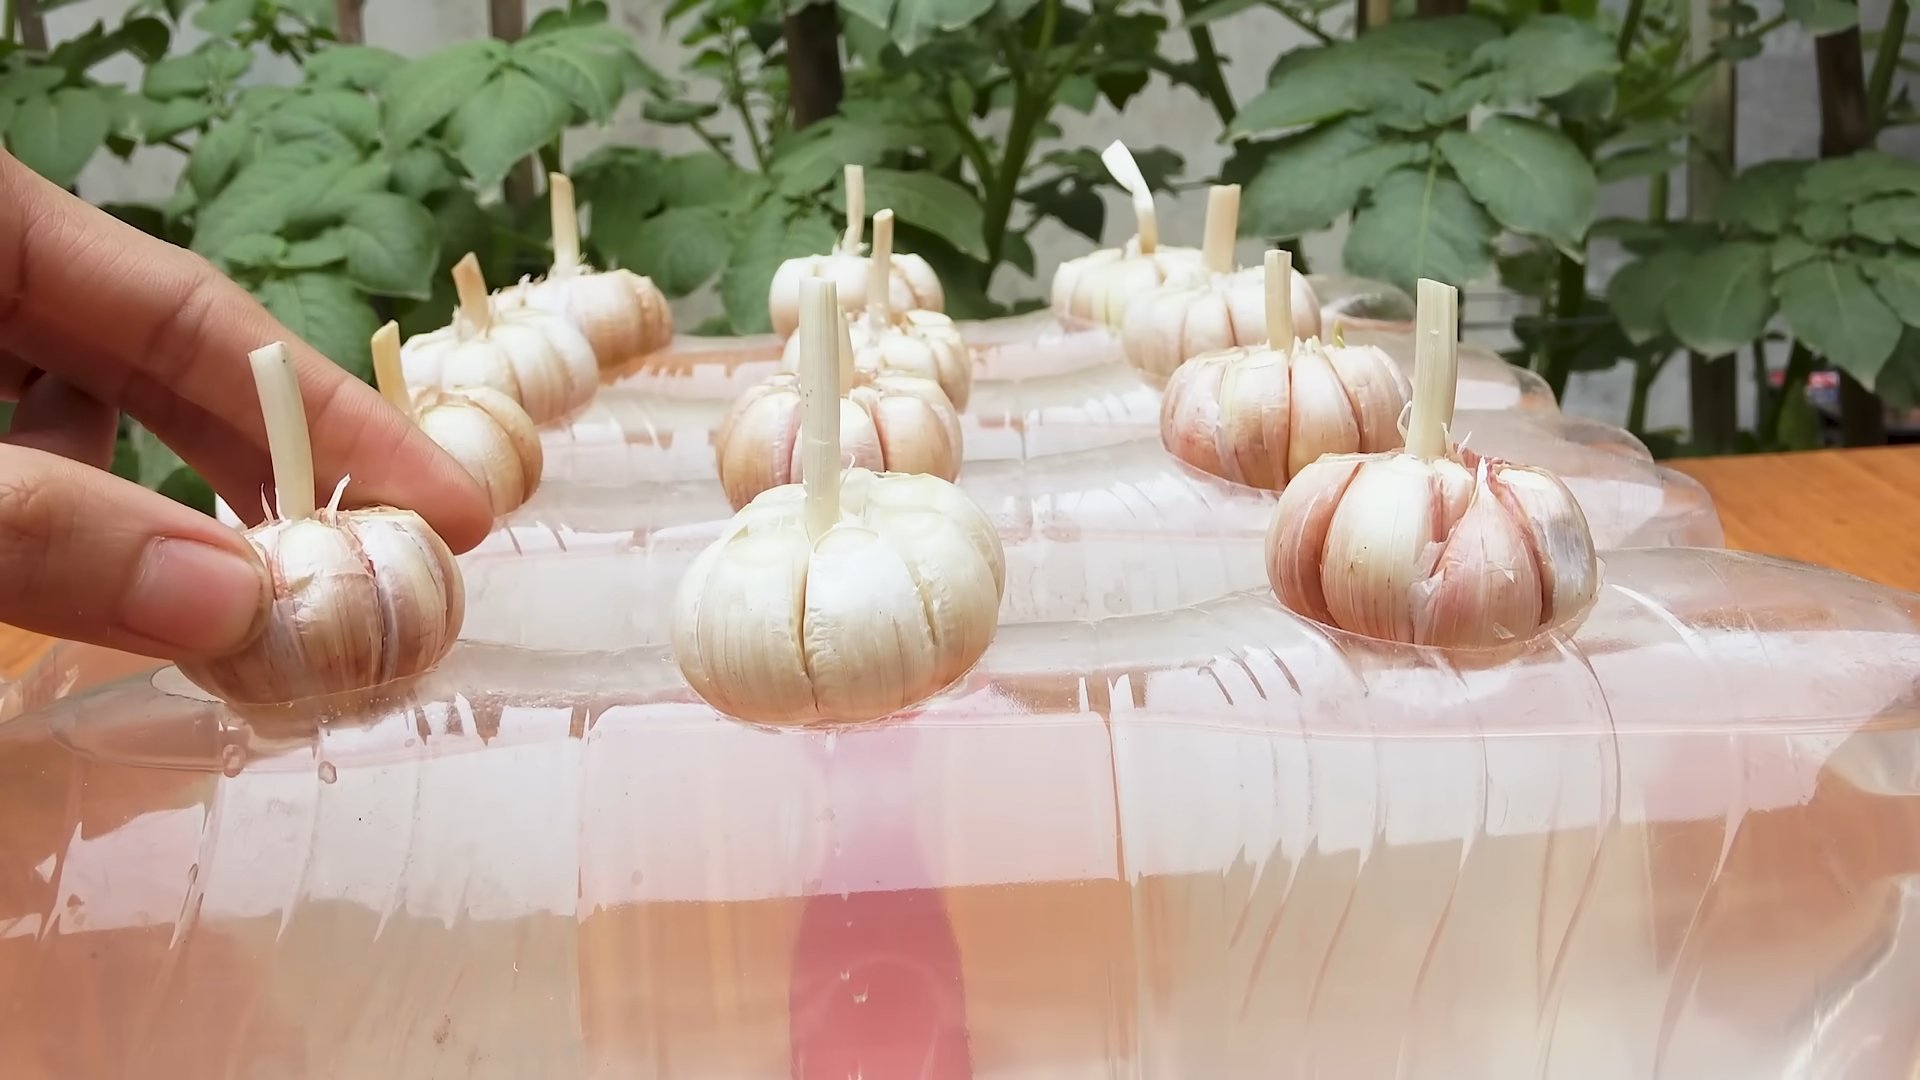
2. Prepare the Garlic Cloves: Gently separate the cloves from the garlic bulb, being careful not to damage them. Leave the papery skin on the cloves intact.
3. Plant the Cloves: Plant each clove pointy-side up, about 2 inches deep in the potting mix. Space the cloves about 2-3 inches apart if you’re planting multiple cloves in the same bottle.
4. Water Gently: Water the soil gently until it’s evenly moist but not soggy. Use a spray bottle to avoid overwatering.
Caring for Your Garlic Plants
Now that your garlic is planted, it’s time to provide the right conditions for it to thrive.
1. Location, Location, Location: Place your water bottle garlic planters in a sunny location. Garlic needs at least 6 hours of sunlight per day to grow properly. A south-facing window is ideal. If you don’t have enough natural light, you can supplement with a grow light.
2. Watering: Water your garlic plants regularly, keeping the soil consistently moist but not waterlogged. Check the soil moisture by sticking your finger into the soil. If the top inch feels dry, it’s time to water. Avoid overwatering, as this can lead to root rot. If you’re using the self-watering method, simply refill the bottom reservoir when it’s empty.
3. Fertilizing (Optional): If you want to give your garlic an extra boost, you can fertilize it every 2-3 weeks with a balanced liquid fertilizer. Follow the instructions on the fertilizer label.
4. Temperature: Garlic prefers cool temperatures, ideally between 60-70°F (15-21°C). Avoid placing your plants near heat sources, such as radiators or vents.
5. Pest Control: Keep an eye out for pests, such as aphids or spider mites. If you notice any pests, you can try spraying them with insecticidal soap or neem oil.
6. Rotating: Rotate the bottles regularly to ensure even light exposure on all sides of the plant.
Harvesting Your Garlic Greens
While you won’t get full-sized garlic bulbs from this method (usually), you *will* get delicious garlic greens!
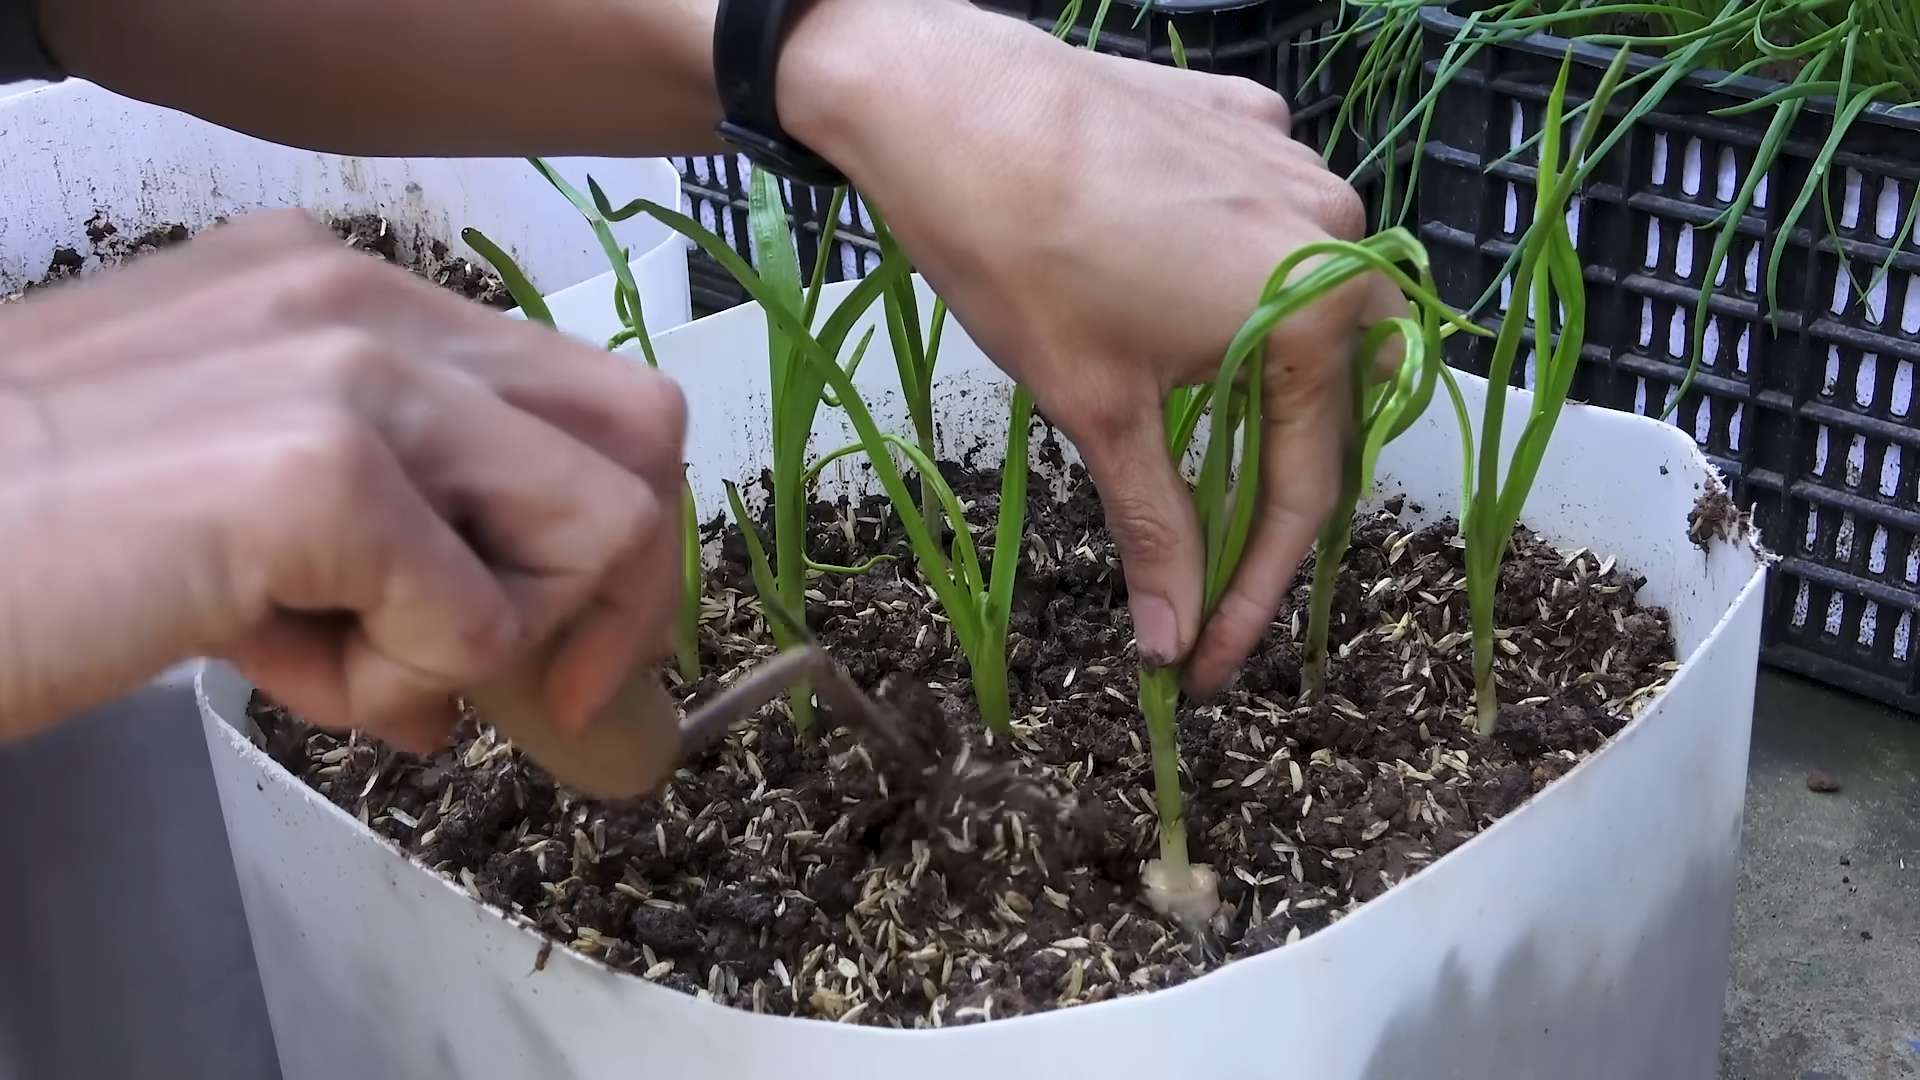
1. When to Harvest: You can start harvesting garlic greens when they’re about 6-8 inches tall.
2. How to Harvest: Use scissors to snip off the greens, leaving about 2 inches of growth at the base of the plant. This will allow the plant to continue growing and producing more greens.
3. Using Your Garlic Greens: Garlic greens have a mild garlic flavor and can be used in a variety of dishes. Add them to salads, soups, stir-fries, or use them as a garnish.
Troubleshooting
Even with the best care, you might encounter a few challenges along the way. Here are some common problems and how to fix them:
* Yellowing Leaves: This can be caused by overwatering, underwatering, or nutrient deficiencies. Check the soil moisture and adjust your watering accordingly. If the soil is consistently moist, you may be overwatering. If the soil is dry, you may be underwatering. If you suspect a nutrient deficiency, try fertilizing with a balanced liquid fertilizer.
* Slow Growth: This can be caused by insufficient sunlight, cool temperatures, or poor soil. Make sure your plants are getting at least 6 hours of sunlight per day. If the temperature is too cool, try moving your plants to a warmer location. If the soil is poor, try repotting with fresh potting mix.
* Root Rot: This is caused by overwatering and poor drainage. Make sure your water bottles have adequate drainage holes. Avoid overwatering and allow the soil to dry out slightly between waterings.
* Pests: Keep an eye out for pests, such as aphids or spider mites. If you notice any pests, you can try spraying them with insecticidal soap or neem oil.
The Self-Watering Method: A Deeper Dive
Remember when I mentioned the self-wate
Hey there, fellow gardening enthusiasts! Ever thought about growing garlic indoors, especially if you’re short on space or just want a fun, quirky project? Well, I’m here to tell you it’s totally doable, and using water bottles makes it surprisingly easy and effective. I’ve been experimenting with this method for a while now, and I’m excited to share my secrets with you. Get ready to transform those empty plastic bottles into mini garlic farms!
What You’ll Need
Before we dive in, let’s gather our supplies. This is a pretty low-cost project, which is always a win in my book!
* Empty Plastic Water Bottles: The size doesn’t matter too much, but I’ve found that 1-2 liter bottles work best. You’ll need at least one per garlic clove you plan to grow.
* Garlic Cloves: Choose organic garlic from the grocery store or your local farmer’s market. Organic is important to avoid any chemical treatments that might hinder growth. Look for firm, plump cloves with no signs of mold or sprouting (although a little sprouting is okay!).
* Potting Mix: A good quality potting mix is essential for providing the nutrients your garlic needs. Avoid using garden soil, as it can be too dense and may contain pests or diseases.
* Water: Tap water is fine, but letting it sit out for 24 hours to dechlorinate is even better.
* Scissors or a Utility Knife: For cutting the water bottles. Be careful!
* Spray Bottle: For misting the soil.
* Optional: Liquid Fertilizer: A balanced liquid fertilizer can give your garlic an extra boost, but it’s not strictly necessary.
* Optional: Pebbles or Gravel: For drainage at the bottom of the bottle.
Preparing the Water Bottles
This is where the magic begins! We’re going to transform those humble water bottles into cozy little homes for our garlic.
1. Clean the Bottles: Give your water bottles a good rinse with soap and water to remove any residue. Make sure to dry them thoroughly.
2. Cut the Bottles: This is where you have a couple of options. I prefer to cut the bottle in half, creating two separate containers. You can also cut off just the top portion (the neck) of the bottle, leaving the bottom intact. If you cut the bottle in half, you’ll have two containers to use. The top half can be inverted and placed inside the bottom half to create a self-watering system (more on that later!). If you only cut off the top, you’ll have one taller container.
3. Create Drainage Holes: If you’re using the bottom half of the bottle, you’ll need to create drainage holes. Use your scissors or utility knife to poke several holes in the bottom of the bottle. This is crucial for preventing waterlogging, which can rot your garlic. If you’re using the self-watering method, you don’t need drainage holes in the bottom half, as the water will be drawn up from the reservoir.
4. Optional: Add Drainage Layer: To further improve drainage, you can add a layer of pebbles or gravel to the bottom of the bottle before adding the potting mix. This helps to prevent the soil from becoming waterlogged.
Planting the Garlic Cloves
Now for the fun part – planting the garlic!
1. Fill the Bottles with Potting Mix: Fill your prepared water bottles with potting mix, leaving about an inch of space at the top. Gently pat down the soil to remove any air pockets.
2. Prepare the Garlic Cloves: Gently separate the cloves from the garlic bulb, being careful not to damage them. Leave the papery skin on the cloves intact.
3. Plant the Cloves: Plant each clove pointy-side up, about 2 inches deep in the potting mix. Space the cloves about 2-3 inches apart if you’re planting multiple cloves in the same bottle.
4. Water Gently: Water the soil gently until it’s evenly moist but not soggy. Use a spray bottle to avoid overwatering.
Caring for Your Garlic Plants
Now that your garlic is planted, it’s time to provide the right conditions for it to thrive.
1. Location, Location, Location: Place your water bottle garlic planters in a sunny location. Garlic needs at least 6 hours of sunlight per day to grow properly. A south-facing window is ideal. If you don’t have enough natural light, you can supplement with a grow light.
2. Watering: Water your garlic plants regularly, keeping the soil consistently moist but not waterlogged. Check the soil moisture by sticking your finger into the soil. If the top inch feels dry, it’s time to water. Avoid overwatering, as this can lead to root rot. If you’re using the self-watering method, simply refill the bottom reservoir when it’s empty.
3. Fertilizing (Optional): If you want to give your garlic an extra boost, you can fertilize it every 2-3 weeks with a balanced liquid fertilizer. Follow the instructions on the fertilizer label.
4. Temperature: Garlic prefers cool temperatures, ideally between 60-70°F (15-21°C). Avoid placing your plants near heat sources, such as radiators or vents.
5. Pest Control: Keep an eye out for pests, such as aphids or spider mites. If you notice any pests, you can try spraying them with insecticidal soap or neem oil.
6. Rotating: Rotate the bottles regularly to ensure even light exposure on all sides of the plant.
Harvesting Your Garlic Greens
While you won’t get full-sized garlic bulbs from this method (usually), you *will* get delicious garlic greens!
1. When to Harvest: You can start harvesting garlic greens when they’re about 6-8 inches tall.
2. How to Harvest: Use scissors to snip off the greens, leaving about 2 inches of growth at the base of the plant. This will allow the plant to continue growing and producing more greens.
3. Using Your Garlic Greens: Garlic greens have a mild garlic flavor and can be used in a variety of dishes. Add them to salads, soups, stir-fries, or use them as a garnish.
Troubleshooting
Even with the best care, you might encounter a few challenges along the way. Here are some common problems and how to fix them:
* Yellowing Leaves: This can be caused by overwatering, underwatering, or nutrient deficiencies. Check the soil moisture and adjust your watering accordingly. If the soil is consistently moist, you may be overwatering. If the soil is dry, you may be underwatering. If you suspect a nutrient deficiency, try fertilizing with a balanced liquid fertilizer.
* Slow Growth: This can be caused by insufficient sunlight, cool temperatures, or poor soil. Make sure your plants are getting at least 6 hours of sunlight per day. If the temperature is too cool, try moving your plants to a warmer location. If the soil is poor, try repotting with fresh potting mix.
* Root Rot: This is caused by overwatering and poor drainage. Make sure your water bottles have adequate drainage holes. Avoid overwatering and allow the soil to dry out slightly between waterings.
* Pests: Keep an eye out for pests, such as aphids or spider mites. If you notice any pests, you can try spraying them with insecticidal soap or neem oil.
The Self-Watering Method: A Deeper Dive
Remember when I mentioned the self-watering method? Let’s explore that in more detail. This is a fantastic option if you tend to forget to water your plants or if you’re going on vacation.
1. How it Works: The self-watering method relies on capillary action to draw water from a reservoir in the bottom of the bottle up into the soil. This keeps the soil consistently moist without the risk of overwatering.
2. Setting it Up: After cutting the water bottle in half, invert the top half and place it inside the bottom half. Make sure the neck of the bottle is submerged in the water in the bottom half. Fill the top half with potting mix and plant your garlic cloves as described above.
3. Maintaining the Reservoir: Regularly check the water level in the bottom reservoir and refill it as needed. You’ll likely need to refill it less often than you would if you were watering the plants manually.
4. Benefits: The self-watering method offers several benefits, including reduced watering frequency, consistent soil moisture, and reduced risk of overwatering.
Why I Love This Method
I’ve tried growing garlic in traditional pots and in the ground, but I have to say, growing garlic in water bottles is one of my favorite methods. Here’s why:
* Space-Saving: Water bottles are compact and can be easily placed on windowsills, shelves, or
Conclusion
So, there you have it! Growing garlic in water bottles is not just a quirky gardening experiment; it’s a genuinely effective and space-saving method to cultivate fresh, flavorful garlic right in your home. We’ve walked you through the simple steps, highlighting how this DIY approach can transform discarded plastic into a thriving mini-garden.
Why is this a must-try? Because it offers a multitude of benefits. First and foremost, it’s incredibly accessible. You likely already have the necessary materials – water bottles and garlic cloves. Second, it’s a fantastic solution for those with limited space, such as apartment dwellers or anyone with a small balcony. Forget about needing a large garden plot; a sunny windowsill is all you need to get started. Third, it’s a sustainable practice, giving plastic bottles a new lease on life and reducing waste. Finally, and perhaps most importantly, it provides you with a continuous supply of fresh garlic greens and, eventually, garlic bulbs.
But the beauty of this method lies in its adaptability. Feel free to experiment with different types of water bottles. While clear bottles allow you to monitor root growth easily, you can also use colored bottles, just be mindful of potential light blockage. Consider using different varieties of garlic, too. Softneck varieties, known for their flexibility and braiding capabilities, might be particularly well-suited for this container gardening approach. You can also try planting multiple cloves in a single bottle, but be sure to provide adequate spacing to prevent overcrowding.
Another variation to consider is the addition of companion plants. Herbs like basil or parsley can be planted alongside your garlic in larger water bottle setups. These companions can help deter pests and enhance the flavor of your garlic. Just ensure that the companion plants have similar watering and sunlight requirements.
Don’t be afraid to get creative with your setup! You can paint the water bottles to add a touch of personality to your indoor garden. You can also group multiple water bottle gardens together to create a visually appealing display. The possibilities are endless!
Growing garlic in water bottles is a rewarding experience that connects you with nature and provides you with fresh, homegrown produce. It’s a simple, sustainable, and space-saving solution that anyone can try.
We wholeheartedly encourage you to give this DIY trick a try. It’s a fun and educational project for both adults and children. Once you’ve harvested your first batch of homegrown garlic, you’ll be amazed at the difference in flavor compared to store-bought varieties.
And most importantly, we want to hear about your experience! Share your photos, tips, and challenges in the comments section below. Let’s create a community of water bottle garlic growers and learn from each other. What worked for you? What didn’t? What unique variations did you try? Your feedback will help others succeed and inspire even more people to embrace this innovative gardening method. So, grab some water bottles, plant some garlic, and let the growing begin! We can’t wait to see your results!
Frequently Asked Questions (FAQ)
1. What kind of water bottle is best for growing garlic?
The best water bottles for growing garlic are clear, plastic bottles with a wide mouth. Clear bottles allow you to easily monitor the root growth and moisture levels of the soil. The wide mouth makes it easier to plant the garlic cloves and add soil. However, you can also use colored bottles, but be aware that darker colors may absorb more heat and potentially affect the soil temperature. Ensure the bottle is clean and has drainage holes at the bottom to prevent waterlogging. Recycled water bottles are ideal, promoting sustainability. Consider the size of the bottle as well; larger bottles can accommodate more cloves and provide more room for root development.
2. How many drainage holes should I put in the water bottle?
A good rule of thumb is to create at least 4-5 drainage holes at the bottom of the water bottle. These holes should be approximately ¼ inch in diameter. Adequate drainage is crucial to prevent the soil from becoming waterlogged, which can lead to root rot and other fungal diseases that can harm your garlic plants. You can use a drill, a hot nail, or a sharp knife to create the drainage holes. Ensure the holes are evenly spaced around the bottom of the bottle to provide consistent drainage. Regularly check the drainage holes to ensure they are not clogged with soil.
3. What type of soil should I use for growing garlic in water bottles?
The ideal soil for growing garlic in water bottles is a well-draining potting mix. Avoid using garden soil, as it can be too heavy and compact, hindering root growth and drainage. A good potting mix should contain a blend of peat moss, perlite, and vermiculite. These components provide good aeration, drainage, and moisture retention. You can also amend the potting mix with compost or aged manure to provide additional nutrients for your garlic plants. Ensure the soil is loose and crumbly to allow for easy root penetration. A slightly acidic to neutral pH (around 6.0 to 7.0) is optimal for garlic growth.
4. How often should I water my garlic plants in water bottles?
Water your garlic plants in water bottles when the top inch of soil feels dry to the touch. The frequency of watering will depend on factors such as the weather, humidity, and the size of the water bottle. In general, you may need to water every 2-3 days during warmer months and less frequently during cooler months. Avoid overwatering, as this can lead to root rot. When watering, ensure that the water drains freely from the drainage holes at the bottom of the bottle. Water early in the morning to allow the foliage to dry before nightfall, reducing the risk of fungal diseases.
5. How much sunlight do garlic plants need when grown in water bottles?
Garlic plants require at least 6-8 hours of direct sunlight per day to thrive. Place your water bottle garlic garden in a sunny location, such as a south-facing windowsill or balcony. If you don’t have access to enough natural sunlight, you can supplement with artificial grow lights. LED grow lights are an energy-efficient option. Rotate the water bottles regularly to ensure that all sides of the plants receive adequate sunlight. Insufficient sunlight can result in weak, leggy growth and reduced bulb size.
6. When is the best time to plant garlic in water bottles?
The best time to plant garlic in water bottles is in the fall, typically around 4-6 weeks before the first expected frost. This allows the garlic cloves to establish roots before winter dormancy. In warmer climates, you can plant garlic in late fall or early winter. Select firm, healthy garlic cloves for planting. Avoid using cloves that are soft, shriveled, or show signs of disease. Planting at the right time ensures that the garlic plants have enough time to develop strong roots and produce large, flavorful bulbs.
7. How long does it take to grow garlic in water bottles?
Growing garlic in water bottles typically takes around 8-9 months from planting to harvest. The garlic cloves will sprout within a few weeks of planting, and the plants will continue to grow throughout the fall and winter. In the spring, the plants will begin to form bulbs. You can harvest the garlic greens (scapes) in the spring for culinary use. The garlic bulbs are typically ready to harvest in late spring or early summer when the leaves begin to turn yellow and brown.
8. Can I grow garlic indoors year-round in water bottles?
While garlic is typically planted in the fall for a summer harvest, you can grow garlic greens indoors year-round in water bottles. The process is similar to growing garlic for bulbs, but you’ll focus on harvesting the green shoots rather than waiting for the bulbs to mature. Plant the garlic cloves in water bottles filled with potting mix and provide adequate sunlight or artificial grow lights. Harvest the greens when they reach a few inches in height. This method provides a continuous supply of fresh garlic flavor for your culinary creations.
9. How do I harvest garlic grown in water bottles?
To harvest garlic bulbs grown in water bottles, wait until the leaves begin to turn yellow and brown, typically in late spring or early summer. Gently loosen the soil around the base of the plant and carefully pull the garlic bulb out of the water bottle. Avoid damaging the bulb during harvest. Once harvested, cure the garlic bulbs by drying them in a well-ventilated area for 2-3 weeks. This allows the outer layers to dry and protects the bulbs from rot. After curing, you can store the garlic bulbs in a cool, dry place for several months.
10. What are some common problems when growing garlic in water bottles and how can I fix them?
Some common problems when growing garlic in water bottles include:
* **Root rot:** Caused by overwatering. Ensure adequate drainage and allow the soil to dry slightly between waterings.
* **Pests:** Aphids and other pests can infest garlic plants. Treat with insecticidal soap or neem oil.
* **Fungal diseases:** Can occur in humid conditions. Provide good air circulation and avoid overhead watering.
* **Nutrient deficiencies:** Yellowing leaves can indicate a lack of nutrients. Fertilize with a balanced liquid fertilizer.
* **Slow growth:** May be due to insufficient sunlight or poor soil. Provide more sunlight and amend the soil with compost.
By addressing these common problems promptly, you can ensure a successful garlic harvest in your water bottle garden.


Leave a Comment