

Grow Asparagus Year Round? Yes, you read that right! Imagine fresh, tender asparagus spears gracing your plate, even when the snow is falling outside. It sounds like a dream, doesn’t it? Well, it’s a dream within reach, and I’m here to show you how with some clever DIY tricks and hacks.
Asparagus has been enjoyed for centuries, with evidence of its cultivation dating back to ancient Rome. The Romans prized it for its delicate flavor and medicinal properties. Today, asparagus remains a culinary delight, packed with vitamins and antioxidants. But, let’s face it, its short growing season can be a real bummer.
That’s where these DIY techniques come in. We’re going to explore ways to extend your asparagus harvest and even grow asparagus year round, regardless of your climate. Think about it: no more relying on expensive, imported asparagus from the grocery store. You’ll have a sustainable, delicious source of this springtime favorite right in your own backyard (or even indoors!).
This article is packed with simple, effective methods that anyone can use. Whether you’re a seasoned gardener or just starting out, I’ll guide you through the process step-by-step. So, get ready to unlock the secrets to a year-round asparagus bounty and impress your friends and family with your gardening prowess!
Spargel das ganze Jahr über selbst anbauen: So geht’s!
Hey Leute, habt ihr auch genug davon, immer nur im Frühling frischen Spargel zu bekommen? Ich auch! Deshalb habe ich mich schlau gemacht und eine Methode gefunden, wie wir Spargel fast das ganze Jahr über selbst anbauen können. Klingt verrückt? Ist es aber nicht! Mit ein bisschen Planung und den richtigen Tricks können wir uns bald über eine längere Spargelsaison freuen. Lasst uns loslegen!
Was wir brauchen:
* Spargelpflanzen (am besten 1-2 Jahre alt)
* Große Pflanzgefäße (mindestens 40 cm Durchmesser und Tiefe)
* Hochwertige Blumenerde
* Kompost
* Sand
* Mulch (z.B. Stroh oder Holzhackschnitzel)
* Ein Gewächshaus oder ein heller, kühler Raum (für die Wintermonate)
* Geduld!
Die Vorbereitung: Der Grundstein für eine lange Spargelsaison
Bevor wir mit dem eigentlichen Anbau beginnen, müssen wir ein paar Vorbereitungen treffen. Das ist wichtig, damit unsere Spargelpflanzen optimal wachsen und gedeihen.
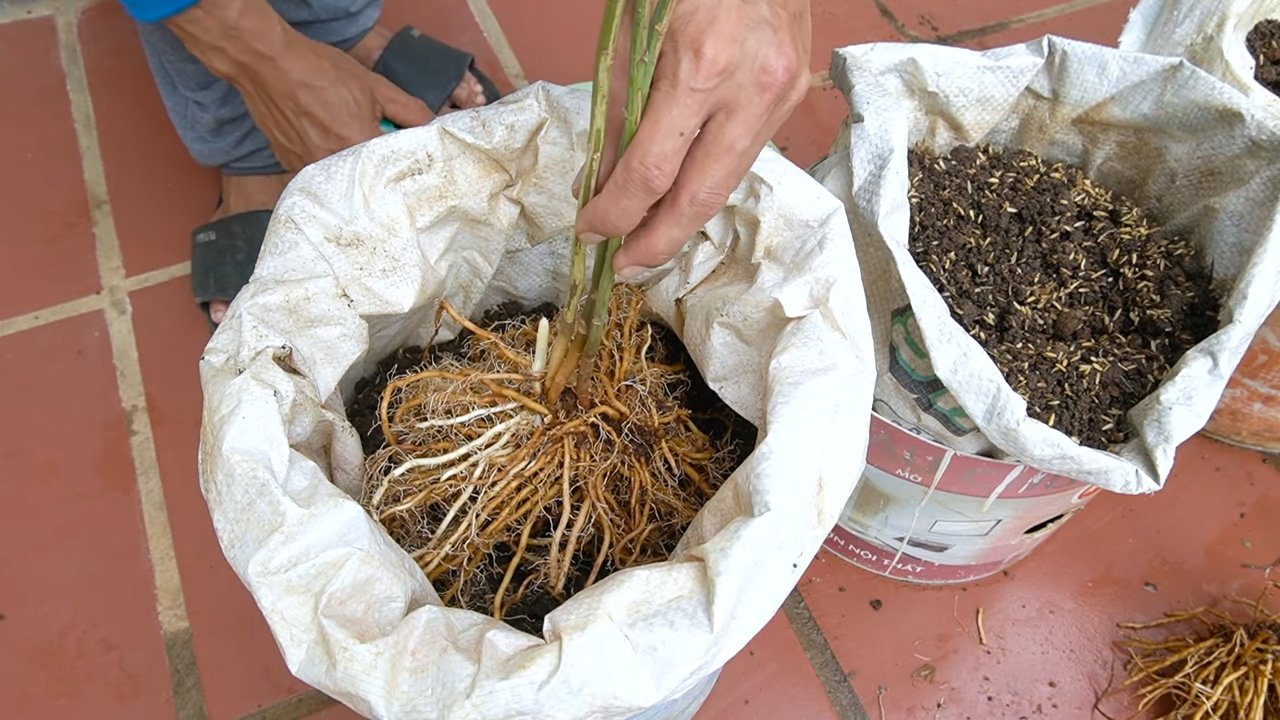
1. Die richtigen Spargelpflanzen auswählen: Achtet darauf, dass ihr gesunde, kräftige Spargelpflanzen kauft. Am besten sind 1-2 Jahre alte Pflanzen, da diese schon etwas robuster sind. Fragt im Gartencenter nach Sorten, die sich gut für den Anbau im Topf eignen. Ich habe mich für die Sorte ‘Gijnlim’ entschieden, da sie früh reift und hohe Erträge liefert.
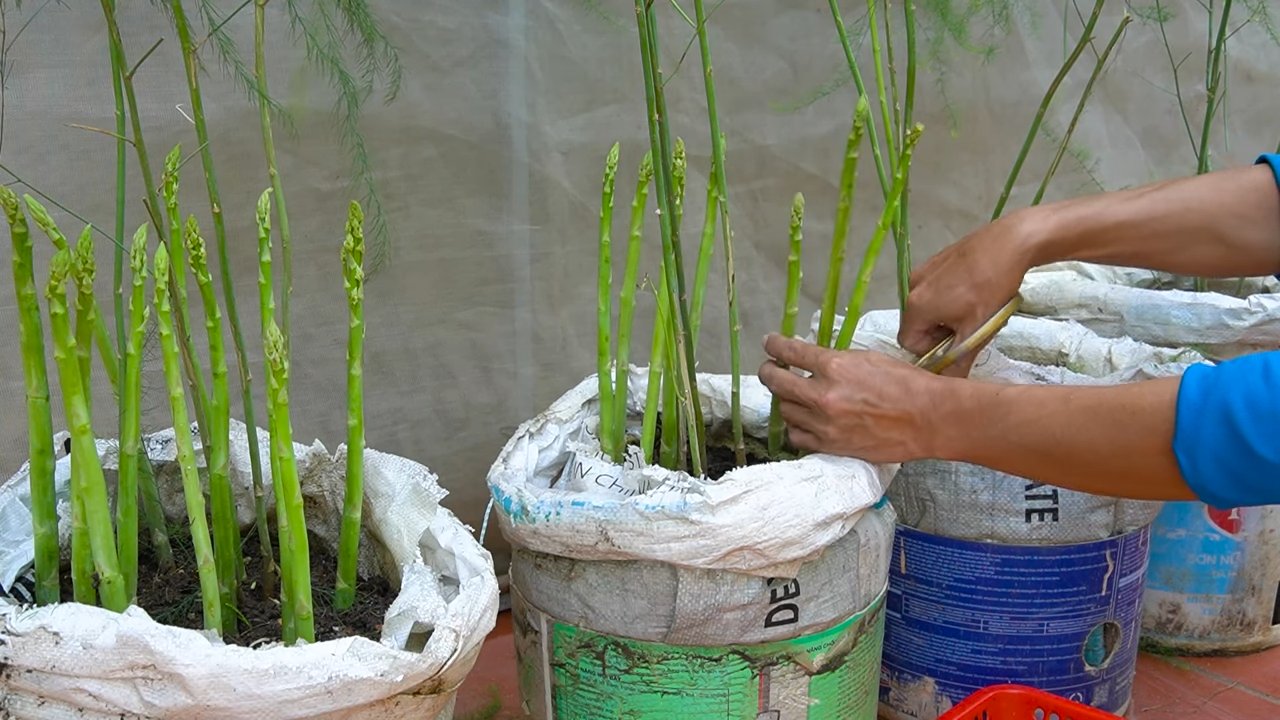
2. Die passenden Pflanzgefäße besorgen: Spargel braucht Platz! Wählt große Pflanzgefäße mit einem Durchmesser und einer Tiefe von mindestens 40 cm. Achtet darauf, dass die Gefäße Abzugslöcher haben, damit überschüssiges Wasser ablaufen kann.
3. Die perfekte Erde mischen: Spargel liebt lockere, gut durchlässige Erde. Ich mische meine Blumenerde immer mit Kompost und Sand, um die Drainage zu verbessern und die Pflanzen mit Nährstoffen zu versorgen. Das Mischungsverhältnis ist ungefähr 2 Teile Blumenerde, 1 Teil Kompost und 1 Teil Sand.
Das Einpflanzen: Der Start in ein langes Spargelleben
Jetzt geht es ans Eingemachte! Das Einpflanzen ist ein wichtiger Schritt, der darüber entscheidet, wie gut unsere Spargelpflanzen anwachsen.
1. Die Pflanzgefäße vorbereiten: Füllt die Pflanzgefäße mit der vorbereiteten Erde. Lasst oben einen Rand von etwa 5 cm frei.
2. Die Spargelpflanzen einsetzen: Macht in der Mitte des Pflanzgefäßes ein Loch, das groß genug ist, um die Wurzeln der Spargelpflanze aufzunehmen. Setzt die Pflanze so ein, dass die Triebspitzen etwa 5 cm unter der Erdoberfläche liegen.
3. Die Erde auffüllen und andrücken: Füllt das Loch mit Erde auf und drückt sie leicht an. Gießt die Pflanzen anschließend gründlich.
4. Mulchen: Bedeckt die Erde mit einer Schicht Mulch (z.B. Stroh oder Holzhackschnitzel). Das schützt die Erde vor dem Austrocknen und hält Unkraut fern.
Die Pflege: Damit der Spargel prächtig gedeiht
Spargel ist zwar relativ pflegeleicht, aber ein paar Dinge sollten wir beachten, damit er prächtig gedeiht und uns eine lange Ernte beschert.
1. Gießen: Gießt die Spargelpflanzen regelmäßig, besonders in trockenen Perioden. Die Erde sollte immer leicht feucht sein, aber nicht nass. Vermeidet Staunässe, da diese zu Wurzelfäule führen kann.
2. Düngen: Spargel ist ein Starkzehrer und braucht regelmäßig Nährstoffe. Düngt die Pflanzen während der Wachstumsperiode (Frühling und Sommer) alle 2-3 Wochen mit einem organischen Dünger oder Komposttee.
3. Unkraut entfernen: Haltet die Pflanzgefäße unkrautfrei. Unkraut konkurriert mit dem Spargel um Nährstoffe und Wasser.
4. Schädlinge und Krankheiten: Achtet auf Schädlinge und Krankheiten. Spargel kann von Spargelkäfern oder Pilzkrankheiten befallen werden. Bei Befall solltet ihr schnell handeln und die Schädlinge bekämpfen oder die befallenen Pflanzenteile entfernen.
Der Trick für die lange Ernte: Die gestaffelte Anzucht
Hier kommt der Clou, mit dem wir die Spargelsaison verlängern können: die gestaffelte Anzucht.
1. Teilt eure Spargelpflanzen auf: Teilt eure Spargelpflanzen in zwei Gruppen. Eine Gruppe bleibt draußen im Garten oder auf dem Balkon, die andere Gruppe kommt ins Gewächshaus oder in einen hellen, kühlen Raum.
2. Die erste Gruppe: Der Frühjahrsspargel: Die Pflanzen, die draußen bleiben, werden wie gewohnt behandelt. Sie treiben im Frühjahr aus und liefern uns den ersten Spargel.
3. Die zweite Gruppe: Der Herbst- und Winterspargel: Die Pflanzen im Gewächshaus oder im kühlen Raum werden etwas anders behandelt.
* Im Sommer: Lasst die Pflanzen im Gewächshaus oder im kühlen Raum normal wachsen. Gießt und düngt sie regelmäßig.
* Im Herbst: Reduziert das Gießen und Düngen. Die Pflanzen sollen langsam in die Ruhephase übergehen.
* Im Winter: Stellt die Pflanzen an einen kühlen, dunklen Ort (z.B. in den Keller). Gießt sie nur noch sehr wenig, damit die Erde nicht austrocknet.
* Im späten Winter/frühen Frühling: Holt die Pflanzen wieder ins Gewächshaus oder in den hellen, kühlen Raum. Gießt sie wieder regelmäßig und düngt sie leicht. Die Pflanzen werden nun wieder austreiben und uns im Herbst und Winter frischen Spargel liefern.
Die Ernte: Der Lohn für unsere Mühe
Endlich ist es soweit! Wir können unseren selbst angebauten Spargel ernten.
1. Das richtige Erntealter: Erntet den Spargel, wenn er etwa 20-25 cm lang ist.
2. Die richtige Erntetechnik: Stecht den Spargel mit einem speziellen Spargelstecher oder einem scharfen Messer etwa 2-3 cm unter der Erdoberfläche ab. Achtet darauf, die anderen Spargeltriebe nicht zu beschädigen.
3. Die Erntezeit: Die Erntezeit für den Frühjahrsspargel ist normalerweise von April bis Juni. Der Herbst- und Winterspargel kann von September bis Dezember geerntet werden.
4. Die Ruhephase: Lasst den Spargelpflanzen nach der Ernte eine Ruhephase von etwa 2-3 Monaten. In dieser Zeit können sie sich erholen und neue Kraft tanken.
Zusätzliche Tipps für eine erfolgreiche Spargelernte
* Sortenwahl: Informiert euch über verschiedene Spargelsorten und wählt die Sorten aus, die am besten zu euren Bedingungen passen. Es gibt Sorten, die besonders früh reifen, Sorten, die besonders ertragreich sind, und Sorten, die besonders resistent gegen Krankheiten sind.
* Bodenanalyse: Lasst eine Bodenanalyse durchführen, um den pH-Wert und den Nährstoffgehalt eures Bodens zu bestimmen. Spargel bevorzugt einen leicht sauren Boden mit einem pH-Wert von 6,0 bis 6,5.
* Pflanzabstand: Achtet auf den richtigen Pflanzabstand. Spargelpflanzen brauchen Platz, um sich zu entwickeln. Der Abstand zwischen den Pflanzen sollte mindestens 30 cm betragen.
* Winterschutz: Schützt die Spargelpflanzen im Winter vor Frost. Bedeckt die Erde mit einer dicken Schicht Mulch oder stellt die Pflanzgefäße an einen geschützten Ort.
* Regelmäßige Kontrolle: Kontrolliert die Spargelpflanzen regelmäßig auf Schädlinge und Krankheiten. Je früher ihr einen Befall erkennt, desto besser könnt ihr ihn bekämpfen.
* Geduld: Spargel braucht Zeit, um zu wachsen und zu gedeihen. Habt Geduld und gebt den Pflanzen die Zeit, die sie brauchen.
Fazit: Spargel das ganze
Conclusion
So, there you have it! Growing asparagus year-round might seem like a feat reserved for seasoned gardeners, but with this simple DIY trick, you can enjoy fresh, tender spears regardless of the season. This method isn’t just about extending your harvest; it’s about taking control of your food source, reducing your reliance on commercially grown produce, and experiencing the immense satisfaction of nurturing your own food from sprout to table.
Why is this a must-try? Because it’s accessible, cost-effective, and yields delicious results. Forget expensive greenhouses or complicated setups. This technique utilizes readily available materials and leverages the natural resilience of asparagus to provide a continuous supply of this nutritional powerhouse. Imagine adding freshly harvested asparagus to your winter omelets, spring salads, summer barbecues, and autumn soups – all thanks to your own ingenuity.
But don’t stop there! Experiment with different varieties of asparagus to discover your favorites. ‘Jersey Knight’ is known for its high yields, while ‘Purple Passion’ offers a unique color and slightly sweeter flavor. You can also adjust the size of your containers to suit your space and needs. For smaller spaces, try using smaller pots and focusing on a more compact harvest. For larger spaces, consider raised beds or larger containers to maximize your yield.
Consider companion planting within your indoor asparagus garden. Herbs like basil and parsley can deter pests and enhance the flavor of your asparagus. Marigolds are also excellent companions, adding a splash of color and further deterring unwanted insects.
The key to success lies in consistent care and attention. Regularly monitor the moisture levels of the soil, ensuring it remains consistently moist but not waterlogged. Provide adequate light, supplementing with grow lights if necessary, especially during the darker winter months. And don’t forget to fertilize regularly with a balanced fertilizer to provide your asparagus with the nutrients it needs to thrive.
We wholeheartedly encourage you to try this DIY trick for **growing asparagus year-round**. It’s a rewarding experience that will transform your relationship with food and connect you with the natural world in a profound way. Once you’ve given it a go, we’d love to hear about your experience! Share your photos, tips, and challenges in the comments below. Let’s build a community of year-round asparagus growers and inspire others to embrace the joys of homegrown food. Your insights could be invaluable to someone just starting out, and together, we can unlock the secrets to a bountiful and sustainable harvest. So, grab your seeds, prepare your containers, and get ready to enjoy the taste of fresh asparagus all year long!
Frequently Asked Questions (FAQ)
What type of asparagus is best for year-round growing?
While most asparagus varieties can be grown year-round using this method, some are better suited than others. ‘Jersey Knight’ is a popular choice due to its high yields and disease resistance. ‘Millennium’ is another excellent option, known for its cold hardiness and adaptability. ‘Purple Passion’ offers a unique flavor and color, but it may require slightly more attention. Ultimately, the best variety for you will depend on your personal preferences and growing conditions. Consider researching different varieties and selecting one that is well-suited to your climate and growing space.
How much light does indoor asparagus need?
Asparagus requires a significant amount of light to thrive, ideally 6-8 hours of direct sunlight per day. If you don’t have a sunny window that provides sufficient light, you’ll need to supplement with grow lights. LED grow lights are a great option as they are energy-efficient and provide the full spectrum of light that plants need. Position the grow lights close to the plants, but not so close that they burn the leaves. Adjust the height of the lights as the plants grow to ensure they are receiving adequate light.
What kind of soil should I use for growing asparagus in containers?
Asparagus prefers well-draining soil that is rich in organic matter. A good mix would be equal parts potting soil, compost, and perlite or vermiculite. The potting soil provides a base for the plants to grow in, the compost adds nutrients and improves drainage, and the perlite or vermiculite helps to aerate the soil and prevent it from becoming compacted. Avoid using garden soil, as it can be too heavy and may contain pests or diseases.
How often should I water my indoor asparagus plants?
Water your asparagus plants regularly, keeping the soil consistently moist but not waterlogged. Check the soil moisture by sticking your finger into the soil about an inch deep. If the soil feels dry, it’s time to water. Water deeply, allowing the water to drain out of the bottom of the container. Avoid overwatering, as this can lead to root rot. During the winter months, when the plants are not actively growing, you may need to water less frequently.
How do I fertilize my indoor asparagus plants?
Asparagus plants are heavy feeders and require regular fertilization to thrive. Use a balanced fertilizer with an NPK ratio of 10-10-10 or 20-20-20. Fertilize every 2-3 weeks during the growing season, following the instructions on the fertilizer label. You can also amend the soil with compost or other organic matter to provide a slow-release source of nutrients.
How long does it take to harvest asparagus after planting?
It typically takes 2-3 years to harvest asparagus spears after planting crowns (dormant roots). If you start from seed, it may take even longer. During the first year, allow the plants to establish themselves and develop a strong root system. In the second year, you can harvest a few spears, but be careful not to overharvest. In the third year and beyond, you can harvest more heavily.
How do I know when to harvest asparagus spears?
Harvest asparagus spears when they are about 6-8 inches tall and the tips are still tightly closed. Use a sharp knife to cut the spears at ground level. Avoid harvesting spears that are too thin or too thick, as they may be tough or bitter.
How do I overwinter my indoor asparagus plants?
Asparagus plants need a period of dormancy to rest and rejuvenate. In the fall, after the foliage has turned yellow and died back, cut the plants back to ground level. Move the containers to a cool, dark place, such as a basement or garage. Water sparingly during the winter months, just enough to keep the soil from completely drying out. In the spring, when new growth appears, move the containers back to a sunny location and resume regular watering and fertilizing.
Can I grow asparagus from seed indoors?
Yes, you can grow asparagus from seed indoors, but it will take longer to harvest spears compared to starting with crowns. Start the seeds indoors 12-14 weeks before the last expected frost. Sow the seeds in small pots filled with well-draining potting mix. Keep the soil moist and warm, and provide plenty of light. Once the seedlings are large enough to handle, transplant them into larger containers.
What are some common pests and diseases that affect asparagus?
Some common pests that affect asparagus include asparagus beetles, aphids, and spider mites. Diseases that can affect asparagus include rust, fusarium crown and root rot, and purple spot. Regularly inspect your plants for signs of pests or diseases. If you find any, take action immediately to control them. You can use insecticidal soap or neem oil to control pests, and fungicides to control diseases. Good sanitation practices, such as removing dead foliage and weeds, can also help to prevent pests and diseases.

Leave a Comment