

Grow Bok Choy at Home and unlock the secrets to fresh, delicious greens right outside your door! Have you ever dreamt of snipping vibrant, crisp bok choy leaves just minutes before adding them to your stir-fry? Well, dream no more! This DIY guide will empower you to cultivate your own thriving bok choy patch, regardless of your gardening experience.
Bok choy, also known as pak choi, boasts a rich history deeply rooted in Chinese cuisine and culture. For centuries, it has been a staple ingredient, prized for its nutritional value and versatility. From steaming and stir-frying to adding it to soups and salads, bok choy’s mild, slightly sweet flavor enhances countless dishes. But beyond its culinary appeal, growing your own bok choy offers a unique connection to this ancient vegetable.
Why should you embark on this bok choy-growing adventure? In today’s world, knowing where your food comes from is more important than ever. By learning to grow bok choy at home, you gain control over the quality and freshness of your produce, avoiding potentially harmful pesticides and supporting sustainable practices. Plus, there’s nothing quite like the satisfaction of harvesting your own homegrown vegetables. So, let’s dive in and discover the simple yet effective DIY tricks that will transform your garden into a bok choy haven!
Grow Your Own Delicious Bok Choy at Home: A Beginner’s Guide
Hey there, fellow gardening enthusiasts! I’m so excited to share my experience with growing bok choy at home. It’s surprisingly easy, even if you’re a complete newbie like I was not too long ago. Bok choy, also known as pak choi, is a type of Chinese cabbage that’s packed with nutrients and adds a delightful crunch to stir-fries, soups, and salads. Plus, it grows relatively quickly, so you’ll be enjoying your homegrown harvest in no time!
Why Grow Bok Choy Yourself?
Before we dive into the how-to, let’s talk about why you should even bother growing your own bok choy.
* Freshness and Flavor: Nothing beats the taste of freshly picked bok choy. It’s so much more vibrant and flavorful than what you find at the grocery store.
* Cost-Effective: Growing your own veggies can save you money in the long run, especially if you eat bok choy regularly.
* Organic and Healthy: You control what goes into your bok choy, so you can avoid harmful pesticides and fertilizers.
* Therapeutic: Gardening is a fantastic way to relieve stress and connect with nature. Trust me, it’s incredibly rewarding to watch your little seedlings grow into healthy plants.
* It’s Easy!: Bok choy is a very forgiving plant.
Choosing the Right Bok Choy Variety
There are several varieties of bok choy to choose from, each with its own unique characteristics. Here are a few popular options:
* Shanghai Green: This variety has light green stems and spoon-shaped leaves. It’s known for its mild flavor and tender texture.
* Joi Choi: Joi Choi is a larger variety with dark green leaves and thick, white stalks. It’s more heat-tolerant than some other varieties.
* Mei Qing Choi: This is a dwarf variety that’s perfect for small gardens or containers. It has light green leaves and a delicate flavor.
* Purple Lady: For a bit of visual interest, try Purple Lady bok choy. It has beautiful purple leaves that add a pop of color to your garden.
I personally love Shanghai Green because of its mild flavor and quick growth, but feel free to experiment and find your favorite!
Getting Started: What You’ll Need
Before you start planting, gather the following supplies:
* Bok Choy Seeds: Choose a variety that suits your climate and preferences.
* Potting Soil (if growing in containers): Use a well-draining potting mix that’s rich in organic matter.
* Garden Soil (if growing in the ground): Amend your garden soil with compost or other organic matter to improve drainage and fertility.
* Containers (optional): If you’re growing in containers, choose pots that are at least 6 inches deep and wide.
* Watering Can or Hose: You’ll need to water your bok choy regularly.
* Fertilizer (optional): A balanced fertilizer can help your bok choy grow strong and healthy.
* Gardening Gloves: Protect your hands from dirt and potential irritants.
* Trowel or Small Shovel: For planting seeds and transplanting seedlings.
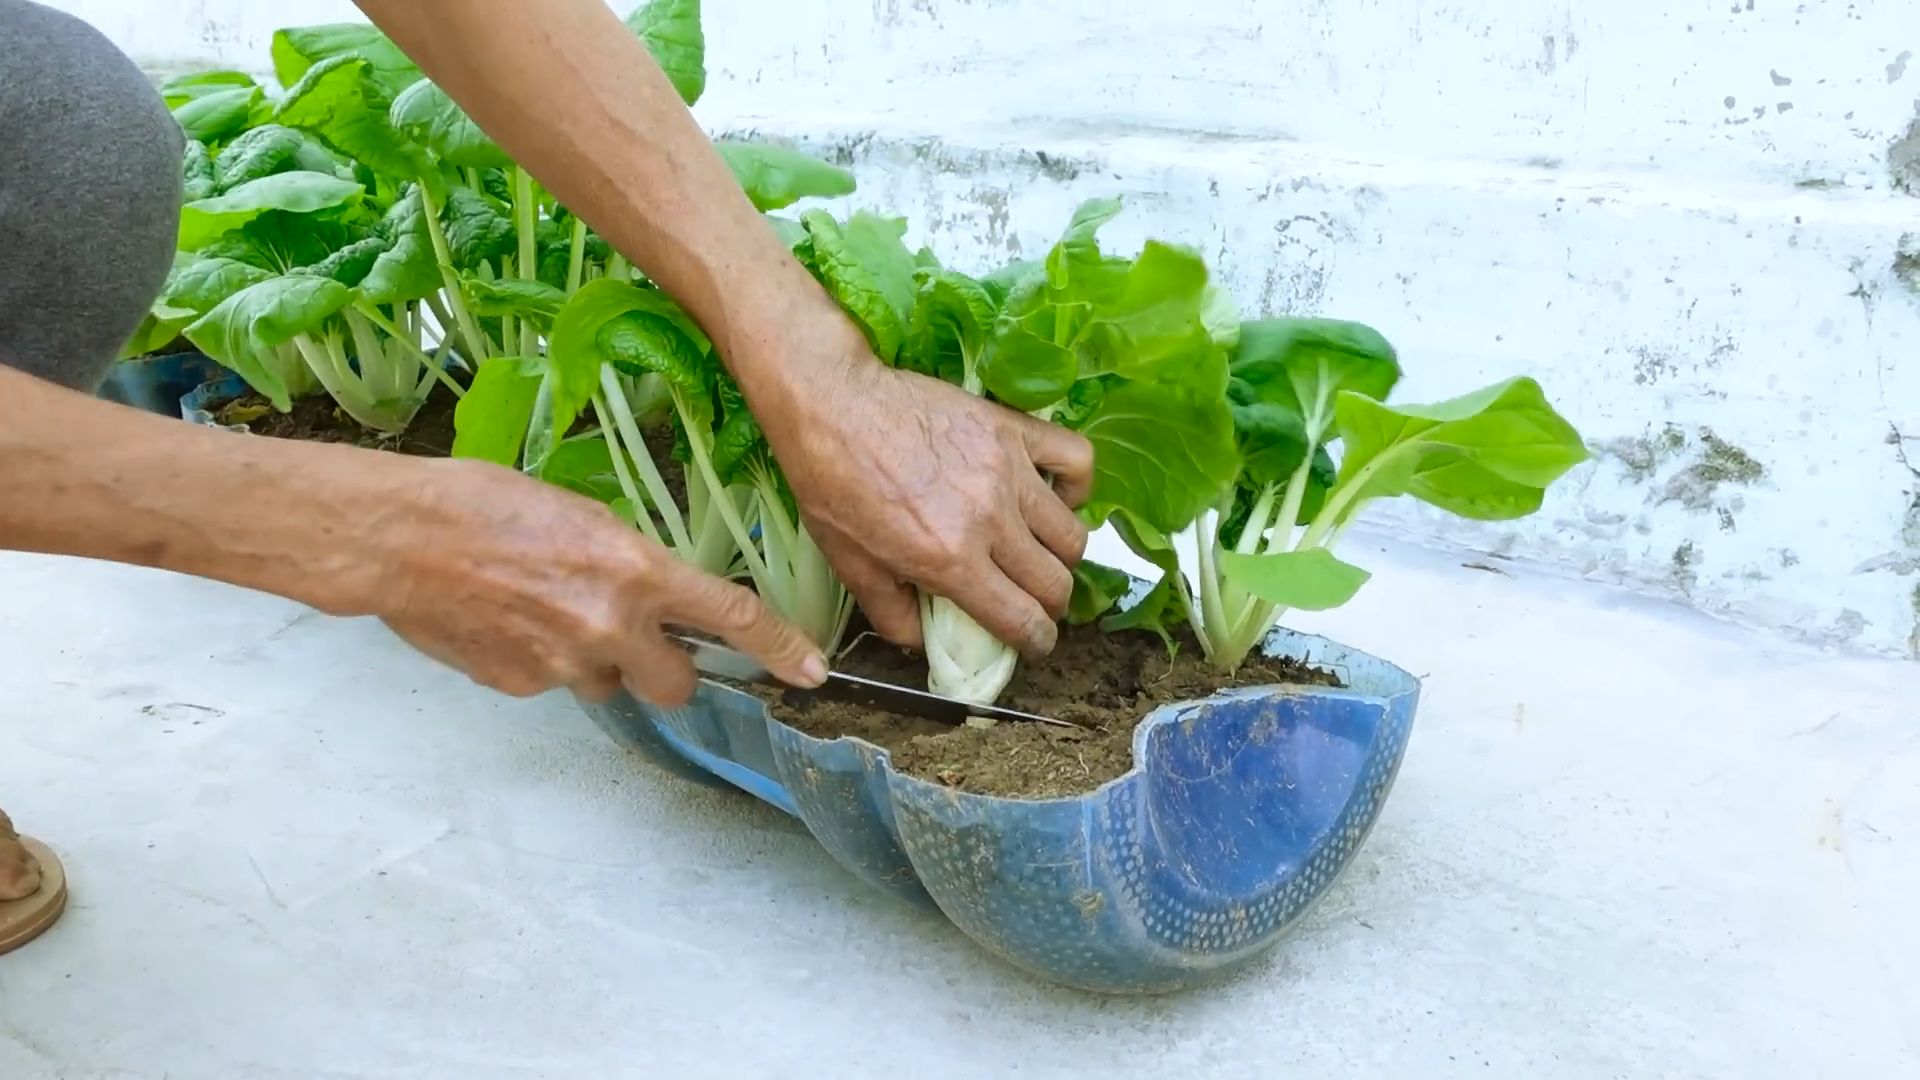
Planting Bok Choy: Step-by-Step Instructions
You can start bok choy seeds indoors or directly sow them in your garden. I prefer direct sowing because it’s less work, but starting indoors can give you a head start, especially if you live in a colder climate.
Direct Sowing (My Preferred Method)
1. Prepare the Soil: Choose a spot in your garden that gets at least 4-6 hours of sunlight per day. Loosen the soil with a trowel or shovel and remove any rocks or debris. Amend the soil with compost or other organic matter to improve drainage and fertility.
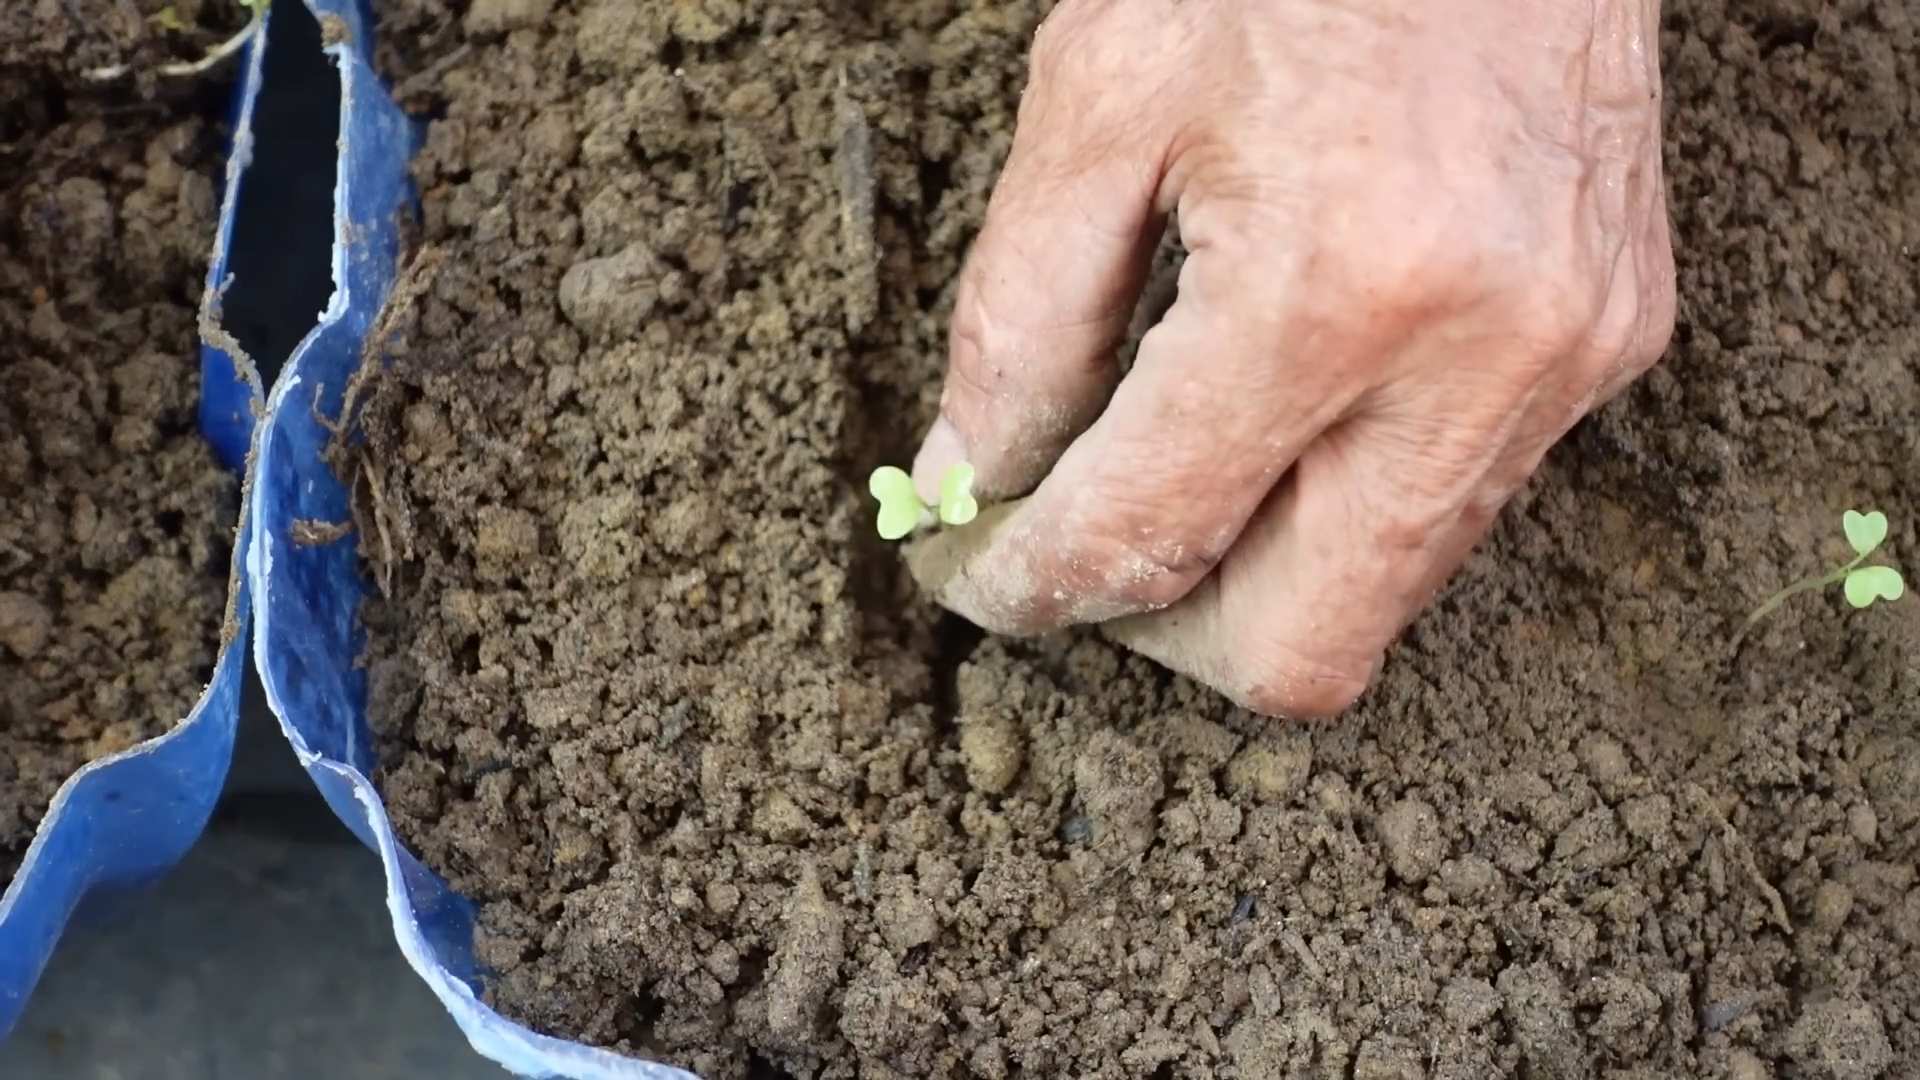
2. Sow the Seeds: Sow the seeds about 1/4 inch deep and 1-2 inches apart. Gently cover the seeds with soil and water them thoroughly.
3. Thin the Seedlings: Once the seedlings emerge (usually within 5-7 days), thin them to about 6-8 inches apart. This will give them enough room to grow and prevent overcrowding. I know it feels cruel to pull out the little guys, but it’s necessary!
4. Water Regularly: Keep the soil consistently moist, but not waterlogged. Water deeply whenever the top inch of soil feels dry.
5. Fertilize (Optional): If you want to give your bok choy a boost, you can fertilize it with a balanced fertilizer every 2-3 weeks. Follow the instructions on the fertilizer package.
Starting Seeds Indoors
1. Sow Seeds in Seed Trays or Small Pots: Fill seed trays or small pots with a seed-starting mix. Sow the seeds about 1/4 inch deep and gently cover them with soil.
2. Water and Provide Light: Water the seeds thoroughly and place the trays or pots in a warm, sunny location or under grow lights.
3. Transplant Seedlings: Once the seedlings have developed a few sets of true leaves (usually after 3-4 weeks), you can transplant them into your garden. Harden off the seedlings by gradually exposing them to outdoor conditions for a week before transplanting.
4. Plant Seedlings in the Garden: Dig holes that are slightly larger than the root balls of the seedlings. Gently remove the seedlings from their containers and place them in the holes. Backfill with soil and water thoroughly. Space the seedlings about 6-8 inches apart.
Caring for Your Bok Choy: Tips and Tricks
Once your bok choy is planted, it’s important to provide it with the right care to ensure a healthy and abundant harvest.
* Watering: Bok choy needs consistent moisture to thrive. Water deeply whenever the top inch of soil feels dry. Avoid overwatering, as this can lead to root rot.
* Fertilizing: Bok choy is a heavy feeder, so it benefits from regular fertilization. Use a balanced fertilizer or a fertilizer specifically formulated for leafy greens.
* Weeding: Keep your garden free of weeds, as they can compete with your bok choy for nutrients and water.
* Pest Control: Bok choy can be susceptible to pests such as aphids, cabbage worms, and flea beetles. Inspect your plants regularly and take action if you notice any signs of infestation. You can use organic pest control methods such as insecticidal soap or neem oil. I’ve found that companion planting with marigolds helps deter some pests.
* Bolting: Bolting is when a plant prematurely flowers and goes to seed. This can happen when bok choy is exposed to hot weather or stress. To prevent bolting, try to plant your bok choy in a location that gets some afternoon shade and keep the soil consistently moist. If your bok choy does start to bolt, you can still harvest the leaves, but they may be a bit more bitter.
Harvesting Your Bok Choy: When and How
Bok choy is typically ready to harvest in about 45-60 days after planting. You can harvest the entire plant at once or harvest individual leaves as needed.
* Harvesting the Entire Plant: To harvest the entire plant, simply cut it off at the base with a sharp knife.
* Harvesting Individual Leaves: To harvest individual leaves, start with the outer leaves and work your way towards the center. This will allow the plant to continue growing and producing new leaves.
I usually harvest individual leaves because I like to have fresh bok choy on hand for stir-fries and salads.
Storing Your Bok Choy: Keeping it Fresh
Bok choy is best eaten fresh, but you can store it in the refrigerator for up to a week.
* Wrap in Damp Paper Towels: Wrap the bok choy in damp paper towels and store it in a plastic bag in the refrigerator.
* Don’t Wash Until Ready to Use: Avoid washing the bok choy until you’re ready to use it, as this can cause it to spoil more quickly.
Troubleshooting: Common Problems and Solutions
Even with the best care, you may encounter some problems when growing bok choy. Here are a few common issues and how to address them:
* Yellowing Leaves: Yellowing leaves can be a sign of nutrient deficiency, overwatering, or underwatering. Check the soil moisture and fertilize if necessary.
* Holes in Leaves: Holes in leaves are often caused by pests such as cabbage worms or flea beetles. Inspect your plants regularly and take action if you notice any signs of infestation.
* Bolting: As mentioned earlier, bolting can happen when bok choy is exposed to hot weather or stress. Try to plant your bok choy in a location that gets some afternoon shade and keep the soil consistently moist.
* Root Rot:
Conclusion
So, there you have it! Growing your own bok choy at home is not only surprisingly simple, but it’s also incredibly rewarding. Forget those wilted, overpriced heads at the grocery store. Imagine stepping out into your garden or onto your balcony and harvesting crisp, vibrant bok choy whenever you need it. The flavor is unmatched – a fresh, slightly peppery bite that elevates any stir-fry, soup, or salad.
This DIY trick is a must-try for several reasons. First, it puts you in control. You know exactly what’s going into your food, avoiding potentially harmful pesticides and ensuring the highest quality produce for you and your family. Second, it’s a fantastic way to reduce your carbon footprint. By growing your own food, you’re cutting down on transportation costs and supporting a more sustainable lifestyle. Third, it’s a budget-friendly option. Once you’ve invested in the initial supplies (which are minimal), you’ll be enjoying fresh bok choy for weeks, even months, to come. Finally, and perhaps most importantly, it’s a deeply satisfying experience. There’s something truly special about nurturing a plant from seed to harvest and then enjoying the fruits (or, in this case, the leaves) of your labor.
But don’t stop there! Experiment with different varieties of bok choy. Try growing baby bok choy for a more delicate flavor and texture, or opt for a red-stemmed variety for a pop of color in your garden and on your plate. You can also adjust the growing conditions to suit your specific climate. If you live in a particularly hot area, provide some afternoon shade to prevent bolting. If you’re in a cooler region, consider starting your seeds indoors to get a head start on the growing season.
Consider companion planting your bok choy with other vegetables and herbs. Marigolds can help deter pests, while dill and chamomile can attract beneficial insects. This not only protects your bok choy but also creates a thriving and diverse ecosystem in your garden.
Don’t be afraid to get creative with your bok choy harvest! Beyond stir-fries and soups, try grilling it for a smoky flavor, adding it to smoothies for a nutrient boost, or even fermenting it for a probiotic-rich side dish. The possibilities are endless!
We wholeheartedly encourage you to give this DIY trick a try. It’s easier than you think, and the rewards are well worth the effort. Once you’ve experienced the joy of growing your own bok choy, you’ll never look at store-bought produce the same way again.
So, grab some seeds, get your hands dirty, and prepare to be amazed. And most importantly, don’t forget to share your experience with us! We’d love to hear about your successes, your challenges, and your favorite ways to enjoy your homegrown bok choy. Share your photos and tips in the comments below – let’s build a community of bok choy enthusiasts! Let us know what you think about growing bok choy at home.
FAQ
What is the best time of year to plant bok choy?
Bok choy is a cool-season crop, which means it thrives in cooler temperatures and shorter days. The best time to plant bok choy is in early spring or late summer/early fall. Avoid planting during the hottest months of summer, as high temperatures can cause the plants to bolt (go to seed prematurely), resulting in bitter-tasting leaves. For a spring crop, start seeds indoors 4-6 weeks before the last expected frost, or direct sow outdoors as soon as the soil can be worked. For a fall crop, sow seeds directly into the garden in late summer or early fall, about 6-8 weeks before the first expected frost.
How much sunlight does bok choy need?
Bok choy needs at least 4-6 hours of sunlight per day to grow well. However, in hotter climates, providing some afternoon shade can help prevent bolting. If you’re growing bok choy indoors, use grow lights to supplement natural sunlight and ensure the plants receive adequate light.
What kind of soil is best for growing bok choy?
Bok choy prefers well-drained, fertile soil that is rich in organic matter. Amend your soil with compost or well-rotted manure before planting to improve drainage and fertility. The ideal soil pH for bok choy is between 6.0 and 7.5.
How often should I water bok choy?
Bok choy needs consistent moisture to thrive. Water deeply and regularly, especially during dry periods. Aim to keep the soil consistently moist but not waterlogged. Mulching around the plants can help retain moisture and suppress weeds.
What are some common pests and diseases that affect bok choy?
Common pests that can affect bok choy include aphids, cabbage worms, flea beetles, and slugs. To control these pests, you can use organic methods such as hand-picking, insecticidal soap, or diatomaceous earth. Diseases that can affect bok choy include downy mildew, clubroot, and black rot. To prevent these diseases, practice good garden hygiene, such as removing infected plant debris and rotating crops. Ensure good air circulation around the plants to reduce humidity and prevent fungal diseases.
How do I harvest bok choy?
You can harvest bok choy at any stage of growth, depending on your preference. For baby bok choy, harvest when the leaves are about 4-6 inches long. For mature bok choy, harvest when the heads are firm and compact. To harvest, simply cut the entire head at the base of the plant with a sharp knife. You can also harvest individual leaves as needed, starting with the outer leaves.
Can I grow bok choy in containers?
Yes, bok choy can be successfully grown in containers. Choose a container that is at least 12 inches deep and wide to allow enough room for the roots to grow. Use a well-draining potting mix and water regularly. Place the container in a location that receives at least 4-6 hours of sunlight per day.
How do I prevent bok choy from bolting?
Bolting is a common problem with bok choy, especially in hot weather. To prevent bolting, choose bolt-resistant varieties, plant in early spring or late summer/early fall, provide some afternoon shade, and water regularly. You can also try using shade cloth to protect the plants from excessive heat.
What are some good companion plants for bok choy?
Good companion plants for bok choy include marigolds, dill, chamomile, garlic, onions, and rosemary. Marigolds help deter pests, while dill and chamomile attract beneficial insects. Garlic and onions can help repel aphids and other pests. Rosemary can help improve the flavor of bok choy.
How long does it take for bok choy to grow?
Bok choy is a relatively fast-growing crop. Baby bok choy can be harvested in as little as 30-40 days, while mature bok choy typically takes 45-60 days to reach harvest. The exact time will depend on the variety, growing conditions, and time of year.
Can I save seeds from my bok choy plants?
Yes, you can save seeds from your bok choy plants, but it requires allowing the plants to bolt and produce seed pods. However, bok choy is an open-pollinated plant, which means that the seeds may not come true to type if cross-pollination occurs with other members of the Brassica family. If you want to save seeds, isolate your bok choy plants from other Brassicas to prevent cross-pollination. Allow the seed pods to dry on the plant, then harvest them and extract the seeds. Store the seeds in a cool, dry place.

Leave a Comment