

Grow chili plants at home and spice up your life! Imagine stepping into your backyard and plucking a fiery red chili straight from the plant, ready to add a kick to your next meal. Sounds amazing, right? For centuries, chili peppers have been more than just a culinary ingredient; they’ve been woven into the cultural fabric of societies worldwide, from ancient Mesoamerica where they were first cultivated, to the vibrant kitchens of Asia and beyond.
But you don’t need to be a seasoned gardener to enjoy the satisfaction of harvesting your own chilies. I understand that the idea of growing your own food can seem daunting, especially if you’re new to gardening. That’s why I’ve put together this collection of easy-to-follow DIY tricks and hacks that will empower you to grow chili plants at home, even if you have limited space or experience.
Why should you bother? Well, store-bought chilies can sometimes lack the freshness and flavor of homegrown varieties. Plus, knowing exactly where your food comes from and how it’s grown is incredibly rewarding. Not only will you save money, but you’ll also have a constant supply of fresh, flavorful chilies at your fingertips. So, let’s dive in and unlock the secrets to a thriving chili garden!
Growing Chili Plants at Home: A Spicy DIY Adventure!
Hey there, fellow spice enthusiasts! Ever dreamt of having a constant supply of fresh, fiery chilies right at your fingertips? Well, you’ve come to the right place! I’m going to walk you through the entire process of growing your own chili plants at home, from seed to harvest. Trust me, it’s incredibly rewarding, and you’ll never have to rely on store-bought chilies again (unless you want to, of course!).
Choosing Your Chili Variety
Before we dive into the nitty-gritty, let’s talk about chili varieties. The world of chilies is vast and exciting, ranging from mild bell peppers to scorching ghost peppers. Think about what kind of heat level you prefer and what you plan to use the chilies for.
Here are a few popular choices to get you started:
- Jalape帽o: A classic, medium-heat chili perfect for salsas, poppers, and pickling.
- Serrano: A bit hotter than jalape帽os, great for adding a kick to sauces and stir-fries.
- Cayenne: These slender red chilies are commonly dried and ground into powder, adding heat to almost any dish.
- Habanero: Proceed with caution! Habaneros are seriously hot and best used sparingly in sauces and marinades.
- Bell Pepper: If you’re not into the heat, bell peppers are a great option for adding color and flavor to your dishes.
Once you’ve decided on your chili variety, you can purchase seeds from a reputable garden center or online retailer. Make sure to choose seeds that are specifically suited for your climate.
Starting Your Chili Seeds Indoors
Starting your chili seeds indoors is crucial, especially if you live in a region with a shorter growing season. This gives your plants a head start and ensures they’re strong enough to thrive when transplanted outdoors.
Here’s what you’ll need:
- Chili seeds
- Seed starting tray or small pots
- Seed starting mix (a light, well-draining soil)
- Spray bottle
- Heat mat (optional, but recommended)
- Grow light (optional, but recommended)
- Clear plastic dome or plastic wrap
Now, let’s get started:
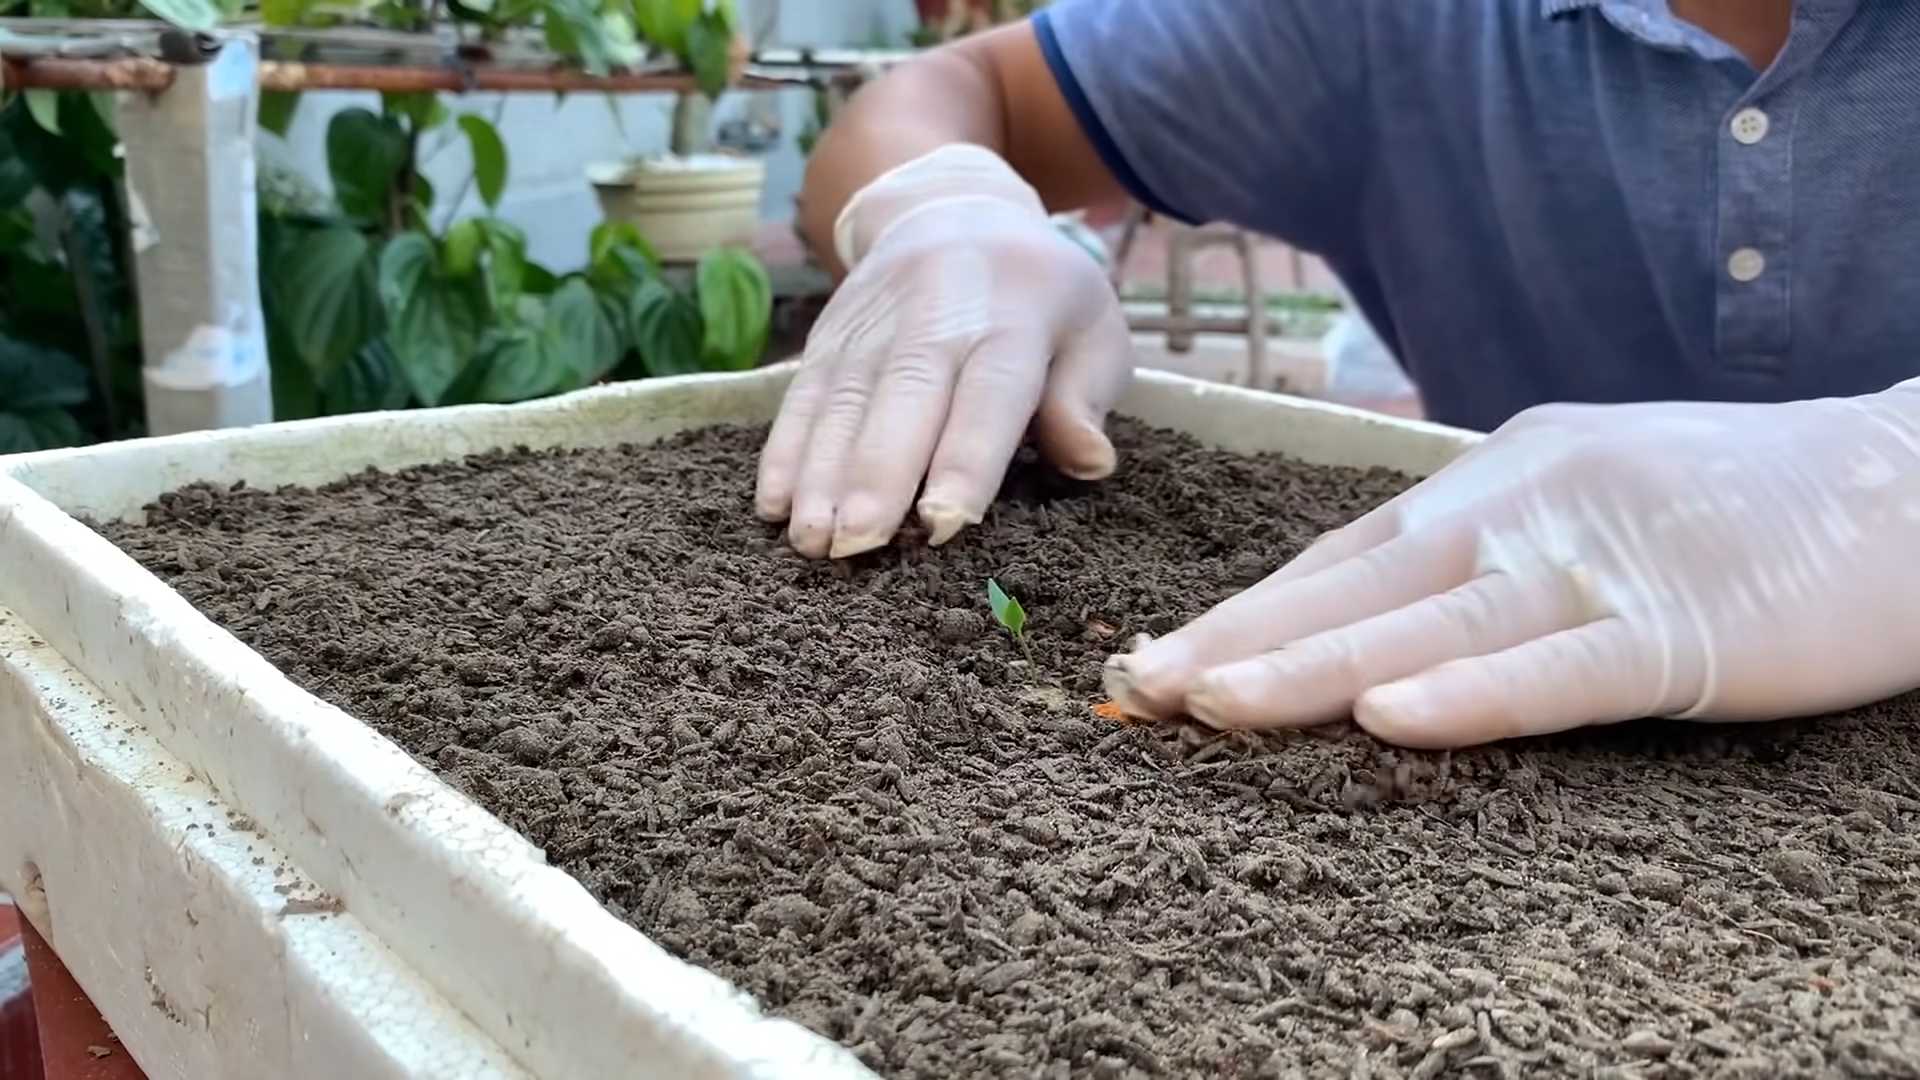
- Prepare your seed starting tray or pots: Fill each cell or pot with seed starting mix, leaving about half an inch of space at the top.
- Sow the seeds: Make a small indentation (about 录 inch deep) in the center of each cell or pot. Place 2-3 seeds in each indentation. This increases the chances of at least one seed germinating.
- Cover the seeds: Gently cover the seeds with seed starting mix.
- Water the seeds: Use a spray bottle to lightly mist the soil. You want to moisten the soil without overwatering it.
- Create a humid environment: Cover the seed starting tray or pots with a clear plastic dome or plastic wrap. This will help retain moisture and create a humid environment, which is essential for germination.
- Provide warmth: Place the seed starting tray or pots on a heat mat. Chili seeds germinate best in warm temperatures (around 75-85掳F). If you don’t have a heat mat, you can place them in a warm spot in your house, such as near a radiator.
- Provide light: Place the seed starting tray or pots under a grow light. If you don’t have a grow light, you can place them near a sunny window, but be sure to rotate them regularly to prevent them from becoming leggy.
- Monitor the moisture: Check the soil moisture daily. If the soil feels dry, mist it with a spray bottle. Be careful not to overwater, as this can lead to fungal diseases.
- Wait for germination: Chili seeds can take anywhere from 7 to 21 days to germinate, depending on the variety and the growing conditions. Be patient!
- Remove the dome or plastic wrap: Once the seeds have germinated, remove the dome or plastic wrap.
Caring for Your Seedlings
Once your chili seeds have germinated, it’s important to provide them with the right care to ensure they grow into strong, healthy plants.
Here’s what you need to do:
- Provide adequate light: Continue to provide your seedlings with plenty of light. If you’re using a grow light, keep it on for 14-16 hours per day. If you’re using natural light, place the seedlings in a sunny window.
- Water regularly: Water your seedlings when the soil feels dry to the touch. Be sure to water them gently to avoid damaging the delicate roots.
- Fertilize: Once your seedlings have developed their first set of true leaves (the leaves that look like miniature versions of the adult leaves), you can start fertilizing them with a diluted liquid fertilizer. Use a fertilizer that is specifically formulated for seedlings.
- Thin the seedlings: If you planted multiple seeds in each cell or pot, you’ll need to thin the seedlings. Choose the strongest seedling in each cell or pot and snip off the others at the soil line.
- Harden off the seedlings: Before transplanting your seedlings outdoors, you’ll need to harden them off. This process gradually acclimates them to the outdoor environment. Start by placing the seedlings outdoors in a sheltered location for a few hours each day. Gradually increase the amount of time they spend outdoors each day, until they can tolerate a full day of sun and wind.
Transplanting Your Chili Plants Outdoors
Once your chili plants are about 6-8 inches tall and the danger of frost has passed, you can transplant them outdoors.
Here’s what you’ll need:
- Your hardened-off chili seedlings
- Gardening gloves
- Trowel or shovel
- Well-draining soil
- Compost or other organic matter
- Watering can or hose
- Mulch (optional)
Follow these steps for successful transplanting:
- Choose a sunny location: Chili plants need at least 6-8 hours of sunlight per day. Choose a location in your garden that receives plenty of sun.
- Prepare the soil: Chili plants prefer well-draining soil that is rich in organic matter. Amend the soil with compost or other organic matter before planting.
- Dig the holes: Dig holes that are slightly larger than the root balls of your chili seedlings. Space the holes about 18-24 inches apart.
- Remove the seedlings from their containers: Gently remove the seedlings from their containers. Be careful not to damage the roots.
- Plant the seedlings: Place the seedlings in the holes and backfill with soil. Gently firm the soil around the base of the plants.
- Water thoroughly: Water the seedlings thoroughly after planting.
- Mulch (optional): Apply a layer of mulch around the base of the plants. Mulch helps to retain moisture, suppress weeds, and regulate soil temperature.
Caring for Your Chili Plants Outdoors
Now that your chili plants are in the ground, it’s time to provide them with the ongoing care they need to thrive.
Here’s what you need to do:
- Water regularly: Water your chili plants when the soil feels dry to the touch. Be sure to water them deeply, so that the water reaches the roots.
- Fertilize: Fertilize your chili plants every 2-3 weeks with a balanced fertilizer.
- Prune: Prune your chili plants to encourage bushier growth and more fruit production. Remove any dead or diseased leaves or branches.
- Support: Some chili varieties, especially those with heavy fruit, may need support. Use stakes or cages to support the plants and prevent them from falling over.
- Pest and disease control: Keep an eye out for pests and diseases. Common pests of chili plants include aphids, spider mites, and whiteflies. Common diseases include fungal diseases and blossom end rot. Treat any pests or diseases promptly to prevent them from spreading.
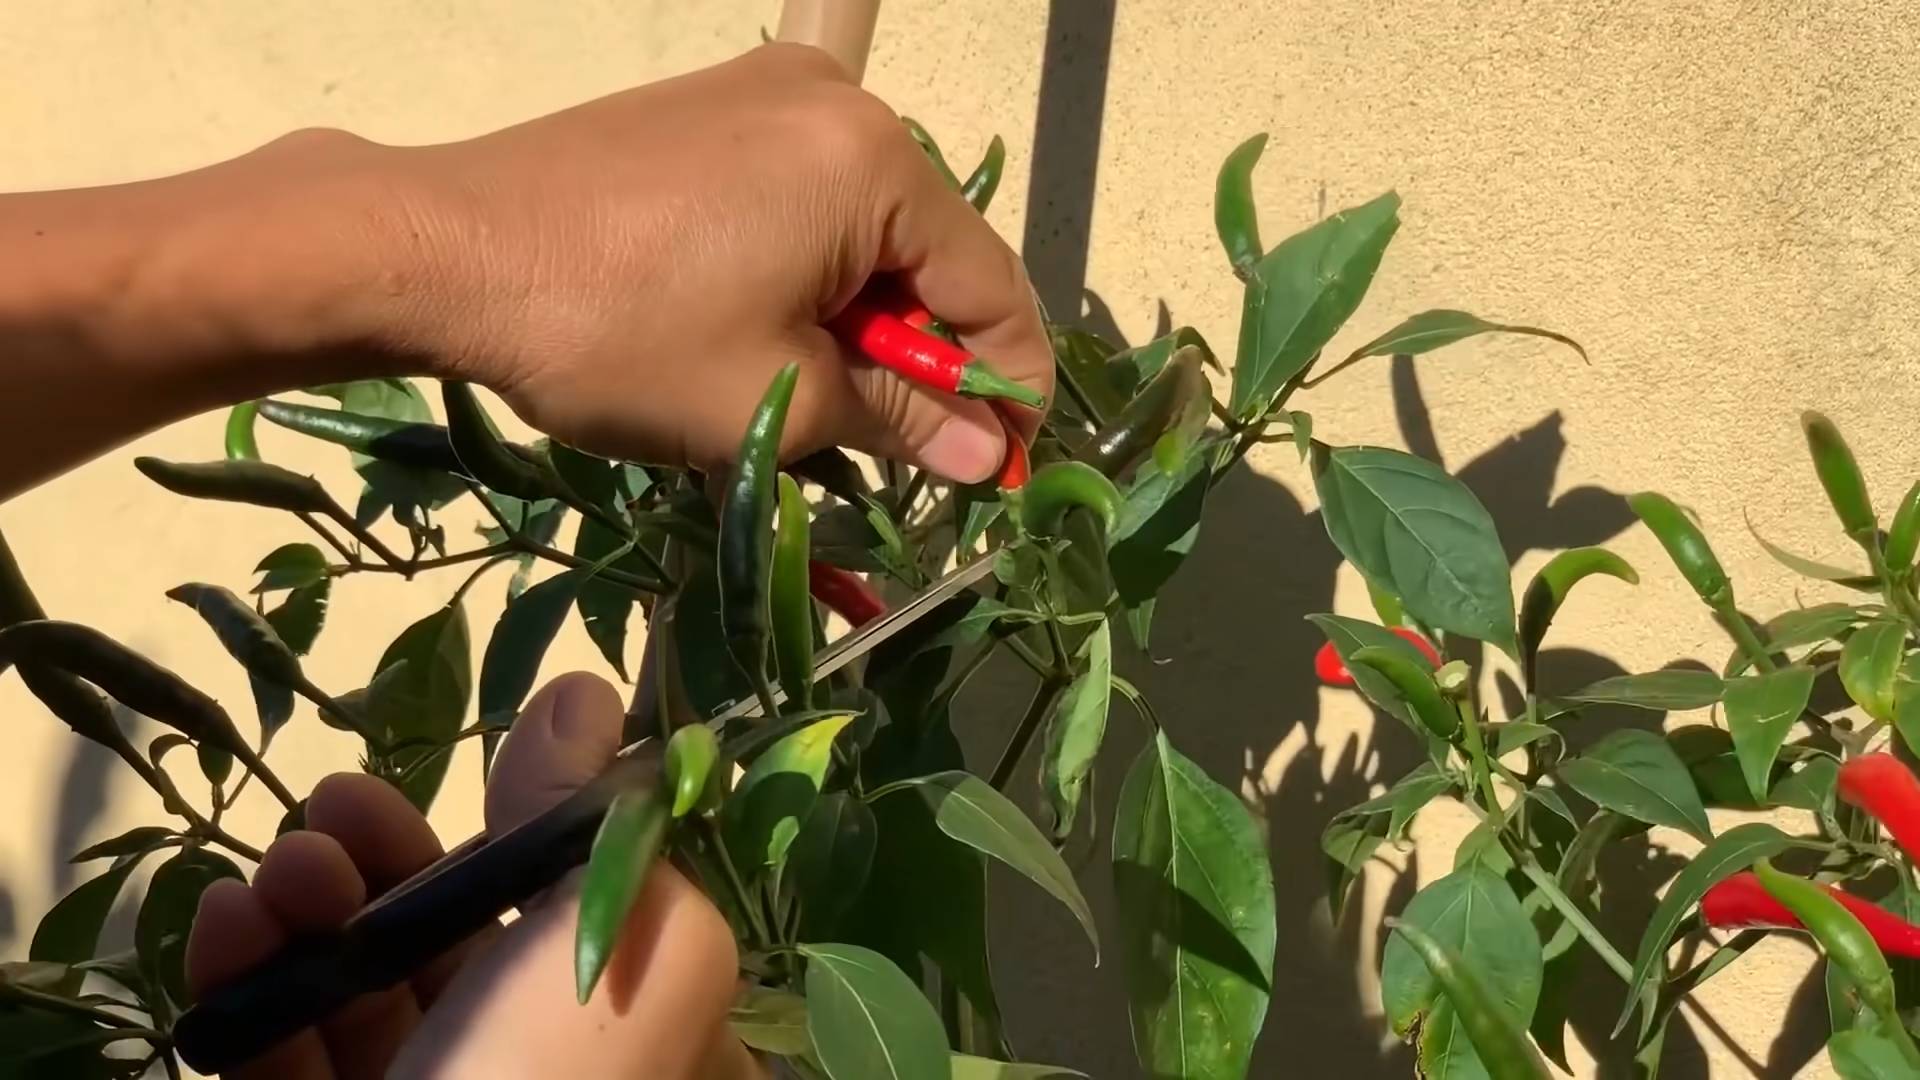
Harvesting Your Chilies
The moment you’ve been waiting for! Harvesting your chilies is the most rewarding part of the process.
Here’s how to do it:
- Harvest when ripe: Chilies are typically ready to harvest when they have reached their mature color and size. The color will vary depending on the variety.
- Use pruning shears or scissors: Use pruning shears or scissors to cut the chilies from the plant. Be careful not to damage the plant.
- Handle with care
Conclusion
So, there you have it! Growing chili plants at home isn’t just a fun hobby; it’s a gateway to fresh, flavorful ingredients right at your fingertips. Forget those bland, store-bought chilies that lack that vibrant kick. With a little patience and these simple steps, you can cultivate a thriving chili garden that will elevate your culinary creations to a whole new level.
This DIY trick is a must-try for several reasons. First and foremost, you gain complete control over the growing process. You know exactly what goes into your plants, ensuring they are free from harmful pesticides and chemicals. Secondly, it’s incredibly rewarding to nurture a plant from seed to harvest, witnessing the miracle of nature unfold before your eyes. And finally, let’s not forget the cost savings! Over time, growing your own chilies can significantly reduce your grocery bill, especially if you’re a chili enthusiast like us.
But the beauty of growing chili plants at home lies in its versatility. Feel free to experiment with different varieties. From the mild and fruity Anaheim to the fiery Scotch Bonnet, the possibilities are endless. Consider growing your chilies in containers if you have limited space, or dedicate a small patch in your garden for a dedicated chili haven. You can even try hydroponics for a more modern and efficient approach.
Don’t be afraid to get creative with your chili plants. Use them to make your own chili oil, hot sauce, or dried chili flakes. Add them to your favorite dishes for an extra layer of flavor and heat. The only limit is your imagination!
We understand that gardening can sometimes seem daunting, but trust us, growing chili plants at home is easier than you think. With a little bit of love and attention, you’ll be harvesting your own chilies in no time.
So, what are you waiting for? Grab some seeds, prepare your soil, and embark on this exciting journey of growing chili plants at home. We’re confident that you’ll be amazed by the results. And most importantly, don’t forget to share your experience with us! We’d love to hear about your successes, challenges, and favorite chili varieties. Tag us in your photos and videos on social media using #HomegrownChilies. Let’s create a community of chili-loving gardeners and inspire others to embrace the joy of growing their own food. Happy gardening!
Frequently Asked Questions (FAQ)
What are the best chili varieties to grow at home?
The best chili varieties to grow at home depend on your personal preference for heat and flavor. For beginners, milder varieties like Anaheim, Poblano, or Jalape帽o are a great starting point. These are relatively easy to grow and offer a good balance of flavor and heat. If you’re looking for something with a bit more kick, consider Serrano or Thai chilies. For experienced chili enthusiasts, the sky’s the limit! Explore hotter varieties like Habanero, Scotch Bonnet, or even Ghost Peppers, but be warned, these require extra care and caution when handling. Remember to research the specific needs of each variety before planting.
How much sunlight do chili plants need?
Chili plants thrive in full sunlight, requiring at least 6-8 hours of direct sunlight per day. Insufficient sunlight can lead to leggy growth, reduced flowering, and smaller, less flavorful chilies. If you’re growing your chili plants indoors, supplement natural sunlight with grow lights to ensure they receive adequate light. Position your plants near a south-facing window for maximum sunlight exposure.
What type of soil is best for chili plants?
Chili plants prefer well-draining, fertile soil with a slightly acidic to neutral pH (around 6.0-7.0). A good potting mix for chili plants should contain a blend of peat moss, perlite, and vermiculite. You can also amend your garden soil with compost or well-rotted manure to improve drainage and fertility. Avoid heavy clay soils, as they can retain too much moisture and lead to root rot.
How often should I water my chili plants?
Water your chili plants regularly, especially during hot and dry weather. The frequency of watering will depend on the climate, soil type, and size of the plant. As a general rule, water deeply when the top inch of soil feels dry to the touch. Avoid overwatering, as this can lead to root rot. Ensure that your pots or containers have adequate drainage holes to prevent waterlogging. During the flowering and fruiting stages, chili plants require more water than usual.
What are some common pests and diseases that affect chili plants?
Chili plants are susceptible to various pests and diseases, including aphids, spider mites, whiteflies, and fungal infections like powdery mildew and blossom end rot. Regularly inspect your plants for signs of infestation or disease. Treat infestations with insecticidal soap or neem oil. Prevent fungal diseases by ensuring good air circulation and avoiding overwatering. Blossom end rot is caused by calcium deficiency, so amend your soil with calcium-rich amendments like bone meal or eggshells.
How do I fertilize my chili plants?
Fertilize your chili plants regularly with a balanced fertilizer, such as a 10-10-10 or 5-5-5 formula. Apply fertilizer according to the manufacturer’s instructions. During the vegetative growth stage, use a fertilizer with a higher nitrogen content to promote leafy growth. Once your plants start flowering and fruiting, switch to a fertilizer with a higher phosphorus and potassium content to encourage fruit production. You can also supplement with organic fertilizers like compost tea or fish emulsion.
When should I harvest my chilies?
The best time to harvest your chilies depends on the variety and your personal preference. Most chilies are ready to harvest when they reach their mature color and size. For example, Jalape帽os are typically harvested when they are dark green and about 2-3 inches long. Habaneros are harvested when they turn bright orange or red. You can also harvest chilies at different stages of ripeness for different flavors. Green chilies tend to be milder and more vegetal, while ripe chilies are hotter and more flavorful. Use pruning shears or scissors to cut the chilies from the plant, leaving a small stem attached.
Can I grow chili plants indoors?
Yes, you can absolutely grow chili plants indoors, especially if you live in a climate with cold winters. Choose a sunny location near a south-facing window or supplement with grow lights. Use a well-draining potting mix and ensure that your pots have adequate drainage holes. Water regularly and fertilize as needed. Indoor chili plants may require hand-pollination to ensure fruit set.
How do I save seeds from my chili plants?
Saving seeds from your chili plants is a great way to propagate your favorite varieties. Choose ripe, healthy chilies from disease-free plants. Cut the chilies open and remove the seeds. Spread the seeds out on a paper towel and let them dry completely for several days. Once the seeds are dry, store them in an airtight container in a cool, dark place. Label the container with the chili variety and date.
What are some creative ways to use my homegrown chilies?
The possibilities are endless! You can use your homegrown chilies to make chili oil, hot sauce, dried chili flakes, chili powder, or chili paste. Add them to your favorite dishes for an extra layer of flavor and heat. Use them in salsas, stews, soups, curries, and stir-fries. You can also pickle them or ferment them for a unique flavor. Get creative and experiment with different recipes to find your favorite ways to use your homegrown chilies.

Leave a Comment