

Grow Choi Sum Easily and unlock the secrets to a thriving, delicious garden right outside your door! Have you ever dreamt of snipping fresh, vibrant greens for your dinner just moments before cooking? Imagine the satisfaction of knowing exactly where your food comes from, free from pesticides and bursting with flavor. This isn’t just a dream; it’s an achievable reality with a little know-how and some simple DIY magic.
For centuries, cultivating your own food has been a cornerstone of cultures worldwide. From ancient Chinese gardens, where Choi Sum likely originated, to the victory gardens of wartime, growing your own produce has always represented self-sufficiency and a connection to the earth. Choi Sum, in particular, is a staple in Asian cuisine, prized for its delicate flavor and nutritional benefits.
But let’s face it, sometimes gardening can feel intimidating. That’s where these DIY tricks and hacks come in! I’m here to show you that you don’t need a green thumb or acres of land to grow Choi Sum easily. Whether you’re a seasoned gardener or a complete beginner, these simple techniques will empower you to cultivate your own bountiful harvest. We’ll cover everything from seed starting to pest control, ensuring you have all the tools you need to succeed. Get ready to roll up your sleeves and transform your space into a flourishing edible oasis!
Growing Choi Sum Made Easy: Your DIY Guide for a Bountiful Harvest
Hello gardening friends! Do you want fresh, crunchy Choi Sum straight from your own garden? Choi Sum, also known as Chinese flowering cabbage, is super easy to grow and quickly provides you with delicious veggies for your kitchen. I’ll show you how to do it step by step—it’s simpler than you think!
What You Need to Grow Choi Sum
- Choi Sum seeds: Ideally organic quality, so you know there are no harmful chemicals.
- Seed-starting soil or potting soil: Depending on whether you want to pre-grow or sow directly outdoors.
- Seed trays or pots: For indoor pre-growing.
- Garden soil: Well-loosened and enriched with compost.
- Compost or organic fertilizer: For strong nutrient supply.
- Watering can or garden hose: To keep your plants hydrated.
- Garden tools: Spade, rake, and a small trowel if needed.
- (Optional) Slug protection: Especially important if you have many snails in your garden.
- (Optional) Garden fleece: For protection against pests and cold.
Preparation: The Foundation for a Successful Harvest
Before we get into planting, good preparation is key. Choi Sum is low-maintenance, but a few steps make sure it thrives.
- The right location: Choi Sum loves the sun! Pick a sunny to semi-shady spot. The more sun, the better it grows.
- Soil preparation: The soil should be loose, rich, and well-draining.
- Loosen the soil with a spade.
- Remove weeds and stones.
- Mix in compost or organic fertilizer for nutrients.
- Soil for pots: If you’re growing in pots or containers, use special vegetable soil that’s designed for good drainage and nutrient supply.
Sowing: Starting Your Green Adventure
You can either pre-grow indoors or sow directly outdoors. Both methods work well.
Pre-Growing Indoors: For an Early Start
This lets you start harvesting earlier and protects seedlings from harsh weather.
- Timing: Start about 4–6 weeks before the last expected frost (usually March or April).
- How to sow:
- Fill trays or pots with seed-starting soil.
- Press the soil lightly.
- Spread the seeds evenly.
- Cover with a thin layer of soil (about 0.5 cm).
- Water gently.
- Place in a bright, warm spot (18–20°C).
- Care:
- Keep the soil moist but not soggy.
- Ventilate trays regularly to prevent mold.
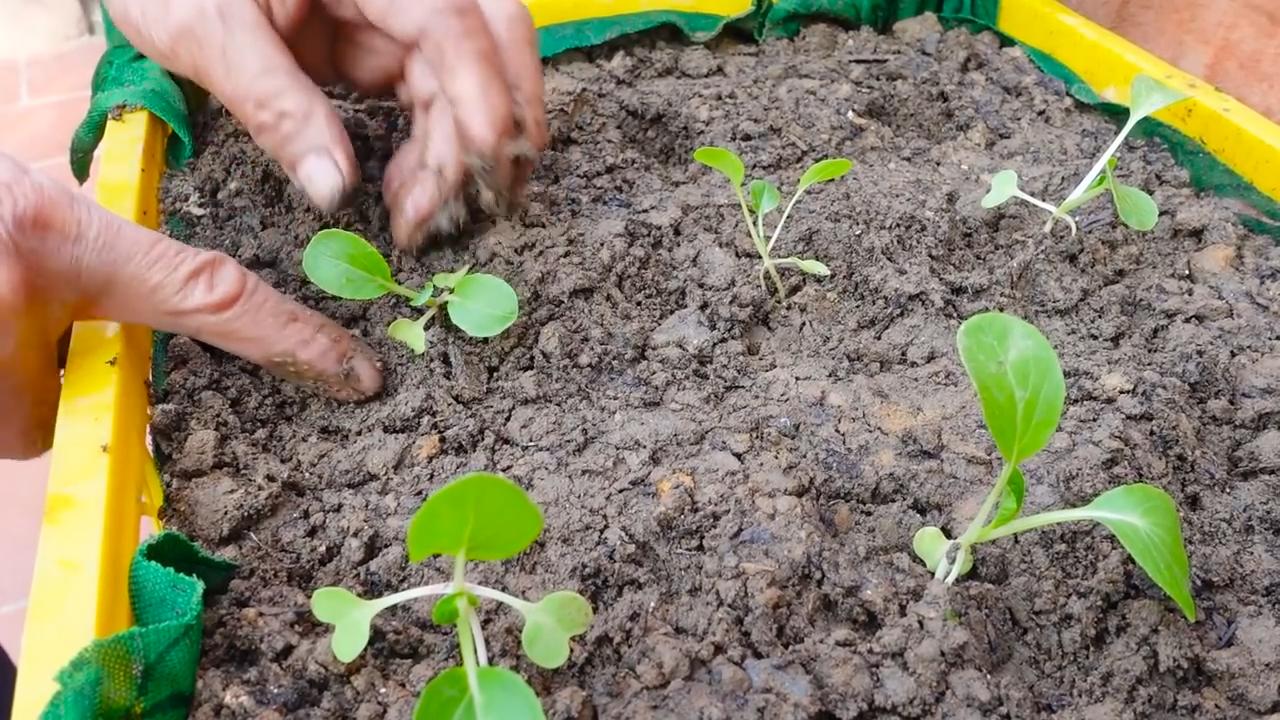
- Once seedlings are 5–7 cm tall, transplant them into bigger pots.
Direct Sowing Outdoors: The Simple Method
Perfect if you want to save time and space indoors.
- Timing: Sow directly once there’s no risk of frost (usually from mid-May).
- How to sow:
- Draw seed rows about 20 cm apart.
- Sow seeds in the rows.
- Cover with a thin layer of soil (about 0.5 cm).
- Water gently.
- Care:
- Keep the soil moist but not waterlogged.
- Thin seedlings to 15–20 cm spacing once they’re 5–7 cm tall.
Transplanting: Moving Seedlings Outdoors
If you pre-grew seedlings indoors, here’s how to move them outside.
- Timing: Transplant after the last frost (around mid-May).
- How to plant:
- Dig holes 15–20 cm apart.
- Place seedlings carefully in the holes.
- Cover with soil.
- Water thoroughly.
Care: Helping Your Choi Sum Thrive
Choi Sum doesn’t need much fuss, but these care steps will give you the best harvest.
- Watering: Water regularly, especially in dry periods. Morning or evening is best to reduce evaporation. Soil should stay moist but not soggy.
- Fertilizing: Choi Sum is a heavy feeder. Add compost or organic fertilizer every 2–3 weeks.
- Weeding: Remove weeds regularly so they don’t compete for nutrients.
- Slug protection: Snails love Choi Sum—use slug barriers or pellets.
- Pest protection: Watch for pests like flea beetles or cabbage butterflies. Use fleece as protection if needed.
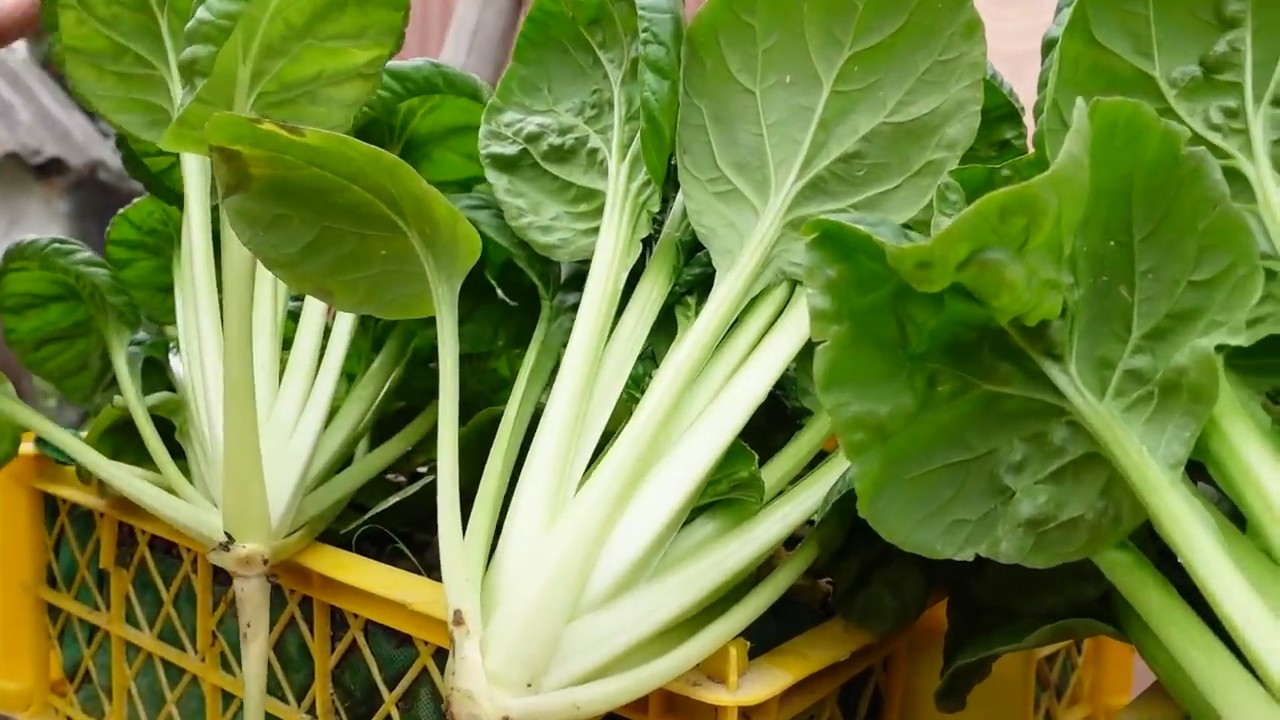
Harvest: The Reward for Your Efforts
Choi Sum grows fast—you can start harvesting just 4–6 weeks after sowing.
- Timing: Harvest once leaves are 15–20 cm tall.
- How to harvest: Cut leaves with a sharp knife. You can either harvest the whole plant or just the outer leaves. If you only cut the outer leaves, the plant keeps growing and gives multiple harvests.
Usage: Straight Into the Kitchen!
Choi Sum is versatile and tastes great raw or cooked.
- Raw: In salads or as a side.
- Cooked: In soups, stews, or as a veggie side dish.
- Stir-fried: A classic in wok dishes or sautéed as a quick side.
I hope this guide helps you grow your own Choi Sum successfully. Have fun and enjoy your harvest!
Conclusion
So, there you have it! Growing your own Choi Sum at home is not only achievable, but it’s also incredibly rewarding. We’ve walked you through a simple, effective DIY trick that bypasses many of the common challenges associated with cultivating this delicious and nutritious vegetable. Forget expensive gardening equipment or complicated techniques. This method focuses on simplicity and accessibility, making fresh, homegrown Choi Sum a reality for everyone, regardless of their gardening experience or space limitations.
Why is this DIY trick a must-try? Because it empowers you to take control of your food source. You know exactly what goes into your Choi Sum – no harmful pesticides, no questionable fertilizers, just pure, natural goodness. Imagine the satisfaction of harvesting your own vibrant green leaves and incorporating them into your favorite stir-fries, soups, or steamed dishes. The flavor is undeniably superior to store-bought varieties, bursting with freshness and a subtle sweetness that will elevate your culinary creations.
Beyond the superior taste and health benefits, growing your own Choi Sum is also a sustainable and environmentally friendly choice. You’re reducing your carbon footprint by minimizing transportation and packaging waste. Plus, you’re contributing to a healthier ecosystem by avoiding the use of harmful chemicals.
Looking for variations? Consider experimenting with different containers. While we recommended specific sizes, you can adapt the method to suit your available space. Balcony gardens, patios, or even sunny windowsills can become thriving Choi Sum havens. You can also try different soil mixes to see what works best in your local climate. Some gardeners swear by adding compost or worm castings to enrich the soil and boost growth.
Furthermore, explore different varieties of Choi Sum. While the standard green Choi Sum is widely available, you might discover other interesting cultivars with unique flavors and textures. Some varieties are more heat-tolerant, while others are better suited for cooler climates. Researching and experimenting with different types can add variety to your harvest and keep your gardening journey exciting.
Don’t be afraid to get creative with your pest control methods. While we emphasized natural solutions, you can also explore companion planting. Certain herbs and flowers, like marigolds and basil, can deter common pests and protect your precious Choi Sum leaves.
Ultimately, the key to success is observation and adaptation. Pay attention to your plants, monitor their growth, and adjust your watering and feeding schedules as needed. Gardening is a learning process, and every experience, whether successful or not, provides valuable insights.
We wholeheartedly encourage you to try this DIY trick for growing Choi Sum. It’s a simple, rewarding, and sustainable way to enjoy fresh, delicious vegetables at home. Once you’ve harvested your first batch, we’d love to hear about your experience! Share your photos, tips, and stories in the comments below. Let’s create a community of Choi Sum enthusiasts and inspire others to embrace the joys of homegrown goodness. Your success with this **grow Choi Sum** method will not only benefit you but also contribute to a more sustainable and flavorful future for all. So, grab your seeds, get your hands dirty, and prepare to be amazed by the abundance you can create!
Frequently Asked Questions (FAQ)
What kind of soil is best for growing Choi Sum?
Choi Sum thrives in well-draining, fertile soil that is rich in organic matter. A good starting point is a mix of equal parts garden soil, compost, and perlite or vermiculite. The compost provides essential nutrients, while the perlite or vermiculite improves drainage and aeration. Avoid heavy clay soils, as they can become waterlogged and inhibit root growth. You can also purchase pre-mixed potting soil specifically formulated for vegetables. Amending your soil with aged manure or worm castings before planting can further enhance its fertility and improve the overall health of your Choi Sum plants. Remember to test the soil pH; Choi Sum prefers a slightly acidic to neutral pH of around 6.0 to 7.0.
How much sunlight does Choi Sum need?
Choi Sum requires at least 4-6 hours of direct sunlight per day to thrive. While it can tolerate some partial shade, insufficient sunlight can result in leggy growth and reduced yields. If you’re growing Choi Sum indoors, place it near a sunny window or supplement with artificial grow lights. Rotate the plants regularly to ensure even light exposure on all sides. If you live in a particularly hot climate, providing some afternoon shade can help prevent the leaves from scorching. Observe your plants closely and adjust their position as needed to ensure they receive adequate sunlight without being exposed to excessive heat.
How often should I water my Choi Sum plants?
Water Choi Sum plants regularly, keeping the soil consistently moist but not waterlogged. The frequency of watering will depend on factors such as the weather, soil type, and container size. Check the soil moisture level daily by inserting your finger about an inch deep. If the soil feels dry to the touch, it’s time to water. Water deeply, allowing the water to penetrate the entire root zone. Avoid overhead watering, as this can promote fungal diseases. Instead, water at the base of the plants. During hot, dry weather, you may need to water more frequently. Mulching around the plants can help retain moisture and reduce the need for watering.
What are some common pests and diseases that affect Choi Sum?
Choi Sum can be susceptible to various pests and diseases, including aphids, cabbage worms, flea beetles, and fungal infections like downy mildew. Regularly inspect your plants for signs of infestation or disease. Aphids can be controlled with a strong spray of water or insecticidal soap. Cabbage worms can be handpicked or treated with Bacillus thuringiensis (Bt), a natural insecticide. Flea beetles can be deterred with row covers or diatomaceous earth. To prevent fungal diseases, ensure good air circulation, avoid overhead watering, and remove any infected leaves promptly. Consider using organic fungicides if necessary. Companion planting with herbs like rosemary and thyme can also help repel pests.
When is the best time to harvest Choi Sum?
Choi Sum is typically ready to harvest about 40-50 days after planting. The best time to harvest is when the flower buds are just beginning to form, but before they open. This is when the leaves are at their most tender and flavorful. You can harvest the entire plant at once or harvest individual leaves as needed. To harvest the entire plant, cut it off at the base of the stem. To harvest individual leaves, simply snip them off with scissors or pruning shears. Regular harvesting encourages continued growth and prolongs the harvest period.
Can I grow Choi Sum in containers?
Yes, Choi Sum is well-suited for container gardening. Choose a container that is at least 6-8 inches deep and wide to allow for adequate root growth. Ensure the container has drainage holes to prevent waterlogging. Use a well-draining potting mix and provide regular watering and fertilization. Container-grown Choi Sum may require more frequent watering than plants grown in the ground, as the soil in containers tends to dry out more quickly. Place the container in a location that receives at least 4-6 hours of direct sunlight per day.
How do I fertilize my Choi Sum plants?
Choi Sum benefits from regular fertilization to support healthy growth and abundant yields. Use a balanced fertilizer with an NPK ratio of 10-10-10 or 14-14-14. Apply the fertilizer according to the package instructions, typically every 2-3 weeks. You can also use organic fertilizers such as compost tea, fish emulsion, or seaweed extract. Avoid over-fertilizing, as this can lead to excessive foliage growth and reduced flowering. Monitor your plants closely and adjust the fertilization schedule as needed.
How do I save seeds from my Choi Sum plants?
Saving seeds from Choi Sum is possible, but it requires allowing the plants to bolt (flower) and produce seed pods. However, be aware that Choi Sum can cross-pollinate with other members of the Brassica family, so the seeds may not be true to type. To save seeds, allow the flower pods to dry completely on the plant. Once dry, harvest the pods and crush them to release the seeds. Clean the seeds by removing any debris and store them in a cool, dry place. Label the seeds with the date and variety. Keep in mind that hybrid varieties of Choi Sum will not produce true-to-type seeds.

Leave a Comment