

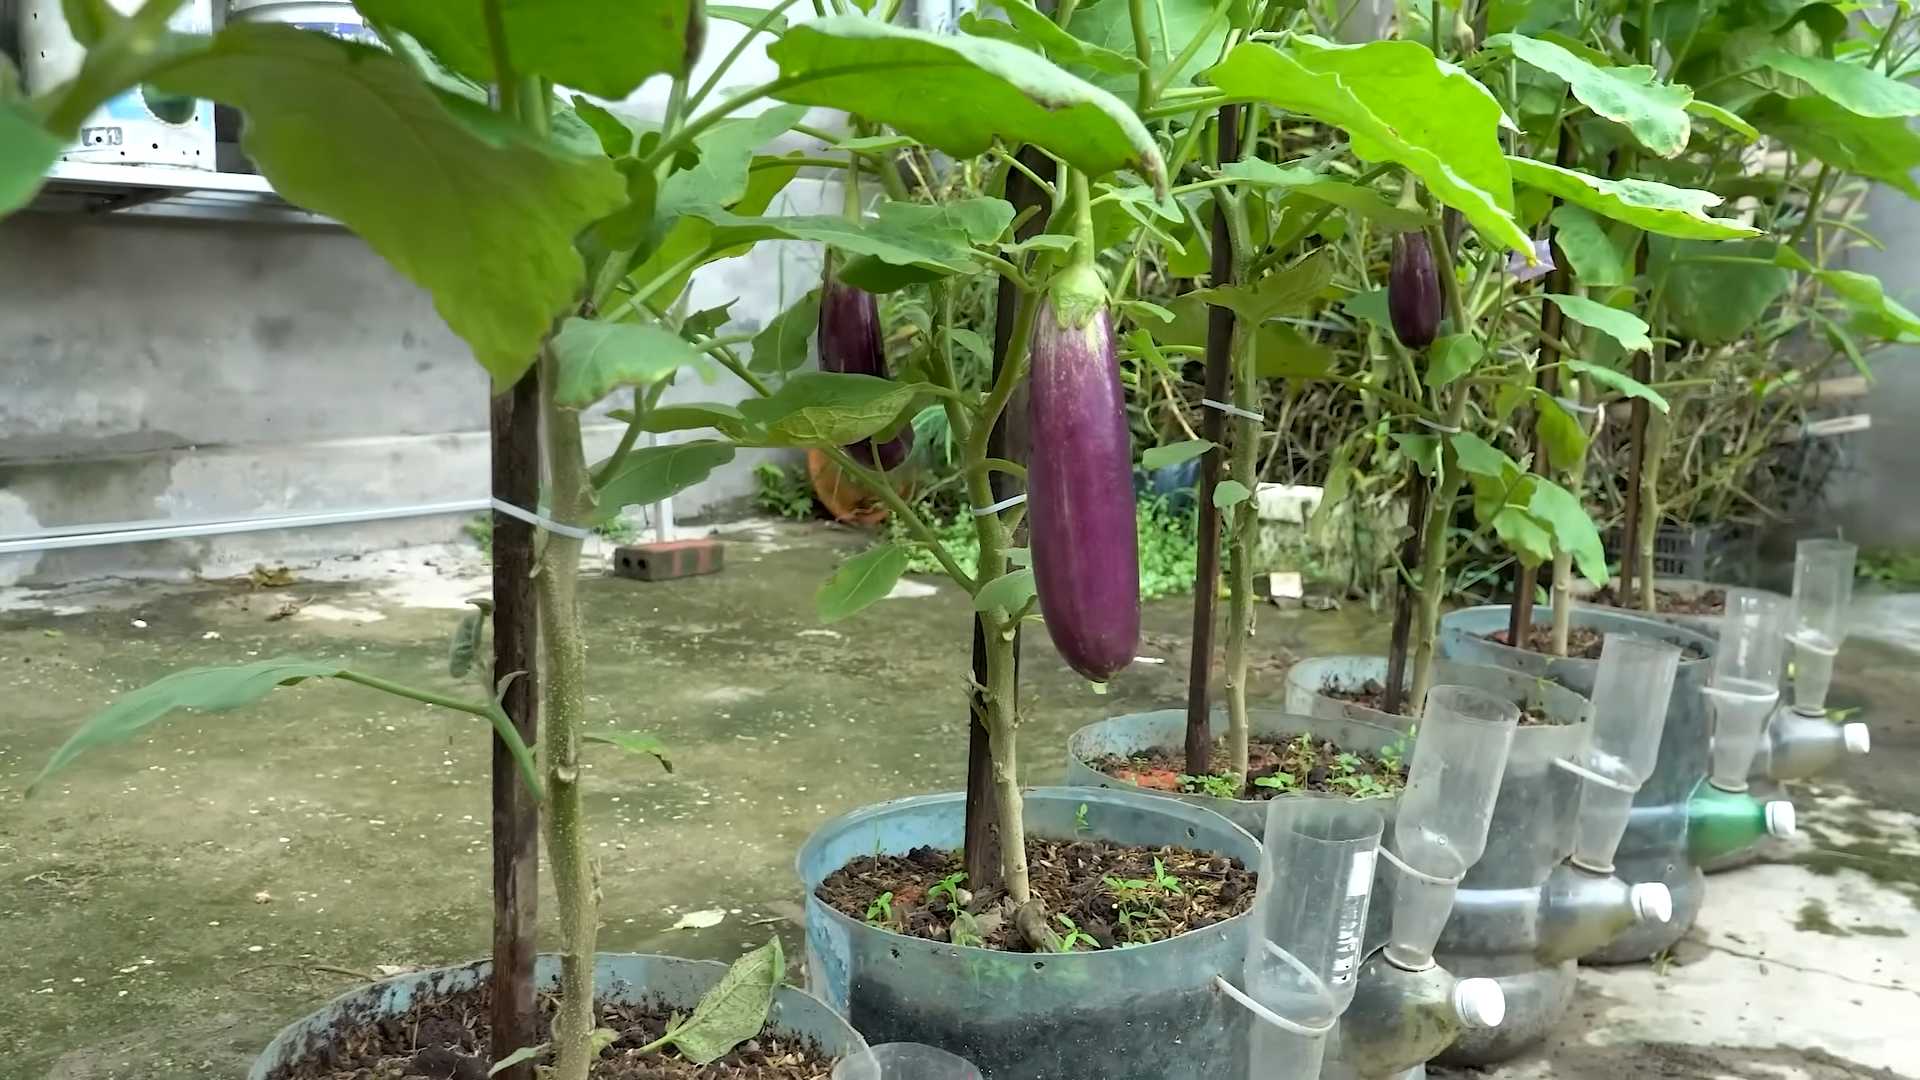
Grow Eggplant Fast? Absolutely! Imagine harvesting plump, glossy eggplants from your own backyard, ready to be transformed into delicious baba ghanoush, hearty moussaka, or a simple, satisfying eggplant parmesan. It’s a dream for many home gardeners, and I’m here to tell you it’s totally achievable, even if you’re short on time or space.
Eggplants, with their rich history tracing back to ancient Asia, have been cultivated for centuries, gracing tables and gardens across the globe. But let’s be honest, sometimes they can be a bit… slow. We’ve all been there, patiently waiting, watching those tiny fruits develop at a snail’s pace. That’s where these DIY tricks come in!
In this article, I’m going to share my favorite tried-and-true methods to help you grow eggplant fast and maximize your yield. Whether you’re a seasoned gardener or just starting out, these simple hacks will give your eggplants the boost they need to thrive. From soil preparation secrets to clever watering techniques, I’ll guide you through each step, ensuring you’ll be enjoying a bountiful eggplant harvest in no time. So, grab your gardening gloves, and let’s get started!
Grow Eggplant Faster: My Secret DIY Soil Warming Hack
Hey fellow gardeners! Are you tired of waiting what feels like forever for your eggplants to mature? I know I was! Eggplants are delicious, but they can be a bit slow to get going, especially in cooler climates. I’ve experimented with a bunch of different techniques over the years, and I’ve finally landed on a DIY soil warming hack that has seriously sped up my eggplant growth. I’m so excited to share it with you! This method focuses on creating a warmer microclimate around your eggplant roots, giving them the boost they need to thrive.
Understanding Why Eggplants Need Warmth
Before we dive into the how-to, let’s quickly chat about why eggplants are such heat-loving plants. Eggplants are native to warmer regions, so they need consistent warmth to germinate, grow, and produce fruit. Cold soil can stunt their growth, delay flowering, and even lead to diseases. By warming the soil, we’re essentially mimicking their ideal growing conditions.
Materials You’ll Need
Okay, let’s gather our supplies. The best part about this hack is that it uses mostly inexpensive and readily available materials. Here’s what you’ll need:
* Black Plastic Mulch: This is the key ingredient! Black plastic absorbs sunlight and traps heat in the soil. You can find it at most garden centers or online. I prefer a thicker gauge for durability.
* Clear Plastic Sheeting (Optional, but Recommended): This creates a mini-greenhouse effect over the black plastic, further boosting the soil temperature.
* Garden Staples or Rocks: To secure the plastic in place.
* Measuring Tape: For accurate cutting.
* Scissors or Utility Knife: For cutting the plastic.
* Soil Thermometer: This is optional, but it’s super helpful for monitoring the soil temperature and making sure it’s within the ideal range (70-85°F or 21-29°C).
* Compost or Well-Rotted Manure: To enrich the soil before planting.
* Eggplant Seedlings: Choose healthy, vigorous seedlings from a reputable source.
* Watering Can or Hose: For watering your eggplants.
Step-by-Step Instructions: Warming Up Your Eggplant Patch
Alright, let’s get our hands dirty! Here’s how to implement my soil warming hack:
1. Prepare the Soil:
* First, choose a sunny spot in your garden that gets at least 6-8 hours of direct sunlight per day. Eggplants are sun worshippers!
* Next, clear the area of any weeds, rocks, or debris.
* Amend the soil with plenty of compost or well-rotted manure. Eggplants are heavy feeders and need nutrient-rich soil to thrive. I usually dig in about 2-3 inches of compost.
* Rake the soil smooth and level.
2. Lay Down the Black Plastic Mulch:
* Measure the area you want to cover with the black plastic. I usually make it a bit wider and longer than the planting area to ensure good coverage.
* Cut the black plastic to the desired size using scissors or a utility knife.
* Carefully lay the black plastic over the prepared soil. Make sure it’s smooth and wrinkle-free.
* Secure the edges of the plastic with garden staples or rocks. You want to make sure it’s held down firmly to prevent it from blowing away.
3. (Optional) Add Clear Plastic Sheeting:
* If you’re using clear plastic sheeting, measure and cut it to the same size as the black plastic.
* Lay the clear plastic over the black plastic, creating a double layer.
* Secure the edges of the clear plastic with garden staples or rocks, making sure it’s tightly sealed to trap heat.
4. Wait and Monitor the Soil Temperature:
* Now comes the waiting game! Let the sun do its work. The black plastic will absorb sunlight and warm the soil underneath.
* If you have a soil thermometer, insert it into the soil under the plastic and monitor the temperature. You want the soil temperature to reach at least 70°F (21°C) before planting your eggplants. This may take a few days or even a week, depending on the weather.
* If you don’t have a soil thermometer, you can simply feel the soil with your hand. It should feel warm to the touch.
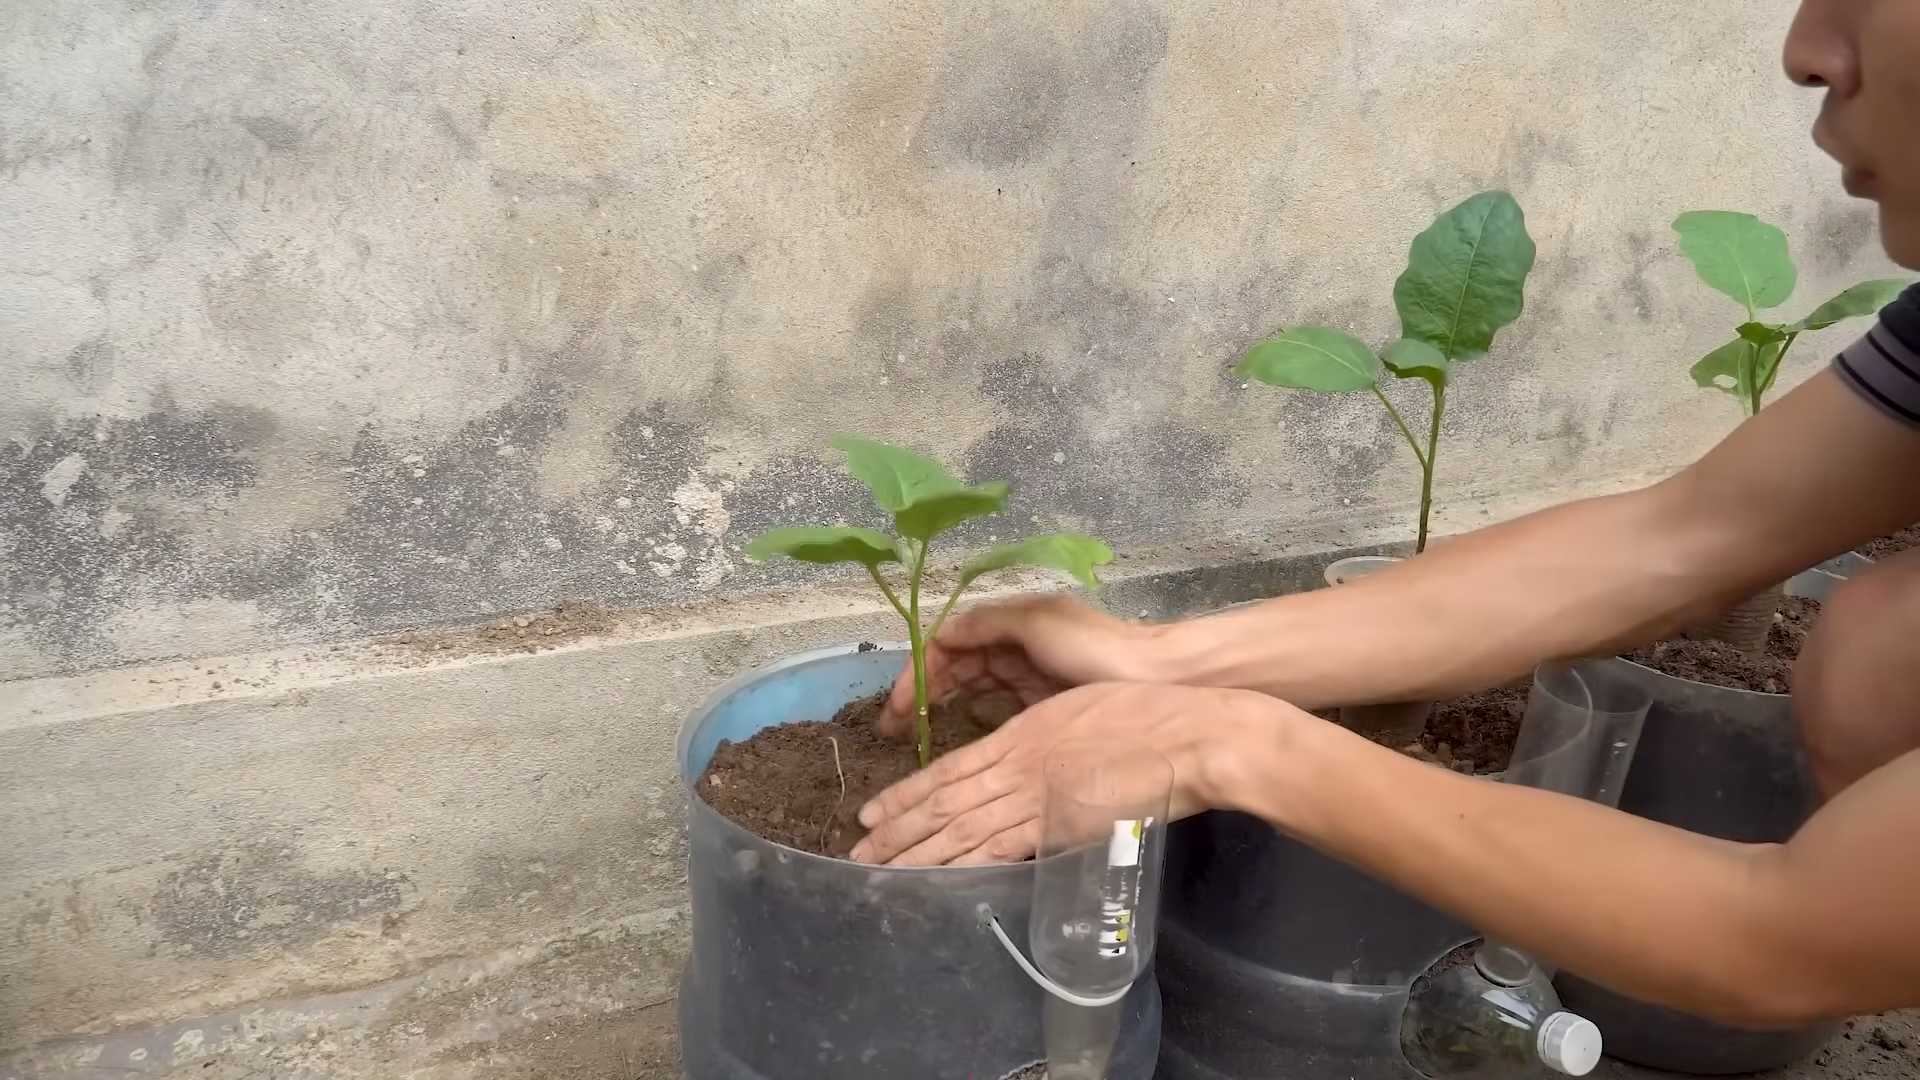
5. Plant Your Eggplant Seedlings:
* Once the soil is warm enough, it’s time to plant your eggplant seedlings.
* Using a utility knife or scissors, carefully cut holes in the plastic mulch where you want to plant your eggplants. Make the holes large enough to accommodate the root balls of the seedlings. I usually space my eggplants about 18-24 inches apart.
* Gently remove the eggplant seedlings from their containers and plant them in the holes.
* Water the seedlings thoroughly after planting.
6. Maintain and Water Regularly:
* Continue to monitor the soil moisture and water your eggplants regularly, especially during dry spells. The plastic mulch will help to retain moisture, but you still need to water them deeply when the soil feels dry.
* Fertilize your eggplants every 2-3 weeks with a balanced fertilizer.
* Remove any weeds that may grow around the base of the plants.
Troubleshooting and Tips for Success
Even with the best laid plans, sometimes things don’t go exactly as expected. Here are a few troubleshooting tips and extra tricks I’ve learned along the way:
* Overheating: If you live in a very hot climate, the soil under the plastic can get too hot, especially with the clear plastic layer. If you notice your plants wilting or showing signs of heat stress, you can remove the clear plastic or partially shade the area during the hottest part of the day.
* Poor Drainage: If your soil doesn’t drain well, the plastic mulch can trap water and lead to root rot. Make sure your soil is well-draining before applying the plastic. You can also add some drainage holes to the plastic.
* Pest Control: Keep an eye out for common eggplant pests like aphids, flea beetle
Hey fellow gardeners! Are you tired of waiting what feels like forever for your eggplants to mature? I know I was! Eggplants are delicious, but they can be a bit slow to get going, especially in cooler climates. I’ve experimented with a bunch of different techniques over the years, and I’ve finally landed on a DIY soil warming hack that has seriously sped up my eggplant growth. I’m so excited to share it with you! This method focuses on creating a warmer microclimate around your eggplant roots, giving them the boost they need to thrive.
Understanding Why Eggplants Need Warmth
Before we dive into the how-to, let’s quickly chat about why eggplants are such heat-loving plants. Eggplants are native to warmer regions, so they need consistent warmth to germinate, grow, and produce fruit. Cold soil can stunt their growth, delay flowering, and even lead to diseases. By warming the soil, we’re essentially mimicking their ideal growing conditions.
Materials You’ll Need
Okay, let’s gather our supplies. The best part about this hack is that it uses mostly inexpensive and readily available materials. Here’s what you’ll need:
* Black Plastic Mulch: This is the key ingredient! Black plastic absorbs sunlight and traps heat in the soil. You can find it at most garden centers or online. I prefer a thicker gauge for durability.
* Clear Plastic Sheeting (Optional, but Recommended): This creates a mini-greenhouse effect over the black plastic, further boosting the soil temperature.
* Garden Staples or Rocks: To secure the plastic in place.
* Measuring Tape: For accurate cutting.
* Scissors or Utility Knife: For cutting the plastic.
* Soil Thermometer: This is optional, but it’s super helpful for monitoring the soil temperature and making sure it’s within the ideal range (70-85°F or 21-29°C).
* Compost or Well-Rotted Manure: To enrich the soil before planting.
* Eggplant Seedlings: Choose healthy, vigorous seedlings from a reputable source.
* Watering Can or Hose: For watering your eggplants.
Step-by-Step Instructions: Warming Up Your Eggplant Patch
Alright, let’s get our hands dirty! Here’s how to implement my soil warming hack:
1. Prepare the Soil:
* First, choose a sunny spot in your garden that gets at least 6-8 hours of direct sunlight per day. Eggplants are sun worshippers!
* Next, clear the area of any weeds, rocks, or debris.
* Amend the soil with plenty of compost or well-rotted manure. Eggplants are heavy feeders and need nutrient-rich soil to thrive. I usually dig in about 2-3 inches of compost.
* Rake the soil smooth and level.
2. Lay Down the Black Plastic Mulch:
* Measure the area you want to cover with the black plastic. I usually make it a bit wider and longer than the planting area to ensure good coverage.
* Cut the black plastic to the desired size using scissors or a utility knife.
* Carefully lay the black plastic over the prepared soil. Make sure it’s smooth and wrinkle-free.
* Secure the edges of the plastic with garden staples or rocks. You want to make sure it’s held down firmly to prevent it from blowing away.
3. (Optional) Add Clear Plastic Sheeting:
* If you’re using clear plastic sheeting, measure and cut it to the same size as the black plastic.
* Lay the clear plastic over the black plastic, creating a double layer.
* Secure the edges of the clear plastic with garden staples or rocks, making sure it’s tightly sealed to trap heat.
4. Wait and Monitor the Soil Temperature:
* Now comes the waiting game! Let the sun do its work. The black plastic will absorb sunlight and warm the soil underneath.
* If you have a soil thermometer, insert it into the soil under the plastic and monitor the temperature. You want the soil temperature to reach at least 70°F (21°C) before planting your eggplants. This may take a few days or even a week, depending on the weather.
* If you don’t have a soil thermometer, you can simply feel the soil with your hand. It should feel warm to the touch.
5. Plant Your Eggplant Seedlings:
* Once the soil is warm enough, it’s time to plant your eggplant seedlings.
* Using a utility knife or scissors, carefully cut holes in the plastic mulch where you want to plant your eggplants. Make the holes large enough to accommodate the root balls of the seedlings. I usually space my eggplants about 18-24 inches apart.
* Gently remove the eggplant seedlings from their containers and plant them in the holes.
* Water the seedlings thoroughly after planting.
6. Maintain and Water Regularly:
* Continue to monitor the soil moisture and water your eggplants regularly, especially during dry spells. The plastic mulch will help to retain moisture, but you still need to water them deeply when the soil feels dry.
* Fertilize your eggplants every 2-3 weeks with a balanced fertilizer.
* Remove any weeds that may grow around the base of the plants.
Troubleshooting and Tips for Success
Even with the best laid plans, sometimes things don’t go exactly as expected. Here are a few troubleshooting tips and extra tricks I’ve learned along the way:
* Overheating: If you live in a very hot climate, the soil under the plastic can get too hot, especially with the clear plastic layer. If you notice your plants wilting or showing signs of heat stress, you can remove the clear plastic or partially shade the area during the hottest part of the day.
* Poor Drainage: If your soil doesn’t drain well, the plastic mulch can trap water and lead to root rot. Make sure your soil is well-draining before applying the plastic. You can also add some drainage holes to the plastic.
* Pest Control: Keep an eye out for common eggplant pests like aphids, flea beetles, and tomato hornworms. Treat them promptly with organic pest control methods.
* Variety Selection: Choose eggplant varieties that are well-suited to your climate and growing conditions. Some varieties are more heat-tolerant than others.
* Watering Technique: When watering, try to water at the base of the plants to avoid wetting the foliage, which can lead to fungal diseases.
* Support: As your eggplants grow, they may need support to prevent the branches from breaking under the weight of the fruit. You can use stakes or cages to support the plants.
Why This Hack Works So Well
This DIY soil warming hack works so well because it addresses the key needs of eggplants: warmth and moisture. The black plastic mulch warms the soil, creating a favorable environment for root growth. The clear plastic (optional) further enhances the warming effect. The plastic also helps to retain moisture, reducing the need for frequent watering. By providing these optimal conditions, you’ll see faster growth, earlier flowering, and a more abundant harvest.
Alternative Soil Warming Methods
While I swear by this plastic mulch method, there are other ways to warm the soil for your eggplants. Here are a few alternatives:
* Raised Beds: Raised beds tend to warm up faster than in-ground gardens because they are elevated and exposed to more sunlight.
* Cold Frames: Cold frames are mini-greenhouses that can be used to protect plants from cold weather and warm the soil.
* Cloches: Cloches are transparent covers that are placed over individual plants to trap heat.
* Heat Mats: Heat mats are electric mats that are placed under seed trays or pots to warm the soil. These are more commonly used for starting seeds indoors.
My Personal Experience and Results
I’ve been using this soil warming hack for several years now, and I’ve consistently seen a significant improvement in my eggplant yields. My eggplants grow faster, produce more fruit, and are less susceptible to diseases. I’ve also noticed that the fruit matures earlier, which is a huge bonus in my short growing season. I highly recommend giving this hack a try! You won’t be disappointed.
Enjoy Your Bountiful Eggplant Harvest!
I hope this guide has been helpful. With a little bit of effort and this simple DIY hack, you can enjoy a bountiful eggplant harvest in no time. Happy gardening!
Conclusion
So, there you have it! This simple yet effective DIY trick for growing eggplant fast is a game-changer for any gardener, whether you’re a seasoned pro or just starting out. We’ve walked you through the steps, explained the science behind why it works, and hopefully, inspired you to give it a try.
Why is this a must-try? Because who doesn’t want to harvest delicious, plump eggplants sooner rather than later? This method not only accelerates growth but also often results in healthier, more robust plants that are better equipped to withstand common garden pests and diseases. Imagine enjoying fresh, homegrown eggplant in your favorite recipes weeks earlier than you thought possible! Think of the eggplant parmesan, the baba ghanoush, the ratatouille – all made with eggplants you nurtured from seedling to table in record time.
But the beauty of gardening lies in experimentation, so don’t be afraid to put your own spin on this technique. Here are a few suggestions and variations to consider:
* Compost Tea Boost: Instead of plain water, try using diluted compost tea for your initial watering. Compost tea is packed with beneficial microbes and nutrients that can give your seedlings an extra boost.
* Rooting Hormone Alternative: If you don’t have rooting hormone on hand, you can try using willow water. Willow branches contain natural rooting compounds. Simply soak a few willow branches in water for a day or two, then use that water to moisten the soil around your seedlings.
* Sunlight Optimization: While eggplants love sunlight, be mindful of scorching during the hottest part of the day, especially in warmer climates. Consider providing some afternoon shade, particularly for young seedlings.
* Container Gardening Adaptation: This trick works just as well for container-grown eggplants. Just ensure your containers are large enough to accommodate the mature plant’s root system.
Ultimately, the best way to discover what works best for you is to get your hands dirty and experiment. We are confident that this DIY trick will significantly improve your eggplant growing experience.
We wholeheartedly encourage you to try this method for growing eggplant fast. It’s easy, affordable, and yields impressive results. And most importantly, we want to hear about your experience! Share your successes, your challenges, and any variations you tried in the comments below. Let’s build a community of eggplant enthusiasts and learn from each other. Happy gardening!
Frequently Asked Questions (FAQ)
What exactly does this DIY trick do to make eggplants grow faster?
This trick primarily focuses on stimulating root development in young eggplant seedlings. By gently stressing the plant and then providing it with a supportive environment (rooting hormone and consistent moisture), we encourage the plant to prioritize root growth. A strong root system is crucial for faster growth because it allows the plant to efficiently absorb water and nutrients from the soil. More nutrients mean more energy for the plant to produce leaves, stems, and eventually, those delicious eggplants. Think of it like building a strong foundation for a house – the stronger the foundation, the taller and more stable the house can be.
Is this trick safe for all varieties of eggplants?
Yes, this trick is generally safe for all varieties of eggplants. However, it’s always a good idea to observe your plants closely after applying the technique. Some more delicate or less vigorous varieties might be slightly more sensitive to the initial stress. If you notice any signs of distress, such as wilting or yellowing leaves, reduce the frequency of watering and ensure the plant is not exposed to excessive heat or direct sunlight. Remember, the goal is to gently encourage growth, not to shock the plant.
How often should I water the seedlings after applying this trick?
Watering frequency depends on several factors, including your climate, soil type, and the size of your container. As a general rule, you should water the seedlings when the top inch of soil feels dry to the touch. Avoid overwatering, as this can lead to root rot. Aim for consistent moisture, but not soggy conditions. A good way to check is to stick your finger into the soil – if it feels dry, it’s time to water. If it feels moist, wait another day or two.
Can I use a different type of rooting hormone?
Yes, you can use different types of rooting hormones. Rooting hormones come in various forms, including powders, liquids, and gels. Choose one that is specifically formulated for vegetable plants. Follow the instructions on the product label carefully. If you prefer a natural alternative, you can try using willow water, as mentioned earlier.
What if I don’t have access to rooting hormone? Will the trick still work?
While rooting hormone significantly enhances the effectiveness of the trick, it’s not absolutely essential. The gentle stress of transplanting and the consistent moisture will still encourage some root growth. However, you might not see the same dramatic results as you would with rooting hormone. If you don’t have rooting hormone, consider using a natural alternative like willow water or simply ensuring that you provide the seedlings with optimal growing conditions, including well-draining soil, adequate sunlight, and consistent watering.
How long does it take to see results after applying this trick?
You should start to see noticeable results within a week or two of applying this trick. The seedlings should begin to exhibit faster growth, with new leaves emerging and the stems thickening. However, the exact timeline will depend on various factors, including the variety of eggplant, the growing conditions, and the overall health of the seedlings. Be patient and continue to provide your plants with the care they need, and you’ll be rewarded with a bountiful harvest.
Can I use this trick on established eggplant plants that are already in the ground?
This trick is most effective on young seedlings that are still developing their root systems. While you can’t directly apply the same technique to established plants, you can still encourage root growth by providing them with optimal growing conditions, such as well-draining soil, adequate sunlight, and regular fertilization. You can also try side-dressing the plants with compost or applying a root stimulator to encourage further root development.
What are some common problems that eggplant growers face, and how can I avoid them?
Some common problems that eggplant growers face include pests (such as aphids, flea beetles, and spider mites), diseases (such as blossom-end rot and fungal infections), and nutrient deficiencies. To avoid these problems, start with healthy seedlings, choose a well-draining soil, provide adequate sunlight and water, and monitor your plants regularly for signs of pests or diseases. Use organic pest control methods when possible, and ensure that your plants are receiving the nutrients they need. Blossom-end rot, for example, is often caused by calcium deficiency, so you may need to amend your soil with calcium-rich amendments.
Is it better to start eggplant seeds indoors or outdoors?
In most climates, it’s best to start eggplant seeds indoors, especially if you want to harvest eggplants early in the season. Eggplants require a long growing season and warm temperatures, so starting them indoors allows you to get a head start. You can then transplant the seedlings outdoors once the weather has warmed up and the risk of frost has passed. If you live in a warm climate with a long growing season, you may be able to direct sow eggplant seeds outdoors, but be sure to choose a sunny location and provide the seedlings with adequate water and protection from pests.
What is the best soil for growing eggplants?
Eggplants prefer well-draining, fertile soil that is rich in organic matter. The ideal soil pH is between 6.0 and 6.8. Before planting, amend your soil with compost or other organic matter to improve drainage and fertility. You can also add a slow-release fertilizer to provide the plants with the nutrients they need throughout the growing season. Avoid heavy clay soils, as they can retain too much water and lead to root rot.


Leave a Comment