

Grow Gourds Successfully and unlock a world of creative possibilities right in your own backyard! Have you ever imagined crafting your own birdhouses, bowls, or even musical instruments from something you’ve grown yourself? It’s not just a whimsical dream; it’s entirely achievable with a little know-how. For centuries, gourds have held a special place in various cultures, serving as essential tools, decorative items, and even spiritual symbols. From the indigenous peoples of the Americas to ancient civilizations in Africa and Asia, gourds have been cherished for their versatility and natural beauty.
But why should you bother learning to grow gourds successfully? In today’s world, where sustainability and DIY projects are gaining immense popularity, cultivating your own gourds offers a unique and rewarding experience. Imagine the satisfaction of creating personalized gifts, adding a rustic touch to your home decor, or simply enjoying the therapeutic process of nurturing these fascinating plants from seed to harvest. Plus, with rising costs and environmental concerns, growing your own materials is a fantastic way to reduce your carbon footprint and save money. I’m here to guide you through simple yet effective tricks and hacks that will transform your garden into a gourd-growing paradise. Let’s get started!
Kürbisse erfolgreich anbauen: Dein DIY-Leitfaden für eine reiche Ernte
Hallo liebe Gartenfreunde! Ich freue mich riesig, euch heute in die faszinierende Welt des Kürbisanbaus einzuführen. Kürbisse sind nicht nur wunderschön anzusehen, sondern auch unglaublich vielseitig in der Küche. Ob als Suppe, Kuchen, Dekoration oder einfach nur zum Schnitzen für Halloween – Kürbisse sind wahre Alleskönner. Und das Beste daran? Mit ein wenig Geduld und den richtigen Tipps kann jeder, auch du, eine reiche Kürbisernte erzielen!
Dieser Leitfaden ist dein persönlicher Begleiter auf dem Weg zum Kürbisglück. Ich werde dir Schritt für Schritt zeigen, wie du von der Aussaat bis zur Ernte alles richtig machst. Also, krempeln wir die Ärmel hoch und legen los!
Die Vorbereitung: Der Schlüssel zum Erfolg
Bevor wir mit dem eigentlichen Anbau beginnen, ist eine gute Vorbereitung das A und O. Denn nur wenn die Rahmenbedingungen stimmen, können sich deine Kürbispflanzen optimal entwickeln.
* Die richtige Sorte wählen: Es gibt unzählige Kürbissorten, von kleinen Zierkürbissen bis hin zu riesigen Speisekürbissen. Überlege dir, welche Sorte du anbauen möchtest und welche am besten zu deinem Garten und deinen Bedürfnissen passt. Beliebte Sorten sind beispielsweise Hokkaido, Butternut, Muskatkürbis und natürlich der klassische Halloween-Kürbis. Informiere dich über die jeweiligen Ansprüche der Sorte, wie z.B. Platzbedarf und Reifezeit.
* Der perfekte Standort: Kürbisse lieben die Sonne! Wähle einen sonnigen Standort mit mindestens 6 Stunden direkter Sonneneinstrahlung pro Tag. Außerdem sollte der Boden locker, humusreich und gut durchlässig sein. Vermeide Staunässe, da diese zu Wurzelfäule führen kann.
* Bodenverbesserung: Kürbisse sind Starkzehrer, das heißt, sie benötigen viele Nährstoffe. Bereite den Boden daher gut vor, indem du reichlich Kompost, verrotteten Mist oder organischen Dünger einarbeitest. Das sorgt für eine optimale Nährstoffversorgung und ein gesundes Wachstum.
* Vorkultur oder Direktsaat: Du hast die Wahl! Kürbisse können entweder ab April im Haus vorgezogen oder ab Mitte Mai direkt ins Freiland gesät werden. Die Vorkultur hat den Vorteil, dass die Pflanzen einen Wachstumsvorsprung haben und früher Früchte tragen. Die Direktsaat ist einfacher, erfordert aber etwas mehr Geduld.
Die Aussaat: Der Start ins Kürbisleben
Jetzt geht es ans Eingemachte! Egal ob du dich für die Vorkultur oder die Direktsaat entscheidest, hier sind die wichtigsten Schritte:
Vorkultur (ab April):
1. Die richtigen Töpfe: Verwende kleine Töpfe (ca. 8-10 cm Durchmesser) mit Anzuchterde.
2. Samen säen: Lege pro Topf 1-2 Kürbiskerne ca. 2-3 cm tief in die Erde.
3. Angießen: Gieße die Erde vorsichtig an, sodass sie feucht, aber nicht nass ist.
4. Der richtige Standort: Stelle die Töpfe an einen hellen und warmen Ort (ca. 20-25°C). Ein Mini-Gewächshaus oder eine Fensterbank sind ideal.
5. Feuchtigkeit halten: Halte die Erde gleichmäßig feucht, aber vermeide Staunässe.
6. Pikieren (optional): Wenn beide Samen aufgegangen sind, kannst du den schwächeren Sämling entfernen.
7. Abhärten: Bevor du die Jungpflanzen ins Freiland setzt, solltest du sie einige Tage lang abhärten. Stelle sie dazu tagsüber ins Freie und hole sie abends wieder rein.
Direktsaat (ab Mitte Mai):
1. Boden vorbereiten: Lockere den Boden gut auf und entferne Unkraut.
2. Pflanzlöcher graben: Grabe Pflanzlöcher im Abstand von ca. 1 Meter (je nach Sorte).
3. Samen säen: Lege pro Pflanzloch 2-3 Kürbiskerne ca. 2-3 cm tief in die Erde.
4. Angießen: Gieße die Erde vorsichtig an.
5. Schutz vor Schnecken: Schütze die jungen Keimlinge vor Schneckenfraß, z.B. mit Schneckenkorn oder einem Schneckenzaun.
6. Vereinzeln: Wenn die Keimlinge aufgegangen sind, kannst du die schwächeren entfernen, sodass nur noch die stärkste Pflanze pro Pflanzloch übrig bleibt.
Die Pflege: Damit deine Kürbisse prächtig gedeihen
Nach der Aussaat beginnt die eigentliche Arbeit. Mit der richtigen Pflege sorgst du dafür, dass deine Kürbispflanzen gesund und kräftig wachsen und eine reiche Ernte bringen.
* Gießen: Kürbisse haben einen hohen Wasserbedarf, besonders während der Fruchtbildung. Gieße regelmäßig und reichlich, am besten morgens oder abends, damit das Wasser nicht so schnell verdunstet. Vermeide es, die Blätter zu gießen, da dies Pilzkrankheiten fördern kann.
* Düngen: Dünge deine Kürbispflanzen regelmäßig mit einem organischen Dünger oder Kompost. Besonders während der Fruchtbildung benötigen sie viele Nährstoffe.
* Unkraut entfernen: Halte den Boden um die Kürbispflanzen herum unkrautfrei, damit sie nicht um Nährstoffe und Wasser konkurrieren müssen.
* Mulchen: Eine Mulchschicht aus Stroh oder Rasenschnitt hält den Boden feucht, unterdrückt Unkraut und schützt die Früchte vor direktem Bodenkontakt.
* Schutz vor Schädlingen und Krankheiten: Achte auf Schädlinge wie Schnecken, Blattläuse und Kürbisfliegen. Bekämpfe sie bei Bedarf mit natürlichen Mitteln. Auch Pilzkrankheiten wie Mehltau können auftreten. Sorge für eine gute Belüftung und vermeide es, die Blätter zu gießen.
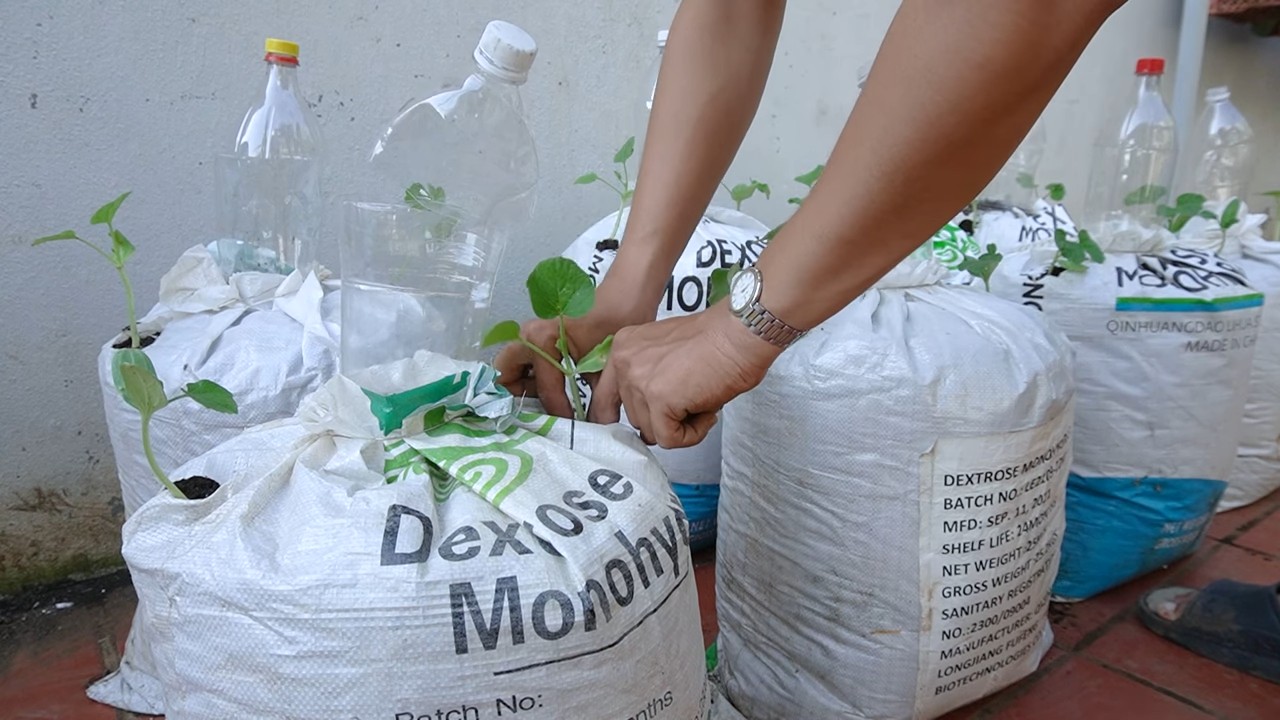
* Rankhilfe (optional): Einige Kürbissorten ranken stark und benötigen eine Rankhilfe. Du kannst ihnen ein Spalier, einen Zaun oder ein Gerüst anbieten, an dem sie sich festhalten können.
* Ausgeizen (optional): Bei einigen Kürbissorten kann es sinnvoll sein, Seitentriebe auszugeizen, um die Fruchtbildung zu fördern. Informiere dich über die spezifischen Bedürfnisse deiner Sorte.
Die Ernte: Der Lohn deiner Mühe
Endlich ist es soweit! Die Kürbisse sind reif und bereit für die Ernte. Aber wann ist der richtige Zeitpunkt?
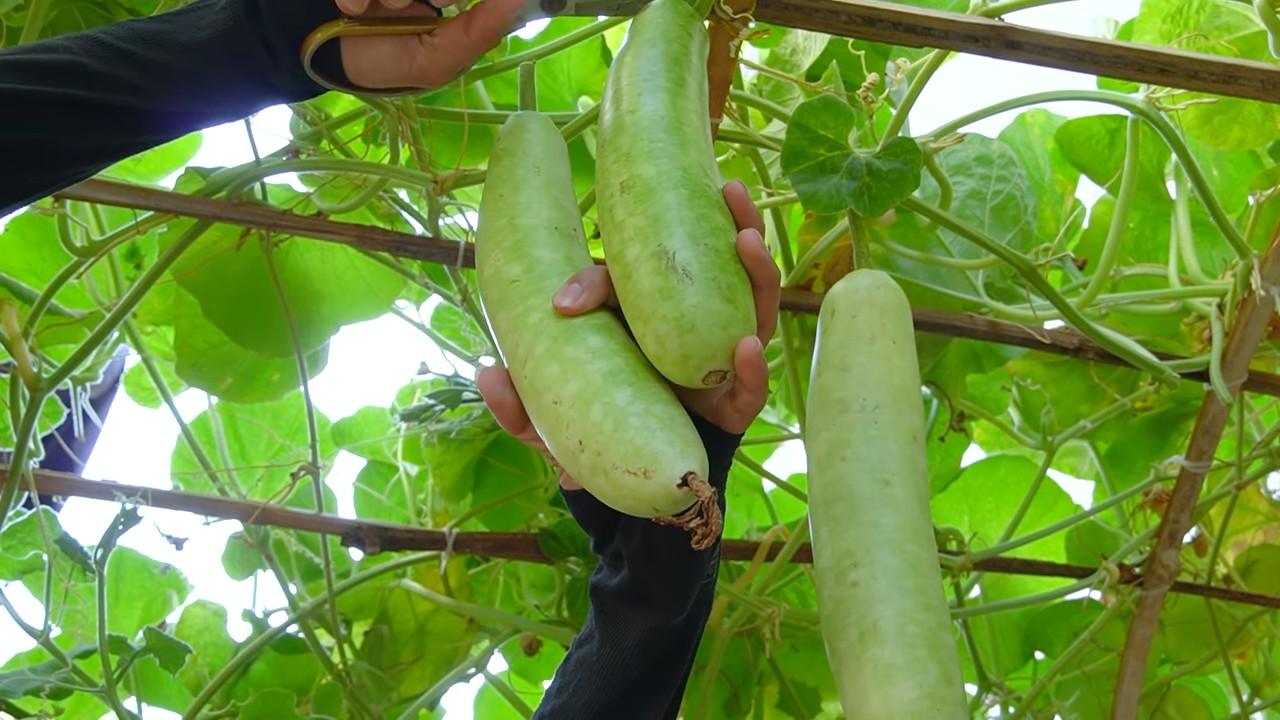
* Reifezeichen: Ein reifer Kürbis hat eine harte Schale, die sich mit dem Fingernagel nicht mehr eindrücken lässt. Der Stiel ist trocken und verholzt. Außerdem klingt der Kürbis hohl, wenn man darauf klopft.
* Erntezeitpunkt: Die meisten Kürbissorten sind im Herbst reif, etwa von September bis Oktober. Ernte die Kürbisse vor dem ersten Frost, da sie sonst Schaden nehmen können.
* Erntemethode: Schneide den Kürbis mit einem scharfen Messer oder einer Gartenschere vom Stiel ab. Lasse dabei einen ca. 5-10 cm langen Stielansatz stehen, da dies die Haltbarkeit verlängert.
* Lagerung: Lagere die Kürbisse an einem trockenen, kühlen und gut belüfteten Ort. Ideal ist ein Keller oder eine Garage. Vermeide es, die Kürbisse übereinander zu stapeln, da dies zu Druckstellen führen kann.
Zusätzliche Tipps für eine erfolgreiche Kürbisernte
* Bienenfreundlicher Garten: Kürbisse sind auf die Bestäubung durch Bienen angewiesen. Sorge für einen bienenfreundlichen Garten mit vielen blühenden Pflanzen.
* Fruchtfolge beachten: Baue Kürbisse nicht jedes Jahr am selben Standort an, um Krankheiten und Schädlingen vorzubeugen.
* Eigene Samen gewinnen: Wenn du möchtest, kannst du aus deinen Kürbissen eigene Samen gewinnen. Lasse dazu einen Kürbis vollständig ausreifen und entnehme die Samen. Trockne sie gut und lagere sie an einem kühlen und trockenen Ort.
Ich hoffe, dieser Leitfaden hat dir geholfen, deine Kürbisanbau-Träume zu verwirklichen. Mit ein wenig Geduld und den richtigen Tipps steht einer reichen Ernte nichts mehr im Wege. Viel Spaß beim Gärtnern
Conclusion
So, there you have it! Mastering the art of growing gourds successfully doesn’t require a green thumb blessed by the garden gods, just a little know-how and a willingness to get your hands dirty. We’ve explored the essential steps, from selecting the right seeds and preparing the soil to providing adequate support and protecting your precious gourds from pests and diseases. But the real magic lies in the proactive approach to pollination and the careful curing process that transforms these garden gems into lasting works of art.
Why is this DIY trick a must-try? Because it empowers you to take control of your gourd-growing journey, ensuring a bountiful harvest of uniquely shaped and sized gourds that you can proudly display or transform into stunning crafts. Imagine the satisfaction of gifting a hand-painted gourd birdhouse to a loved one, or decorating your home with intricately carved gourd lanterns that you grew yourself. The possibilities are endless!
Don’t be afraid to experiment with different gourd varieties. Try growing birdhouse gourds for their classic shape, or explore the whimsical forms of dipper gourds and bottle gourds. Consider adding ornamental gourds to your garden for a splash of color and texture. You can even try growing gourds on different types of supports, such as trellises, fences, or even old trees, to create a unique and visually appealing display.
Remember, growing gourds successfully is a journey, not a destination. There will be challenges along the way, but with patience, persistence, and a little bit of creativity, you can overcome them and reap the rewards of a truly fulfilling gardening experience.
We encourage you to embrace this DIY trick and embark on your own gourd-growing adventure. Share your experiences with us in the comments below! We’d love to hear about your successes, your challenges, and your creative gourd projects. Let’s build a community of gourd enthusiasts who inspire and support each other. Happy growing!
Frequently Asked Questions (FAQs)
What is the best time to start growing gourds?
The ideal time to start growing gourds is typically after the last frost in spring, when the soil has warmed up to at least 65°F (18°C). Gourds require a long growing season, typically 90-120 days, so starting them early is crucial, especially in cooler climates. You can start seeds indoors 4-6 weeks before the last frost to get a head start. Just be sure to harden off the seedlings gradually before transplanting them outdoors.
How much space do gourds need to grow?
Gourds are vigorous vines that require ample space to spread. Allow at least 4-6 feet between plants, and provide a sturdy trellis or support system for them to climb. If you’re growing gourds on the ground, give them even more space to sprawl. Remember that some gourd varieties can produce vines that reach 20 feet or more in length, so plan accordingly.
What kind of soil is best for growing gourds?
Gourds thrive in well-drained, fertile soil that is rich in organic matter. Amend your soil with compost, aged manure, or other organic materials before planting to improve drainage and fertility. A slightly acidic to neutral soil pH (6.0-7.0) is ideal. Conduct a soil test to determine the pH and nutrient levels of your soil, and adjust accordingly.
How often should I water my gourd plants?
Gourds need consistent moisture, especially during hot, dry weather. Water deeply and regularly, aiming to keep the soil consistently moist but not waterlogged. Avoid overhead watering, as this can promote fungal diseases. Use a soaker hose or drip irrigation system to deliver water directly to the roots. Mulching around the plants can also help to retain moisture and suppress weeds.
How do I pollinate my gourds if there are no bees?
Gourds have separate male and female flowers. If you’re not seeing a lot of bee activity in your garden, you may need to hand-pollinate your gourds to ensure fruit set. Identify the male flowers (they have a long, thin stem) and the female flowers (they have a small, immature gourd at the base). In the early morning, when the flowers are open, use a small paintbrush or cotton swab to collect pollen from the male flower and transfer it to the stigma of the female flower. Repeat this process for several days to increase the chances of successful pollination.
How do I know when my gourds are ripe?
Gourds are typically ready to harvest in the fall, after the vines have died back and the gourds have turned hard and dry. The skin of the gourd should be firm and resistant to scratching. The stem connecting the gourd to the vine should also be dry and brown. Leave the gourds on the vine as long as possible to allow them to fully mature and cure.
How do I cure my gourds after harvesting them?
Curing is essential for preserving gourds and preventing them from rotting. After harvesting, wash the gourds with a mild soap and water solution to remove any dirt or debris. Place the gourds in a well-ventilated area, such as a garage or shed, where they will be protected from frost and direct sunlight. Arrange the gourds so that they are not touching each other, and turn them regularly to ensure even drying. The curing process can take several weeks or even months, depending on the size and thickness of the gourds. You’ll know the gourds are fully cured when they are lightweight and the seeds rattle inside.
What are some common pests and diseases that affect gourds?
Common pests that affect gourds include squash bugs, squash vine borers, and aphids. Diseases include powdery mildew, downy mildew, and blossom end rot. Regularly inspect your plants for signs of pests or diseases, and take appropriate action to control them. Use organic pest control methods whenever possible, such as insecticidal soap, neem oil, or diatomaceous earth. Ensure good air circulation around your plants to prevent fungal diseases.
Can I eat gourds?
While some gourds are edible when young, most are grown for ornamental or crafting purposes and are not considered palatable. Edible gourds, such as spaghetti squash and butternut squash, are typically harvested before they fully mature and have a different texture and flavor than ornamental gourds. It’s important to identify the type of gourd you are growing before attempting to eat it.
How can I decorate my gourds?
The possibilities for decorating gourds are endless! You can paint them, carve them, wood burn them, or embellish them with beads, shells, or other decorative materials. Use acrylic paints for a durable finish, and seal your finished gourds with a clear varnish or polyurethane to protect them from the elements. Let your creativity run wild and create unique and personalized gourd art that reflects your own style.

Leave a Comment