

Grow lemongrass year round, even if you live in a climate that seems determined to thwart your tropical dreams! Have you ever craved the vibrant, citrusy zing of lemongrass in your cooking, only to be met with a sad, brown clump in your garden after the first frost? I know I have! It’s frustrating, especially when you consider that lemongrass, a staple in Southeast Asian cuisine, has been cultivated for centuries, not just for its culinary uses but also for its medicinal properties.
From fragrant Thai curries to soothing herbal teas, lemongrass adds a unique flavor profile that’s hard to replicate. But what if I told you that you could enjoy fresh lemongrass, bursting with flavor, all year long, regardless of where you live? This DIY guide is your secret weapon to conquer the seasons and grow lemongrass year round, bringing a touch of the tropics to your kitchen, no matter the weather outside.
We’ll explore simple, effective techniques to protect your lemongrass from the cold, ensuring a continuous supply of this amazing herb. Say goodbye to expensive grocery store runs and hello to homegrown goodness! Let’s get started and unlock the secrets to a thriving, year-round lemongrass harvest.
Zitronengras das ganze Jahr über selbst anbauen: Ein DIY-Leitfaden
Hallo liebe Gartenfreunde! Habt ihr euch jemals gefragt, wie ihr das frische, zitronige Aroma von Zitronengras das ganze Jahr über genießen könnt, egal ob es draußen schneit oder die Sonne scheint? Ich zeige euch, wie ihr Zitronengras erfolgreich in Innenräumen anbauen könnt, sodass ihr immer frische Zutaten für eure asiatischen Gerichte, Tees oder sogar duftende DIY-Projekte zur Hand habt. Keine Sorge, es ist einfacher als ihr denkt!
Was ihr braucht:
Bevor wir loslegen, hier eine Liste der Dinge, die ihr benötigt:
* Zitronengras-Stängel: Am besten aus dem Supermarkt oder Asia-Laden. Achtet darauf, dass sie gesund aussehen und noch Wurzelansätze haben.
* Ein Glas oder eine Vase: Für die Bewurzelung.
* Wasser: Am besten gefiltert oder abgestanden.
* Blumentöpfe: Mit Drainagelöchern.
* Blumenerde: Eine gut durchlässige Mischung ist ideal.
* Flüssigdünger: Für Kräuter oder Gemüse.
* Eine Sprühflasche: Zum Befeuchten der Blätter.
* Ein sonniger Standort: Ein Fensterbrett mit viel Licht ist perfekt.
* Optional: Eine Anzuchtlampe, falls ihr nicht genügend Sonnenlicht habt.
Phase 1: Bewurzelung der Zitronengras-Stängel
Das Bewurzeln der Stängel ist der erste und wichtigste Schritt. Hier ist, wie ich es mache:
1. Vorbereitung der Stängel: Nehmt eure Zitronengras-Stängel und entfernt die äußeren, trockenen oder beschädigten Blätter. Lasst nur die inneren, grünen Blätter übrig. Schneidet die Stängel am unteren Ende leicht an, um die Wasseraufnahme zu erleichtern.
2. Einweichen im Wasser: Füllt euer Glas oder eure Vase mit Wasser. Achtet darauf, dass das Wasser sauber ist. Stellt die vorbereiteten Zitronengras-Stängel hinein, sodass die unteren Enden etwa 2-3 cm im Wasser stehen. Die Blätter sollten nicht im Wasser sein, da sie sonst faulen könnten.
3. Standortwahl: Stellt das Glas an einen warmen, hellen Ort, aber nicht in direktes Sonnenlicht. Ein Fensterbrett ist ideal.
4. Wasserwechsel: Wechselt das Wasser alle 1-2 Tage, um es frisch und sauber zu halten. Das verhindert die Bildung von Bakterien und fördert die Wurzelbildung.
5. Geduld ist gefragt: Nach etwa 1-3 Wochen solltet ihr sehen, wie sich kleine Wurzeln bilden. Habt Geduld, es kann manchmal etwas länger dauern. Die Wurzeln sollten mindestens 2-3 cm lang sein, bevor ihr die Stängel einpflanzt.
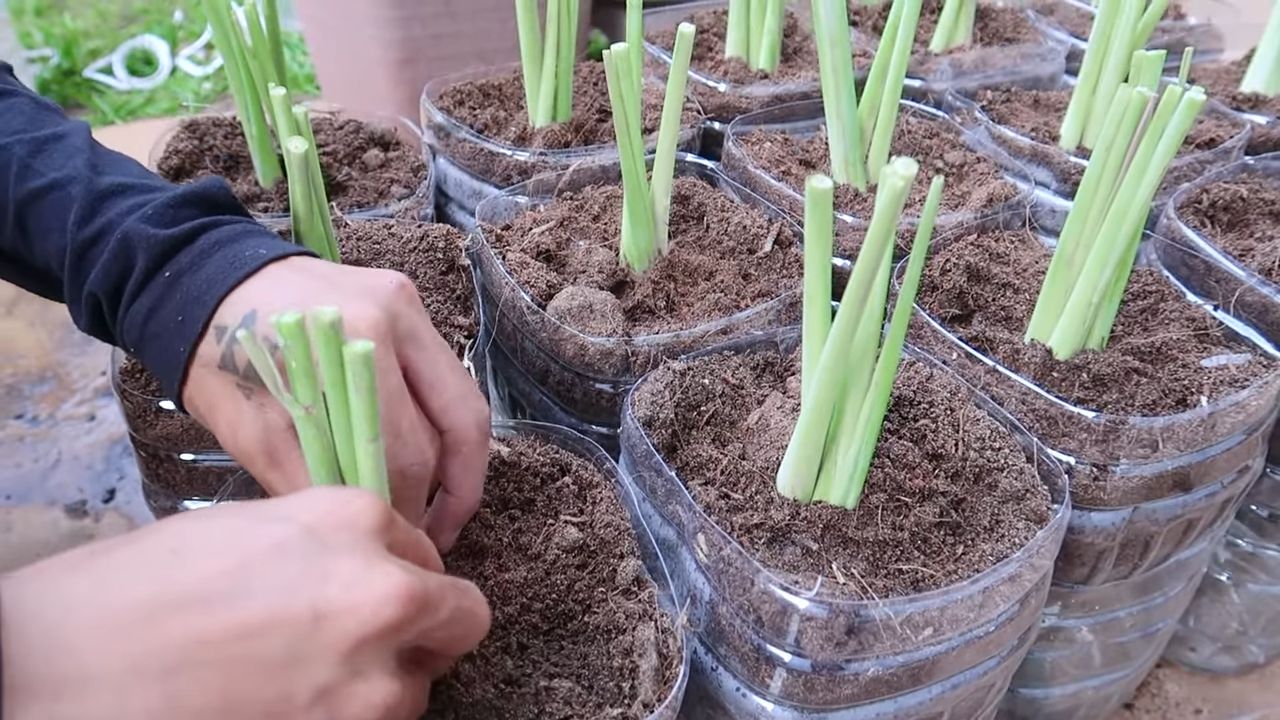
Phase 2: Einpflanzen des Zitronengrases
Sobald die Wurzeln ausreichend entwickelt sind, ist es Zeit, das Zitronengras einzupflanzen.
1. Vorbereitung der Töpfe: Wählt Blumentöpfe mit Drainagelöchern, um Staunässe zu vermeiden. Füllt die Töpfe mit eurer Blumenerde. Lasst etwa 2-3 cm Platz bis zum Rand des Topfes.
2. Einpflanzen der Stängel: Macht mit eurem Finger oder einem kleinen Löffel ein Loch in die Erde, das groß genug ist, um die Wurzeln des Zitronengrases aufzunehmen. Setzt die Stängel vorsichtig in die Löcher und bedeckt die Wurzeln mit Erde. Drückt die Erde leicht an, um die Stängel zu stabilisieren.
3. Angießen: Gießt die frisch eingepflanzten Stängel gründlich an. Das hilft der Erde, sich um die Wurzeln zu setzen und versorgt die Pflanzen mit Feuchtigkeit.
4. Standortwahl (erneut): Stellt die Töpfe an einen sonnigen Standort. Zitronengras liebt viel Licht, also je mehr Sonne, desto besser. Wenn ihr nicht genügend Sonnenlicht habt, könnt ihr eine Anzuchtlampe verwenden.
Phase 3: Pflege des Zitronengrases in Innenräumen
Die richtige Pflege ist entscheidend, damit euer Zitronengras in Innenräumen gedeiht.
1. Bewässerung: Gießt das Zitronengras regelmäßig, aber vermeidet Staunässe. Die Erde sollte immer leicht feucht sein, aber nicht durchnässt. Überprüft die Feuchtigkeit der Erde, indem ihr euren Finger etwa 2-3 cm tief in die Erde steckt. Wenn sich die Erde trocken anfühlt, ist es Zeit zu gießen.
2. Luftfeuchtigkeit: Zitronengras mag eine hohe Luftfeuchtigkeit. Ihr könnt die Luftfeuchtigkeit erhöhen, indem ihr die Blätter regelmäßig mit Wasser besprüht oder die Töpfe auf eine Schale mit Kieselsteinen und Wasser stellt. Das verdunstende Wasser erhöht die Luftfeuchtigkeit in der Umgebung der Pflanzen.
3. Düngung: Düngt das Zitronengras alle 2-4 Wochen mit einem Flüssigdünger für Kräuter oder Gemüse. Befolgt die Anweisungen auf der Düngerpackung. Düngen ist besonders wichtig während der Wachstumsperiode (Frühling und Sommer).
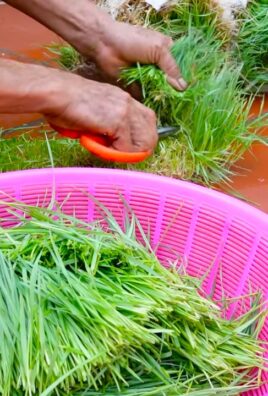
4. Beschneidung: Schneidet die Blätter regelmäßig zurück, um das Wachstum zu fördern und die Pflanzen buschiger zu machen. Ihr könnt die abgeschnittenen Blätter zum Kochen oder für Tees verwenden. Entfernt auch regelmäßig trockene oder braune Blätter.
5. Umpflanzen: Wenn die Töpfe zu klein werden, müsst ihr das Zitronengras in größere Töpfe umpflanzen. Das ist in der Regel alle 1-2 Jahre notwendig. Wählt Töpfe, die etwa 2-3 cm größer sind als die vorherigen.
6. Schädlingsbekämpfung: Achtet auf Schädlinge wie Blattläuse oder Spinnmilben. Wenn ihr Schädlinge entdeckt, könnt ihr sie mit einem milden Insektizid oder einer Seifenlösung bekämpfen. Sprüht die Blätter gründlich ein, auch die Unterseiten.
Zusätzliche Tipps für den Erfolg:
* Licht ist entscheidend: Zitronengras braucht viel Licht, um gut zu wachsen. Wenn ihr nicht genügend Sonnenlicht habt, investiert in eine Anzuchtlampe.
* Gute Drainage: Staunässe ist der Feind des Zitronengrases. Achtet darauf, dass die Töpfe gute Drainagelöcher haben und verwendet eine gut durchlässige Blumenerde.
* Regelmäßige Pflege: Regelmäßige Bewässerung, Düngung und Beschneidung sind wichtig, damit euer Zitronengras gesund und produktiv bleibt.
* Beobachtung: Beobachtet eure Pflanzen regelmäßig, um Probleme frühzeitig zu erkennen und zu beheben.
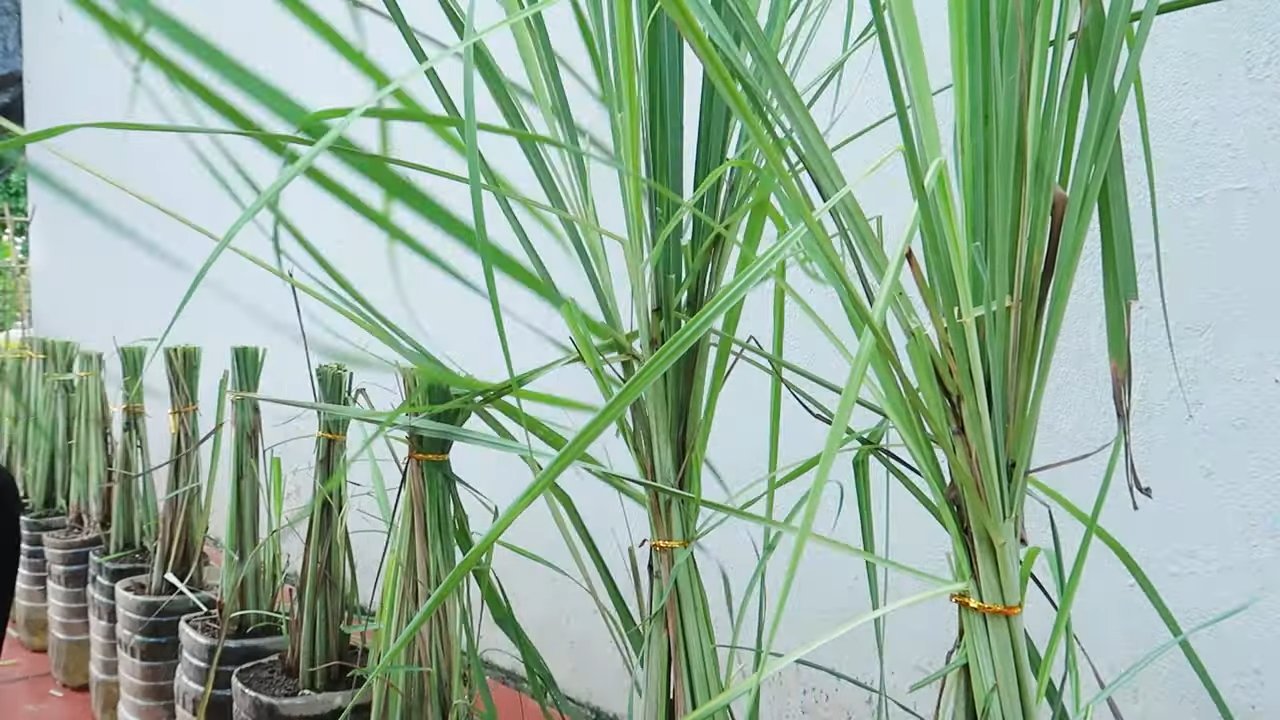
Ernte des Zitronengrases
Ihr könnt das Zitronengras ernten, sobald die Stängel dick genug sind. Schneidet die Stängel am unteren Ende ab, etwa 2-3 cm über dem Boden. Ihr könnt die Stängel frisch verwenden oder sie trocknen, um sie später zu verwenden. Die abgeschnittenen Stängel werden wieder austreiben, sodass ihr immer wieder ernten könnt.
Ich hoffe, dieser Leitfaden hilft euch dabei, Zitronengras das ganze Jahr über erfolgreich in Innenräumen anzubauen. Mit etwas Geduld und Pflege könnt ihr euch immer über frisches Zitronengras freuen! Viel Spaß beim Gärtnern!
Conclusion
So, there you have it! Growing lemongrass year-round doesn’t have to be a pipe dream relegated to tropical climates. With a little ingenuity and this simple DIY trick, you can enjoy the vibrant, citrusy flavor of fresh lemongrass whenever your culinary heart desires. This method not only extends the growing season but also provides a sustainable way to access this versatile herb, reducing your reliance on store-bought options and minimizing waste.
This isn’t just about having lemongrass on hand; it’s about embracing a more self-sufficient and rewarding approach to cooking. Imagine the satisfaction of adding freshly harvested lemongrass to your Thai curries, Vietnamese pho, or even a refreshing herbal tea, knowing you nurtured it from a simple stalk. The difference in flavor between fresh and dried lemongrass is truly remarkable, and this DIY method allows you to experience that difference firsthand, all year long.
Why is this DIY trick a must-try? Because it’s cost-effective, environmentally friendly, and incredibly rewarding. You’re not just growing lemongrass; you’re cultivating a connection to your food and enhancing your culinary creations. Plus, it’s a fantastic conversation starter!
Looking for variations? Consider experimenting with different potting mixes to find what works best for your local climate and growing conditions. You can also try propagating lemongrass from seed, although this method is generally more challenging and time-consuming. For those with limited space, container gardening is an excellent option. Choose a large pot with good drainage and ensure your lemongrass receives plenty of sunlight. You can even bring your potted lemongrass indoors during the coldest months to provide extra protection.
Don’t be afraid to get creative! Try using different types of containers, such as repurposed buckets or even old tires. Just make sure they have adequate drainage. You can also experiment with different fertilizers to see which one promotes the most vigorous growth. Organic options like compost tea or fish emulsion are excellent choices.
We wholeheartedly encourage you to try this DIY trick for growing lemongrass year-round. It’s a simple yet effective way to elevate your cooking and connect with nature. Once you’ve given it a go, we’d love to hear about your experience! Share your tips, tricks, and photos in the comments below. Let’s build a community of lemongrass enthusiasts and inspire others to embrace the joy of homegrown herbs. Your insights could be invaluable to someone just starting out. So, grab a stalk of lemongrass, follow these simple steps, and get ready to enjoy the fresh, vibrant flavor of homegrown lemongrass all year long! We can’t wait to see your lemongrass thriving!
Frequently Asked Questions (FAQ)
What kind of lemongrass should I use to start?
Ideally, you should use fresh lemongrass stalks from a reputable grocery store or Asian market. Look for stalks that are firm, green, and have a bulbous base. Avoid stalks that are dry, brown, or show signs of mold. Organic lemongrass is always a good choice if available. The key is to find stalks that are healthy and haven’t been sitting on the shelf for too long. The fresher the stalk, the better the chances of successful rooting.
How long does it take for lemongrass to root using this method?
Generally, you should start to see roots emerge within 1-3 weeks. The exact timeframe can vary depending on factors such as water temperature, sunlight exposure, and the overall health of the lemongrass stalk. Be patient and change the water every few days to prevent bacterial growth. Once the roots are about an inch long, you can transplant the lemongrass into a pot with well-draining soil.
What type of soil is best for growing lemongrass?
Lemongrass thrives in well-draining soil that is rich in organic matter. A good potting mix should consist of equal parts of garden soil, compost, and perlite or vermiculite. This combination provides the necessary nutrients, drainage, and aeration for healthy root growth. Avoid using heavy clay soils, as they can retain too much moisture and lead to root rot. You can also amend your soil with aged manure or other organic fertilizers to further enhance its fertility.
How much sunlight does lemongrass need?
Lemongrass requires at least 6-8 hours of direct sunlight per day to thrive. If you’re growing lemongrass indoors, place it near a sunny window or supplement with grow lights. Insufficient sunlight can result in weak, leggy growth and reduced flavor. During the summer months, you can move your lemongrass outdoors to a sunny location. Just be sure to gradually acclimate it to the increased sunlight to prevent sunburn.
How often should I water my lemongrass?
Water your lemongrass regularly, especially during hot and dry weather. The soil should be kept consistently moist but not waterlogged. Check the soil moisture by sticking your finger about an inch deep. If the soil feels dry, it’s time to water. Avoid overwatering, as this can lead to root rot. During the winter months, reduce watering frequency as the plant’s growth slows down.
How do I fertilize my lemongrass?
Feed your lemongrass with a balanced fertilizer every 2-3 weeks during the growing season (spring and summer). You can use a liquid fertilizer diluted to half strength or a slow-release granular fertilizer. Organic options like compost tea or fish emulsion are also excellent choices. Avoid over-fertilizing, as this can burn the roots. During the winter months, reduce or eliminate fertilization.
How do I harvest lemongrass?
To harvest lemongrass, simply cut off the stalks near the base of the plant. Use a sharp knife or pruning shears to make a clean cut. You can harvest individual stalks as needed or harvest the entire plant at once. The lower portion of the stalk, near the bulb, is the most flavorful. Remove any tough outer leaves before using the lemongrass in your cooking.
Can I grow lemongrass in a container?
Yes, lemongrass grows very well in containers. Choose a large pot with good drainage and fill it with well-draining potting mix. Ensure your lemongrass receives plenty of sunlight and water it regularly. Container-grown lemongrass may require more frequent fertilization than lemongrass grown in the ground. You can also bring your container-grown lemongrass indoors during the winter months to protect it from frost.
How do I overwinter lemongrass?
Lemongrass is a tropical plant and is not frost-hardy. If you live in a cold climate, you’ll need to overwinter your lemongrass indoors. Before the first frost, dig up your lemongrass plant and pot it in a large container. Cut back the foliage to about 6 inches. Place the container in a sunny location indoors and water it sparingly. You can also store the lemongrass in a cool, dark place, such as a basement or garage. Just be sure to keep the soil slightly moist. In the spring, after the last frost, you can gradually acclimate your lemongrass back to the outdoors.
My lemongrass is turning brown. What’s wrong?
Browning leaves on lemongrass can be caused by several factors, including underwatering, overwatering, nutrient deficiencies, or pest infestations. Check the soil moisture to ensure you’re not over or underwatering. If the soil is consistently wet, reduce watering frequency. If the soil is dry, water more often. You can also fertilize your lemongrass with a balanced fertilizer to address any nutrient deficiencies. Inspect the plant for pests, such as aphids or spider mites, and treat accordingly. If the browning is severe, you may need to prune back the affected foliage.

Leave a Comment