

Grow melons at home? Absolutely! Imagine biting into a juicy, sun-ripened melon you nurtured from seed to fruit, right in your own backyard. It’s a taste of summer that’s hard to beat, and trust me, it’s more achievable than you might think. For centuries, melons have been cultivated across various cultures, from ancient Egypt where they were buried with pharaohs, to the vibrant gardens of Persia. Their sweet taste and refreshing qualities have made them a prized crop throughout history.
But why should you bother learning how to grow melons at home? Well, store-bought melons often lack the intense flavor and sweetness of homegrown varieties. Plus, you have complete control over the growing process, ensuring your melons are free from harmful pesticides and chemicals. In this article, I’m going to share some simple yet effective DIY tricks and hacks that will help you cultivate a thriving melon patch, even if you’re a beginner gardener. We’ll cover everything from choosing the right varieties for your climate to maximizing sunlight and providing the perfect nutrients. Get ready to impress your friends and family with your homegrown melon bounty!
DIY: Grow Delicious Melons in Your Backyard Oasis
Okay, melon lovers, let’s get real. Store-bought melons are fine, but nothing beats the juicy, sweet flavor of a homegrown melon, ripened to perfection right in your own backyard. I’m going to walk you through everything you need to know to successfully grow melons at home, even if you’re a beginner gardener. Trust me, it’s easier than you think, and the reward is absolutely worth it!
Choosing Your Melon Variety
First things first, let’s talk about melon varieties. There are so many to choose from, and the best one for you will depend on your climate, space, and personal preferences. Here are a few popular options:
* Watermelon: A classic summer favorite! Look for varieties like ‘Sugar Baby’ (compact and early maturing), “Crimson Sweet” (large and flavorful), or ‘Yellow Doll’ (unique yellow flesh).
* Cantaloupe: Known for its fragrant aroma and sweet, orange flesh. ‘Hales Best Jumbo’ and ‘Athena’ are reliable choices.
* Honeydew: A refreshing and subtly sweet melon with pale green flesh. ‘Honeycrisp’ is a popular variety.
* Galia Melon: A cross between cantaloupe and honeydew, offering a unique flavor and texture.
* Specialty Melons: Don’t be afraid to experiment! There are many other interesting melon varieties, such as Charentais, Casaba, and Crenshaw.
Things to consider when choosing a variety:
* Growing Season Length: Make sure the variety you choose has a maturity date that fits within your growing season.
* Space Requirements: Some melon varieties, especially watermelons, can take up a lot of space. Choose a variety that fits your garden.
* Disease Resistance: Look for varieties that are resistant to common melon diseases in your area.
* Taste Preference: Ultimately, choose a melon that you’ll enjoy eating!
Preparing Your Melon Patch
Melons are sun-loving, heavy feeders, so proper soil preparation is crucial for success. Here’s how to get your melon patch ready:
* Sunlight: Melons need at least 6-8 hours of direct sunlight per day. Choose a location in your garden that gets plenty of sun.
* Soil: Melons prefer well-drained, fertile soil with a pH of 6.0-6.8. Amend your soil with plenty of compost or well-rotted manure to improve drainage and fertility.
* Spacing: Give your melon plants plenty of room to grow. Watermelons typically need 3-4 feet between plants, while cantaloupes and honeydews need 2-3 feet. Check the seed packet for specific spacing recommendations.
* Support: Some melon varieties, especially smaller ones, can be grown on trellises to save space and improve air circulation.
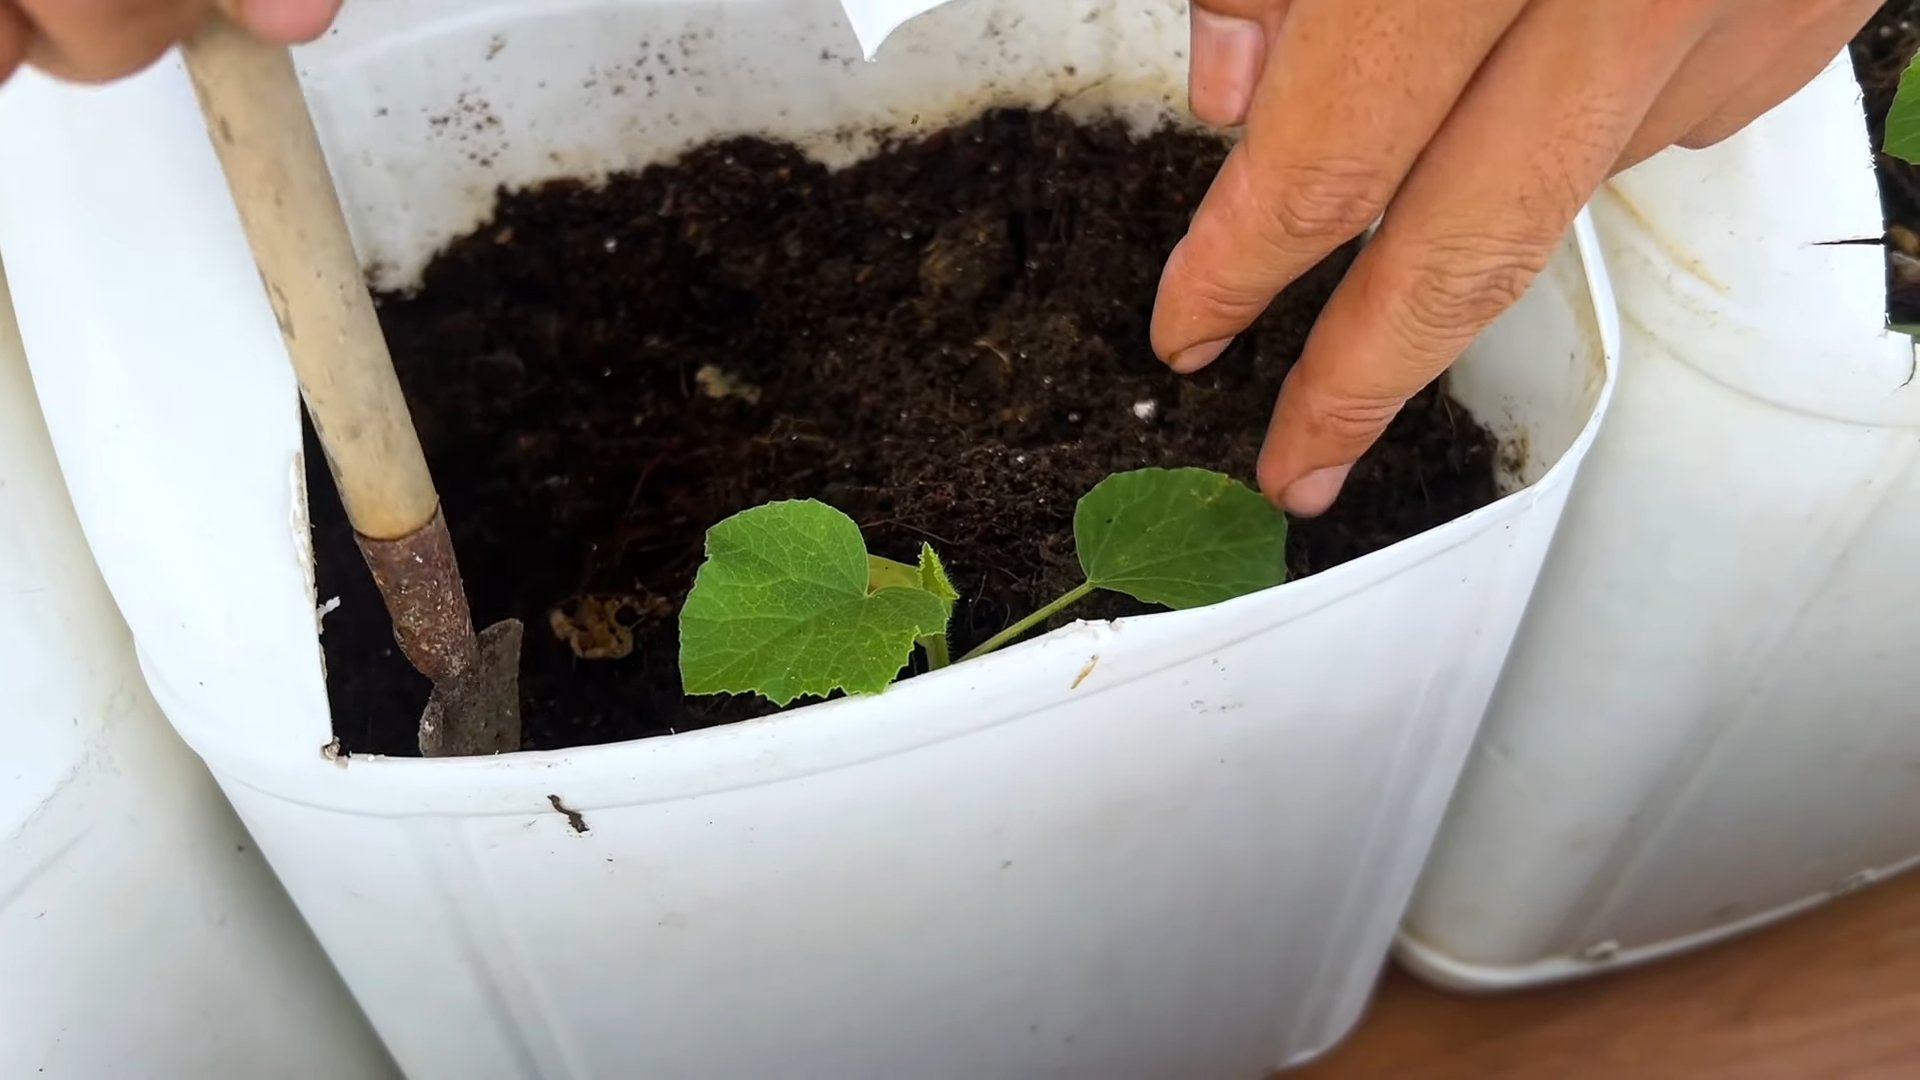
Planting Your Melon Seeds or Transplants
You can start melon seeds indoors 4-6 weeks before the last expected frost, or you can direct sow them in the garden after the soil has warmed up to at least 70掳F (21掳C).
Starting Seeds Indoors:
1. Choose Your Containers: Use seed starting trays or small pots filled with seed starting mix.
2. Sow the Seeds: Plant the seeds about 1 inch deep.
3. Water Gently: Keep the soil moist but not soggy.
4. Provide Warmth and Light: Place the trays or pots in a warm location (75-85掳F/24-29掳C) and provide plenty of light, either from a sunny window or a grow light.
5. Harden Off: Before transplanting your seedlings outdoors, gradually acclimate them to outdoor conditions by exposing them to increasing amounts of sunlight and wind over a period of 7-10 days.
Direct Sowing Seeds:
1. Prepare the Soil: Make sure the soil is warm and well-drained.
2. Sow the Seeds: Plant the seeds about 1 inch deep, following the spacing recommendations on the seed packet.
3. Water Gently: Keep the soil moist until the seeds germinate.
4. Thin Seedlings: Once the seedlings emerge, thin them to the strongest plant per spacing recommendation.
Transplanting Seedlings:
1. Dig Holes: Dig holes that are slightly larger than the root balls of your seedlings.
2. Gently Remove Seedlings: Carefully remove the seedlings from their containers, being careful not to damage the roots.
3. Plant Seedlings: Place the seedlings in the holes and backfill with soil.
4. Water Thoroughly: Water the seedlings well after planting.
Caring for Your Melon Plants
Once your melon plants are established, it’s important to provide them with proper care to ensure a bountiful harvest.
* Watering: Melons need consistent watering, especially during hot, dry weather. Water deeply and regularly, aiming for about 1-2 inches of water per week. Avoid overhead watering, as this can promote fungal diseases. Drip irrigation is a great option for watering melons.
* Fertilizing: Melons are heavy feeders and benefit from regular fertilization. Use a balanced fertilizer (e.g., 10-10-10) every 2-3 weeks, or use a fertilizer specifically formulated for melons.
* Weeding: Keep your melon patch free of weeds, as weeds can compete with your melon plants for water and nutrients. Mulching can help suppress weeds and retain moisture in the soil.
* Pest and Disease Control: Monitor your melon plants regularly for pests and diseases. Common melon pests include aphids, squash bugs, and cucumber beetles. Common melon diseases include powdery mildew, downy mildew, and fusarium wilt. Use organic pest control methods whenever possible, such as insecticidal soap, neem oil, or row covers. Choose disease-resistant varieties to minimize disease problems.
* Pollination: Melons require pollination to produce fruit. If you’re not seeing any fruit set, you may need to hand-pollinate your melon flowers. To hand-pollinate, use a small paintbrush to transfer pollen from the male flowers to the female flowers. Female flowers have a small fruit behind the flower, while male flowers do not.
Training and Pruning (Optional)
While not strictly necessary, training and pruning your melon plants can improve air circulation, reduce disease problems, and encourage larger fruit.
* Trellising: If you’re growing melons on trellises, train the vines to climb the trellis by gently tying them to the support structure.
* Pruning: You can prune your melon plants to remove excess foliage and encourage fruit development. Remove any yellowing or diseased leaves, as well as any suckers (small shoots that grow from the base of the plant).
Harvesting Your Melons
Knowing when to harvest your melons is key to enjoying their full flavor and sweetness. Here are some tips for harvesting different types of melons:
* Watermelon: Look for a dull, rather than shiny, rind. The underside of the melon (where it rests on the ground) should be yellow or cream-colored. The tendril closest to the melon should be brown and dry. When you thump the melon, it should sound hollow.
* Cantaloupe: The melon should have a fragrant aroma. The stem should slip easily from the melon when it’s ripe. The rind should be a golden-tan color.
* Honeydew: The melon should have a smooth, waxy rind. The blossom end (opposite the stem end) should be slightly soft. The melon should have a slightly sweet aroma.
Harvesting Tips:
* Use a sharp knife or pruning shears to harvest your melons.
* Handle the melons carefully to avoid bruising them.
* Store harvested melons in a cool, dry place.
Troubleshooting Common Melon Problems
Even with the best care, you may encounter some problems when growing melons. Here are some common issues and how to address them:
* Poor Fruit Set: This can be caused by lack of pollination, cool temperatures, or nutrient deficiencies. Hand-pollinate your melon flowers, provide adequate warmth, and fertilize regularly.
* Cracked Fruit: This can be caused by inconsistent watering or rapid changes in temperature. Water your melon plants consistently and protect them from extreme temperature fluctuations.
* Pest Infestations: Monitor your melon plants regularly for pests and use organic pest control methods to address infestations.
* Disease Problems: Choose disease-resistant varieties and practice good sanitation to minimize disease problems.
Enjoying Your Homegrown Melons
Congratulations! You’ve successfully grown your own delicious melons. Now it’s time to enjoy the fruits (or rather, melons) of your labor.
* Eat Them Fresh: There’s nothing like biting into
Conclusion
So, there you have it! Growing melons at home, while it might seem daunting at first, is entirely achievable with a little planning and the right approach. We’ve explored a simple yet effective DIY trick that can significantly boost your chances of a bountiful harvest, even in less-than-ideal conditions. This isn’t just about saving money; it’s about connecting with your food, understanding the growing process, and experiencing the immense satisfaction of biting into a juicy, homegrown melon.
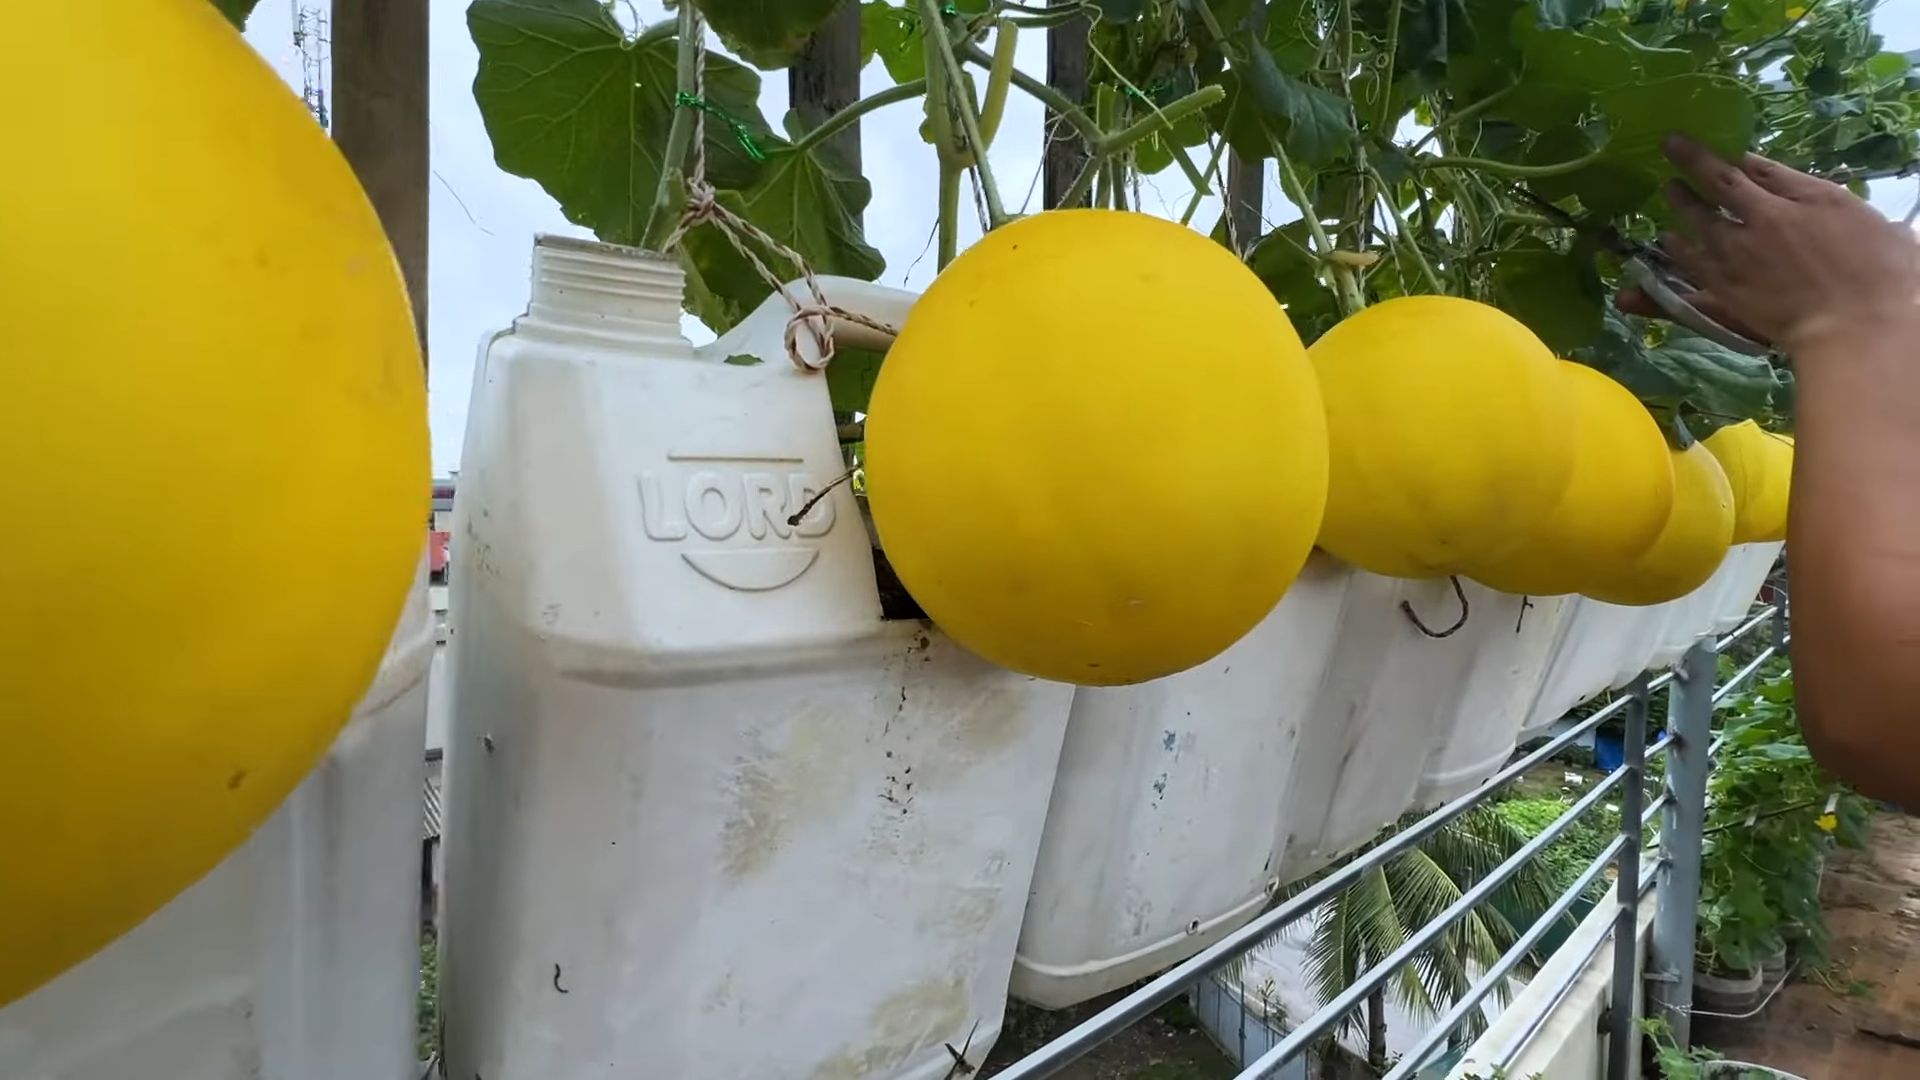
Why is this DIY trick a must-try? Because it addresses some of the most common challenges faced by home gardeners attempting to grow melons. It provides crucial support for the developing fruit, preventing rot and pest damage, while also optimizing sunlight exposure for even ripening. Think of it as a little helping hand for your melon vines, ensuring they can focus their energy on producing the sweetest, most flavorful fruit possible.
But don’t stop there! Feel free to experiment with variations on this technique. Instead of using nylon stockings, you could repurpose old t-shirts or even create small hammocks from netting. The key is to provide adequate support and ventilation. Consider the size and weight of the melon variety you’re growing when choosing your materials. For smaller melons like cantaloupe, lighter fabrics will suffice, while larger watermelons might require something more robust.
Another variation to consider is the placement of your melon supports. If you’re growing melons on a trellis, you can attach the supports directly to the trellis structure. This is particularly useful for vertical gardening and maximizing space in smaller gardens. You can also adjust the height of the supports as the melons grow, ensuring they remain properly cradled throughout their development.
Furthermore, think about companion planting to enhance your melon patch. Marigolds can deter pests, while basil can improve the flavor of your melons. A well-planned garden ecosystem can contribute to healthier plants and a more abundant harvest.
Ultimately, the best way to discover what works best for you is to get your hands dirty and try it out! Don’t be afraid to experiment and adapt the technique to suit your specific needs and growing conditions. Remember, gardening is a journey of learning and discovery.
We wholeheartedly encourage you to try this DIY trick for growing melons at home. It’s a simple, cost-effective way to improve your chances of success and enjoy the unparalleled taste of homegrown fruit. And most importantly, we want to hear about your experience! Share your photos, tips, and stories in the comments below. Let’s create a community of melon-growing enthusiasts and learn from each other’s successes and challenges. Your insights could inspire others to embark on their own melon-growing adventures. Let’s cultivate a community of successful home gardeners, one delicious melon at a time!
Frequently Asked Questions (FAQ)
Q: What kind of melons does this DIY trick work best for?
A: This trick is versatile and can be used for a wide variety of melons, including watermelons, cantaloupes, honeydew melons, and even smaller varieties like sugar baby watermelons. The key is to adjust the size and strength of the support to match the weight of the melon. For larger watermelons, you’ll need a more robust support system than you would for smaller cantaloupes. Consider the mature size of the melon variety you’re growing when planning your support system.
Q: When should I start supporting my melons?
A: It’s best to start supporting your melons as soon as they begin to develop and reach a significant size. This is typically when they are about the size of a softball or slightly larger. Supporting them early prevents them from resting directly on the ground, which can lead to rot and pest problems. Regularly check your melon vines and provide support as soon as you notice the fruits starting to grow.
Q: What if I don’t have nylon stockings? What else can I use?
A: No problem! There are several alternatives to nylon stockings. Old t-shirts, netting, burlap sacks, or even strips of fabric can be used to create a supportive hammock for your melons. The most important thing is to choose a material that is strong enough to support the weight of the melon and allows for good air circulation. Avoid using materials that are too dense or waterproof, as this can trap moisture and promote rot.
Q: How do I attach the support to the vine or trellis?
A: The method of attachment will depend on the type of support you’re using and the structure of your melon vines. For nylon stockings or fabric strips, you can gently tie them around the stem of the melon vine, being careful not to constrict the stem or damage the plant. If you’re using a trellis, you can attach the support directly to the trellis structure using zip ties, twine, or even S-hooks. Make sure the support is securely attached and can bear the weight of the melon.
Q: Will this DIY trick protect my melons from pests?
A: While this trick primarily provides support and prevents rot, it can also offer some protection from pests. By keeping the melons off the ground, you reduce their exposure to ground-dwelling pests like slugs and snails. Additionally, the support system can make it more difficult for pests to access the melons. However, it’s still important to monitor your melon patch regularly for pests and take appropriate measures to control them if necessary. Consider using organic pest control methods like neem oil or insecticidal soap.
Q: How often should I check the support system?
A: It’s a good idea to check the support system regularly, especially as the melons grow larger. Make sure the support is still securely attached and that the melon is properly cradled. Adjust the support as needed to accommodate the growing size and weight of the melon. Also, check for any signs of wear and tear on the support material and replace it if necessary.
Q: Can I use this trick for melons grown in containers?
A: Yes, this trick can be adapted for melons grown in containers. You’ll need to provide a sturdy support structure for the vines, such as a trellis or tomato cage. Attach the melon supports to the trellis or cage, ensuring they are strong enough to hold the weight of the melons. Container-grown melons may require more frequent watering and fertilization than those grown in the ground.
Q: What if my melons are already on the ground? Is it too late to use this trick?
A: It’s not too late! Even if your melons are already on the ground, you can still use this trick to provide support and prevent further damage. Gently lift the melon and place it in the support system, being careful not to damage the vine. This will help to improve air circulation and reduce the risk of rot.
Q: How do I know when my melons are ripe?
A: Determining when a melon is ripe can be tricky, but there are a few telltale signs to look for. For watermelons, look for a dull rind and a yellowish spot on the underside where it rested on the ground. You should also be able to thump the melon and hear a deep, hollow sound. For cantaloupes, look for a sweet aroma and a stem that slips easily from the vine. Honeydew melons should have a creamy yellow color and a slightly waxy feel. With experience, you’ll develop a better sense of when your melons are perfectly ripe.
Q: Will this DIY trick guarantee a successful melon harvest?
A: While this DIY trick can significantly improve your chances of success, it’s not a guarantee. Many factors can affect melon growth, including weather conditions, soil quality, and pest and disease pressure. However, by providing support, preventing rot, and optimizing sunlight exposure, this trick can give your melons a significant boost and increase your chances of enjoying a bountiful harvest. Remember to provide your melons with adequate water, nutrients, and protection from pests and diseases for the best results.

Leave a Comment