

Grow Parsley at Home? Absolutely! Imagine stepping outside your door and snipping fresh, vibrant parsley to elevate your culinary creations. No more wilted bunches from the grocery store – just the bright, peppery flavor of homegrown goodness at your fingertips. This isn’t just about having fresh herbs; it’s about connecting with nature and adding a touch of magic to your everyday life.
Parsley, with its rich history dating back to ancient Greece and Rome, wasn’t always just a garnish. It was once revered for its medicinal properties and even used to crown victors in athletic competitions! Today, while we might not be crowning athletes with parsley, we can certainly crown our dishes with its delightful flavor. But let’s be honest, buying fresh parsley can be a gamble. It often ends up yellowing in the fridge before you even get a chance to use it all. That’s where the beauty of DIY comes in!
This article is your ultimate guide to successfully grow parsley at home, even if you think you have a black thumb. I’m going to share simple, effective tricks and hacks that will transform your balcony, patio, or even a sunny windowsill into a thriving parsley paradise. Forget complicated gardening jargon; we’re keeping it real, practical, and fun. Get ready to unlock the secrets to abundant parsley harvests and impress your friends and family with your newfound green thumb!
Growing Parsley at Home: A Comprehensive DIY Guide
Hello gardening friends! I’m excited to show you today how you can easily grow your own parsley at home. Fresh parsley straight from the garden or windowsill is unbeatable – both in taste and convenience. And the best part: it’s really not hard!
Why Grow Parsley Yourself?
- Freshness and Flavor: Homegrown parsley tastes more intense and fresh than store-bought.
- Cost Savings: Over time, you’ll save money since you won’t need to buy parsley constantly.
- Sustainability: You reduce your carbon footprint as there’s no need for transportation.
- Always Available: You’ll always have fresh parsley on hand whenever you need it for cooking.
- Therapeutic: Parsley is rich in vitamins and minerals and has anti-inflammatory properties.
What You Need for Growing Parsley
- Parsley Seeds: It’s best to choose a variety you like. There’s flat-leaf and curly parsley.
- Seed Trays or Pots: For pre-growing.
- Potting Soil: It’s best to use seed-starting soil, which is low in nutrients.
- Pots or a Garden Bed: For the later planting.
- Watering Can or Spray Bottle: For watering.
- Spade or Shovel: For transplanting.
- Labels: To identify the varieties (optional).
- A Sunny or Semi-Shady Location: Parsley needs light but not direct midday sun.
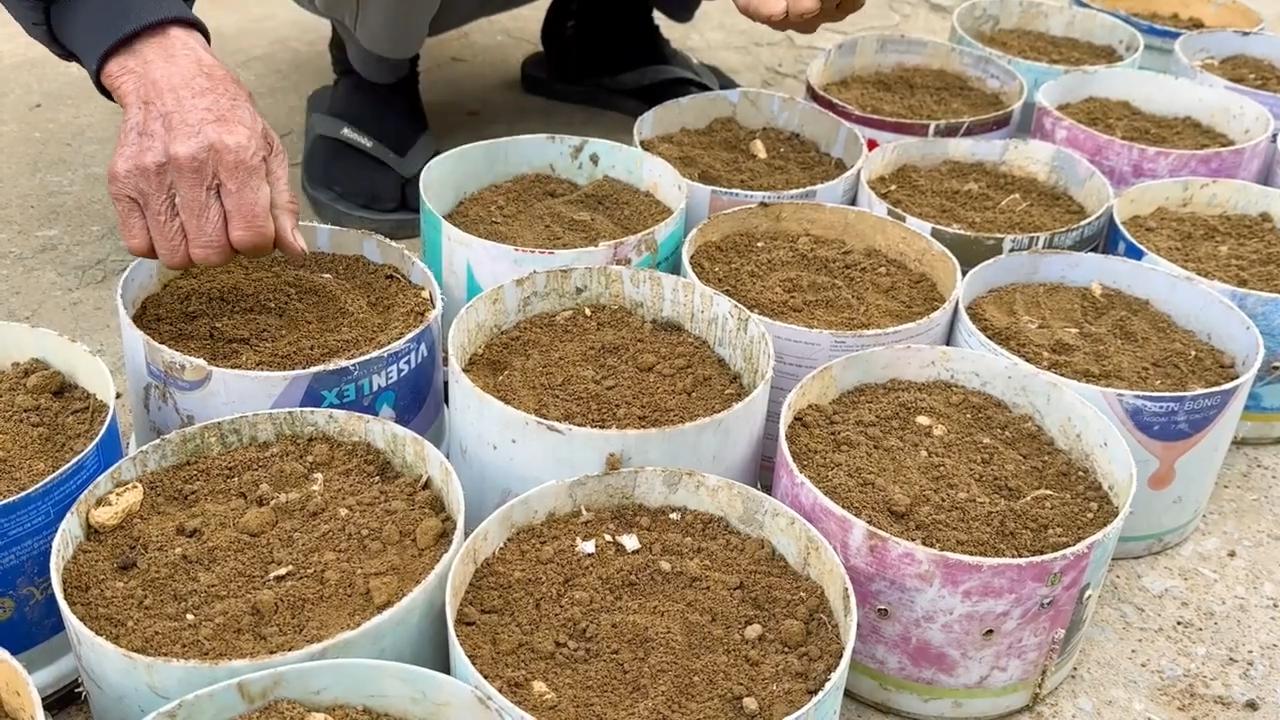
Sowing and Pre-Growing
Parsley is a light-germinator, meaning the seeds need light to sprout. Germination can take some time, so be patient!
- Prepare the Seed Trays: Fill the seed trays or pots with seed-starting soil. Gently press the soil down.
- Sow the Seeds: Evenly distribute the parsley seeds on the soil. Press them lightly but do not cover them with soil.
- Watering: Moisten the soil carefully with a spray bottle. Ensure that the soil is moist but not wet.
- Location: Place the seed trays in a bright, warm spot. Avoid direct sunlight.
- Moisture: Keep the soil moist by spraying it regularly.
- Patience: Germination can take 2-3 weeks. Don’t get discouraged!
Transplanting the Parsley
Once the parsley seedlings are big enough (about 5-7 cm tall), they can be transplanted.
- Prepare the Pots or Garden Bed: Fill the pots or garden bed with potting soil. Loosen the soil and remove weeds.
- Dig Planting Holes: Dig small holes that are large enough to accommodate the root balls of the parsley seedlings.
- Transplanting: Carefully remove the parsley seedlings from the seed trays. Be sure not to damage the roots. Place the seedlings in the planting holes and cover them with soil. Gently press the soil down.
- Watering: Water the parsley seedlings thoroughly.
- Location: Place the pots in a sunny or semi-shady location. If you planted the parsley in the garden bed, ensure that the location drains well.
Caring for Parsley
Proper care is essential for a bountiful harvest.
- Watering: Parsley needs regular watering, especially during dry weather. Make sure the soil is always moist but not soaking wet. Avoid waterlogging.
- Fertilizing: Fertilize the parsley regularly with organic fertilizer. I like to use compost or horn meal.
- Weed Control: Regularly remove weeds so that parsley has enough space and nutrients.
- Pest Protection: Watch out for pests such as aphids or snails. If necessary, use organic pest control methods.
- Pruning: Regularly prune the parsley to encourage growth. Remove any yellow or brown leaves.
Harvesting Parsley
Harvesting is the most enjoyable part!
- Harvest Time: You can start harvesting the parsley once it’s big enough. It’s best to harvest in the morning when the essential oils are most intense.
- Harvesting Technique: Cut the parsley stems with scissors or a knife. Be careful not to damage the plant.
- Storage: Fresh parsley will last for a few days in the fridge. You can also freeze it or dry it.
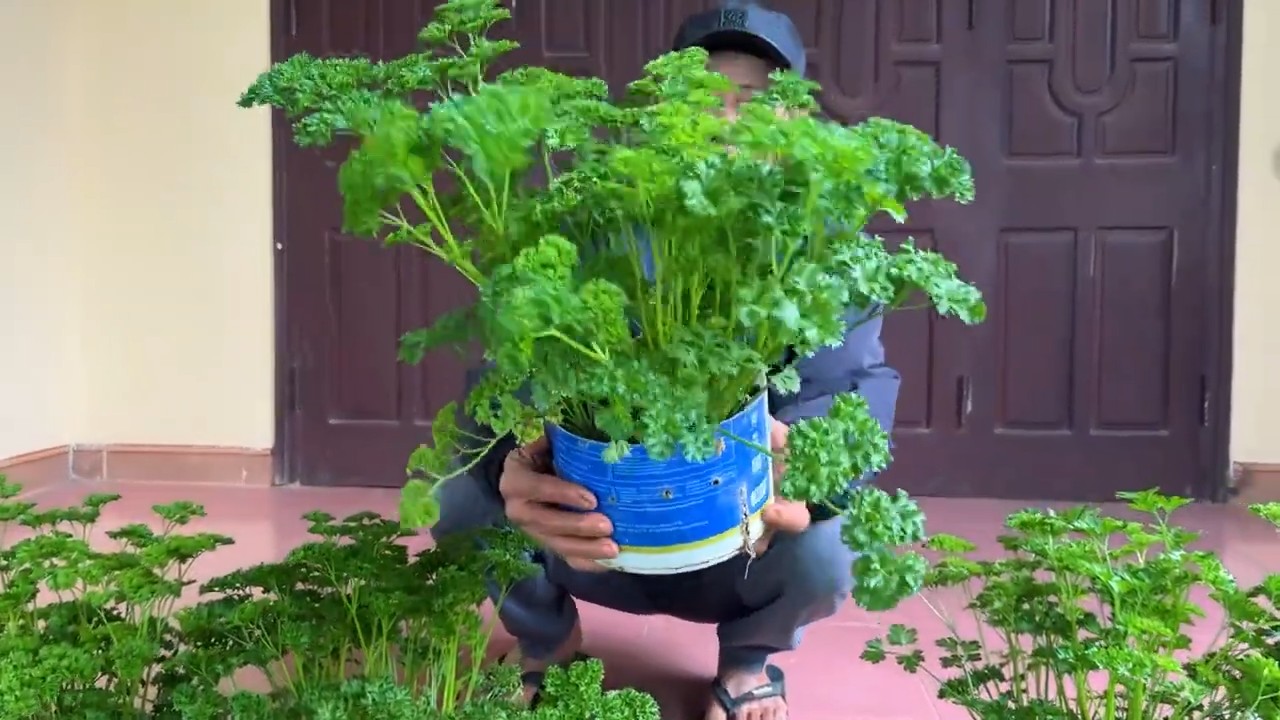
Growing Parsley in Pots on the Balcony or Windowsill
Parsley is perfect for growing in pots on your balcony or windowsill.
- Pot Size: Choose a pot with a diameter of at least 20 cm.
- Soil: Use high-quality potting soil.
- Location: Place the pot in a sunny or semi-shady spot.
- Watering: Water the parsley regularly.
- Fertilizing: Fertilize the parsley regularly with a liquid fertilizer.
Common Problems and Solutions
- Yellow Leaves: This can indicate a nutrient deficiency or too much water. Fertilize the parsley or reduce watering.
- Aphids: Control aphids using organic pest control products or wash them off with water.
- Snails: Collect snails by hand or use snail bait.
- No Germination: The seeds may be too old, or the soil may have been too dry. Use fresh seeds and make sure the soil is adequately watered.
Recommended Varieties
- Flat-Leaf Parsley (Italian Parsley): Has a strong flavor and is great for cooking.
- Curly Parsley: More decorative and has a milder taste.
- Root Parsley: Grown mainly for its roots, which can be used as a vegetable.
Additional Tips
- Parsley is Biennial: In the second year, parsley will flower and produce seeds. After flowering, the plant dies.
- Parsley and Tomatoes: Parsley makes a good companion for tomatoes as it helps ward off pests.
- Parsley and Mint: Do not plant parsley near mint, as they can interfere with each other’s growth.
Drying Parsley Properly
If you have a large harvest, you can also dry parsley to make it last longer.
Oven Drying: Spread the parsley on a baking sheet and dry it in the oven at a low temperature (about 40-50°C).
Harvesting: Harvest the parsley in the morning when the essential oils are most intense.
Cleaning: Gently wash the parsley and pat it dry.
Drying: There are several ways to dry parsley:
Air Drying: Tie the parsley into small bundles and hang it in a dry, airy place.
Conclusion
So, there you have it! Growing parsley at home is not only achievable, but it’s also a rewarding and cost-effective way to ensure you always have fresh herbs on hand. Forget those wilted, overpriced bunches from the grocery store. Imagine stepping out your back door or reaching for a pot on your windowsill and snipping vibrant, flavorful parsley whenever you need it. The difference in taste between homegrown and store-bought is truly remarkable.
This DIY trick is a must-try for several reasons. First, you’re in complete control of the growing process. You can choose organic soil, avoid harmful pesticides, and ensure your parsley receives the optimal amount of sunlight and water. Second, it’s incredibly convenient. No more last-minute trips to the store when you realize you’re out of parsley. Third, it’s a sustainable practice. You’re reducing your carbon footprint by growing your own food and minimizing packaging waste. Finally, it’s a fantastic way to connect with nature and experience the satisfaction of nurturing something from seed to harvest.
Looking to experiment? Consider growing different varieties of parsley! Flat-leaf parsley (Italian parsley) is known for its robust flavor and is ideal for cooking, while curly parsley is often used as a garnish. You can also try growing parsley in different containers, from small pots on your kitchen counter to larger raised beds in your garden. If you live in a colder climate, consider bringing your parsley indoors during the winter months to ensure a continuous supply. Another variation is to companion plant your parsley with tomatoes, carrots, or roses, as it is believed to improve their growth and flavor.
Don’t be intimidated if you’ve never grown herbs before. Parsley is relatively easy to care for, and with a little attention, you’ll be enjoying fresh, flavorful parsley in no time. We’ve provided you with all the essential information you need to get started, from choosing the right seeds to harvesting your bounty.
We wholeheartedly encourage you to give this DIY trick a try. It’s a simple, affordable, and incredibly rewarding way to enhance your culinary creations and connect with nature. Once you experience the joy of growing your own parsley, you’ll never go back to store-bought again.
We’d love to hear about your experiences! Share your tips, tricks, and photos of your homegrown parsley on our social media channels. Let us know what worked for you, what challenges you faced, and any creative ways you’ve used your fresh parsley in your cooking. Together, we can create a community of passionate home gardeners and inspire others to embrace the joy of growing their own food. So, grab your seeds, get your hands dirty, and start growing parsley at home today! You won’t regret it.
Frequently Asked Questions (FAQ)
What is the best time of year to plant parsley?
Parsley can be planted in early spring or late summer. For a spring planting, start seeds indoors 6-8 weeks before the last expected frost. For a late summer planting, sow seeds directly into the garden about 10-12 weeks before the first expected frost. Parsley is a biennial, meaning it will grow for two years, but its flavor is best in the first year.
How much sunlight does parsley need?
Parsley thrives in full sun (6-8 hours of direct sunlight per day) but can tolerate partial shade, especially in hotter climates. If you’re growing parsley indoors, place it near a sunny window or use a grow light to ensure it receives adequate light. Insufficient sunlight can lead to leggy growth and reduced flavor.
What kind of soil is best for growing parsley?
Parsley prefers well-draining soil that is rich in organic matter. A slightly acidic to neutral pH (6.0-7.0) is ideal. Amend your soil with compost or other organic materials before planting to improve drainage and fertility. You can also use a potting mix specifically formulated for herbs if you’re growing parsley in containers.
How often should I water my parsley?
Keep the soil consistently moist, but not waterlogged. Water deeply when the top inch of soil feels dry to the touch. Avoid overwatering, as this can lead to root rot. During hot, dry weather, you may need to water more frequently. Mulching around the base of the plant can help retain moisture and suppress weeds.
How do I harvest parsley?
Harvest parsley by snipping off the outer stems near the base of the plant. This encourages new growth from the center. Avoid cutting more than one-third of the plant at a time. You can harvest parsley throughout the growing season, as needed. For the best flavor, harvest in the morning after the dew has dried.
Can I grow parsley indoors?
Yes, parsley can be successfully grown indoors. Choose a pot that is at least 6 inches in diameter and has drainage holes. Use a well-draining potting mix and place the pot in a sunny location, such as a windowsill that receives at least 6 hours of direct sunlight per day. Water regularly and fertilize every few weeks with a balanced liquid fertilizer.
How do I fertilize parsley?
Parsley benefits from regular fertilization, especially when grown in containers. Use a balanced liquid fertilizer (such as 10-10-10) diluted to half strength every 2-3 weeks during the growing season. Avoid over-fertilizing, as this can lead to excessive foliage growth at the expense of flavor. You can also amend the soil with compost or other organic materials to provide a slow-release source of nutrients.
What are some common pests and diseases that affect parsley?
Parsley is generally resistant to pests and diseases, but it can be susceptible to aphids, spider mites, and parsley worms. Aphids and spider mites can be controlled with insecticidal soap or neem oil. Parsley worms are the larvae of swallowtail butterflies and can be handpicked off the plants. Root rot can occur in poorly drained soil. To prevent root rot, ensure your soil is well-draining and avoid overwatering.
How do I store fresh parsley?
Freshly harvested parsley can be stored in the refrigerator for up to a week. To store, wrap the parsley in a damp paper towel and place it in a plastic bag or container. You can also store parsley in a glass of water, like cut flowers. Change the water every day or two. Parsley can also be dried or frozen for longer storage. To dry parsley, hang it upside down in a cool, dry place or use a dehydrator. To freeze parsley, chop it and place it in ice cube trays with water or olive oil. Once frozen, transfer the cubes to a freezer bag.
Can I grow parsley from cuttings?
While it’s more common to grow parsley from seeds, you can try propagating it from cuttings. Take a cutting from a healthy stem, about 4-6 inches long, and remove the lower leaves. Dip the cut end in rooting hormone and plant it in a pot filled with moist potting mix. Cover the pot with a plastic bag to create a humid environment and place it in a warm, bright location. Keep the soil moist and wait for roots to develop, which can take several weeks. However, success rates with parsley cuttings can be lower than with other herbs.
My parsley is bolting (going to seed). What should I do?
Bolting is a natural process that occurs when parsley is exposed to high temperatures or long days. Once parsley bolts, the leaves become bitter and less flavorful. To delay bolting, provide shade during the hottest part of the day and water regularly. If your parsley has already bolted, you can still harvest the seeds for future planting. Alternatively, you can cut back the flowering stems to encourage new growth, but the flavor may still be affected.
Is parsley safe for pets?
Parsley is generally considered safe for pets in small quantities. It can even provide some health benefits, such as freshening breath and aiding digestion. However, large amounts of parsley can be toxic to pets, so it’s best to offer it in moderation. If you have any concerns, consult with your veterinarian.
Leave a Comment