

Grow Peanuts at Home? Absolutely! Imagine the satisfaction of harvesting your own homegrown peanuts, ready to be roasted, turned into creamy peanut butter, or simply enjoyed as a healthy snack. Forget the store-bought variety – we’re diving into the wonderful world of cultivating these legumes right in your backyard, balcony, or even on your sunny windowsill!
Peanuts, believe it or not, have a rich history, dating back thousands of years to South America. They were a staple food for indigenous populations and eventually spread across the globe, becoming a beloved snack and ingredient in countless cuisines. In the United States, George Washington Carver’s work revolutionized peanut farming, leading to its widespread cultivation and use in various products.
But why should you bother to grow peanuts at home? Well, for starters, it’s incredibly rewarding! There’s something truly special about nurturing a plant from seed to harvest. Plus, homegrown peanuts often taste fresher and more flavorful than anything you can buy in a store. More importantly, you know exactly what went into growing them – no pesticides or harmful chemicals, just pure, natural goodness. In this DIY article, I’ll share some simple yet effective tricks and hacks to help you successfully cultivate these delicious legumes, regardless of your gardening experience. Let’s get started and unlock the secrets to a bountiful peanut harvest!
Erdnüsse zu Hause anbauen: Dein umfassender DIY-Leitfaden
Hallo liebe Gartenfreunde! Habt ihr euch jemals gefragt, wie Erdnüsse eigentlich wachsen? Und noch besser: Habt ihr euch vorgestellt, sie einfach selbst im eigenen Garten oder sogar auf dem Balkon anzubauen? Ich zeige euch, wie das geht! Es ist einfacher, als ihr denkt, und das Erfolgserlebnis, die eigenen Erdnüsse zu ernten, ist unbezahlbar. Lasst uns gemeinsam in dieses spannende Projekt eintauchen!
Was du für den Erdnussanbau brauchst
Bevor wir loslegen, hier eine Liste mit allem, was du benötigst:
* Erdnüsse: Unbehandelte, rohe Erdnüsse (am besten aus dem Bioladen oder einem Landhandel). Geröstete oder gesalzene Erdnüsse keimen nicht!
* Töpfe oder Beet: Je nachdem, ob du im Garten oder auf dem Balkon anbaust. Die Töpfe sollten mindestens 30 cm tief sein.
* Erde: Lockere, gut durchlässige Erde. Eine Mischung aus Gartenerde, Kompost und Sand ist ideal.
* Wasser: Zum Gießen, natürlich!
* Sonne: Erdnüsse lieben die Sonne. Wähle einen sonnigen Standort.
* Geduld: Erdnüsse brauchen Zeit zum Wachsen.
Schritt-für-Schritt-Anleitung: So ziehst du deine eigenen Erdnüsse
Hier ist eine detaillierte Anleitung, die dir Schritt für Schritt zeigt, wie du deine eigenen Erdnüsse anbaust. Keine Sorge, es ist wirklich nicht schwer!
1. Die Erdnüsse vorbereiten
1. Erdnüsse auswählen: Suche dir die größten und prallsten Erdnüsse aus. Das erhöht die Wahrscheinlichkeit, dass sie keimen.
2. Erdnüsse knacken: Knacke die Erdnüsse vorsichtig, sodass die Kerne nicht beschädigt werden.
3. Einweichen (optional): Du kannst die Erdnusskerne für 24 Stunden in lauwarmes Wasser legen. Das beschleunigt den Keimprozess. Ich mache das meistens, weil ich es kaum erwarten kann, bis sie sprießen!
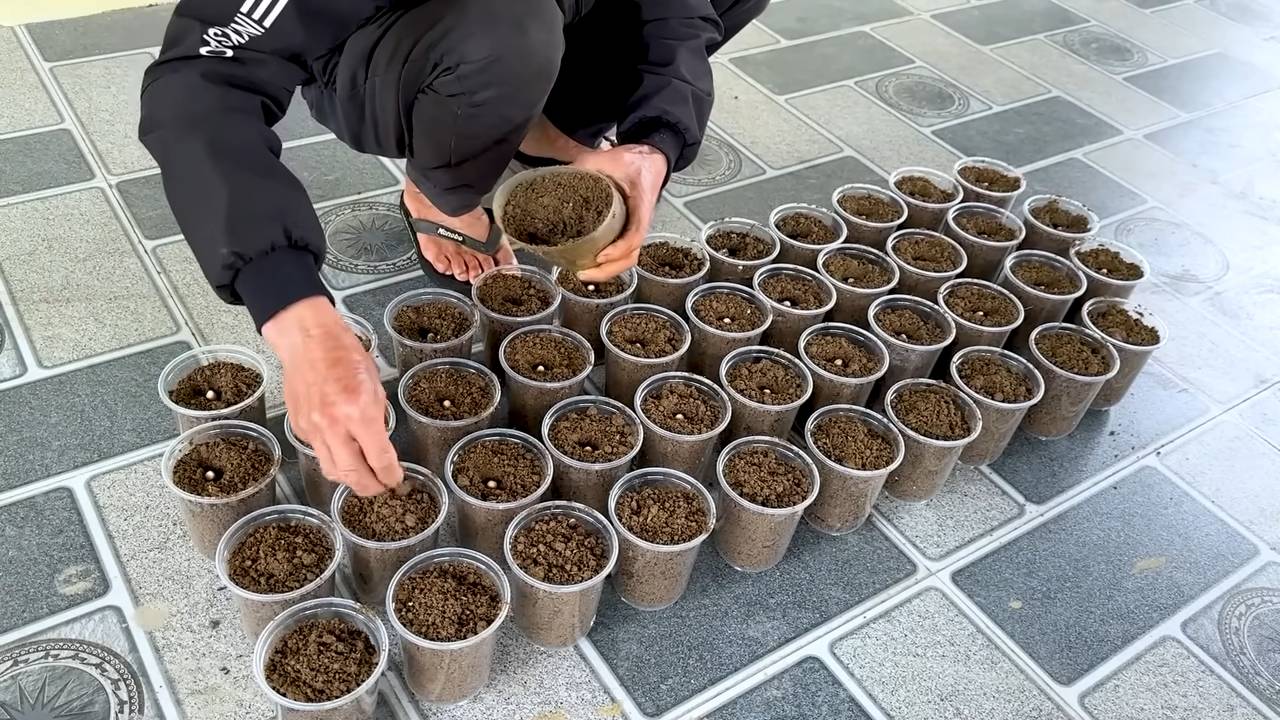
2. Die Aussaat
1. Töpfe oder Beet vorbereiten: Fülle die Töpfe oder das Beet mit der vorbereiteten Erde. Achte darauf, dass die Erde locker und gut durchlässig ist.
2. Erdnüsse pflanzen: Drücke die Erdnusskerne etwa 2-3 cm tief in die Erde. Lege pro Topf 2-3 Kerne, um sicherzustellen, dass mindestens eine keimt. Im Beet kannst du die Erdnüsse in einem Abstand von etwa 15-20 cm pflanzen.
3. Angießen: Gieße die Erde vorsichtig an, sodass sie feucht, aber nicht nass ist.
3. Die Pflege
1. Standort: Stelle die Töpfe an einen sonnigen und warmen Ort. Erdnüsse brauchen mindestens 6-8 Stunden Sonne pro Tag.
2. Gießen: Halte die Erde feucht, aber vermeide Staunässe. Gieße regelmäßig, besonders an heißen Tagen.
3. Düngen: Dünge die Erdnusspflanzen etwa alle zwei Wochen mit einem organischen Dünger. Ich verwende gerne Komposttee oder einen speziellen Gemüsedünger.
4. Häufeln: Sobald die Pflanzen etwa 15-20 cm hoch sind, solltest du sie anhäufeln. Das bedeutet, dass du Erde um die Basis der Pflanzen herum aufträgst. Das fördert die Bildung der Erdnüsse unter der Erde. Das ist super wichtig!
5. Unkraut entfernen: Halte das Beet oder die Töpfe frei von Unkraut. Unkraut konkurriert mit den Erdnusspflanzen um Nährstoffe und Wasser.
4. Die Blüte und Fruchtbildung
1. Blüte: Nach einigen Wochen werden die Erdnusspflanzen kleine, gelbe Blüten bilden. Diese Blüten sind selbstbestäubend.
2. Fruchtbildung: Nach der Blüte bilden die Pflanzen sogenannte “Pegs” aus. Das sind kleine Stiele, die sich in die Erde bohren und dort die Erdnüsse bilden. Das ist wirklich faszinierend zu beobachten!
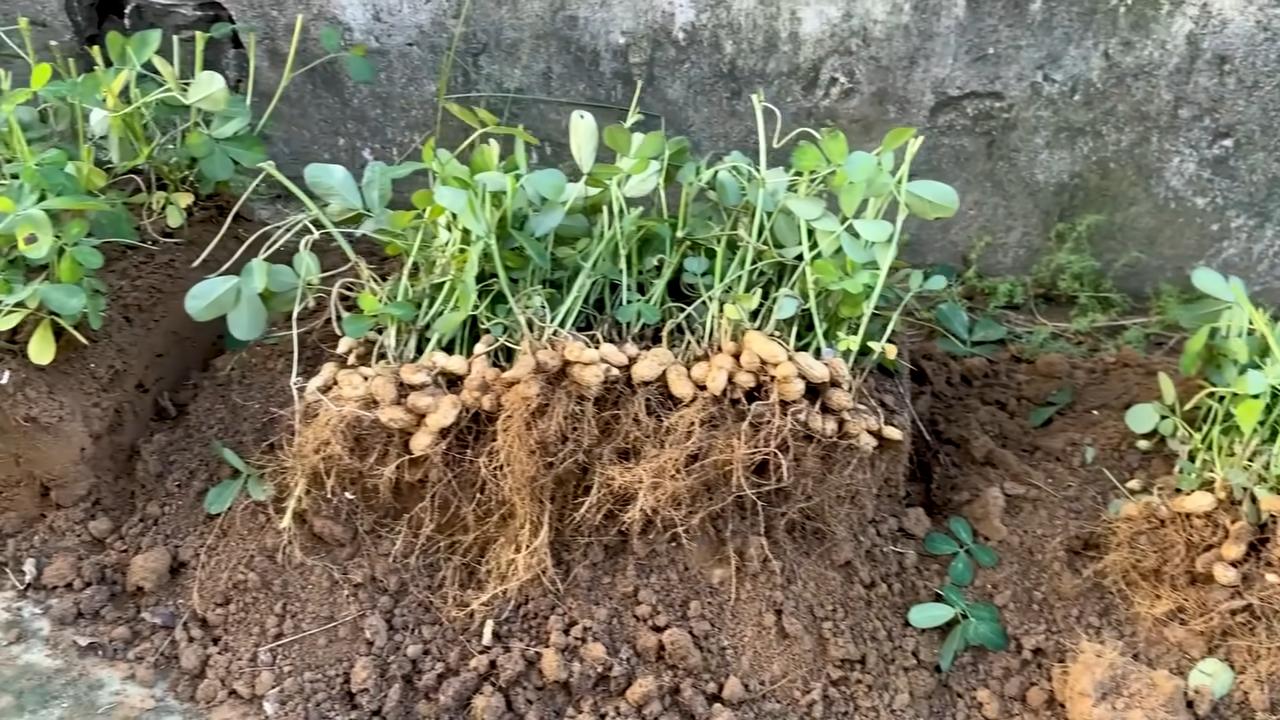
5. Die Ernte
1. Erntezeitpunkt: Die Erntezeit ist in der Regel im Herbst, etwa 4-5 Monate nach der Aussaat. Du erkennst, dass die Erdnüsse reif sind, wenn die Blätter der Pflanzen gelb werden und absterben.
2. Ernten: Ziehe die Pflanzen vorsichtig aus der Erde. Die Erdnüsse sollten an den Wurzeln hängen.
3. Reinigen: Schüttle die Erde von den Erdnüssen ab und wasche sie gründlich.
4. Trocknen: Lege die Erdnüsse zum Trocknen an einen warmen und trockenen Ort. Das kann mehrere Tage oder Wochen dauern. Du kannst sie auch im Backofen bei niedriger Temperatur (ca. 50°C) trocknen. Achte darauf, dass sie nicht verbrennen!
5. Lagern: Lagere die getrockneten Erdnüsse an einem kühlen und trockenen Ort.
Häufige Probleme und Lösungen
Auch beim Erdnussanbau können Probleme auftreten. Hier sind einige häufige Probleme und wie du sie lösen kannst:
* Schlechte Keimung: Wenn die Erdnüsse nicht keimen, kann das an schlechter Qualität der Erdnüsse liegen oder an zu kalten Temperaturen. Verwende frische, unbehandelte Erdnüsse und sorge für ausreichend Wärme.
* Schädlinge: Erdnusspflanzen können von Schädlingen wie Blattläusen oder Schnecken befallen werden. Kontrolliere die Pflanzen regelmäßig und bekämpfe Schädlinge mit natürlichen Mitteln.
* Krankheiten: Erdnusspflanzen können von Pilzkrankheiten befallen werden. Sorge für eine gute Belüftung und vermeide Staunässe.
Zusätzliche Tipps für den erfolgreichen Erdnussanbau
Hier sind noch ein paar zusätzliche Tipps, die dir helfen können, erfolgreich Erdnüsse anzubauen:
* Wähle die richtige Sorte: Es gibt verschiedene Erdnusssorten. Informiere dich, welche Sorte für dein Klima am besten geeignet ist.
* Bodenverbesserung: Verbessere den Boden mit Kompost oder anderen organischen Materialien. Das sorgt für eine gute Nährstoffversorgung der Pflanzen.
* Fruchtfolge: Baue Erdnüsse nicht jedes Jahr am selben Ort an. Wechsle die Kulturen, um Krankheiten und Schädlingen vorzubeugen.
* Beobachtung: Beobachte deine Pflanzen regelmäßig und reagiere schnell auf Probleme.
Erdnüsse im Topf anbauen: So geht’s auf dem Balkon
Kein Garten? Kein Problem! Erdnüsse lassen sich auch wunderbar im Topf auf dem Balkon anbauen. Hier sind ein paar Besonderheiten, die du beachten solltest:
* Topfgröße: Wähle einen ausreichend großen Topf (mindestens 30 cm tief und breit).
* Erde: Verwende eine hochwertige Blumenerde mit guter Drainage.
* Standort: Stelle den Topf an einen sonnigen und warmen Ort auf dem Balkon.
* Gießen: Gieße regelmäßig, aber vermeide Staunässe.
* Düngen: Dünge die Pflanzen regelmäßig mit einem Flüssigdünger.
Was du mit deinen geernteten Erdnüssen machen kannst
Nach der Ernte gibt es viele Möglichkeiten, deine selbst angebauten Erdnüsse zu genießen:
* Roh essen: Du kannst die Erdnüsse roh essen, aber sie schmecken besser, wenn sie geröstet sind.
* Rösten: Röste die Erdnüsse im Backofen oder in der Pfanne. Das verstärkt den Geschmack.
* Erdnussbutter: Stelle deine eigene Erdnussbutter her. Das ist super einfach und schmeckt viel besser als gekaufte.
* Kochen: Verwende die Erdnüsse in verschiedenen Gerichten, wie z.B. Currys oder Salaten.
Ich hoffe, dieser Leitfaden hat dir geholfen und dich inspiriert, deine eigenen Erdnüsse anzubauen. Es ist ein lohnendes Projekt, das viel Freude bereitet. Viel Erfolg und eine reiche Ernte!
Conclusion
So, there you have it! Growing peanuts at home is not only achievable, but it’s also a deeply rewarding experience that connects you to the food you eat in a profound way. Forget the store-bought, often bland, and sometimes questionably sourced peanuts. Imagine the satisfaction of harvesting your own crop, knowing exactly where they came from and how they were grown. This isn’t just about saving money; it’s about embracing a more sustainable and fulfilling lifestyle.
This DIY trick for growing peanuts offers a unique opportunity to witness the entire life cycle of this fascinating legume, from tiny seed to crunchy snack. It’s a fantastic project for families, offering a hands-on learning experience for children about botany, agriculture, and the importance of patience. Plus, the process itself is surprisingly simple, requiring minimal space and equipment. Even if you only have a small balcony or patio, you can still enjoy the fruits (or rather, the nuts!) of your labor.
But the benefits don’t stop there. Homegrown peanuts often boast a superior flavor compared to their commercially produced counterparts. The freshness and the care you put into nurturing them translate into a richer, more intense peanutty taste. And let’s not forget the sheer joy of sharing your homegrown bounty with friends and family, knowing that you’ve created something truly special.
Don’t be afraid to experiment with different varieties of peanuts to find your favorite flavor profile. Virginia peanuts are known for their large size and excellent roasting qualities, while Spanish peanuts are smaller and sweeter, perfect for snacking. Runner peanuts are commonly used in peanut butter, so if you’re a fan of homemade peanut butter, this might be the variety for you.
Consider adding companion plants to your peanut patch to enhance growth and deter pests. Marigolds, for example, are known to repel nematodes, while basil can attract beneficial insects. You can also try intercropping peanuts with other vegetables, such as beans or corn, to maximize space and improve soil health.
We strongly encourage you to give this DIY trick a try. It’s a fun, educational, and ultimately delicious way to connect with nature and enjoy the simple pleasures of homegrown food. Once you’ve harvested your first crop of peanuts, be sure to share your experience with us! We’d love to hear about your successes, challenges, and any unique tips or tricks you’ve discovered along the way. Post photos of your peanut plants, share your favorite peanut recipes, and let’s build a community of home peanut growers! So, get your hands dirty and start **growing peanuts at home** today! You won’t regret it.
Frequently Asked Questions (FAQ)
1. What is the best time of year to plant peanuts?
The ideal time to plant peanuts is in the spring, after the last frost has passed and the soil has warmed up to at least 65 degrees Fahrenheit (around 18 degrees Celsius). Peanuts require a long growing season of at least 120-150 days, so it’s important to get them in the ground as early as possible to ensure a good harvest. In warmer climates, you may be able to plant peanuts as early as March or April, while in cooler climates, you may need to wait until May or June. Check your local weather forecasts and soil temperatures to determine the best planting time for your region.
2. What kind of soil is best for growing peanuts?
Peanuts thrive in well-drained, sandy loam soil that is rich in organic matter. The soil should be loose and friable to allow the developing peanut pods to easily penetrate the ground. Avoid heavy clay soils, as they can become compacted and restrict root growth. The ideal soil pH for peanuts is between 6.0 and 6.5. Before planting, amend your soil with compost or other organic matter to improve drainage and fertility. You can also add a small amount of gypsum to provide calcium, which is essential for peanut pod development.
3. How much sunlight do peanuts need?
Peanuts require at least 6-8 hours of direct sunlight per day to thrive. Choose a planting location that receives plenty of sunlight throughout the growing season. If you are growing peanuts in containers, make sure to place them in a sunny spot where they will receive adequate sunlight. Insufficient sunlight can lead to stunted growth, reduced yields, and poor-quality peanuts.
4. How often should I water my peanut plants?
Peanuts need consistent moisture throughout the growing season, especially during pod development. Water your peanut plants deeply and regularly, especially during dry spells. Aim to keep the soil consistently moist but not waterlogged. Overwatering can lead to root rot and other fungal diseases. A good rule of thumb is to water when the top inch of soil feels dry to the touch. Consider using a soaker hose or drip irrigation system to deliver water directly to the roots of the plants.
5. How do I know when my peanuts are ready to harvest?
Peanuts are typically ready to harvest in the fall, about 120-150 days after planting. The leaves of the peanut plants will start to turn yellow and brown, and the pods will feel firm and plump. To check if the peanuts are ready, dig up a few plants and examine the pods. The inside of the pods should be filled with mature peanuts that have a reddish-brown skin. If the peanuts are still white or immature, they are not ready to harvest.
6. What are some common pests and diseases that affect peanuts?
Peanuts can be susceptible to a variety of pests and diseases, including aphids, spider mites, nematodes, leaf spot, and white mold. To prevent pest and disease problems, choose disease-resistant varieties, practice crop rotation, and maintain good soil health. Regularly inspect your peanut plants for signs of pests or diseases and take action promptly if you notice any problems. You can use organic pesticides or fungicides to control pests and diseases, but always follow the instructions carefully.
7. Can I grow peanuts in containers?
Yes, you can successfully grow peanuts in containers, as long as you choose a large enough container and provide adequate drainage. A container that is at least 18 inches in diameter and 12 inches deep is recommended. Fill the container with a well-draining potting mix and make sure there are drainage holes at the bottom. Water the plants regularly and fertilize them every few weeks with a balanced fertilizer. Place the container in a sunny location where it will receive at least 6-8 hours of direct sunlight per day.
8. How do I cure and store my harvested peanuts?
After harvesting your peanuts, it’s important to cure them properly to prevent mold and spoilage. Gently shake off any excess soil from the plants and allow them to dry in a well-ventilated area for several days. Once the plants are dry, remove the peanuts from the vines and spread them out in a single layer on a screen or tray. Allow the peanuts to air dry for 2-3 weeks, or until the shells are brittle and the kernels are crisp. Store the cured peanuts in an airtight container in a cool, dry place. You can also freeze peanuts for longer storage.

Leave a Comment