

Grow peanuts at home? Absolutely! Imagine the satisfaction of harvesting your own homegrown peanuts, fresh from the earth. It’s easier than you might think, and this DIY guide will walk you through every step of the process. Forget those store-bought peanuts – get ready for a truly rewarding gardening experience!
Peanuts, also known as groundnuts, have a rich history, dating back thousands of years in South America. They’ve since become a beloved snack and staple food worldwide. But did you know that growing your own peanuts is not only fun but also a fantastic way to connect with nature and enjoy a truly fresh, organic treat?
In today’s world, where we’re increasingly conscious of where our food comes from, grow peanuts at home offers a unique opportunity to control the entire process, from planting to harvesting. Plus, it’s a fantastic project for families, teaching children about plant life cycles and the joys of gardening. This DIY article will provide you with simple, effective tricks and hacks to ensure a bountiful peanut harvest, even if you have limited space. So, let’s get our hands dirty and embark on this exciting gardening adventure together!
Growing Peanuts at Home: A Beginner’s Guide
Hey there, fellow gardening enthusiasts! Ever thought about growing your own peanuts? It might sound a little daunting, but trust me, it’s a surprisingly fun and rewarding experience. Plus, imagine the bragging rights when you’re snacking on peanuts you grew yourself! This guide will walk you through everything you need to know to successfully cultivate peanuts right in your own backyard (or even in containers!).
What You’ll Need
Before we dive in, let’s gather our supplies. Here’s a checklist of everything you’ll need to get started:
* Peanut Seeds (Raw, Unsalted): This is the most crucial ingredient! Make sure you get raw, unsalted peanuts. Roasted or salted peanuts won’t sprout. You can usually find these at garden centers or online. Look for varieties suited to your climate.
* Well-Draining Soil: Peanuts thrive in loose, sandy loam soil. Good drainage is essential to prevent rot.
* Large Containers (Optional): If you’re short on space or have poor soil, large containers (at least 18 inches deep and wide) are a great option.
* Compost or Aged Manure: To enrich the soil and provide essential nutrients.
* Gardening Gloves: To keep your hands clean and protected.
* Trowel or Shovel: For digging and planting.
* Watering Can or Hose: For regular watering.
* Mulch (Optional): To help retain moisture and suppress weeds. Straw or hay works well.
* Patience: Growing peanuts takes time and care, so be prepared to be patient!
Choosing the Right Peanut Variety
Not all peanuts are created equal! Different varieties have different growth habits and maturity times. Here are a few popular types to consider:
* Virginia Peanuts: These are the large, elongated peanuts often roasted in the shell. They take about 120-150 days to mature.
* Spanish Peanuts: These are smaller, rounder peanuts with reddish-brown skins. They mature relatively quickly, in about 90-110 days.
* Runner Peanuts: These are commonly used for peanut butter. They mature in about 120-130 days.
* Valencia Peanuts: These have multiple peanuts per shell and are known for their sweet flavor. They mature in about 90-110 days.
Choose a variety that suits your climate and growing season. If you have a shorter growing season, opt for a faster-maturing variety like Spanish or Valencia.
Preparing the Soil
Peanuts need well-draining, loose soil to thrive. Here’s how to prepare your soil:
1. Choose a Sunny Location: Peanuts need at least 6-8 hours of direct sunlight per day.
2. Clear the Area: Remove any weeds, rocks, or debris from the planting area.
3. Loosen the Soil: Use a garden fork or tiller to loosen the soil to a depth of at least 12 inches. This will allow the peanut pegs (the structures that develop into peanuts) to easily penetrate the soil.
4. Amend the Soil: Mix in plenty of compost or aged manure to enrich the soil and improve drainage. Peanuts prefer slightly acidic soil (pH 6.0-6.5). You can test your soil pH with a soil testing kit and amend it accordingly.
5. Level the Soil: Rake the soil smooth to create a level planting surface.
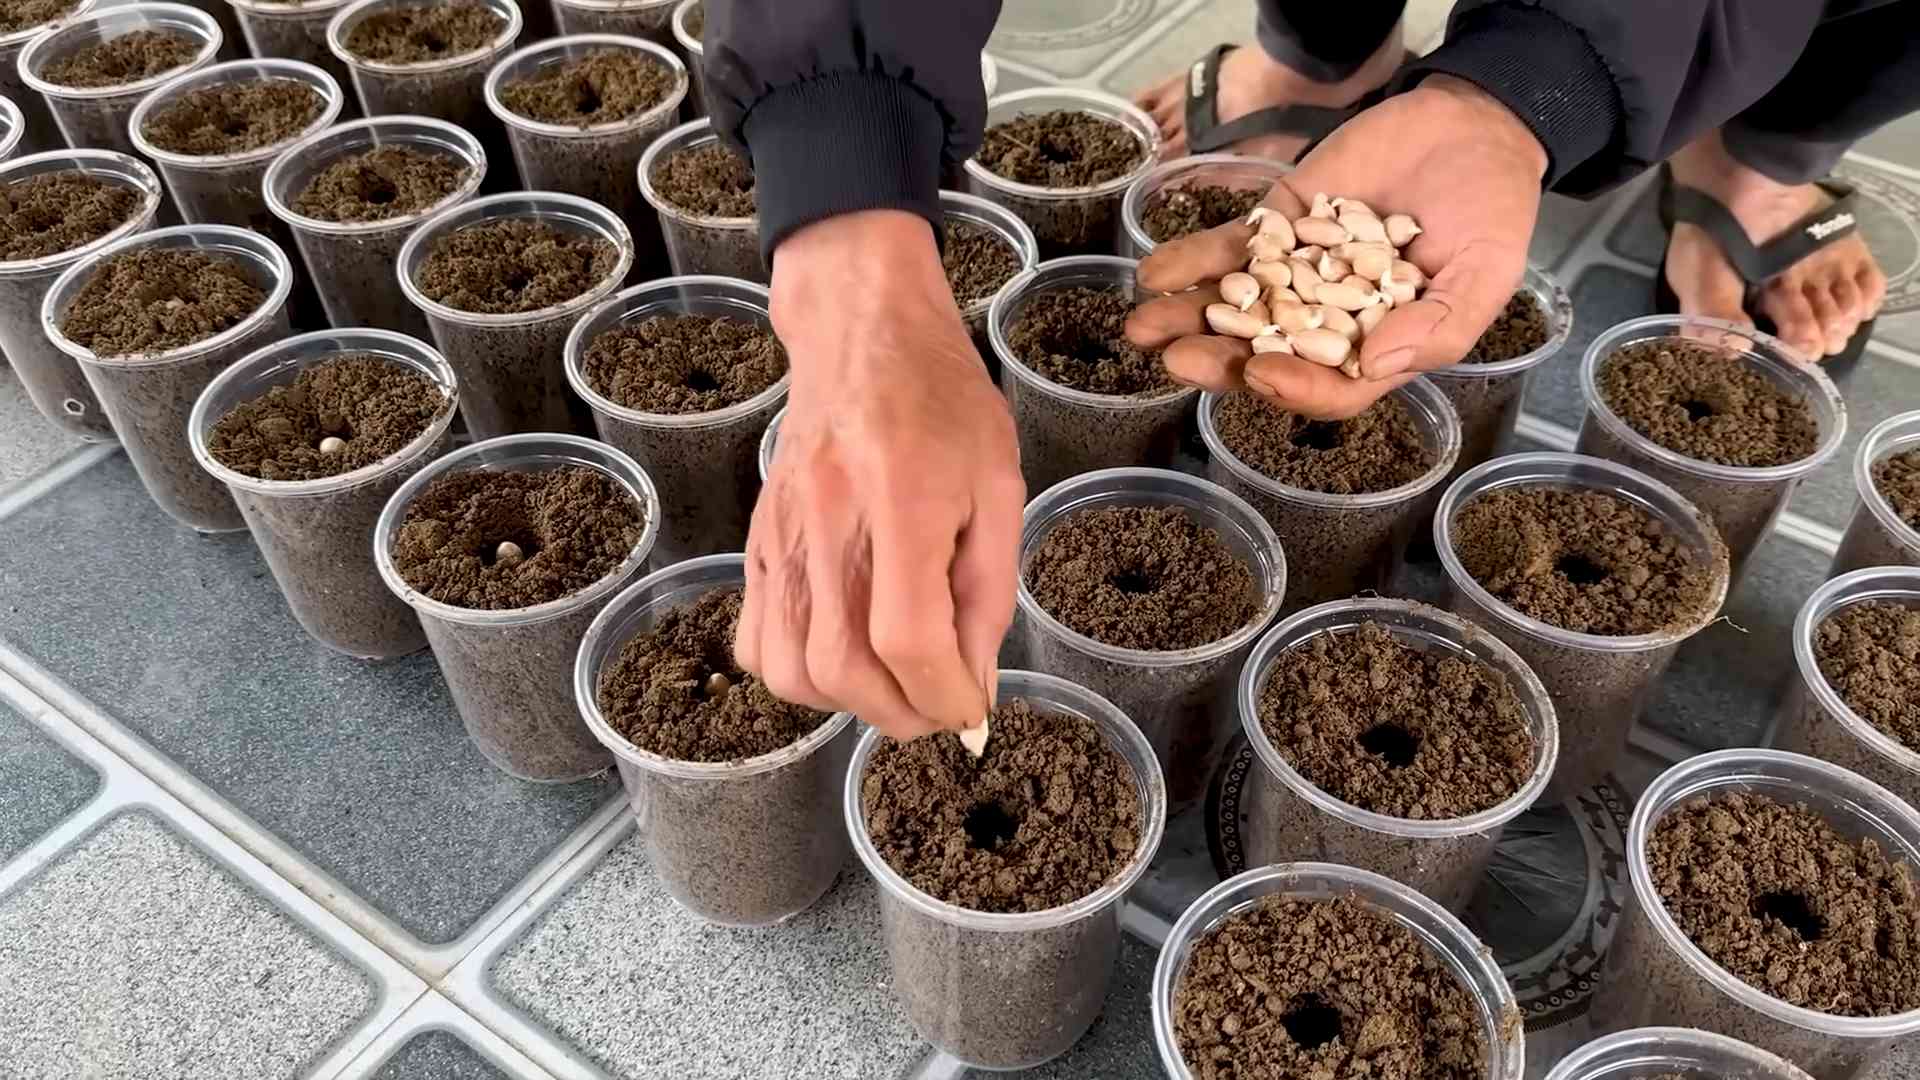
Planting the Peanut Seeds
Now for the fun part – planting! Here’s how to plant your peanut seeds:
1. Soak the Seeds (Optional): Soaking the peanut seeds in water for a few hours before planting can help speed up germination. However, this step is optional.
2. Planting Time: Wait until the soil temperature is consistently above 65°F (18°C) before planting. This is usually a few weeks after the last frost.
3. Spacing: Plant the peanut seeds about 1-2 inches deep and 6-8 inches apart in rows that are 2-3 feet apart. If you’re planting in containers, plant 2-3 seeds per container.
4. Cover the Seeds: Gently cover the seeds with soil and pat it down lightly.
5. Water Thoroughly: Water the planting area thoroughly after planting.
Caring for Your Peanut Plants
Once your peanut plants are in the ground, it’s important to provide them with the care they need to thrive.
1. Watering: Water your peanut plants regularly, especially during dry periods. Keep the soil consistently moist, but avoid overwatering, which can lead to root rot.
2. Weeding: Keep the planting area free of weeds, which can compete with your peanut plants for nutrients and water. Hand-pull weeds carefully to avoid disturbing the peanut plants’ roots.
3. Fertilizing: Peanuts are legumes, which means they can fix nitrogen from the air. However, they still benefit from a balanced fertilizer. Apply a fertilizer that is low in nitrogen and higher in phosphorus and potassium about 4-6 weeks after planting. Follow the instructions on the fertilizer label.
4. Hilling: As your peanut plants grow, you may need to hill the soil around the base of the plants. This helps to support the plants and encourages the peanut pegs to penetrate the soil.
5. Calcium: Peanuts need calcium to develop properly. If your soil is deficient in calcium, you can add gypsum to the soil.
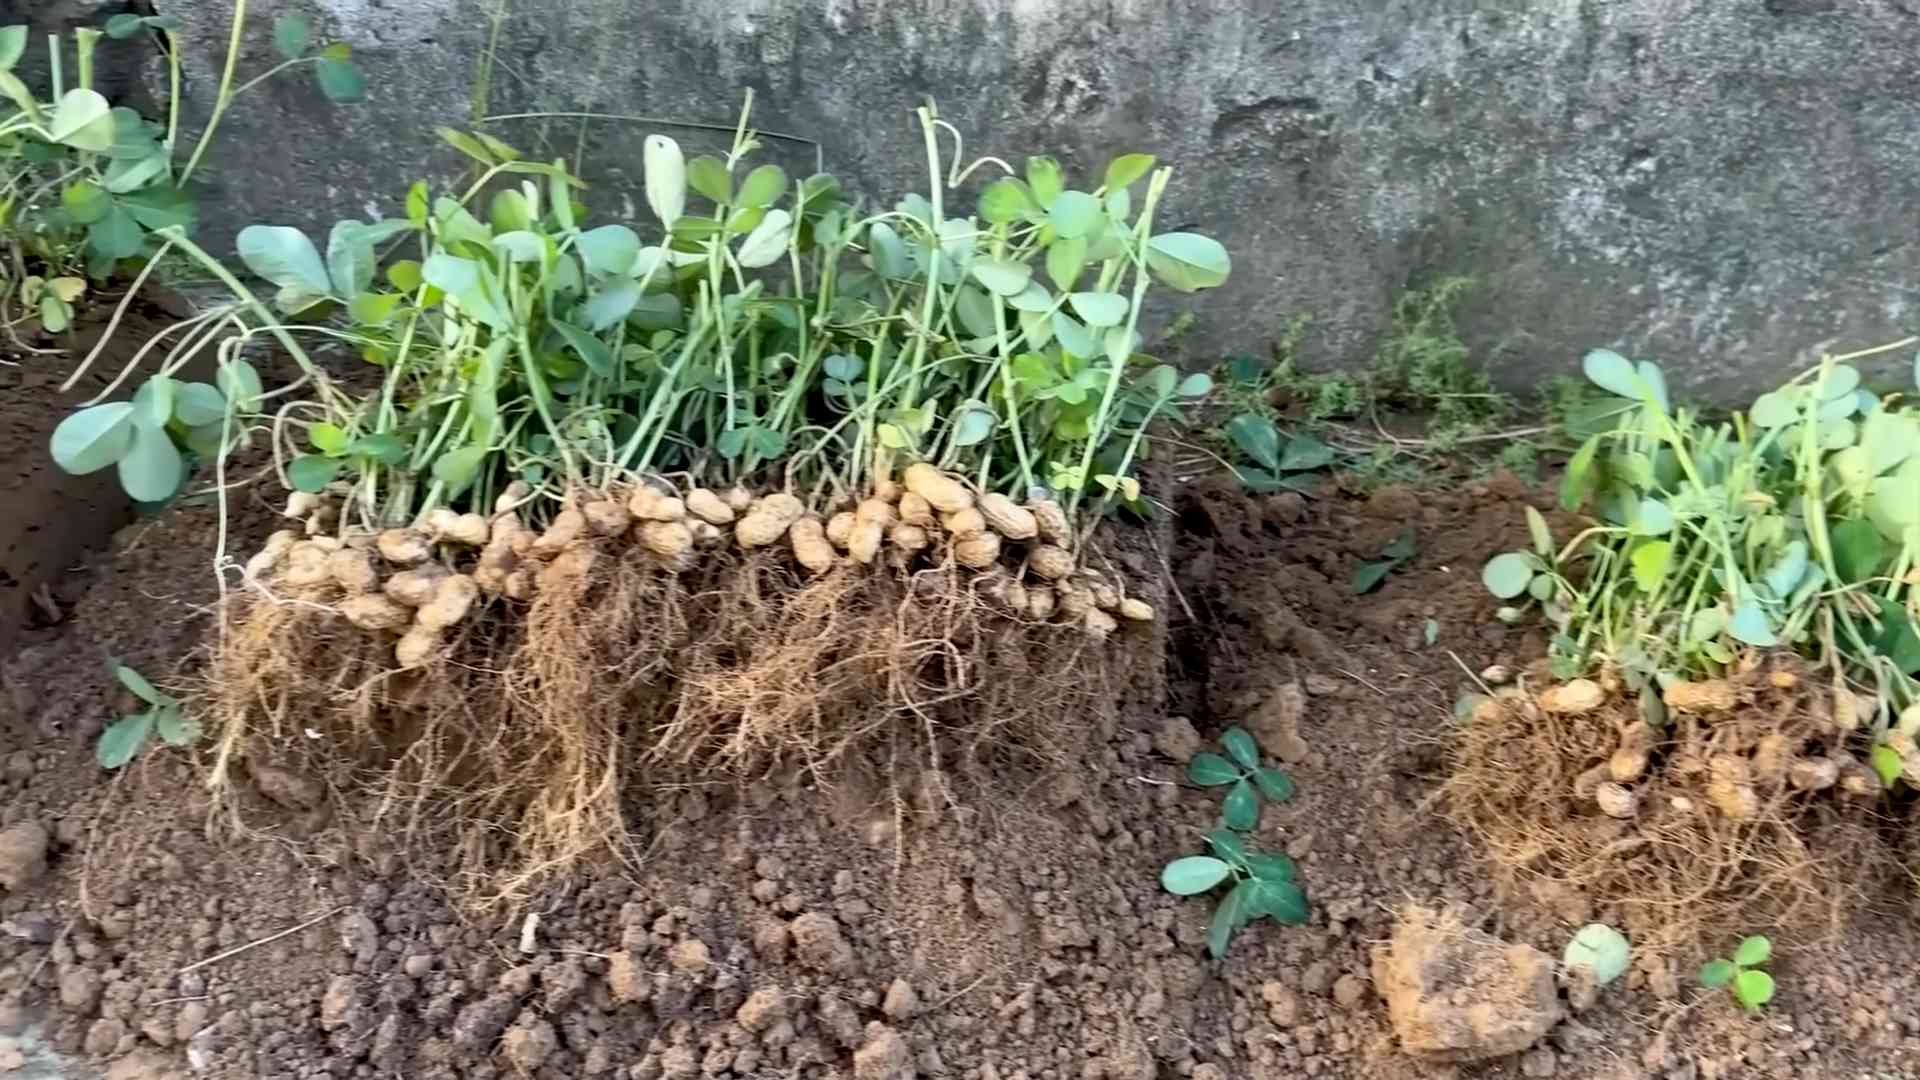
Understanding Pegging
This is where the magic happens! After the peanut plants flower, they develop “pegs” – small, stem-like structures that grow downwards from the base of the plant and into the soil. These pegs are what will eventually develop into peanuts.
* Protecting the Pegs: Make sure the soil around the base of the plants is loose and easy for the pegs to penetrate. Avoid compacting the soil.
* Moisture is Key: Keep the soil consistently moist during the pegging stage to encourage peanut development.
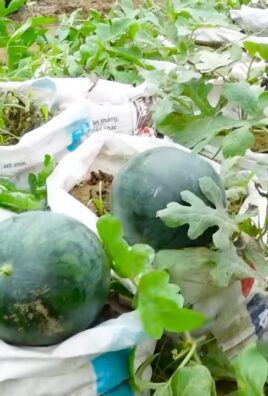
Harvesting Your Peanuts
Harvesting is the most exciting part! Here’s how to know when your peanuts are ready to harvest:
1. Timing: Peanuts are typically ready to harvest in the fall, about 120-150 days after planting, depending on the variety.
2. Check the Leaves: The leaves of the peanut plants will start to turn yellow and brown when the peanuts are ready to harvest.
3. Dig Up a Plant: Carefully dig up a plant and check the peanuts. The peanuts should be plump and the shells should be well-formed. The inside of the shell should have visible veins and a dark color.
4. Harvesting: Once you’re sure the peanuts are ready, use a garden fork or shovel to carefully dig up the plants. Shake off any excess soil.
Curing Your Peanuts
Curing is essential for developing the flavor and preventing mold. Here’s how to cure your peanuts:
1. Shake off Excess Soil: Gently shake off any excess soil from the peanut plants.
2. Hang the Plants: Hang the peanut plants upside down in a well-ventilated area for 2-4 weeks. You can hang them in a shed, garage, or barn. Make sure the area is protected from rain and direct sunlight.
3. Check for Mold: Check the peanuts regularly for mold. If you see any mold, remove the affected peanuts immediately.
4. Test for Dryness: After 2-4 weeks, test the peanuts for dryness. The peanuts should be brittle and the shells should snap easily.
Storing Your Peanuts
Once the peanuts are cured, you can store them in a cool, dry place.
1. Remove the Peanuts: Remove the peanuts from the plants.
2. Store in a Cool, Dry Place: Store the peanuts in an airtight container in a cool, dry place, such as a pantry or refrigerator.
3. Freezing: You can also freeze peanuts for longer storage.
Troubleshooting
Even with the best care, you might encounter some challenges. Here are a few common problems and how to address them:
* Poor Germination: Make sure you’re using fresh, raw, unsalted peanuts. Soil temperature is also crucial.
* Yellowing Leaves: This could indicate a nutrient deficiency. Try fertilizing with a balanced fertilizer.
* Root Rot: This is caused by overwatering. Make sure your soil has good drainage and avoid overwatering.
* Pests: Aphids and spider mites can sometimes attack peanut plants. Use insecticidal soap to control these pests.
Enjoying Your Homegrown Peanuts
Congratulations! You’ve successfully grown your own peanuts. Now it’s time to enjoy the fruits (or
Conclusion
So, there you have it! Growing peanuts at home is not only achievable, but it’s also a deeply rewarding experience. Forget the store-bought varieties that often lack that fresh, earthy flavor. With a little patience and these simple steps, you can cultivate your own supply of delicious, homegrown peanuts, bursting with natural goodness.
Why is this DIY trick a must-try? Because it connects you to your food source in a tangible way. You’ll witness the entire life cycle of the peanut plant, from tiny seedling to bountiful harvest. It’s an educational experience for the whole family, especially children, who will be fascinated by the underground magic of peanut production. Plus, the taste of freshly harvested peanuts is simply unparalleled. They’re sweeter, nuttier, and possess a unique flavor profile that you just can’t find in commercially grown peanuts.
Beyond the pure enjoyment of homegrown peanuts, this project also offers a sustainable and eco-friendly alternative to purchasing peanuts that may have traveled long distances and been treated with various chemicals. You have complete control over the growing process, ensuring that your peanuts are organic and free from harmful additives.
Looking for variations? Consider experimenting with different peanut varieties. Virginia peanuts are known for their large size and are ideal for roasting. Spanish peanuts are smaller and sweeter, perfect for peanut butter. Valencia peanuts produce multiple peanuts per shell and are great for boiling. You can also try growing peanuts in containers if you have limited garden space. Just be sure to choose a large container with good drainage.
Another fun variation is to infuse your peanut patch with companion plants. Marigolds can help deter nematodes, while basil can repel aphids. These natural pest control methods will keep your peanut plants healthy and thriving.
Don’t be intimidated by the prospect of growing peanuts. It’s a surprisingly easy and forgiving process. The key is to provide the right conditions: plenty of sunlight, well-drained soil, and consistent watering. With a little care and attention, you’ll be rewarded with a bountiful harvest of delicious, homegrown peanuts.
We wholeheartedly encourage you to try this DIY trick. It’s a fun, educational, and rewarding experience that will connect you to your food in a meaningful way. And most importantly, it will provide you with a delicious supply of fresh, homegrown peanuts that you can enjoy in countless ways.
So, grab some peanut seeds, prepare your garden, and get ready to embark on this exciting adventure. We’re confident that you’ll be amazed by the results. And don’t forget to share your experience with us! We’d love to hear about your peanut-growing journey, see photos of your plants, and learn about any tips or tricks you discover along the way. Share your stories and photos on social media using #HomegrownPeanuts and let’s inspire others to join the peanut-growing revolution! Let’s all enjoy the satisfaction of growing peanuts at home.
Frequently Asked Questions (FAQ)
What is the best time of year to plant peanuts?
The ideal time to plant peanuts is in the spring, after the last frost. The soil temperature should be consistently above 65 degrees Fahrenheit (18 degrees Celsius). In most regions, this typically falls between April and June. Planting too early can result in poor germination and stunted growth.
What kind of soil is best for growing peanuts?
Peanuts thrive in well-drained, sandy loam soil. This type of soil allows for good aeration and drainage, which is essential for healthy root development and peanut formation. Avoid heavy clay soils, as they can become waterlogged and inhibit peanut growth. If you have clay soil, amend it with organic matter, such as compost or peat moss, to improve drainage. The soil pH should be between 6.0 and 6.5.
How much sunlight do peanut plants need?
Peanut plants require at least 6-8 hours of direct sunlight per day. Choose a location in your garden that receives full sun throughout the growing season. Insufficient sunlight can lead to weak, leggy plants and reduced peanut production.
How often should I water my peanut plants?
Peanut plants need consistent watering, especially during flowering and peanut development. Water deeply and regularly, aiming to keep the soil consistently moist but not waterlogged. Avoid overhead watering, as this can promote fungal diseases. A good rule of thumb is to water when the top inch of soil feels dry to the touch. During periods of drought, you may need to water more frequently.
How long does it take for peanuts to mature?
Peanuts typically take 120-150 days to mature, depending on the variety and growing conditions. You’ll know your peanuts are ready to harvest when the foliage begins to yellow and the inside of the peanut shells are darkened with prominent veins. You can also dig up a few plants to check the maturity of the peanuts.
How do I harvest peanuts?
To harvest peanuts, carefully dig up the entire plant, being careful not to damage the peanut pods. Gently shake off any excess soil and hang the plants upside down in a well-ventilated area to dry for several weeks. Once the plants are dry, you can remove the peanuts from the vines.
How do I cure peanuts?
Curing is an essential step in preserving the flavor and quality of your homegrown peanuts. After harvesting, spread the peanuts in a single layer on a screen or tray and allow them to air dry in a well-ventilated area for 2-3 weeks. Turn the peanuts regularly to ensure even drying. The peanuts are properly cured when the shells are brittle and the kernels are loose inside.
How do I store peanuts?
Store cured peanuts in an airtight container in a cool, dry place. Properly stored peanuts can last for several months. You can also freeze peanuts for longer storage.
Can I grow peanuts in containers?
Yes, you can grow peanuts in containers if you have limited garden space. Choose a large container with good drainage and fill it with well-drained potting mix. Be sure to provide the plants with plenty of sunlight and water.
What are some common pests and diseases that affect peanut plants?
Some common pests that affect peanut plants include aphids, spider mites, and nematodes. Common diseases include leaf spot and white mold. You can control pests and diseases by using organic pest control methods, such as insecticidal soap or neem oil, and by practicing good garden hygiene.
Can I eat the peanut leaves?
Yes, peanut leaves are edible and can be used in salads or cooked like spinach. They are a good source of protein and fiber. However, it’s best to harvest the leaves before the peanuts begin to mature, as they can become bitter later in the season.
Are there any companion plants that are beneficial for peanuts?
Yes, several companion plants can benefit peanut plants. Marigolds can help deter nematodes, while basil can repel aphids. Other beneficial companion plants include rosemary, thyme, and oregano.
What if my peanut plants are flowering but not producing peanuts?
This could be due to several factors, including insufficient pollination, poor soil conditions, or lack of water. Ensure that your plants are receiving adequate sunlight, water, and nutrients. You can also try hand-pollinating the flowers by gently shaking the plants.
Can I save seeds from my homegrown peanuts to plant next year?
Yes, you can save seeds from your homegrown peanuts to plant next year. Choose healthy, mature peanuts and allow them to dry completely. Store the seeds in an airtight container in a cool, dry place until planting time.
Leave a Comment