

Grow Peanuts in Foam Box? Absolutely! Have you ever dreamed of harvesting your own crunchy, homegrown peanuts right from your backyard (or even your balcony)? It sounds like a far-fetched idea, especially if you don’t have a sprawling farm, but trust me, it’s totally achievable with this fun and surprisingly simple DIY project.
For centuries, peanuts have been a staple crop, deeply rooted in cultures around the globe. Originating in South America, these legumes (yes, they’re not actually nuts!) have journeyed across continents, becoming a beloved snack and a crucial ingredient in countless cuisines. Now, you can participate in this rich history by cultivating your own peanut patch, no matter how small your space!
Why should you try this Grow Peanuts in Foam Box trick? Well, for starters, it’s incredibly rewarding to nurture a plant from seed to harvest. Plus, growing your own food is a fantastic way to connect with nature, reduce your carbon footprint, and enjoy the freshest, most flavorful peanuts imaginable. This method is perfect for urban gardeners, apartment dwellers, or anyone looking for a unique and space-saving gardening solution. I’m excited to show you how easy it is to get started!
Growing Peanuts in a Styrofoam Container: Your DIY Guide for a Successful Harvest
Hey gardening friends! Have you ever thought about growing your own peanuts? It’s easier than you think and a lot of fun, especially if you have limited space. In this article, I’ll show you how to grow peanuts in a styrofoam container. Not only does this save space, but it’s also a great way to create the ideal climate for your little peanut plants. Let’s get started!
What You Need: The Materials List
Before we begin, here’s a list of everything you’ll need for your peanut-growing project:
- A styrofoam container: The bigger, the better, to give the peanut plants enough space to grow. Aim for a size of at least 60x40x30 cm (Length x Width x Height). The bigger the container, the better!
- Peanuts: Raw, unsalted peanuts. Make sure they are not roasted, as roasted peanuts won’t germinate. You can often find them at the supermarket or health food stores.
- High-quality potting soil: A well-draining soil mix is important for healthy peanut growth. I recommend a mix of potting soil, compost, and some sand.
- Compost: For additional nutrients and better soil structure.
- Sand: To improve drainage and prevent waterlogging.
- Garden fleece: To line the bottom of the container and prevent the soil from washing out.
- Watering can or hose: For watering the plants.
- Spray bottle: For watering the seedlings.
- Scissors or a knife: For cutting the garden fleece.
- Optional: Plant labels to keep track of the varieties.
- Optional: A small shovel or scoop to fill the container.
Step-by-Step Guide: How to Plant Your Peanuts
Now that we have everything ready, we can start planting. Don’t worry, it’s really not difficult!
- Prepare the Styrofoam Container: First, ensure your styrofoam container has drainage holes. If not, carefully drill a few holes in the bottom. This is important to allow excess water to drain away and prevent the roots from rotting. Next, line the container with garden fleece. This will prevent soil from spilling out of the holes. Cut the fleece so that it covers the entire inside of the container.
- Prepare the Soil: Mix the potting soil, compost, and sand in a ratio of about 2:1:1. That means two parts potting soil, one part compost, and one part sand. This creates a loose, nutrient-rich, and well-draining soil mix. Fill the container with this mixture, leaving about 5-10 cm from the top.
- Prepare the Peanuts: Soak the peanuts in lukewarm water for about 12-24 hours before planting. This helps to speed up the germination process. You can also lightly nick the shell to help the germination process, but be careful not to damage the peanut inside.
- Plant the Peanuts: Press the peanuts about 2-3 cm deep into the soil. Be sure to leave enough space between each peanut, about 15-20 cm. This gives the plants enough room to grow.
- Watering: Gently water the soil so that it is moist but not soggy. Avoid waterlogging. A watering can with a spray nozzle or a spray bottle is best to evenly moisten the soil.
- Choosing a Location: Place the styrofoam container in a sunny and warm spot. Peanuts love the sun! A spot on the balcony, terrace, or in the garden is ideal.
Caring for Your Peanut Plants: How to Keep Them Healthy and Happy
Taking care of your peanut plants is key to a successful harvest. Here are a few tips to keep in mind:
- Watering: Water the plants regularly, especially during the flowering and fruiting stages. The soil should always be slightly moist but not soaked. Avoid waterlogging, as it can lead to root rot. On hot days, you may need to water them daily.
- Fertilizing: Fertilize the plants every few weeks with an organic fertilizer. A liquid vegetable fertilizer is ideal. Make sure to follow the instructions on the package to avoid over-fertilizing.
- Weed Control: Keep the container free from weeds. Weeds can compete with the peanut plants for nutrients and water.
- Soil Care: Loosen the soil regularly to improve aeration. This helps the roots to breathe better and take in nutrients.
- Watch for Pests: Check your plants regularly for pests such as aphids or spider mites. If necessary, you can use natural pest control methods.
The Flowering Stage: When the Peanuts Produce Fruit
After about 4-6 weeks, your peanut plants will start to bloom. The flowers are small and yellow. After fertilization, “pegs” will form, which are stems that grow into the soil. The peanuts will develop on these stems.
Important: Make sure the soil around the plants is loose and moist so the “pegs” can easily penetrate the soil. You can also mound the soil slightly to help the “pegs” grow.
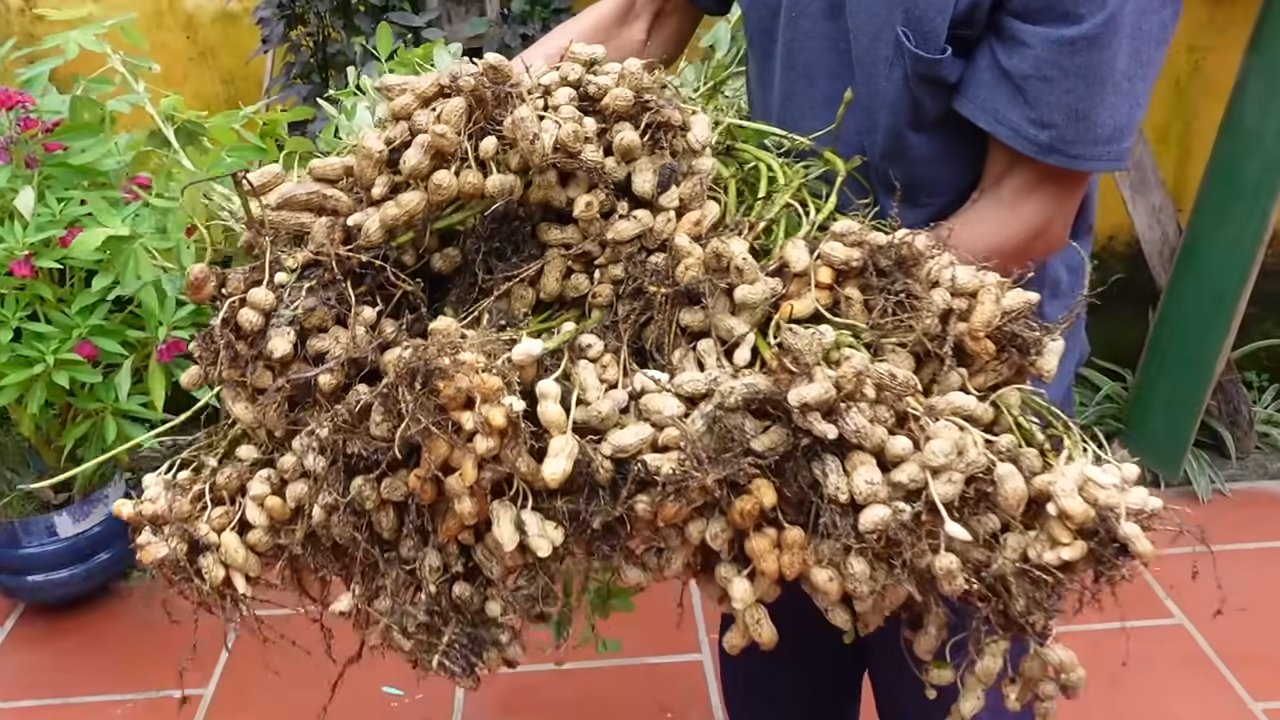
The Harvest: The Reward for Your Efforts
Harvest time is the most exciting part! Peanuts are typically ready to harvest after about 120-150 days. You’ll know they are ready when the leaves turn yellow and the plants begin to wilt.
- Preparing for Harvest: Water the plants one last time before harvesting. This makes it easier to dig them up.
- Harvesting the Peanuts: Gently pull the plants out of the soil. Shake off the soil and collect the peanuts.
- Drying the Peanuts: Wash the peanuts and lay them out to dry in a warm, well-ventilated spot. You can also dry them on a baking sheet in the oven at a low temperature (about 50°C). Drying usually takes a few days.
- Storing the Peanuts: Store the dried peanuts in a cool, dry place. They will keep for several months.
Common Problems and Solutions
Even with peanut cultivation, issues can arise. Here are a few common problems and how to solve them:
- No Germination: If the peanuts don’t germinate, there could be several reasons. They might not be fresh enough, or the soil might have been too dry or too wet. Make sure to use fresh peanuts, keep the soil moist, and soak the peanuts before planting.
- Yellow Leaves: Yellow leaves can be a sign of nutrient deficiency. Fertilize the plants with organic fertilizer.
- Pests: If pests appear, you can use natural pest control methods.
- Root Rot: Root rot occurs due to waterlogging. Ensure the soil is well-draining and that the plants are not overwatered.
Additional Tips for a Successful Harvest
- Choose the Right Variety: There are different peanut varieties, so experiment with different types to see which one works best for you.
- Space Between Plants: Give the plants enough space to grow. Peanuts need room for their roots to spread out.
- Mulch: A mulch layer can help retain moisture, suppress weeds, and improve soil quality.
- Regular Monitoring: Keep an eye on your plants for any signs of trouble. The earlier you catch issues, the easier they are to resolve.
- Patience: Peanuts take time to grow. Don’t be discouraged if it doesn’t work out immediately. With practice, you’ll soon enjoy a bountiful peanut harvest.
I hope this guide helps you successfully grow peanuts in your styrofoam container. It’s really a fun and rewarding project, and I’m sure you’ll enjoy it! Good luck and enjoy your delicious harvest!

Conclusion
So, there you have it! Growing peanuts in a foam box isn’t just a quirky gardening experiment; it’s a surprisingly effective and rewarding way to cultivate your own delicious, homegrown snacks. We’ve walked you through the process, highlighting the benefits of this method – from its space-saving advantages to its ability to control the growing environment and protect your precious peanut plants from pests and harsh weather.
But why is this DIY trick a must-try? Simply put, it democratizes peanut cultivation. You don’t need acres of farmland or specialized equipment. A simple foam box, readily available and inexpensive, becomes your personal peanut patch. Imagine the satisfaction of harvesting your own peanuts, knowing you nurtured them from seed to shell, all within the confines of a recycled container. The taste of freshly dug, homegrown peanuts is simply unparalleled – a flavor explosion that store-bought varieties can’t even begin to replicate.
Beyond the sheer joy of homegrown goodness, this method offers a fantastic learning opportunity, especially for children. It’s a hands-on lesson in botany, sustainability, and the magic of food production. Watching the peanut plants sprout, flower, and eventually produce their underground treasures is an experience that fosters a deeper appreciation for the natural world.
Looking for variations to spice things up? Consider these ideas:
* Experiment with different peanut varieties: Virginia, Spanish, Runner, and Valencia peanuts each offer unique flavors and textures. Try growing a few different types to discover your personal favorite.
* Add companion plants: Marigolds, basil, and other herbs can help deter pests and attract beneficial insects to your foam box garden.
* Get creative with your foam box: Paint it, decorate it, or even build a small trellis for the peanut plants to climb. Turn your functional container into a work of art.
* Adjust your soil mix: While the recommended mix works well, you can tailor it to your specific climate and growing conditions. Consider adding more compost for extra nutrients or perlite for improved drainage.
Ultimately, the success of your foam box peanut garden depends on your dedication and attention to detail. Monitor the soil moisture, provide adequate sunlight, and be patient. The rewards, however, are well worth the effort.
We wholeheartedly encourage you to give this DIY trick a try. It’s a fun, educational, and ultimately delicious way to connect with nature and enjoy the fruits (or rather, nuts) of your labor. And most importantly, we want to hear about your experience! Share your photos, tips, and stories with us in the comments below. Let’s build a community of foam box peanut growers and inspire others to embrace the joy of homegrown peanuts. Let us know if you were able to successfully grow peanuts in foam box. Happy gardening!
Frequently Asked Questions (FAQ)
1. What kind of foam box is best for growing peanuts?
The ideal foam box is one that’s sturdy, clean, and has adequate drainage. Look for boxes that are at least 12 inches deep to provide enough room for the peanut plants to develop their root systems and produce peanuts. The width and length will depend on how many plants you want to grow, but a box that’s roughly 2 feet by 3 feet is a good starting point for a few plants. Make sure the box is food-grade if possible, to avoid any potential contamination of your peanuts. You can often find suitable foam boxes at grocery stores, fish markets, or even from online retailers. Ensure the box has drainage holes; if not, drill several holes in the bottom to prevent waterlogging.
2. How often should I water my peanut plants in a foam box?
Watering frequency depends on several factors, including the weather, the type of soil you’re using, and the size of your plants. As a general rule, water deeply whenever the top inch of soil feels dry to the touch. Avoid overwatering, as this can lead to root rot. During hot, dry weather, you may need to water daily, while in cooler, wetter conditions, you may only need to water every few days. A good way to check is to stick your finger into the soil – if it feels dry an inch down, it’s time to water. Also, observe your plants for signs of stress, such as wilting leaves, which can indicate underwatering.
3. What kind of soil is best for growing peanuts in a foam box?
Peanuts thrive in well-draining, sandy loam soil. A good mix would be equal parts of potting soil, compost, and sand. The potting soil provides essential nutrients, the compost improves drainage and adds organic matter, and the sand helps to prevent the soil from becoming compacted. Avoid using heavy clay soil, as it can hinder the development of the peanut pods. You can also add a slow-release fertilizer to the soil mix to provide a steady supply of nutrients throughout the growing season.
4. How much sunlight do peanut plants need?
Peanut plants need at least 6-8 hours of direct sunlight per day to thrive. Choose a location for your foam box that receives plenty of sunlight throughout the day. If you live in a particularly hot climate, you may need to provide some afternoon shade to prevent the plants from getting scorched. If you’re growing peanuts indoors, you’ll need to supplement with grow lights to provide adequate light.
5. How long does it take to grow peanuts in a foam box?
The time it takes to grow peanuts from seed to harvest typically ranges from 120 to 150 days, depending on the variety and growing conditions. Be patient and monitor your plants closely. You’ll know the peanuts are ready to harvest when the leaves start to turn yellow and the inside of the peanut shells are brown.
6. What are some common pests and diseases that affect peanut plants, and how can I prevent them?
Common pests that can affect peanut plants include aphids, spider mites, and leafhoppers. You can prevent these pests by regularly inspecting your plants and using organic pest control methods, such as insecticidal soap or neem oil. Diseases that can affect peanut plants include leaf spot and root rot. To prevent these diseases, ensure good air circulation around your plants, avoid overwatering, and use disease-resistant peanut varieties.
7. Can I grow peanuts in a foam box indoors?
Yes, you can grow peanuts in a foam box indoors, but you’ll need to provide adequate light and ventilation. Use grow lights to supplement natural sunlight and ensure good air circulation to prevent diseases. Indoor peanut plants may also require more frequent watering and fertilization than outdoor plants.
8. How do I harvest peanuts from a foam box?
When the peanut plants are ready for harvest (leaves turning yellow), carefully dig up the entire plant, being careful not to damage the peanut pods. Gently shake off any excess soil and allow the plants to dry in the sun for a few days. Once the plants are dry, you can remove the peanuts from the vines.
9. How do I cure and store my homegrown peanuts?
After harvesting, cure the peanuts by drying them in a well-ventilated area for several weeks. This helps to improve their flavor and prevent them from spoiling. Once the peanuts are cured, you can store them in an airtight container in a cool, dry place. You can also roast the peanuts for a delicious snack.
10. What if my peanut plants flower but don’t produce peanuts?
This can be due to several factors, including poor pollination, insufficient sunlight, or nutrient deficiencies. Ensure your plants are receiving adequate sunlight and nutrients, and consider hand-pollinating the flowers to improve peanut production. You can also add a fertilizer specifically formulated for peanuts to provide the necessary nutrients.
Leave a Comment