

Grow pineapple at home? Absolutely! Imagine plucking a juicy, sun-ripened pineapple straight from your own backyard. Sounds like a tropical dream, right? Well, it’s more achievable than you might think, and this DIY guide is your passport to pineapple paradise. Forget those expensive grocery store pineapples – we’re about to unlock the secrets to cultivating your own sweet treat.
The pineapple, a symbol of hospitality and welcome, has a rich history. Originating in South America, it was prized by indigenous cultures long before European explorers discovered its deliciousness. In fact, pineapples were so rare and coveted in 17th and 18th century Europe that they were often rented out as status symbols for dinner parties! Now, you can bring that touch of exotic luxury to your own home, without breaking the bank.
Why should you learn this DIY trick? Because growing your own pineapple is not only incredibly rewarding, but it’s also a sustainable way to enjoy this tropical fruit. Plus, it’s a fantastic conversation starter! This article will guide you through each step, from selecting the perfect pineapple top to nurturing your plant to its fruiting glory. So, let’s dive in and discover how easy it is to grow pineapple at home and enjoy the fruits (literally!) of your labor.
Ananas selber ziehen: Ein tropischer Traum für dein Zuhause!
Hey Leute! Habt ihr euch jemals gefragt, ob man eine Ananas einfach so zu Hause ziehen kann? Die Antwort ist: Ja, das geht! Und ich zeige euch, wie. Es ist einfacher, als ihr denkt, und das Ergebnis ist einfach fantastisch. Stellt euch vor, ihr könntet eure eigene, selbst gezogene Ananas ernten! Klingt gut, oder? Los geht’s!
Was du brauchst: Die Zutaten für dein Ananas-Abenteuer
Bevor wir loslegen, brauchen wir ein paar Dinge. Keine Sorge, die meisten davon hast du wahrscheinlich schon zu Hause.
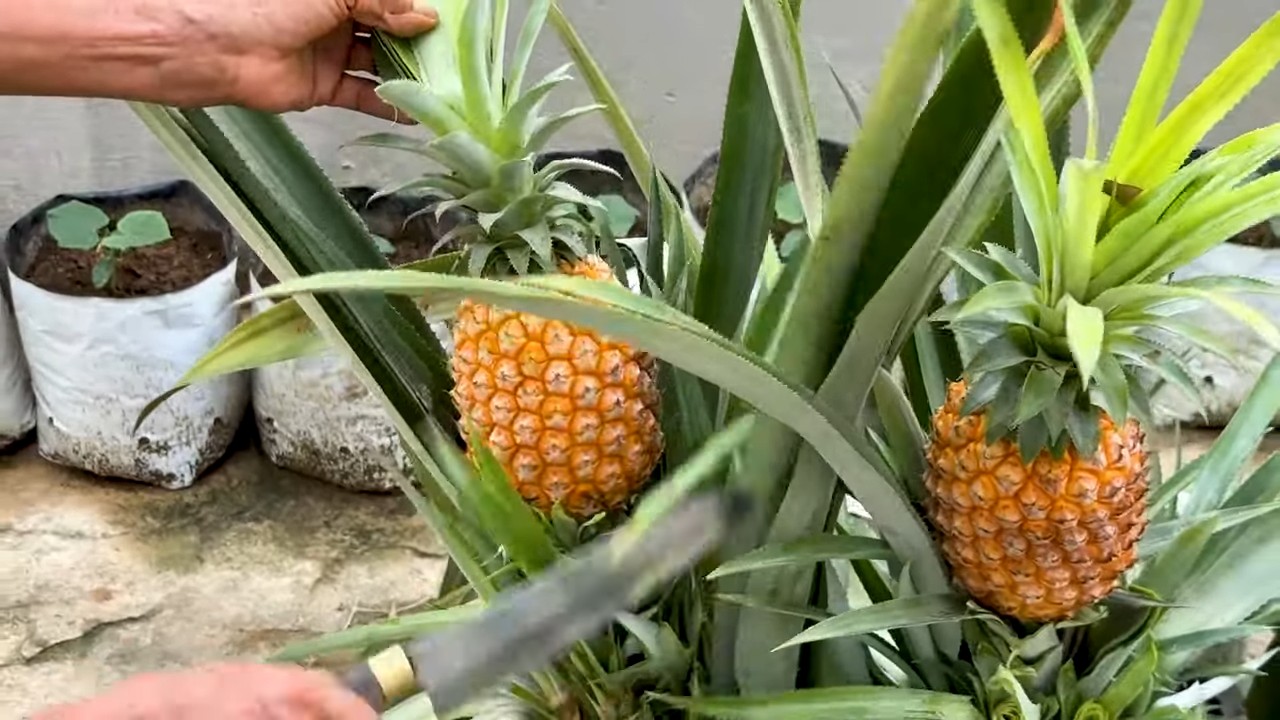
* Eine reife Ananas: Am besten eine, die im Supermarkt schon etwas länger liegt und einen schönen, gesunden Blattschopf hat. Achte darauf, dass die Blätter grün und fest sind und keine braunen oder welken Stellen haben.
* Ein scharfes Messer: Ein Küchenmesser oder ein Teppichmesser tut es auch. Wichtig ist, dass es sauber und scharf ist, damit wir den Ananaskopf sauber abtrennen können.
* Ein Glas oder eine Vase: Hier kommt der Ananaskopf zum Wurzeln. Es sollte breit genug sein, damit der Kopf gut darin steht, aber nicht zu groß, damit er nicht untergeht.
* Zahnstocher (optional): Die helfen, den Ananaskopf im Glas zu stabilisieren, falls er nicht von alleine steht.
* Blumenerde: Am besten eine lockere, gut durchlässige Erde. Kakteenerde oder Anzuchterde sind ideal.
* Ein Blumentopf: Der Topf sollte groß genug sein, damit die Ananas genügend Platz zum Wachsen hat. Ein Durchmesser von 20-25 cm ist ein guter Anfang.
* Wasser: Klares, sauberes Wasser zum Bewässern.
* Geduld: Ananas wachsen nicht über Nacht. Es braucht Zeit und Pflege, bis du deine eigene Ananas ernten kannst.
Schritt-für-Schritt-Anleitung: So ziehst du deine eigene Ananas
Okay, jetzt haben wir alles zusammen. Dann können wir ja loslegen!
1. Den Ananaskopf vorbereiten:
* Nimm dein scharfes Messer und trenne den Blattschopf der Ananas vorsichtig vom Fruchtkörper ab. Achte darauf, dass du so wenig Fruchtfleisch wie möglich am Kopf lässt.
* Entferne die untersten Blätter des Ananaskopfes. Ziehe sie einfach vorsichtig ab. Dadurch legst du den Stiel frei, aus dem später die Wurzeln wachsen werden.
* Lass den Ananaskopf ein paar Tage (ca. 2-3 Tage) an einem trockenen, luftigen Ort trocknen. Das hilft, Fäulnis zu verhindern.
2. Den Ananaskopf bewurzeln:
* Fülle dein Glas oder deine Vase mit Wasser.
* Stecke den Ananaskopf so in das Wasser, dass nur der Stiel (der Teil, wo du die Blätter entfernt hast) im Wasser steht. Die Blätter sollten nicht im Wasser sein, da sie sonst faulen können.
* Wenn der Ananaskopf nicht von alleine steht, kannst du ihn mit Zahnstochern stabilisieren. Stecke die Zahnstocher einfach rundherum in den Stiel und lege sie auf den Rand des Glases.
* Stelle das Glas an einen hellen, warmen Ort, aber nicht in die pralle Sonne.
* Wechsle das Wasser alle paar Tage, um Fäulnis zu vermeiden.
* Nach einigen Wochen (ca. 4-8 Wochen) sollten sich Wurzeln bilden. Hab Geduld, es kann etwas dauern!
3. Die Ananas einpflanzen:
* Sobald die Wurzeln einige Zentimeter lang sind, ist es Zeit, die Ananas einzupflanzen.
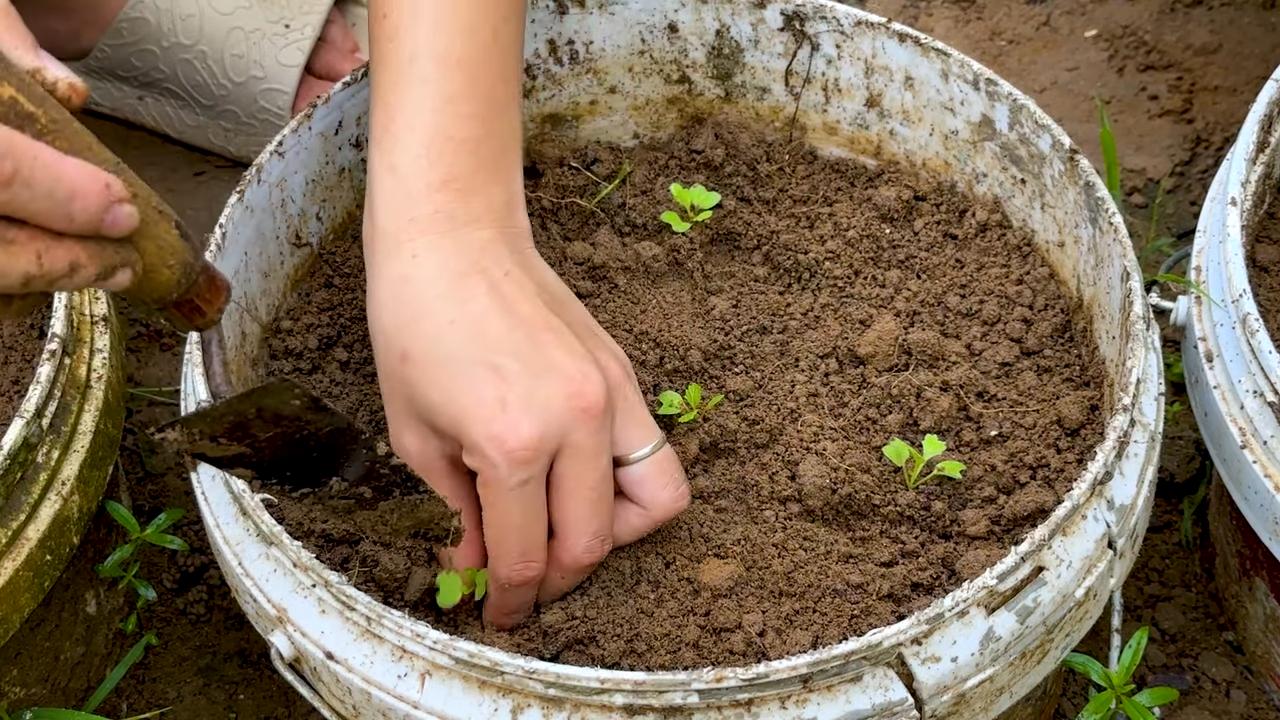
* Fülle deinen Blumentopf mit Blumenerde.
* Mache ein Loch in die Erde, das groß genug ist, um den Ananaskopf aufzunehmen.
* Setze den Ananaskopf vorsichtig in das Loch und fülle es mit Erde auf. Achte darauf, dass die Wurzeln gut bedeckt sind.
* Gieße die Ananas gut an.
4. Die Ananas pflegen:
* Stelle den Blumentopf an einen hellen, warmen Ort. Ananas lieben Sonne, aber direkte Mittagssonne kann die Blätter verbrennen.
* Gieße die Ananas regelmäßig, aber nicht zu viel. Die Erde sollte immer leicht feucht sein, aber nicht nass.
* Dünge die Ananas alle paar Wochen mit einem Flüssigdünger für Zimmerpflanzen.
* Drehe den Topf regelmäßig, damit die Ananas gleichmäßig wächst.
Geduld ist gefragt: Vom Ananaskopf zur Frucht
Jetzt heißt es warten und pflegen. Es kann bis zu zwei Jahre dauern, bis deine Ananas Früchte trägt. Aber keine Sorge, auch ohne Frucht ist die Ananaspflanze eine schöne Zimmerpflanze.
Hier sind ein paar Tipps, um die Fruchtbildung zu fördern:
* Sorge für ausreichend Wärme: Ananas lieben Wärme. Eine Temperatur zwischen 20 und 30 Grad Celsius ist ideal.
* Erhöhe die Luftfeuchtigkeit: Besprühe die Blätter regelmäßig mit Wasser, um die Luftfeuchtigkeit zu erhöhen.
Hey Leute! Habt ihr euch jemals gefragt, ob man eine Ananas einfach so zu Hause ziehen kann? Die Antwort ist: Ja, das geht! Und ich zeige euch, wie. Es ist einfacher, als ihr denkt, und das Ergebnis ist einfach fantastisch. Stellt euch vor, ihr könntet eure eigene, selbst gezogene Ananas ernten! Klingt gut, oder? Los geht’s!
Was du brauchst: Die Zutaten für dein Ananas-Abenteuer
Bevor wir loslegen, brauchen wir ein paar Dinge. Keine Sorge, die meisten davon hast du wahrscheinlich schon zu Hause.
* Eine reife Ananas: Am besten eine, die im Supermarkt schon etwas länger liegt und einen schönen, gesunden Blattschopf hat. Achte darauf, dass die Blätter grün und fest sind und keine braunen oder welken Stellen haben.
* Ein scharfes Messer: Ein Küchenmesser oder ein Teppichmesser tut es auch. Wichtig ist, dass es sauber und scharf ist, damit wir den Ananaskopf sauber abtrennen können.
* Ein Glas oder eine Vase: Hier kommt der Ananaskopf zum Wurzeln. Es sollte breit genug sein, damit der Kopf gut darin steht, aber nicht zu groß, damit er nicht untergeht.
* Zahnstocher (optional): Die helfen, den Ananaskopf im Glas zu stabilisieren, falls er nicht von alleine steht.
* Blumenerde: Am besten eine lockere, gut durchlässige Erde. Kakteenerde oder Anzuchterde sind ideal.
* Ein Blumentopf: Der Topf sollte groß genug sein, damit die Ananas genügend Platz zum Wachsen hat. Ein Durchmesser von 20-25 cm ist ein guter Anfang.
* Wasser: Klares, sauberes Wasser zum Bewässern.
* Geduld: Ananas wachsen nicht über Nacht. Es braucht Zeit und Pflege, bis du deine eigene Ananas ernten kannst.
Schritt-für-Schritt-Anleitung: So ziehst du deine eigene Ananas
Okay, jetzt haben wir alles zusammen. Dann können wir ja loslegen!
1. Den Ananaskopf vorbereiten:
* Nimm dein scharfes Messer und trenne den Blattschopf der Ananas vorsichtig vom Fruchtkörper ab. Achte darauf, dass du so wenig Fruchtfleisch wie möglich am Kopf lässt.
* Entferne die untersten Blätter des Ananaskopfes. Ziehe sie einfach vorsichtig ab. Dadurch legst du den Stiel frei, aus dem später die Wurzeln wachsen werden.
* Lass den Ananaskopf ein paar Tage (ca. 2-3 Tage) an einem trockenen, luftigen Ort trocknen. Das hilft, Fäulnis zu verhindern.
2. Den Ananaskopf bewurzeln:
* Fülle dein Glas oder deine Vase mit Wasser.
* Stecke den Ananaskopf so in das Wasser, dass nur der Stiel (der Teil, wo du die Blätter entfernt hast) im Wasser steht. Die Blätter sollten nicht im Wasser sein, da sie sonst faulen können.
* Wenn der Ananaskopf nicht von alleine steht, kannst du ihn mit Zahnstochern stabilisieren. Stecke die Zahnstocher einfach rundherum in den Stiel und lege sie auf den Rand des Glases.
* Stelle das Glas an einen hellen, warmen Ort, aber nicht in die pralle Sonne.
* Wechsle das Wasser alle paar Tage, um Fäulnis zu vermeiden.
* Nach einigen Wochen (ca. 4-8 Wochen) sollten sich Wurzeln bilden. Hab Geduld, es kann etwas dauern!
3. Die Ananas einpflanzen:
* Sobald die Wurzeln einige Zentimeter lang sind, ist es Zeit, die Ananas einzupflanzen.
* Fülle deinen Blumentopf mit Blumenerde.
* Mache ein Loch in die Erde, das groß genug ist, um den Ananaskopf aufzunehmen.
* Setze den Ananaskopf vorsichtig in das Loch und fülle es mit Erde auf. Achte darauf, dass die Wurzeln gut bedeckt sind.
* Gieße die Ananas gut an.
4. Die Ananas pflegen:
* Stelle den Blumentopf an einen hellen, warmen Ort. Ananas lieben Sonne, aber direkte Mittagssonne kann die Blätter verbrennen.
* Gieße die Ananas regelmäßig, aber nicht zu viel. Die Erde sollte immer leicht feucht sein, aber nicht nass.
* Dünge die Ananas alle paar Wochen mit einem Flüssigdünger für Zimmerpflanzen.
* Drehe den Topf regelmäßig, damit die Ananas gleichmäßig wächst.
Geduld ist gefragt: Vom Ananaskopf zur Frucht
Jetzt heißt es warten und pflegen. Es kann bis zu zwei Jahre dauern, bis deine Ananas Früchte trägt. Aber keine Sorge, auch ohne Frucht ist die Ananaspflanze eine schöne Zimmerpflanze.
Hier sind ein paar Tipps, um die Fruchtbildung zu fördern:
* Sorge für ausreichend Wärme: Ananas lieben Wärme. Eine Temperatur zwischen 20 und 30 Grad Celsius ist ideal.
* Erhöhe die Luftfeuchtigkeit: Besprühe die Blätter regelmäßig mit Wasser, um die Luftfeuchtigkeit zu erhöhen.
* Ethylen-Trick: Um die Fruchtbildung anzuregen, kannst du einen Apfel in eine Plastiktüte zusammen mit der Ananaspflanze stecken. Äpfel produzieren Ethylen, ein Gas, das die Reifung von Früchten fördert. Lasse die Tüte für ein paar Tage geschlossen.
Häufige Probleme und Lösungen: Was tun, wenn etwas schief geht?
Auch beim Ananas ziehen kann es zu Problemen kommen. Hier sind ein paar häufige Probleme und wie du sie lösen kannst:
* Die Blätter werden braun: Das kann verschiedene Ursachen haben. Entweder bekommt die Ananas zu viel Sonne, zu wenig Wasser oder zu wenig Nährstoffe. Überprüfe die Bedingungen und passe sie entsprechend an.
* Der Ananaskopf fault: Das passiert meistens, wenn zu viel Fruchtfleisch am Kopf gelassen wurde oder wenn das Wasser nicht regelmäßig gewechselt wurde. Schneide die faulen Stellen ab und wechsle das Wasser öfter.
* Die Ananas wächst nicht: Das kann daran liegen, dass sie zu wenig Licht, Wärme oder Nährstoffe bekommt. Stelle sie an einen helleren, wärmeren Ort und dünge sie regelmäßig.
Extra-Tipps für Ananas-Profis: So wird deine Ananas noch besser!
Du willst noch mehr aus deiner Ananas herausholen? Hier sind ein paar Extra-Tipps für Ananas-Profis:
* Verwende Regenwasser: Regenwasser ist weicher als Leitungswasser und enthält weniger Kalk. Das tut der Ananas gut.
* Dünge mit Kaffeesatz: Kaffeesatz ist ein natürlicher Dünger, der Stickstoff, Phosphor und Kalium enthält. Einfach unter die Erde mischen.
* Vermehrung durch Seitentriebe: Wenn deine Ananas Seitentriebe bildet, kannst du diese abtrennen und separat einpflanzen. So bekommst du noch mehr Ananaspflanzen!
Fazit: Ananas selber ziehen ist ein tolles Hobby!
Ich hoffe, diese Anleitung hat dir geholfen, deine eigene Ananas zu ziehen. Es ist ein tolles Hobby, das viel Freude bereitet. Und wer weiß, vielleicht erntest du ja bald deine erste eigene Ananas! Viel Erfolg und viel Spaß beim Gärtnern!
Conclusion
So, there you have it! Growing your own pineapple at home isn’t just a fun project; it’s a rewarding experience that brings a touch of the tropics right to your windowsill or garden. We’ve walked you through the simple steps, from selecting the perfect pineapple top to nurturing your new plant into a fruit-bearing beauty.
Why is this DIY trick a must-try? Because it’s more than just growing a pineapple; it’s about connecting with nature, understanding the life cycle of a plant, and enjoying the unparalleled satisfaction of harvesting something you’ve nurtured from scratch. Store-bought pineapples are great, but nothing compares to the vibrant flavor and sense of accomplishment that comes with a homegrown one. Plus, you’re reducing your carbon footprint by avoiding the transportation and packaging associated with commercially grown fruit.
But the fun doesn’t stop there! Feel free to experiment with different varieties of pineapple. The smooth cayenne is a popular choice, but explore other options like the sugarloaf or the red Spanish for unique flavors and textures. You can also try different potting mixes to see what works best in your climate. Some gardeners swear by a mix of peat moss, perlite, and vermiculite, while others prefer a more organic blend with compost and coconut coir.
Consider using different containers as well. While a standard pot works perfectly well, you could also try growing your pineapple in a raised bed or even a large container on your patio. Just be sure to provide adequate drainage and plenty of sunlight.
And don’t forget the power of community! Share your progress and experiences with other pineapple enthusiasts online. There are countless forums and social media groups dedicated to gardening, where you can ask questions, share tips, and celebrate your successes.
Ultimately, growing a pineapple at home is an adventure. It requires patience, dedication, and a little bit of green thumb magic. But the rewards are well worth the effort. Imagine serving a slice of your own homegrown pineapple to friends and family, knowing that you nurtured it from a simple pineapple top. It’s a conversation starter, a source of pride, and a delicious treat all rolled into one.
We wholeheartedly encourage you to give this DIY trick a try. Don’t be intimidated by the process. Even if you’re a beginner gardener, you can successfully grow a pineapple with a little bit of care and attention. And remember, even if your first attempt isn’t perfect, you’ll learn valuable lessons that will help you succeed in the future.
So, grab a pineapple, follow our instructions, and embark on your own pineapple-growing journey. We can’t wait to hear about your experiences! Share your photos, tips, and stories with us in the comments below. Let’s create a community of pineapple growers and spread the joy of homegrown goodness. Happy growing! Let us know if you have any questions about how to **grow pineapple at home**.
Frequently Asked Questions (FAQ)
How long does it take to grow a pineapple from a top?
Growing a pineapple from a top is a patience-testing endeavor, but the reward is well worth the wait! Generally, it takes anywhere from 2 to 3 years for a pineapple plant grown from a top to produce fruit. The exact timeframe depends on several factors, including the variety of pineapple, the climate, the amount of sunlight it receives, and the overall care it gets. Warmer climates with consistent sunlight will typically see faster growth. Remember to fertilize regularly and provide adequate water, but avoid overwatering, which can lead to root rot.
What kind of soil is best for growing pineapples?
Pineapples thrive in well-draining, slightly acidic soil. A pH level between 4.5 and 6.5 is ideal. A good potting mix for pineapples can be created by combining equal parts of peat moss, perlite, and vermiculite. This mixture provides excellent drainage and aeration, which are crucial for healthy root development. You can also amend the soil with organic matter, such as compost or well-rotted manure, to improve its fertility and water retention. Avoid heavy clay soils, as they tend to retain too much water and can suffocate the roots.
How much sunlight does a pineapple plant need?
Pineapples are sun-loving plants and require at least 6 to 8 hours of direct sunlight per day to thrive. If you’re growing your pineapple indoors, place it near a sunny window, preferably one that faces south or west. You may also need to supplement with artificial light, especially during the winter months or in regions with limited sunlight. Rotate the plant regularly to ensure that all sides receive adequate light. Insufficient sunlight can lead to stunted growth and reduced fruit production.
How often should I water my pineapple plant?
Water your pineapple plant regularly, but avoid overwatering. The soil should be kept consistently moist, but not soggy. Water thoroughly when the top inch of soil feels dry to the touch. During the warmer months, you may need to water more frequently than during the cooler months. Be sure to provide good drainage to prevent root rot. A well-draining pot with drainage holes is essential. You can also mist the leaves occasionally to increase humidity, especially if you live in a dry climate.
How do I fertilize my pineapple plant?
Pineapples are heavy feeders and benefit from regular fertilization. Use a balanced fertilizer, such as a 10-10-10 or 14-14-14, diluted to half strength. Fertilize every 2 to 3 months during the growing season (spring and summer). You can also use a liquid fertilizer, such as fish emulsion or seaweed extract, diluted according to the package instructions. Avoid over-fertilizing, as this can burn the roots. A foliar feeding, where you spray the leaves with a diluted fertilizer solution, can also be beneficial.
How do I get my pineapple plant to fruit?
Getting your pineapple plant to fruit can sometimes be a challenge, but there are a few tricks you can try. One common method is to expose the plant to ethylene gas, which is a natural ripening hormone. You can do this by placing a ripe apple or banana near the plant and covering it with a plastic bag for a few days. The ripening fruit will release ethylene gas, which can stimulate flowering. Another method is to pour a small amount of calcium carbide solution (dissolve a small piece of calcium carbide in water) into the center of the plant. This will also release ethylene gas. Be careful when handling calcium carbide, as it can be irritating to the skin and eyes.
What are some common problems when growing pineapples and how do I fix them?
Some common problems when growing pineapples include root rot, mealybugs, and scale. Root rot is caused by overwatering and poor drainage. To prevent root rot, ensure that your pineapple plant is planted in well-draining soil and that you are not overwatering it. Mealybugs and scale are sap-sucking insects that can weaken the plant. You can control these pests by wiping them off with a cotton swab dipped in rubbing alcohol or by spraying the plant with insecticidal soap. Regularly inspect your plant for signs of pests and diseases to catch problems early.
Can I grow a pineapple indoors?
Yes, you can absolutely grow a pineapple indoors! In fact, it’s a great way to bring a touch of the tropics into your home, especially if you live in a colder climate. The key to success is providing your pineapple plant with plenty of sunlight, warmth, and humidity. Place it near a sunny window, preferably one that faces south or west. You may also need to supplement with artificial light, especially during the winter months. Keep the temperature between 65°F and 80°F (18°C and 27°C). Mist the leaves regularly to increase humidity.
What do I do with the pineapple after I harvest it?
Congratulations on harvesting your homegrown pineapple! Now it’s time to enjoy the fruits (literally!) of your labor. You can eat the pineapple fresh, use it in smoothies, grill it, or add it to your favorite recipes. The possibilities are endless! You can also save the top of the pineapple and start the growing process all over again. This is a great way to propagate new pineapple plants and continue enjoying the benefits of homegrown fruit.


Leave a Comment