

Grow Pumpkins Small Spaces? Absolutely! You might think sprawling vines and massive gourds are only for those with acres of land, but I’m here to tell you that’s simply not true. For centuries, pumpkins have been a symbol of abundance and harvest, deeply woven into the fabric of autumn celebrations worldwide. From ancient indigenous traditions to modern-day jack-o’-lanterns, these vibrant fruits hold a special place in our hearts and on our tables.
But what if you dream of carving your own homegrown pumpkin but only have a tiny balcony or a compact patio? Don’t despair! This DIY guide is packed with clever tricks and hacks to help you successfully grow pumpkins small spaces, even if you’re short on square footage. I’ll show you how to choose the right varieties, optimize your container gardening setup, and provide the support your pumpkin vines need to thrive.
Imagine the satisfaction of harvesting your very own pumpkins, grown with your own two hands, right in the heart of your urban oasis. No more relying on the grocery store – you’ll have a bounty of beautiful pumpkins for pies, decorations, and everything in between. Let’s get started and transform your limited space into a pumpkin paradise!
Growing Pumpkins in Small Spaces: A DIY Guide to Vertical Pumpkin Power!
Hey there, fellow gardening enthusiasts! Dreaming of carving your own homegrown pumpkin this Halloween, but think you don’t have the space? Think again! I’m here to show you how to grow pumpkins, even in the tiniest of gardens, balconies, or patios, using a clever vertical growing technique. It’s easier than you think, and the results are incredibly rewarding. Let’s get started!
What You’ll Need: The Essential Supplies
Before we dive into the nitty-gritty, let’s gather our supplies. This is crucial for a smooth and successful pumpkin-growing adventure.
* Pumpkin Seeds: Choose a smaller variety like ‘Jack Be Little,’ ‘Baby Boo,’ or ‘Spookies.’ These are perfect for vertical growing and won’t overwhelm your structure. I personally love ‘Jack Be Little’ for their adorable size and vibrant orange color.
* Large Container: You’ll need a container at least 24 inches in diameter and 12 inches deep. A half whiskey barrel, a large plastic tub, or even a repurposed container will work. Make sure it has drainage holes!
* High-Quality Potting Mix: Don’t skimp on the soil! Use a well-draining potting mix rich in organic matter. I recommend a mix specifically formulated for vegetables.
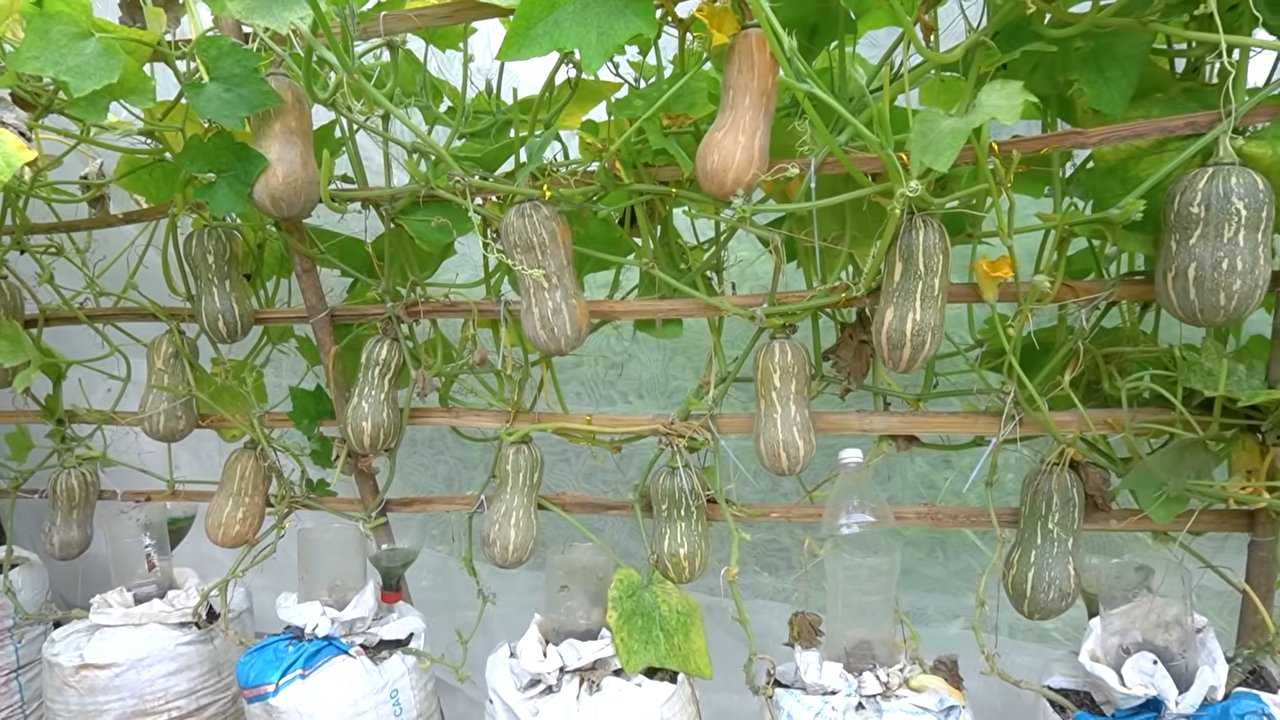
* Trellis or Support Structure: This is the key to vertical pumpkin growing! A sturdy trellis, a strong tomato cage, or even a DIY structure made from wood or metal will do the trick. It needs to be at least 6 feet tall and capable of supporting the weight of the pumpkins.
* Planting Stakes or Markers: To keep track of where you planted your seeds.
* Gardening Gloves: To protect your hands.
* Watering Can or Hose: For regular watering.
* Fertilizer: A balanced fertilizer (10-10-10) or a fertilizer specifically for vegetables.
* Soft Plant Ties or Pantyhose: For supporting the growing pumpkins.
* Pruning Shears or Scissors: For trimming vines as needed.
* Mulch: To help retain moisture and suppress weeds.
* Optional: A small piece of burlap or shade cloth to protect developing pumpkins from sunburn.
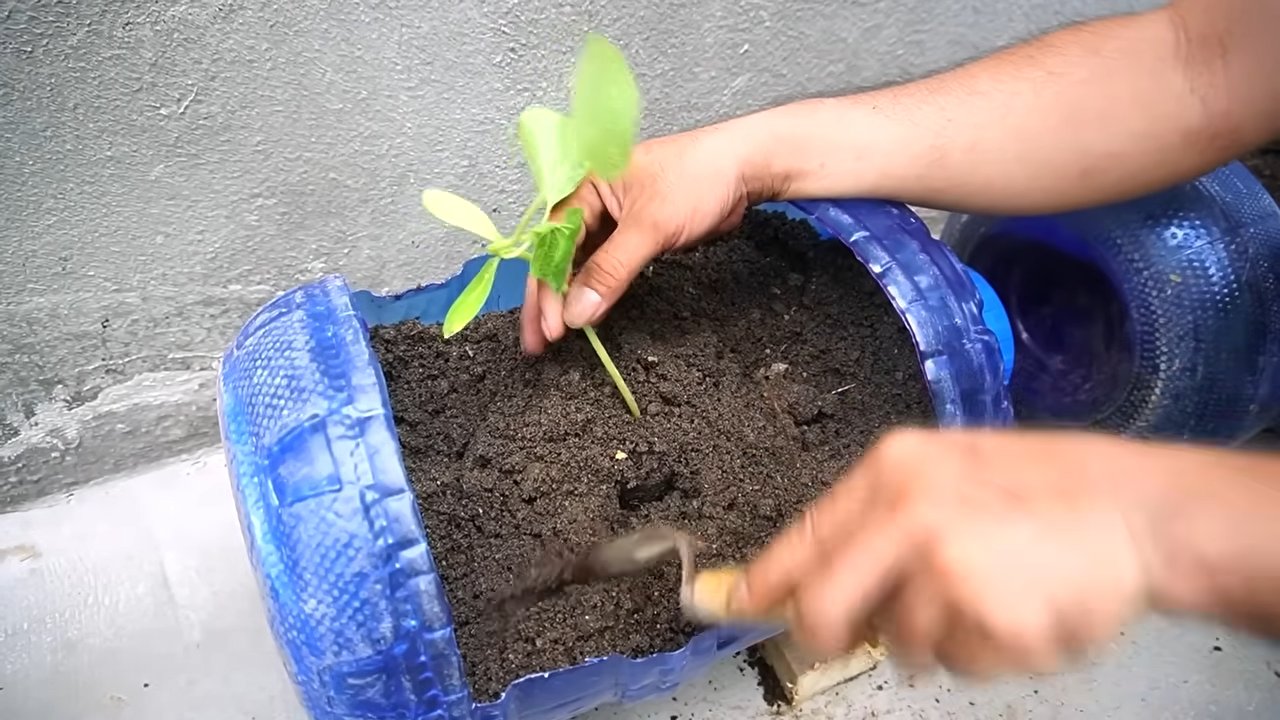
Getting Started: Planting Your Pumpkin Seeds
Now that we have everything we need, let’s get those pumpkin seeds in the ground!
1. Prepare the Container: Fill your large container with the high-quality potting mix, leaving a few inches of space at the top.
2. Plant the Seeds: Sow 2-3 pumpkin seeds per container, about 1 inch deep and a few inches apart.
3. Water Gently: Water the soil thoroughly but gently, making sure not to dislodge the seeds.
4. Mark the Spot: Use planting stakes or markers to identify where you planted the seeds.
5. Choose a Sunny Location: Place the container in a location that receives at least 6-8 hours of direct sunlight per day. Pumpkins are sun-loving plants!
Building Your Vertical Support System
This is where the magic happens! A strong and reliable support system is essential for successful vertical pumpkin growing.
1. Position the Trellis: Place your trellis or support structure firmly in the container, making sure it’s stable and won’t topple over when the pumpkins start to grow. I like to bury the base of the trellis a few inches into the soil for extra stability.
2. Ensure Stability: If you’re using a DIY structure, make sure it’s well-built and can withstand the weight of the mature pumpkins. Consider anchoring it to a wall or fence for added support.
3. Consider the Pumpkin’s Growth Habit: Think about how the pumpkin vines will grow and design your support system accordingly. You want to provide ample space for the vines to climb and spread.
Nurturing Your Pumpkin Vines: Training and Pruning
As your pumpkin vines grow, you’ll need to train them to climb the trellis and prune them to encourage fruit production.
1. Train the Vines: Gently guide the pumpkin vines up the trellis, using soft plant ties or pantyhose to secure them. Be careful not to damage the delicate vines.
2. Prune Excess Vines: Once the vines reach the top of the trellis, you can prune them to encourage the plant to focus its energy on producing pumpkins. Trim off any side shoots or suckers that are growing from the main vine.
3. Remove Male Flowers: Pumpkin plants produce both male and female flowers. The female flowers have a small, immature pumpkin at the base, while the male flowers do not. To encourage fruit production, you can remove some of the male flowers, leaving only a few to pollinate the female flowers.
Supporting the Growing Pumpkins: Preventing Breakage
As your pumpkins grow larger, they’ll need extra support to prevent them from breaking off the vine. This is a crucial step for a successful harvest.
1. Create Slings: Use soft plant ties, pantyhose, or even pieces of burlap to create slings to support the growing pumpkins.
2. Distribute the Weight: Make sure the slings are securely attached to the trellis and that they distribute the weight of the pumpkins evenly.
3. Monitor Regularly: Check the slings regularly to make sure they’re still providing adequate support. Adjust them as needed as the pumpkins grow larger.
4. Protect from Sunburn: If the pumpkins are exposed to direct sunlight, you can use a small piece of burlap or shade cloth to protect them from sunburn.
Watering and Fertilizing: Keeping Your Pumpkins Healthy
Proper watering and fertilizing are essential for healthy pumpkin growth and abundant fruit production.
1. Water Regularly: Water your pumpkin plants deeply and regularly, especially during hot, dry weather. Aim to keep the soil consistently moist but not waterlogged.
2. Fertilize Regularly: Feed your pumpkin plants with a balanced fertilizer (10-10-10) or a fertilizer specifically for vegetables every 2-3 weeks. Follow the instructions on the fertilizer package.
3. Avoid Over-Fertilizing: Be careful not to over-fertilize, as this can lead to excessive vine growth and reduced fruit production.
Pollination: Ensuring Fruit Set
Pumpkins require pollination to produce fruit. If you’re not seeing any pumpkins developing, you may need to hand-pollinate the flowers.
1. Identify Male and Female Flowers: As mentioned earlier, female flowers have a small, immature pumpkin at the base, while male flowers do not.
2. Hand-Pollinate: In the early morning, when the flowers are open, use a small paintbrush or cotton swab to transfer pollen from the male flower to the female flower.
3. Repeat as Needed: Repeat the hand-pollination process for several days to ensure successful fruit set.
Pest and Disease Control: Protecting Your Crop
Pumpkins can be susceptible to various pests and diseases. Here’s how to protect your crop:
1. Monitor Regularly: Inspect your pumpkin plants regularly for signs of pests or diseases.
2. Common Pests: Common pumpkin pests include squash bugs, squash vine borers, and aphids. Use insecticidal soap or other organic pest control methods to control these pests.
3. Common Diseases: Common pumpkin diseases include powdery mildew and downy mildew. Use a fungicide or other organic disease control methods to prevent and treat these diseases.
4. Good Air Circulation: Ensure good air circulation around your pumpkin plants to help prevent diseases.
Harvesting Your Pumpkins: The Grand Finale!
After months of care and attention, it’s finally time to harvest your pumpkins!
1. Check for Maturity: Pumpkins are typically ready to harvest when the skin is hard and the stem is dry and brown.
2. Tap the Pumpkin: A ripe pumpkin will sound hollow when tapped.
3. Cut the Stem: Use a sharp knife or pruning shears to cut the stem, leaving a few inches of stem attached to the pumpkin.
4. Handle with Care: Handle the pumpkins carefully to avoid bruising or damaging them.
5. Cure the Pumpkins: Cure the pumpkins in a warm, dry place for 1-2 weeks to harden the skin and improve their storage life.
Troubleshooting: Common Problems and Solutions
Even with the best care, you may encounter some problems along the way. Here are some common issues and how to address them:
* Lack of Fruit Set: This could be due to poor pollination. Try hand-pollinating the flowers.
* Yellowing Leaves: This could be due to nutrient deficiencies. Fertilize your pumpkin plants regularly.
* Pest Infestations: Use insecticidal soap or other organic pest control methods to control pests.
* Disease Problems: Use a fungicide or other
Conclusion
So, there you have it! Growing pumpkins in small spaces might seem like an impossible feat, but with a little ingenuity and the right techniques, you can absolutely cultivate these autumnal beauties even without a sprawling garden. This DIY approach to pumpkin cultivation is more than just a space-saving solution; it’s a testament to the power of resourcefulness and a chance to connect with nature in a meaningful way, regardless of your living situation.
Why is this DIY trick a must-try? Because it empowers you to enjoy the satisfaction of growing your own food, even when space is limited. Imagine the pride of carving a jack-o’-lantern from a pumpkin you nurtured from a tiny seed, all within the confines of your balcony or patio. Beyond the personal fulfillment, it’s also an environmentally conscious choice, reducing your reliance on commercially grown produce and minimizing your carbon footprint. Plus, it’s a fantastic conversation starter and a unique way to decorate your outdoor space.
But the benefits don’t stop there. This method allows for greater control over the growing environment. You can easily monitor soil moisture, adjust sunlight exposure, and protect your precious pumpkins from pests and diseases. This level of control often leads to healthier, more robust plants and, ultimately, a more bountiful harvest.
Looking for variations? Consider experimenting with different pumpkin varieties. Smaller, ornamental pumpkins like Jack Be Little or Baby Boo are particularly well-suited for container gardening. You can also try training your pumpkin vines to grow vertically along a trellis or fence, maximizing space and creating a stunning visual display. Another fun variation is to incorporate companion planting. Marigolds, for example, can help deter pests, while basil can improve the overall health of your pumpkin plants.
Don’t be afraid to get creative with your container choices. While large pots are ideal, you can also repurpose items like old tires, wooden crates, or even sturdy laundry baskets. Just make sure your chosen container has adequate drainage and is large enough to accommodate the pumpkin’s root system.
We wholeheartedly encourage you to give this DIY trick a try. It’s a rewarding experience that will not only provide you with delicious pumpkins but also deepen your appreciation for the natural world. And most importantly, we want to hear about your journey! Share your experiences, successes, and challenges with us. Post photos of your pumpkin plants, tell us about the varieties you’re growing, and let us know what tips and tricks you’ve discovered along the way. Your insights could inspire others to embark on their own small-space pumpkin-growing adventures. Let’s create a community of urban gardeners, sharing our knowledge and celebrating the joy of growing pumpkins, no matter how limited our space may be. So, grab your seeds, prepare your soil, and get ready to experience the magic of growing pumpkins in small spaces. Happy gardening!
Frequently Asked Questions (FAQ)
What is the best type of pumpkin to grow in a small space?
Smaller pumpkin varieties are generally better suited for small spaces. Consider options like ‘Jack Be Little,’ ‘Baby Boo,’ ‘Small Sugar,’ or ‘Spookies.’ These varieties produce smaller fruits and have less aggressive vines, making them easier to manage in containers or limited garden areas. Avoid larger varieties like ‘Atlantic Giant,’ which require significantly more space and resources. The key is to choose a variety that aligns with the size of your container and the amount of space you can dedicate to its growth.
How large of a container do I need for growing pumpkins?
The size of the container depends on the pumpkin variety you choose. For smaller varieties like ‘Jack Be Little,’ a 10-gallon container might suffice. However, for slightly larger varieties, aim for at least a 20-gallon container. The larger the container, the more room the roots have to grow, which translates to a healthier and more productive plant. Ensure the container has adequate drainage holes to prevent waterlogging, which can lead to root rot.
What type of soil is best for growing pumpkins in containers?
Pumpkins thrive in well-draining, nutrient-rich soil. A good potting mix specifically formulated for vegetables is an excellent choice. You can also create your own mix by combining equal parts of compost, peat moss (or coconut coir), and perlite or vermiculite. Compost provides essential nutrients, peat moss (or coconut coir) helps retain moisture, and perlite or vermiculite improves drainage and aeration. Avoid using garden soil in containers, as it can become compacted and hinder root growth.
How much sunlight do pumpkins need?
Pumpkins require at least 6-8 hours of direct sunlight per day to thrive. Choose a location that receives ample sunlight throughout the day. If you’re growing pumpkins on a balcony or patio, consider the sun’s path and position your containers accordingly. If you don’t have enough natural sunlight, you can supplement with grow lights.
How often should I water my pumpkin plants?
Water your pumpkin plants regularly, especially during hot and dry weather. The soil should be consistently moist but not waterlogged. Check the soil moisture by sticking your finger about an inch deep into the soil. If it feels dry, it’s time to water. Water deeply, allowing the water to reach the roots. Avoid overhead watering, as it can promote fungal diseases.
How do I fertilize my pumpkin plants?
Pumpkins are heavy feeders and require regular fertilization. Start with a balanced fertilizer (e.g., 10-10-10) when planting. Once the plants start to flower, switch to a fertilizer higher in phosphorus (the middle number) to promote fruit development. You can also supplement with compost tea or liquid seaweed extract. Follow the instructions on the fertilizer label and avoid over-fertilizing, which can damage the plants.
How do I pollinate my pumpkin flowers?
Pumpkins have separate male and female flowers. Female flowers have a small, immature pumpkin at the base, while male flowers do not. Bees and other pollinators typically pollinate the flowers. However, if you’re growing pumpkins in a small space or if pollinator activity is low, you may need to hand-pollinate. To hand-pollinate, use a small paintbrush to transfer pollen from the male flower to the female flower. Do this in the morning, when the flowers are open.
How do I prevent pests and diseases?
Monitor your pumpkin plants regularly for signs of pests and diseases. Common pests include squash bugs, squash vine borers, and aphids. Common diseases include powdery mildew and fungal leaf spots. Use organic pest control methods, such as insecticidal soap or neem oil, to control pests. Improve air circulation and avoid overhead watering to prevent diseases. Remove any infected leaves or plants promptly.
How do I train my pumpkin vines to grow vertically?
Training pumpkin vines to grow vertically can save space and improve air circulation. Use a sturdy trellis, fence, or other support structure. Gently guide the vines up the support structure and tie them loosely with twine or plant ties. As the pumpkins grow, you may need to provide additional support to prevent the vines from breaking.
When are pumpkins ready to harvest?
Pumpkins are typically ready to harvest in the fall, when the skin is hard and the color is deep and vibrant. The stem should also be dry and brown. To harvest, cut the pumpkin from the vine with a sharp knife, leaving a few inches of stem attached. Handle the pumpkins carefully to avoid bruising or damaging the skin. Cure the pumpkins in a warm, dry place for a week or two to harden the skin and improve their storage life.
Leave a Comment