

Grow Purple Sweet Peppers and transform your garden into a vibrant, edible masterpiece! Have you ever dreamed of strolling through your backyard, plucking a perfectly ripe, jewel-toned pepper straight from the vine? It’s not just a fantasy; it’s an achievable reality with a few simple tricks and a little DIY spirit. For centuries, gardeners have experimented with cultivating unique and colorful varieties of peppers, adding both beauty and nutritional value to their tables.
But why settle for ordinary green peppers when you can grow purple sweet peppers that are bursting with flavor and visual appeal? In this article, I’m going to share some easy-to-follow DIY hacks that will help you cultivate these stunning peppers, even if you’re a complete beginner. From selecting the right seeds to providing the optimal growing conditions, I’ll guide you through every step of the process.
Let’s face it, store-bought produce can be expensive and often lacks the freshness and flavor of homegrown vegetables. Plus, there’s something incredibly satisfying about nurturing a plant from seed to harvest. So, ditch the grocery store and embrace the joy of growing your own delicious, eye-catching purple sweet peppers. Get ready to impress your friends and family with your gardening prowess and enjoy the unique taste of these delightful treats!
Growing Vibrant Purple Sweet Peppers: A DIY Guide
Okay, so you want to grow your own gorgeous purple sweet peppers? Awesome! I’m here to walk you through the whole process, from seed to table. It’s easier than you might think, and the reward of biting into a homegrown, vibrantly colored pepper is totally worth it.
Choosing Your Purple Sweet Pepper Variety
First things first, let’s talk varieties. Not all purple peppers are created equal! Some are hotter than others, and some are more purple than others. Here are a few of my favorites:
* ‘Purple Beauty’: This is a classic choice. It’s a bell pepper type, so it’s nice and blocky, and it ripens to a deep, glossy purple. The flavor is mild and sweet.
* ‘Purple Marconi’: If you prefer a longer, more slender pepper, the ‘Purple Marconi’ is a great option. It’s also sweet and mild, perfect for grilling or roasting.
* ‘Sweet Chocolate’: Don’t let the name fool you, it’s not chocolate flavored! This pepper starts green and matures to a rich, dark brown-purple. It’s known for its exceptional sweetness.
* ‘Oda’: This is a Japanese variety that produces small, cone-shaped peppers that turn a beautiful deep purple. They’re great for pickling or stir-fries.
Once you’ve picked your variety (or varieties!), you’re ready to get started.
Starting Your Seeds (or Buying Seedlings)
You have two options here: start your own seeds indoors, or buy seedlings from a nursery. Starting from seed gives you more control over the process and allows you to choose from a wider variety of peppers. Buying seedlings is quicker and easier, but you’ll be limited to what’s available at your local nursery.
Starting Seeds Indoors (Recommended)
I highly recommend starting your seeds indoors, especially if you live in a cooler climate. This gives your peppers a head start on the growing season.
1. Gather Your Supplies: You’ll need:
* Pepper seeds
* Seed starting trays or small pots
* Seed starting mix (a light, sterile potting mix)
* A heat mat (optional, but helpful)
* A grow light (also optional, but highly recommended)
* A spray bottle filled with water
2. Sow the Seeds: Fill your seed starting trays or pots with seed starting mix. Moisten the mix with the spray bottle. Sow the seeds about 1/4 inch deep, placing 2-3 seeds per cell or pot.
3. Provide Warmth and Light: Pepper seeds need warmth to germinate. Place the trays or pots on a heat mat, if you have one. Cover them with a clear plastic dome or plastic wrap to create a humid environment. Place the trays or pots under a grow light, or in a very sunny window.
4. Keep the Soil Moist: Check the soil daily and mist with water as needed to keep it moist but not soggy.
5. Wait for Germination: Pepper seeds can take anywhere from 7 to 21 days to germinate, depending on the temperature and variety. Be patient!
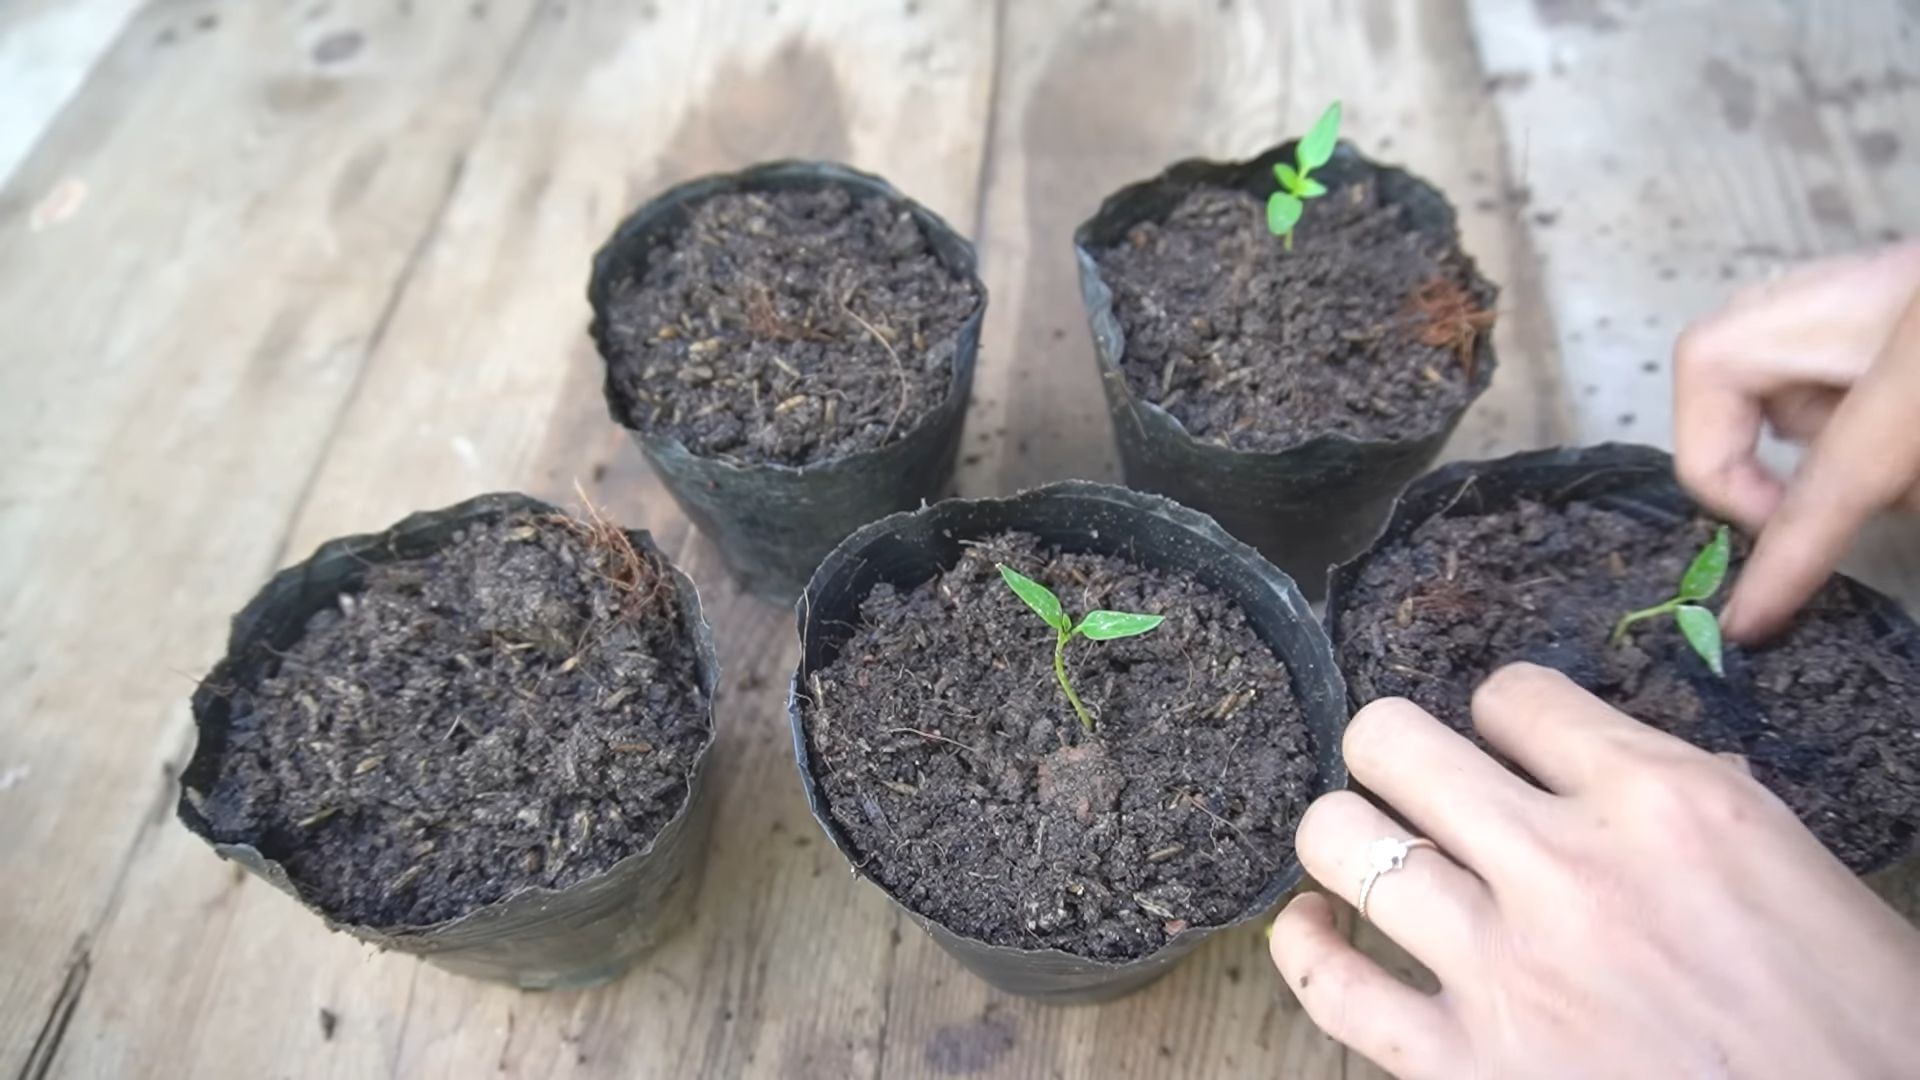
6. Thin the Seedlings: Once the seedlings have emerged and have a couple of sets of true leaves (the leaves that look like miniature pepper leaves), thin them to one seedling per cell or pot. Choose the strongest, healthiest-looking seedling and snip off the others at the soil line.
7. Harden Off the Seedlings: Before transplanting your seedlings outdoors, you need to “harden them off.” This means gradually exposing them to outdoor conditions over a period of 7-10 days. Start by placing them in a sheltered spot outdoors for an hour or two each day, gradually increasing the amount of time they spend outside. Protect them from direct sunlight and strong winds.
Buying Seedlings
If you’re buying seedlings, choose plants that are healthy and vigorous, with dark green leaves and sturdy stems. Avoid plants that are leggy, yellowed, or have any signs of pests or diseases.
Preparing Your Garden Bed
Peppers need a sunny spot with well-drained soil. Choose a location that gets at least 6-8 hours of direct sunlight per day.
1. Test Your Soil: It’s always a good idea to test your soil to see what nutrients it’s lacking. You can buy a soil testing kit at most garden centers, or send a sample to your local agricultural extension office.
2. Amend the Soil: Based on your soil test results, amend the soil with compost, aged manure, or other organic matter to improve its fertility and drainage. Peppers prefer slightly acidic soil with a pH of 6.0 to 6.8.
3. Prepare the Planting Area: Dig a hole that is slightly larger than the root ball of your pepper plant. Space the plants about 18-24 inches apart.
Transplanting Your Peppers
Once the danger of frost has passed and the soil has warmed up, it’s time to transplant your peppers into the garden.
1. Water the Seedlings: Water the seedlings thoroughly before transplanting them.
2. Carefully Remove the Seedlings: Gently remove the seedlings from their trays or pots, being careful not to damage the roots.
3. Plant the Seedlings: Place the seedlings in the prepared holes, making sure that the top of the root ball is level with the surrounding soil.
4. Fill the Holes: Fill the holes with soil and gently firm it around the plants.
5. Water Thoroughly: Water the plants thoroughly after transplanting.
6. Mulch: Apply a layer of mulch around the plants to help retain moisture, suppress weeds, and regulate soil temperature. I like to use straw or shredded leaves.
Caring for Your Purple Sweet Peppers
Now that your peppers are in the ground, it’s time to give them the care they need to thrive.
1. Watering: Peppers need consistent moisture, especially during hot, dry weather. Water deeply whenever the top inch of soil feels dry to the touch. Avoid overwatering, which can lead to root rot.
2. Fertilizing: Peppers are heavy feeders, so they need regular fertilization. Use a balanced fertilizer, such as 10-10-10, every 2-3 weeks. You can also use a liquid fertilizer, such as fish emulsion or seaweed extract.
3. Staking or Caging: As your pepper plants grow, they may need staking or caging to support the weight of the fruit. This is especially important for bell pepper varieties, which can get quite heavy.
4. Pruning: Pruning is not essential for peppers, but it can help to improve air circulation and sunlight penetration. Remove any suckers (small shoots that grow from the base of the plant) and any yellowed or diseased leaves.
5. Pest and Disease Control: Keep an eye out for pests and diseases, such as aphids, flea beetles, and blossom end rot. Treat any problems promptly with organic pest control methods, such as insecticidal soap or neem oil. Blossom end rot is often caused by calcium deficiency, so you can add calcium to the soil by mixing in some crushed eggshells or bone meal.
Harvesting Your Purple Sweet Peppers
The best part! You can harvest your purple sweet peppers when they have reached their mature size and color. The exact time will depend on the variety, but generally, they’ll be ready to harvest about 60-80 days after transplanting.
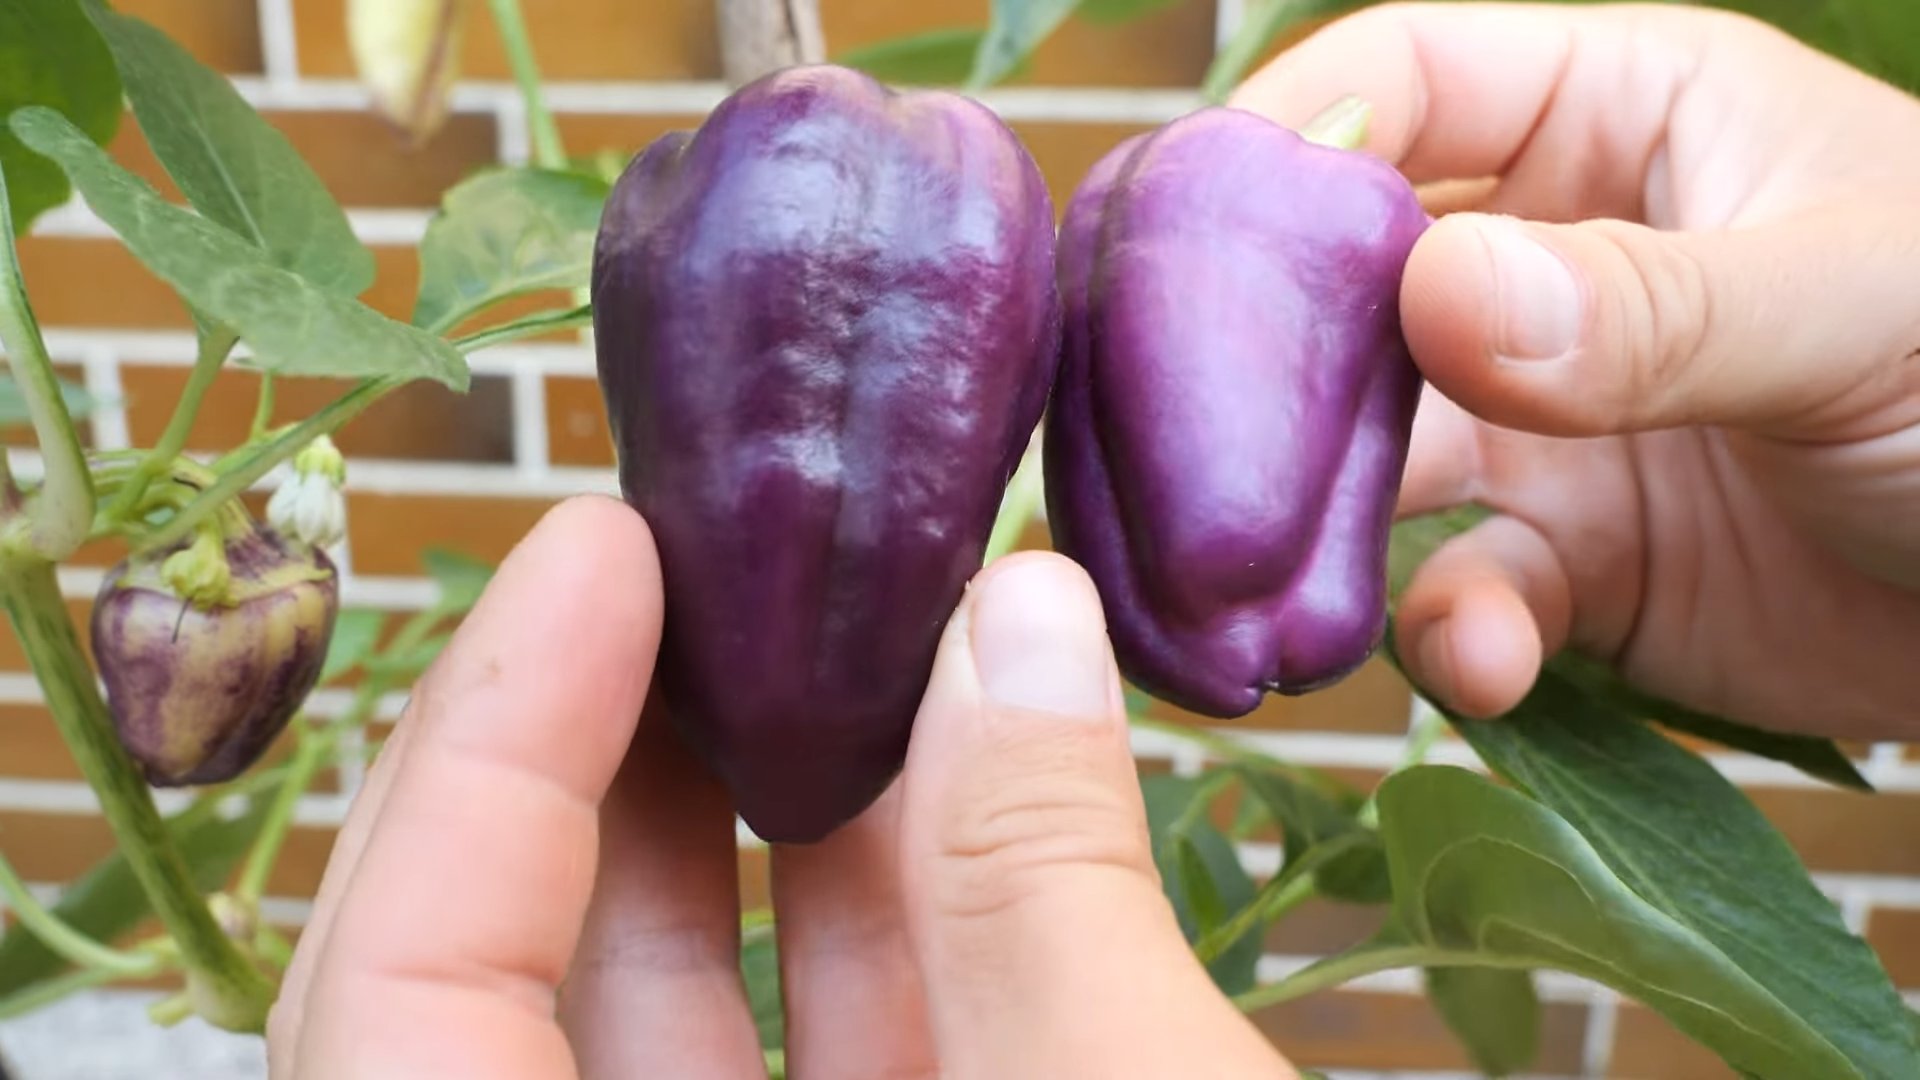
1. Check for Ripeness: The peppers should be firm and have a deep, vibrant purple color.
2. Harvest Carefully: Use a sharp knife or pruning shears to cut the peppers from the plant, leaving a short stem attached.
3. Enjoy Your Harvest: Purple sweet peppers can be eaten fresh, grilled, roasted, stuffed, or used in a variety of dishes. They’re also great for pickling or preserving.
Troubleshooting
Even with the best care, you might encounter some problems along the way. Here are a few common issues and how to deal with them:
* Blossom End Rot: This is a common problem that causes the bottom of the pepper to rot. It’s usually caused by calcium deficiency, but it can also be caused by inconsistent watering. To prevent blossom end rot, make sure your soil is well-drained and that you’re watering consistently. You can also add calcium to the soil by mixing in some crushed eggshells or bone meal.
* Aphids: These tiny insects can suck the sap from your pepper plants, causing them to weaken and become stunted. To control aphids, spray your plants with insecticidal soap or neem oil.
* Flea Beetles: These small, jumping beetles can chew holes in the leaves of your pepper plants. To control flea beetles, cover your plants with row covers or spray them with neem oil.
* Sunscald: This occurs
Conclusion
So, there you have it! Growing your own purple sweet peppers isn’t just a gardening project; it’s an investment in flavor, color, and a whole lot of fun. We’ve walked through the essential steps, from selecting the right seeds and nurturing seedlings to transplanting and providing ongoing care. The reward? A vibrant harvest of uniquely colored and deliciously sweet peppers that will elevate your culinary creations and impress your friends and family.
But why is this DIY trick a must-try? Beyond the sheer satisfaction of growing your own food, cultivating purple sweet peppers offers several compelling advantages. Firstly, you have complete control over the growing process, ensuring your peppers are free from harmful pesticides and chemicals. This is especially important for those who prioritize organic and sustainable living. Secondly, the taste of homegrown produce is simply unmatched. The freshness and sweetness of a pepper picked straight from the vine are a world apart from anything you can find in a grocery store. And finally, let’s not forget the visual appeal! Purple sweet peppers add a stunning pop of color to your garden and your plate, making them a conversation starter and a delightful addition to any meal.
Looking for variations and ways to personalize your purple sweet pepper growing experience? Consider these suggestions:
* Experiment with different varieties: While we’ve focused on general techniques, different cultivars of purple sweet peppers may have slightly different needs. Research specific varieties like ‘Purple Beauty’ or ‘Violetta’ to tailor your approach.
* Companion planting: Enhance your pepper’s growth by planting beneficial companions like basil, marigolds, or carrots nearby. These plants can deter pests and improve soil health.
* Container gardening: If you have limited space, purple sweet peppers thrive in containers. Choose a pot that is at least 12 inches in diameter and ensure it has good drainage.
* Preserving your harvest: When you have a bumper crop, explore ways to preserve your peppers. Pickling, roasting and freezing, or drying are all excellent options for enjoying your harvest year-round. You can even make a vibrant purple pepper jelly!
* Spice it up: While we focused on sweet peppers, you can use these same techniques to grow purple hot peppers, like ‘Purple Jalapeno’ or ‘Black Hungarian’. Just be sure to handle them with care!
We truly believe that anyone can successfully grow purple sweet peppers with a little patience and dedication. The unique color and flavor of these peppers make them a worthwhile addition to any garden. Don’t be intimidated by the process; start small, learn as you go, and most importantly, have fun!
Now, it’s your turn! We encourage you to embark on your own purple sweet pepper growing adventure. Share your experiences with us – your successes, your challenges, and your delicious creations. Post photos of your vibrant harvest on social media using #PurplePepperPower and tag us so we can celebrate your gardening triumphs. We can’t wait to see what you grow! Remember, mastering the art of growing your own purple sweet peppers is a rewarding journey that connects you with nature and provides you with a delicious and healthy food source. Happy gardening!
Frequently Asked Questions (FAQ)
What are the best conditions for growing purple sweet peppers?
Purple sweet peppers, like most peppers, thrive in warm, sunny conditions. They need at least 6-8 hours of direct sunlight per day. The ideal temperature range for growth is between 70°F and 85°F (21°C and 29°C). The soil should be well-draining and rich in organic matter. Amend your soil with compost or aged manure before planting to provide essential nutrients. Consistent watering is also crucial, especially during hot weather. Avoid overwatering, which can lead to root rot.
How long does it take to grow purple sweet peppers from seed?
Growing purple sweet peppers from seed to harvest typically takes between 60 and 80 days, depending on the variety and growing conditions. Starting seeds indoors 6-8 weeks before the last expected frost can give you a head start. Once the seedlings have developed several sets of true leaves and the weather has warmed up, you can transplant them outdoors. Be patient, as peppers can be slow to germinate and grow initially.
What are common pests and diseases that affect purple sweet peppers, and how can I prevent them?
Common pests that can affect purple sweet peppers include aphids, spider mites, pepper weevils, and cutworms. Diseases include blossom-end rot, fungal leaf spot, and viral diseases. To prevent these problems, practice good garden hygiene. Remove any diseased or infested plants promptly. Use insecticidal soap or neem oil to control pests. Ensure proper spacing between plants to promote air circulation and reduce the risk of fungal diseases. Blossom-end rot is often caused by calcium deficiency or inconsistent watering. Amend your soil with calcium-rich amendments like bone meal or crushed eggshells and maintain consistent soil moisture.
How often should I water my purple sweet pepper plants?
Water your purple sweet pepper plants deeply and regularly, especially during hot, dry weather. Aim to keep the soil consistently moist but not waterlogged. Water at the base of the plant to avoid wetting the foliage, which can increase the risk of fungal diseases. A good rule of thumb is to water when the top inch of soil feels dry to the touch. Mulching around the plants can help retain moisture and suppress weeds.
When is the best time to harvest purple sweet peppers?
Purple sweet peppers are typically ready to harvest when they have reached their mature size and color. The exact color will depend on the variety, but they should be a deep, vibrant purple. The peppers should feel firm to the touch. Use pruning shears or a sharp knife to cut the peppers from the plant, leaving a small stem attached. Harvesting regularly encourages the plant to produce more peppers.
Can I grow purple sweet peppers in containers?
Yes, purple sweet peppers can be successfully grown in containers. Choose a pot that is at least 12 inches in diameter and has good drainage holes. Use a high-quality potting mix that is well-draining and rich in organic matter. Place the container in a sunny location that receives at least 6-8 hours of direct sunlight per day. Water regularly and fertilize every 2-3 weeks with a balanced fertilizer. Container-grown peppers may need more frequent watering than those grown in the ground.
What kind of fertilizer should I use for purple sweet peppers?
Purple sweet peppers benefit from a balanced fertilizer with a slightly higher phosphorus content to promote flowering and fruit production. A fertilizer with an NPK ratio of 5-10-5 or 10-20-10 is a good choice. Apply fertilizer according to the package directions, typically every 2-3 weeks during the growing season. Avoid over-fertilizing, which can lead to excessive foliage growth and reduced fruit production. You can also use organic fertilizers like compost tea or fish emulsion.
Why are my purple sweet peppers turning green or red?
The color of purple sweet peppers can change as they mature. Some varieties may start out green and gradually turn purple as they ripen. Others may turn red if left on the plant for too long. The ideal time to harvest is when the peppers are a deep, vibrant purple. If your peppers are turning green or red, it doesn’t necessarily mean they are not edible, but they may not have the same sweetness and flavor as fully ripe purple peppers.
Are purple sweet peppers hotter than other sweet peppers?
No, purple sweet peppers are not typically hotter than other sweet peppers. They are generally considered to be mild and sweet in flavor. The color of the pepper does not indicate its heat level. If you are looking for a hotter pepper, you will need to choose a variety that is specifically bred for heat, such as jalapenos or habaneros.
How can I save seeds from my purple sweet peppers?
To save seeds from your purple sweet peppers, allow the peppers to fully ripen on the plant until they are soft and slightly wrinkled. Cut the peppers open and remove the seeds. Rinse the seeds in water to remove any pulp. Spread the seeds out on a paper towel to dry completely. Once the seeds are dry, store them in an airtight container in a cool, dark, and dry place. Properly stored seeds can remain viable for several years.

Leave a Comment