

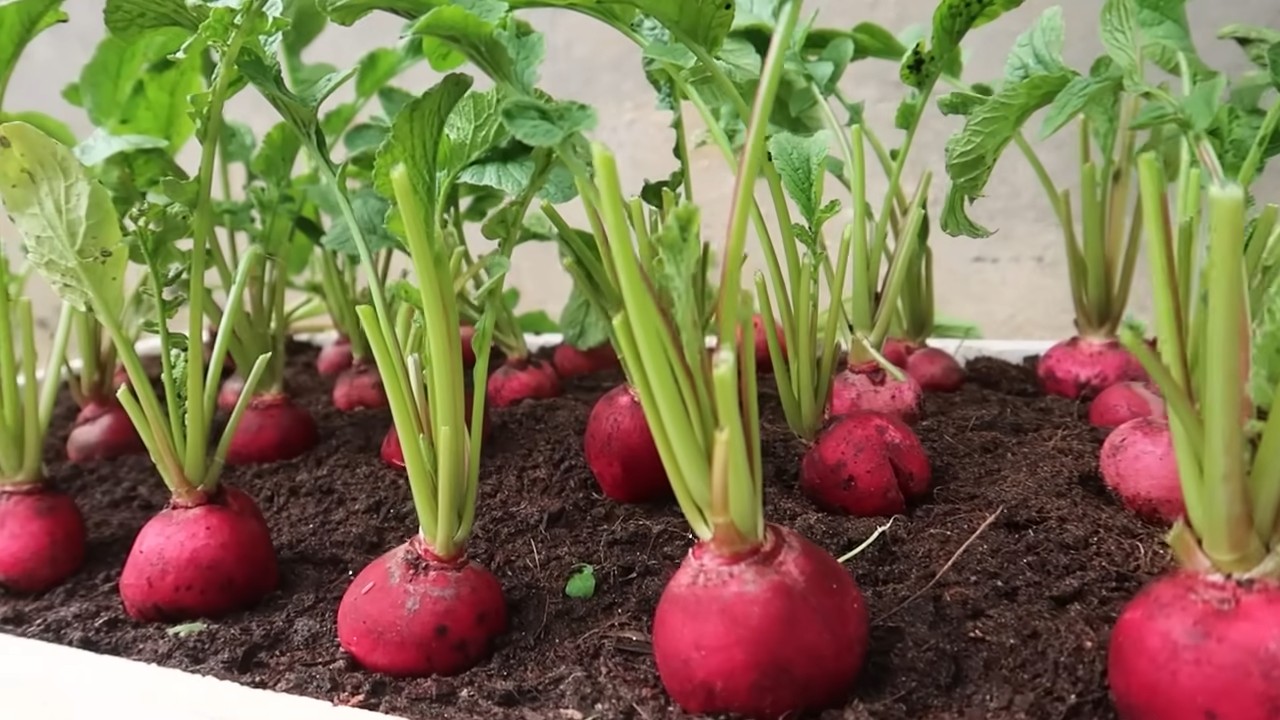
Grow Red Radish Winter, even when the frosty winds howl! Imagine plucking crisp, vibrant red radishes from your own garden in the heart of winter. Sounds impossible? Think again! This DIY guide is your secret weapon to defying the cold and enjoying fresh, peppery radishes all season long.
For centuries, resourceful gardeners have sought ways to extend the growing season, and the humble radish, with its quick maturation and cold tolerance, has been a champion. From ancient Roman farmers to modern-day urban homesteaders, the desire to cultivate fresh produce year-round has driven innovation and ingenuity. Now, you can tap into that legacy!
Let’s face it, winter can be a dreary time for food lovers. The vibrant colors and fresh flavors of summer seem like a distant memory. But with a few simple tricks and a little DIY spirit, you can bring a burst of freshness to your winter meals. Learning how to grow red radish winter is not only a rewarding experience, but it also provides you with a healthy and delicious alternative to store-bought produce. Plus, who doesn’t love the satisfaction of saying, “I grew this myself!”? This article will guide you through every step, from choosing the right varieties to protecting your crop from the elements, ensuring a bountiful harvest even when the snow is falling. So, grab your gloves, and let’s get started!
Winterrettich selbst anbauen: Eine Schritt-für-Schritt-Anleitung
Hallo Gartenfreunde! Winterrettich anzubauen ist gar nicht so schwer, wie man vielleicht denkt. Mit ein bisschen Planung und den richtigen Schritten könnt ihr auch in den kälteren Monaten frischen, knackigen Rettich ernten. Ich zeige euch, wie es geht!
Warum Winterrettich?
Winterrettich ist eine tolle Ergänzung für jeden Gemüsegarten. Er ist nicht nur lecker und vielseitig einsetzbar, sondern auch sehr gesund. Außerdem ist er robust und kann auch mit kühleren Temperaturen gut umgehen. Das macht ihn zum idealen Gemüse für die späte Saison.
Vorbereitung ist alles: Die richtige Planung
Bevor wir loslegen, müssen wir ein paar Dinge vorbereiten. Dazu gehören die Auswahl der richtigen Sorte, die Vorbereitung des Bodens und die Planung des Aussaatzeitpunkts.
* Sortenwahl: Es gibt verschiedene Sorten von Winterrettich. Einige sind milder, andere schärfer. Beliebte Sorten sind ‘Schwarzer Rettich’, ‘Münchner Bier’ und ‘Runder Schwarzer Winter’. Wählt eine Sorte, die euch schmeckt und die gut zu eurem Klima passt.
* Boden vorbereiten: Rettich mag lockeren, humusreichen Boden. Entfernt Steine und Unkraut und lockert den Boden gut auf. Mischt Kompost oder gut verrotteten Mist unter, um den Boden mit Nährstoffen anzureichern.
* Aussaatzeitpunkt: Der ideale Aussaatzeitpunkt für Winterrettich ist im Juli oder August. So haben die Pflanzen genügend Zeit, vor dem ersten Frost zu wachsen.
Schritt-für-Schritt-Anleitung: So gelingt die Aussaat
Jetzt geht’s ans Eingemachte! Hier ist eine detaillierte Anleitung, wie ihr Winterrettich erfolgreich aussät:
1. Boden vorbereiten: Wie bereits erwähnt, ist ein lockerer, humusreicher Boden wichtig. Lockert den Boden noch einmal gründlich auf und entfernt alle Steine und Unkräuter.
2. Saatrillen ziehen: Zieht mit einer Hacke oder einem Stock Saatrillen mit einem Abstand von etwa 20-30 cm zueinander. Die Rillen sollten etwa 2-3 cm tief sein.
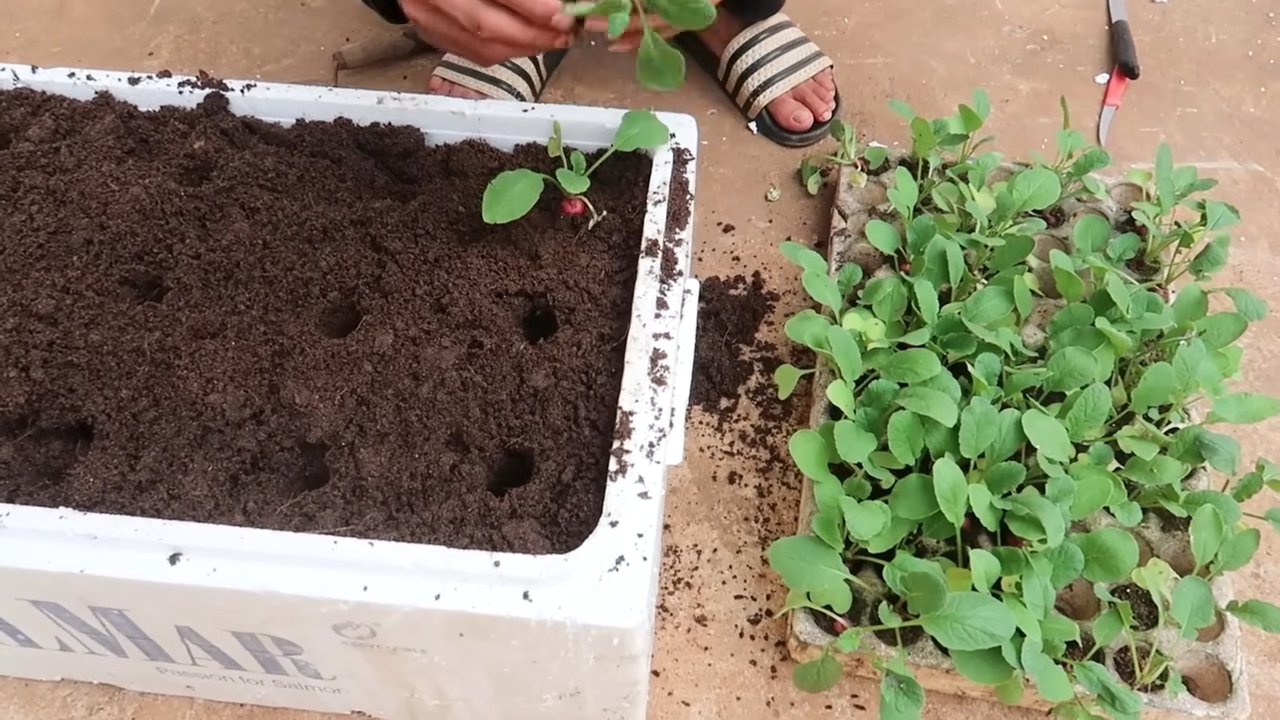
3. Aussaat: Legt die Rettichsamen in die Saatrillen. Achtet darauf, dass die Samen nicht zu dicht liegen. Ein Abstand von etwa 5-10 cm zwischen den Samen ist ideal.
4. Mit Erde bedecken: Bedeckt die Samen mit Erde und drückt die Erde leicht an.
5. Gießen: Gießt die Saatrillen vorsichtig an. Achtet darauf, dass die Erde nicht weggeschwemmt wird.
6. Feucht halten: Haltet die Erde in den nächsten Wochen feucht. Gießt regelmäßig, besonders bei trockenem Wetter.
Pflege und Hege: So wächst der Rettich prächtig
Nach der Aussaat ist es wichtig, den Rettich gut zu pflegen, damit er prächtig wächst.
* Gießen: Rettich braucht regelmäßig Wasser, besonders in trockenen Perioden. Achtet darauf, dass der Boden immer leicht feucht ist.
* Unkraut jäten: Entfernt regelmäßig Unkraut, damit der Rettich nicht von ihm überwuchert wird.
* Ausdünnen: Wenn die Rettichpflanzen zu dicht stehen, müsst ihr sie ausdünnen. Entfernt die schwächsten Pflanzen, damit die stärkeren Pflanzen genügend Platz zum Wachsen haben.
* Schutz vor Schädlingen: Rettich kann von verschiedenen Schädlingen befallen werden, wie zum Beispiel Erdflöhen oder Schnecken. Kontrolliert die Pflanzen regelmäßig und bekämpft Schädlinge bei Bedarf mit geeigneten Mitteln. Ich persönlich bevorzuge natürliche Methoden, wie zum Beispiel das Ausbringen von Kaffeesatz gegen Schnecken.
* Bodenpflege: Eine Mulchschicht aus Stroh oder Laub kann helfen, den Boden feucht zu halten und Unkraut zu unterdrücken.
Erntezeit: Wann ist der Rettich reif?
Die Erntezeit für Winterrettich ist in der Regel von Oktober bis November. Ihr könnt den Rettich ernten, sobald er die gewünschte Größe erreicht hat. Die Größe hängt von der jeweiligen Sorte ab.
* Erntezeitpunkt: Der Rettich ist reif, wenn er sich fest anfühlt und die Schale glatt ist.
* Erntemethode: Zieht den Rettich vorsichtig aus der Erde. Wenn er sich nicht leicht ziehen lässt, könnt ihr ihn mit einer Grabegabel lockern.
* Lagerung: Winterrettich lässt sich gut lagern. Entfernt das Laub und lagert den Rettich an einem kühlen, dunklen und trockenen Ort. Im Keller oder in einer Erdmiete hält er sich mehrere Monate.
Herausforderungen und Lösungen: Was tun, wenn es nicht klappt?
Auch beim Anbau von Winterrettich kann es zu Problemen kommen. Hier sind einige häufige Herausforderungen und mögliche Lösungen:
* Schlechte Keimung: Wenn die Samen nicht keimen, kann das verschiedene Ursachen haben. Möglicherweise war der Boden zu trocken oder zu feucht, die Samen waren zu alt oder die Temperatur war nicht optimal. Achtet darauf, dass der Boden feucht ist und die Samen nicht zu alt sind.
* Schädlinge: Wie bereits erwähnt, kann Rettich von verschiedenen Schädlingen befallen werden. Kontrolliert die Pflanzen regelmäßig und bekämpft Schädlinge bei Bedarf mit geeigneten Mitteln.
* Krankheiten: Rettich kann auch von verschiedenen Krankheiten befallen werden, wie zum Beispiel Falschem Mehltau. Achtet auf Anzeichen von Krankheiten und bekämpft sie bei Bedarf mit geeigneten Mitteln.
* Wachstumsstörungen: Wenn der Rettich nicht richtig wächst, kann das verschiedene Ursachen haben. Möglicherweise fehlt es ihm an Nährstoffen, Wasser oder Licht. Achtet darauf, dass der Boden ausreichend Nährstoffe enthält und der Rettich genügend Wasser und Licht bekommt.
Rezepte und Verwendungsmöglichkeiten: Was tun mit der Ernte?
Winterrettich ist vielseitig einsetzbar. Er kann roh, gekocht, gebraten oder eingelegt werden. Hier sind ein paar Ideen, was ihr mit eurer Ernte anfangen könnt:
* Roh: Rettich kann roh in Salaten oder als Rohkost gegessen werden. Er hat einen würzigen, leicht scharfen Geschmack.
* Gekocht: Rettich kann gekocht als Beilage zu Fleisch oder Fisch serviert werden. Er verliert beim Kochen etwas von seiner Schärfe.
* Gebraten: Rettich kann gebraten als Gemüsebeilage oder als Zutat in Pfannengerichten verwendet werden.
* Eingelegt: Rettich kann eingelegt werden, um ihn länger haltbar zu machen. Eingelegter Rettich ist eine leckere Beilage zu Brot oder Käse.
* Rettichsalat: Ein Klassiker! Rettich raspeln, mit Essig, Öl, Salz, Pfeffer und eventuell etwas Zucker anmachen.
* Rettichsuppe: Eine wärmende Suppe für kalte Tage. Rettich, Kartoffeln und andere Gemüsesorten in Brühe kochen und pürieren.
* Rettichgemüse: Rettich in Scheiben schneiden und mit anderen Gemüsesorten in der Pfanne anbraten.
Zusätzliche Tipps und Tricks
Hier sind noch ein paar zusätzliche Tipps und Tricks, die euch beim Anbau von Winterrettich helfen können:
* Fruchtfolge beachten: Baut Rettich nicht jedes Jahr am selben Standort an. Wechselt die Anbaufläche, um Krankheiten und Schädlingen vorzubeugen.
* Mischkultur: Rettich verträgt sich gut mit anderen Gemüsesorten, wie zum Beispiel Salat, Spinat oder Karotten. Baut Rettich in Mischkultur an, um den Boden optimal zu nutzen.
* Gründüngung: Nach der Ernte des Rettichs könnt ihr eine Gründüngung aussäen, um den Boden zu verbessern. Geeignete Gründüngungspflanzen sind zum Beispiel Phacelia oder Senf.
* Eigene Samen gewinnen: Wenn ihr möchtet, könnt ihr auch eigene Samen von eurem Rettich gewinnen. Lasst dafür einige Pflanzen blühen und die Samen reifen. Sammelt die Samen ein und lagert sie trocken und kühl.
Fazit
Mit ein bisschen Geduld und den richtigen Schritten könnt ihr auch im Winter frischen Rettich aus eurem eigenen Garten ernten. Probiert
Conclusion
So, there you have it! Growing red radishes in winter might seem like a challenge, but with a little planning and these simple DIY tricks, you can enjoy the crisp, peppery flavor of homegrown radishes even when the snow is falling. This isn’t just about having fresh vegetables; it’s about connecting with nature, learning a new skill, and experiencing the satisfaction of nurturing something from seed to table.
Why is this DIY trick a must-try? Because it empowers you to extend your growing season, reduce your reliance on store-bought produce (which often travels long distances and loses flavor in the process), and add a vibrant splash of color and taste to your winter meals. Imagine the delight of adding freshly harvested radishes to your salads, soups, or even just enjoying them as a crunchy, healthy snack on a cold winter day. The taste is simply unmatched.
But don’t stop there! Experiment with different varieties of radishes. While we’ve focused on red radishes, there are many other types that thrive in cooler conditions, such as French Breakfast radishes or even black Spanish radishes for a more intense flavor. Consider adding companion plants to your indoor garden, like lettuce or spinach, to maximize your yield and create a diverse and thriving ecosystem. You can also adjust the soil mix to suit your specific needs. For example, adding more compost will improve drainage and nutrient content, while adding perlite will increase aeration.
Another variation to consider is using different types of containers. While we’ve suggested using pots, you could also try using raised beds or even repurposed containers like old buckets or tubs. Just make sure that whatever container you choose has adequate drainage.
We encourage you to embrace this DIY project and discover the joy of growing your own food, even in the depths of winter. It’s a rewarding experience that will not only provide you with delicious, fresh radishes but also connect you with the natural world in a meaningful way.
Don’t be afraid to experiment, adapt, and learn from your experiences. Gardening is a journey, and there’s always something new to discover. And most importantly, share your success (and your challenges!) with others. Post pictures of your radish harvest on social media, share your tips and tricks with your friends and family, and let’s create a community of winter gardeners who are passionate about growing their own food.
We are confident that you will find this DIY trick for growing red radishes in winter to be a game-changer. So, grab your seeds, prepare your soil, and get ready to enjoy the taste of homegrown radishes all winter long! We can’t wait to hear about your experiences. Happy gardening!
Frequently Asked Questions (FAQ)
What is the ideal temperature for growing red radishes indoors in winter?
The ideal temperature range for growing red radishes indoors in winter is between 50°F (10°C) and 65°F (18°C). While radishes can tolerate slightly cooler temperatures, growth will be slower. Avoid temperatures above 70°F (21°C), as this can cause the radishes to bolt (go to seed) prematurely, resulting in a bitter taste and smaller roots. Maintaining a consistent temperature is key to successful winter radish growing. Consider using a heat mat if your indoor temperatures tend to fluctuate significantly.
How much sunlight do red radishes need when grown indoors?
Red radishes require at least 6 hours of direct sunlight per day to thrive. If you don’t have a sunny windowsill, you’ll need to supplement with grow lights. Fluorescent or LED grow lights are excellent options. Position the lights a few inches above the seedlings and adjust as they grow. A timer can be used to ensure consistent light exposure. Insufficient light will result in leggy, weak plants and poor root development. Remember, adequate light is crucial for the photosynthesis process, which fuels the growth of your radishes.
What type of soil is best for growing red radishes in containers?
The best type of soil for growing red radishes in containers is a well-draining, loose potting mix. Avoid heavy clay soils, as they can become waterlogged and inhibit root growth. A good mix would consist of equal parts potting soil, compost, and perlite or vermiculite. The compost provides essential nutrients, while the perlite or vermiculite improves drainage and aeration. You can also add a slow-release fertilizer to the soil mix to provide a steady supply of nutrients throughout the growing season. Ensure the pH of the soil is between 6.0 and 7.0 for optimal radish growth.
How often should I water my red radishes grown indoors?
Water your red radishes regularly, keeping the soil consistently moist but not waterlogged. Check the soil moisture level daily by sticking your finger about an inch into the soil. If it feels dry, it’s time to water. Water deeply, allowing excess water to drain out of the bottom of the container. Avoid overhead watering, as this can promote fungal diseases. Overwatering can lead to root rot, while underwatering can stunt growth. Adjust your watering schedule based on the temperature and humidity levels in your home.
How long does it take for red radishes to mature when grown indoors in winter?
Red radishes typically mature in 20 to 30 days when grown indoors in winter. However, the exact time can vary depending on the variety, temperature, and light conditions. Check the seed packet for specific maturity dates. You can start harvesting radishes when the roots are about 1 inch in diameter. Don’t let them get too large, as they can become pithy and develop a strong, unpleasant flavor. Succession planting, where you sow seeds every week or two, will ensure a continuous harvest throughout the winter.
What are some common problems when growing red radishes indoors and how can I prevent them?
Some common problems when growing red radishes indoors include bolting (going to seed), root maggots, and fungal diseases. Bolting can be prevented by maintaining a consistent temperature and providing adequate light. Root maggots can be controlled by using a floating row cover or by introducing beneficial nematodes to the soil. Fungal diseases can be prevented by ensuring good air circulation and avoiding overwatering. Regularly inspect your plants for any signs of pests or diseases and take action promptly.
Can I grow red radishes in a hydroponic system?
Yes, you can absolutely grow red radishes in a hydroponic system. Radishes are well-suited for hydroponics due to their short growing cycle and relatively small size. Use a nutrient-rich hydroponic solution and provide adequate light and aeration. Monitor the pH and nutrient levels regularly to ensure optimal growth. Hydroponic radishes tend to grow faster and produce larger roots compared to soil-grown radishes.
What are some creative ways to use my homegrown red radishes?
Beyond salads, there are many creative ways to use your homegrown red radishes. Try pickling them for a tangy snack, roasting them with other root vegetables for a sweet and savory side dish, or adding them to soups and stews for a peppery kick. You can also use the radish greens in salads or sauté them with garlic and olive oil. Radish butter, made by blending radishes with softened butter and herbs, is a delicious spread for bread or crackers. Don’t be afraid to experiment and discover new ways to enjoy your homegrown radishes!

Leave a Comment