

Growing Okra in Containers: Unlock the secrets to a bountiful harvest, even without a sprawling garden! Have you ever dreamt of plucking fresh, vibrant okra right from your patio? I know I have! This often-overlooked vegetable, with its unique flavor and nutritional benefits, is surprisingly easy to cultivate in pots, bringing a touch of Southern charm and homegrown goodness to even the smallest spaces.
Okra, also known as “lady’s fingers,” has a rich history, tracing back to ancient Ethiopia and Egypt. It traveled across continents, becoming a staple in Southern cuisine and various cultures worldwide. For generations, okra has been cherished not only for its culinary versatility but also for its medicinal properties.
But why should you consider growing okra in containers? Well, imagine the satisfaction of harvesting your own organic produce, free from harmful pesticides. Plus, container gardening offers unparalleled flexibility. You can move your okra plants to chase the sun, protect them from unexpected frosts, and enjoy fresh okra even if you live in an apartment or have limited yard space. This DIY guide will equip you with all the essential tips and tricks to successfully cultivate this Southern gem in pots, ensuring a thriving and delicious harvest. Let’s get started!
Growing Okra in Containers: A Beginner’s Guide
Okra, also known as lady’s fingers, is a warm-season vegetable that’s surprisingly easy to grow, even if you don’t have a sprawling garden. I’ve had great success growing okra in containers, and I’m excited to share my tips and tricks with you! This guide will walk you through everything you need to know, from choosing the right container to harvesting your delicious okra pods.
Choosing the Right Container and Soil
Before we get our hands dirty, let’s talk about the essentials: the container and the soil. These are crucial for a happy and productive okra plant.
* Container Size: Okra plants need room to grow, both above and below the soil. I recommend a container that’s at least 12 inches in diameter and 12 inches deep. A 5-gallon bucket works perfectly, but larger is always better! The bigger the container, the more stable the plant will be, and the more room the roots will have to spread.
* Drainage: This is non-negotiable! Okra hates soggy feet. Make sure your container has plenty of drainage holes at the bottom. If it doesn’t, you can easily drill some.
* Material: Plastic, terracotta, or even fabric pots will work. I personally prefer plastic because they retain moisture better, which is important in hot weather. Terracotta pots are beautiful, but they dry out faster. Fabric pots are great for aeration, but they might require more frequent watering.
* Soil: Don’t use garden soil! It’s too heavy and doesn’t drain well in containers. Instead, opt for a high-quality potting mix. I like to use a mix that’s specifically formulated for vegetables. You can also amend your potting mix with compost or aged manure for added nutrients. A good mix should be well-draining, lightweight, and rich in organic matter.
Planting Your Okra Seeds
Now for the fun part: planting! Okra is a warm-weather crop, so it’s important to wait until the soil has warmed up before planting.
* Timing: Okra thrives in warm weather. Wait until after the last frost and the soil temperature is consistently above 65°F (18°C). I usually start my okra seeds indoors about 4-6 weeks before the last expected frost. This gives them a head start.
* Starting Seeds Indoors (Optional): If you’re starting seeds indoors, use seed-starting trays or small pots filled with seed-starting mix. Plant the seeds about ½ inch deep and keep the soil moist but not soggy. Place the trays in a warm, sunny location or under grow lights.
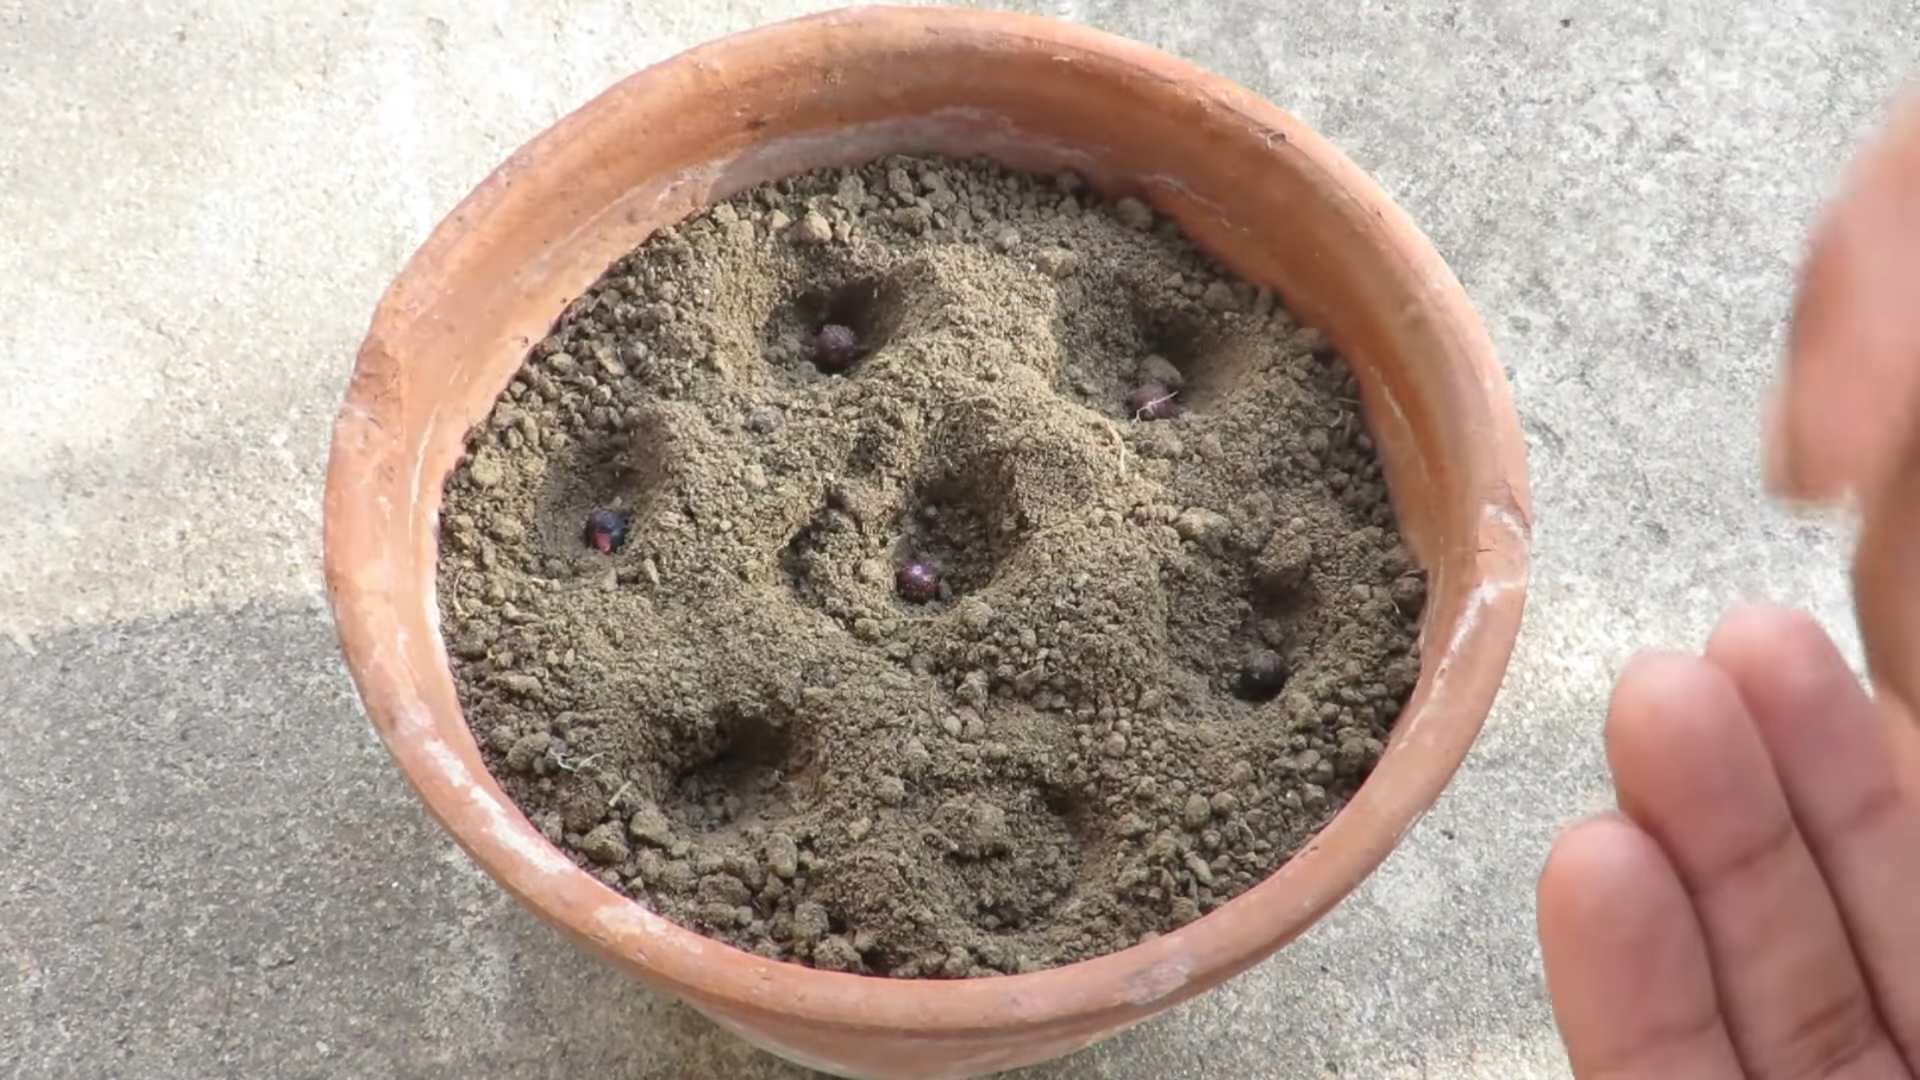
* Direct Sowing: If you’re planting directly into the container, sow the seeds about ½ inch deep and 2-3 inches apart. Once the seedlings emerge, thin them to one plant per container (if you planted multiple seeds).
* Watering: After planting, water the soil gently but thoroughly. Keep the soil consistently moist until the seeds germinate.
* Germination: Okra seeds usually germinate within 7-14 days, depending on the temperature. Be patient!
Caring for Your Okra Plants
Once your okra plants are established, it’s time to provide them with the care they need to thrive.
* Sunlight: Okra needs at least 6-8 hours of direct sunlight per day. Choose a sunny spot for your container. If you don’t have a sunny spot, you might need to supplement with grow lights.
* Watering: Water deeply and regularly, especially during hot, dry weather. Okra plants need consistent moisture, but avoid overwatering, which can lead to root rot. Check the soil moisture regularly by sticking your finger into the soil. If the top inch feels dry, it’s time to water.
* Fertilizing: Okra is a heavy feeder, so it needs regular fertilization. I like to use a balanced fertilizer (e.g., 10-10-10) every 2-3 weeks. You can also use a liquid fertilizer or compost tea. Follow the instructions on the fertilizer package.
* Mulching: Apply a layer of mulch around the base of the plant to help retain moisture, suppress weeds, and regulate soil temperature. I like to use straw, wood chips, or shredded leaves.
* Pruning: Pruning isn’t usually necessary for okra, but you can remove any yellowing or dead leaves to improve air circulation.
* Pest Control: Keep an eye out for pests like aphids, spider mites, and okra worms. You can usually control these pests with insecticidal soap or neem oil. I prefer to use organic pest control methods whenever possible.
* Staking (Optional): Some okra varieties can grow quite tall, so you might need to stake them to prevent them from falling over. Use bamboo stakes or tomato cages to support the plants.
Harvesting Your Okra
The moment we’ve all been waiting for: harvesting! Knowing when and how to harvest okra is key to getting the best flavor and texture.
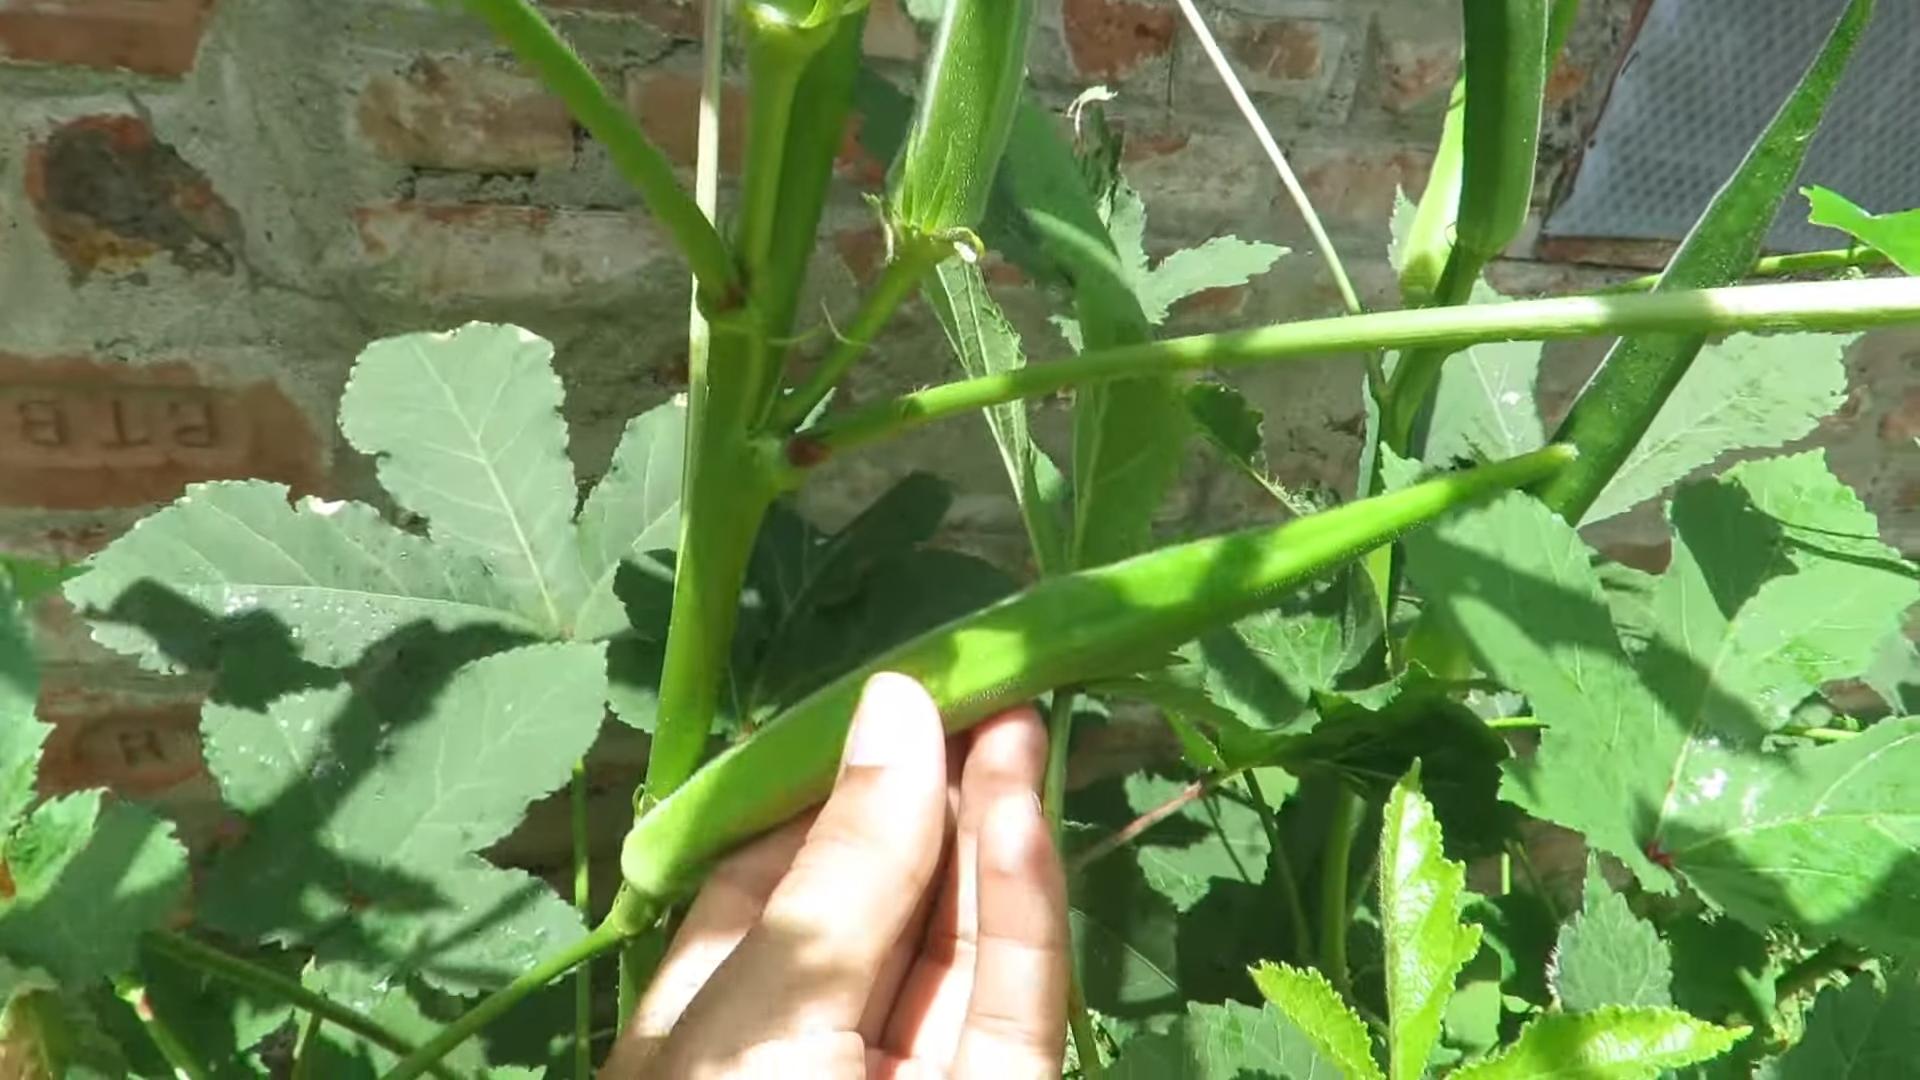
* Timing: Okra pods are best harvested when they are young and tender, usually 2-4 inches long. They can become tough and woody if left on the plant too long. Check your plants daily during the harvest season.
* Harvesting Technique: Use a sharp knife or pruning shears to cut the pods from the plant. Be careful not to damage the plant. Wear gloves when harvesting okra, as the pods can be prickly and irritating to the skin.
* Frequency: Harvest okra pods every 1-2 days to encourage continued production. The more you harvest, the more the plant will produce.
* Storage: Okra pods are best used fresh, but they can be stored in the refrigerator for a few days. Wrap them in a paper towel and place them in a plastic bag. You can also freeze okra pods for longer storage.
Choosing the Right Okra Variety
There are many different okra varieties to choose from, each with its own unique characteristics. Here are a few of my favorites:
* Clemson Spineless: This is a classic okra variety that’s known for its spineless pods, making it easier to harvest. It’s also very productive and heat-tolerant.
* Burgundy: This variety produces beautiful red pods that are just as delicious as they are attractive. It’s also relatively compact, making it a good choice for containers.
* Emerald: This variety produces long, slender, dark green pods that are very tender and flavorful. It’s also a good choice for hot climates.
* Dwarf Green Long Pod: As the name suggests, this is a dwarf variety that’s perfect for containers. It produces long, green pods that are very productive.
Troubleshooting Common Problems
Even with the best care, you might encounter some problems while growing okra. Here are a few common issues and how to address them:
* Yellowing Leaves: This can be caused by overwatering, underwatering, nutrient deficiencies, or pests. Check the soil moisture and adjust your watering accordingly. Fertilize the plant with a balanced fertilizer. Inspect the plant for pests and treat them as needed.
* Lack of Pod Production: This can be caused by insufficient sunlight, poor pollination, or nutrient deficiencies. Make sure the plant is getting at least 6-8 hours of direct sunlight per day. Hand-pollinate the flowers if necessary. Fertilize the plant with a balanced fertilizer.
* Tough Pods: This is usually caused by harvesting the pods too late. Harvest the pods when they are young and tender, usually 2-4 inches long.
* Pest Infestations: Keep an eye out for pests like aphids, spider mites, and okra worms. Control these pests with insecticidal soap or neem oil.
Step-by-Step Instructions: Growing Okra in Containers
Let’s break down the entire process into easy-to-follow steps:
1. Choose Your Container: Select a container that’s at least 12 inches in diameter and 12 inches deep with good drainage holes.
2. Prepare Your Soil: Fill the container with a high-quality potting mix. Amend with compost or aged manure for added nutrients.
3. Plant Your Seeds: Sow okra seeds ½ inch deep, either directly in the container or in seed-starting trays indoors.
4. Water Thoroughly: Water the soil gently but thoroughly after planting.
5. Provide Sunlight: Place the container in a location that receives at least 6-8 hours of direct sunlight per day.
6. Water Regularly: Water deeply and regularly, especially during hot, dry weather. Check the soil moisture regularly.
7. Fertilize Every 2-3 Weeks: Fertilize with a balanced fertilizer every 2-3 weeks.
8. Mulch the Soil: Apply a layer of mulch around the base of the plant to retain moisture and suppress weeds.
Conclusion
So, there you have it! Growing okra in containers isn’t just a possibility; it’s a rewarding and surprisingly simple way to enjoy fresh, homegrown okra, even if you’re limited on space. We’ve covered everything from selecting the right container and soil to nurturing your okra plants for a bountiful harvest. But why is this DIY trick a must-try?
Firstly, the convenience is unparalleled. Imagine stepping onto your balcony or patio and picking fresh okra pods just moments before adding them to your favorite gumbo or stir-fry. No more trips to the grocery store, no more wondering about the freshness of your produce. You have complete control over the growing process, ensuring that your okra is organic and free from harmful pesticides.
Secondly, container gardening allows you to optimize the growing conditions for your okra. You can easily move your containers to take advantage of sunlight, protect them from harsh weather, and provide them with the perfect amount of water and nutrients. This level of control can lead to healthier, more productive plants than you might achieve in a traditional garden bed.
Thirdly, growing okra in containers is a fantastic way to add beauty and greenery to your living space. The tall, stately okra plants with their attractive foliage and delicate flowers can create a stunning visual display. It’s a garden that’s both functional and aesthetically pleasing.
But the benefits don’t stop there. This method is also incredibly accessible. Whether you’re a seasoned gardener or a complete beginner, you can successfully grow okra in containers with just a little bit of knowledge and effort. It’s a great way to learn about gardening and connect with nature, even in an urban environment.
Now, let’s talk about variations. While we’ve focused on the basics, there are plenty of ways to customize your container okra garden. Consider experimenting with different varieties of okra, such as ‘Clemson Spineless’ for its smooth pods or ‘Burgundy’ for its beautiful red color. You can also try companion planting, adding herbs like basil or marigolds to your containers to deter pests and attract pollinators. Another variation is to use self-watering containers, which can be especially helpful if you tend to forget to water your plants regularly. You could also explore vertical gardening techniques, using trellises or other supports to maximize space and create a visually stunning display.
Ultimately, the best way to discover the joys of growing okra in containers is to simply give it a try. Don’t be afraid to experiment, learn from your mistakes, and adapt your approach as needed. The rewards of fresh, homegrown okra are well worth the effort.
We are confident that you will find success with this DIY trick. We encourage you to embark on this gardening adventure and experience the satisfaction of harvesting your own okra. And most importantly, we want to hear about your experience! Share your photos, tips, and stories with us in the comments below. Let’s create a community of container okra growers and inspire others to discover the joys of homegrown produce. Happy gardening!
Frequently Asked Questions (FAQ)
What is the best size container for growing okra?
The ideal container size for growing okra is at least 10 gallons, but 15-20 gallons is even better. Okra plants have deep taproots and need ample space to develop a strong root system. A larger container will also provide more stability for the tall plants, preventing them from tipping over in windy conditions. Using a smaller container can stunt the plant’s growth and reduce its yield. Make sure the container has adequate drainage holes to prevent waterlogging.
What type of soil should I use for growing okra in containers?
Use a well-draining potting mix specifically formulated for containers. Avoid using garden soil, as it can become compacted in containers and restrict root growth. A good potting mix will contain a blend of peat moss, perlite, and vermiculite, which provide good drainage and aeration. You can also amend the potting mix with compost or other organic matter to improve its fertility. Ensure the pH level of the soil is between 6.0 and 7.0 for optimal okra growth.
How often should I water my container okra plants?
Water your okra plants deeply and regularly, especially during hot, dry weather. Check the soil moisture level daily by sticking your finger into the soil. If the top inch feels dry, it’s time to water. Water until the excess water drains out of the bottom of the container. Avoid overwatering, as this can lead to root rot. Mulching around the base of the plants can help retain moisture and reduce the need for frequent watering.
How much sunlight do okra plants need?
Okra plants need at least 6-8 hours of direct sunlight per day to thrive. Choose a location for your containers that receives plenty of sunlight throughout the day. If you live in a particularly hot climate, you may need to provide some afternoon shade to prevent the plants from getting scorched. Insufficient sunlight can result in leggy plants with poor yields.
What kind of fertilizer should I use for okra?
Okra plants are heavy feeders and benefit from regular fertilization. Use a balanced fertilizer with an NPK ratio of 10-10-10 or 14-14-14. Apply the fertilizer according to the package instructions, typically every 2-3 weeks during the growing season. You can also supplement with organic fertilizers such as compost tea or fish emulsion. Avoid over-fertilizing, as this can burn the roots and damage the plants.
How do I deal with pests and diseases on my okra plants?
Inspect your okra plants regularly for signs of pests or diseases. Common pests include aphids, spider mites, and okra worms. You can control these pests with insecticidal soap, neem oil, or by handpicking them off the plants. Diseases such as powdery mildew and fungal leaf spots can be prevented by providing good air circulation and avoiding overhead watering. If you notice any signs of disease, treat the plants with a fungicide.
When should I harvest my okra pods?
Harvest okra pods when they are young and tender, typically 2-4 inches long. Overripe pods become tough and fibrous. Check your plants daily during the harvest season, as okra pods grow quickly. Use a sharp knife or pruning shears to cut the pods from the plant, leaving a small stub. Regular harvesting encourages the plant to produce more pods.
Can I grow okra indoors?
While it’s possible to grow okra indoors, it can be challenging due to the plant’s high light requirements. If you want to try growing okra indoors, you’ll need to provide supplemental lighting with grow lights. Choose a sunny window and supplement with artificial light for at least 12-14 hours per day. Make sure the container is large enough and provide adequate ventilation.
What are some good companion plants for okra?
Good companion plants for okra include basil, marigolds, peppers, and tomatoes. Basil and marigolds help deter pests, while peppers and tomatoes can benefit from the shade provided by the tall okra plants. Avoid planting okra near beans or cabbage, as they can compete for nutrients.
How long does it take for okra to mature and produce pods?
Okra typically takes 50-65 days to mature and produce pods after planting. The exact time will depend on the variety of okra, the growing conditions, and the climate. You can start harvesting okra pods about 2 months after planting the seeds.
Leave a Comment