

Grow vegetables at home, even if you think you have a “brown thumb,” is easier than you might imagine! Are you tired of bland, store-bought tomatoes that taste like cardboard? Do you dream of fresh, flavorful salads bursting with homegrown goodness? Well, get ready to ditch the grocery store produce aisle and embrace the joy of cultivating your own edible oasis. This article is packed with simple, effective DIY tricks and hacks that will transform your backyard, balcony, or even windowsill into a thriving vegetable garden.
The practice of growing your own food dates back centuries, with evidence suggesting that humans have been cultivating gardens for over 10,000 years! From the hanging gardens of Babylon to the victory gardens of World War II, growing vegetables at home has always been a source of sustenance, independence, and connection to nature. It’s a tradition worth reviving, and I’m here to show you how.
In today’s world, where concerns about food security, pesticides, and the environmental impact of long-distance transportation are growing, learning how to grow vegetables at home is more important than ever. Not only will you enjoy fresher, healthier produce, but you’ll also save money, reduce your carbon footprint, and experience the therapeutic benefits of gardening. Plus, there’s nothing quite like the satisfaction of harvesting your own vegetables and sharing them with family and friends. So, let’s get our hands dirty and unlock the secrets to a bountiful harvest!
DIY Home Vegetable Garden: From Seed to Supper!
Hey there, fellow garden enthusiasts! I’m so excited you’re thinking about growing your own vegetables. Trust me, there’s nothing quite like the taste of a tomato you’ve nurtured from a tiny seed. It’s rewarding, saves you money, and you know exactly what’s going into your food. This guide will walk you through everything you need to know to create a thriving vegetable garden, even if you’re a complete beginner.
Choosing Your Location and Preparing the Soil
Before you even think about seeds, you need to find the perfect spot and get your soil ready. This is crucial for success!
* Sunlight is Key: Most vegetables need at least 6-8 hours of direct sunlight per day. Observe your yard throughout the day to see where the sun shines the longest.
* Soil Matters: Good drainage is essential. Vegetables don’t like soggy feet!
* Accessibility: Choose a location that’s easy to access for watering, weeding, and harvesting. You don’t want to be trekking across the yard every day.
* Water Source: Make sure you have a water source nearby. Lugging watering cans long distances gets old fast!
Now, let’s get our hands dirty!
1. Clear the Area: Remove any grass, weeds, rocks, and debris from your chosen garden spot. A shovel and a good pair of gardening gloves are your best friends here.
2. Test Your Soil: You can buy a soil testing kit at most garden centers or send a sample to your local agricultural extension office. This will tell you the pH level and nutrient content of your soil. Most vegetables prefer a slightly acidic soil (pH 6.0-7.0).
3. Amend the Soil: Based on your soil test results, you’ll likely need to amend your soil. This means adding organic matter to improve drainage, fertility, and overall soil structure.
* Compost: This is gardening gold! Compost adds nutrients, improves drainage, and helps retain moisture. I always add a generous layer of compost to my garden beds.
* Manure: Well-rotted manure is another excellent soil amendment. Be sure it’s well-rotted to avoid burning your plants.
* Peat Moss: This helps improve drainage and water retention, especially in sandy soils.
* Other Amendments: Depending on your soil test results, you may need to add lime to raise the pH or sulfur to lower it.
4. Till or Dig: Once you’ve added your amendments, it’s time to till or dig them into the soil. This helps incorporate the organic matter and loosen the soil. You can use a garden fork, shovel, or tiller. Aim to dig down at least 12 inches.
5. Rake it Smooth: Rake the soil smooth to create a level planting surface. This will make it easier to plant your seeds or seedlings.
Choosing Your Vegetables and Starting Seeds
Okay, now for the fun part! Deciding what to grow.
* Consider Your Climate: Choose vegetables that are well-suited to your local climate and growing season. Your local agricultural extension office can provide information on the best vegetables to grow in your area.
* Think About Your Space: If you have a small garden, choose compact varieties of vegetables.
* Grow What You Love to Eat: There’s no point in growing vegetables you don’t enjoy!
* Succession Planting: Plant crops at intervals to extend your harvest season.
Now, let’s talk about starting seeds. You have two options: starting seeds indoors or direct sowing them in the garden.
Starting Seeds Indoors
Starting seeds indoors gives you a head start on the growing season, especially in colder climates.
1. Gather Your Supplies: You’ll need seed starting trays or pots, seed starting mix, seeds, a spray bottle, and a grow light or sunny windowsill.
2. Fill the Trays: Fill the seed starting trays or pots with seed starting mix. Gently tap the trays to settle the mix.
3. Sow the Seeds: Follow the instructions on the seed packet for planting depth and spacing. Generally, you’ll want to plant seeds about twice as deep as they are wide.
4. Water Gently: Use a spray bottle to gently moisten the soil. Avoid overwatering, which can lead to damping off (a fungal disease that kills seedlings).
5. Provide Light: Place the trays under a grow light or in a sunny windowsill. If using a windowsill, rotate the trays regularly to prevent the seedlings from leaning towards the light.
6. Keep the Soil Moist: Check the soil moisture daily and water as needed. The soil should be moist but not soggy.
7. Harden Off the Seedlings: Before transplanting the seedlings into the garden, you’ll need to harden them off. This means gradually exposing them to outdoor conditions over a period of 7-10 days. Start by placing the trays in a sheltered location for a few hours each day, gradually increasing the amount of time they spend outdoors.
Direct Sowing Seeds
Direct sowing seeds means planting them directly into the garden soil. This is a good option for vegetables that don’t transplant well, such as carrots, radishes, and beans.
1. Prepare the Soil: Make sure the soil is loose and free of rocks and debris.
2. Sow the Seeds: Follow the instructions on the seed packet for planting depth and spacing.
3. Water Gently: Water the soil gently after planting.
4. Keep the Soil Moist: Keep the soil moist until the seeds germinate.
5. Thin the Seedlings: Once the seedlings emerge, thin them to the recommended spacing. This means removing some of the seedlings to give the remaining plants enough room to grow.
Transplanting Seedlings and Caring for Your Garden
Once your seedlings are ready or your direct-sown seeds have sprouted, it’s time to get them into the garden!
1. Choose a Cloudy Day: Transplanting seedlings on a cloudy day will help reduce stress on the plants.
2. Dig a Hole: Dig a hole that’s slightly larger than the root ball of the seedling.
3. Gently Remove the Seedling: Gently remove the seedling from the tray or pot. Be careful not to damage the roots.
4. Place the Seedling in the Hole: Place the seedling in the hole and backfill with soil. Gently firm the soil around the base of the plant.
5. Water Thoroughly: Water the seedling thoroughly after transplanting.
6. Mulch: Apply a layer of mulch around the plants to help retain moisture, suppress weeds, and regulate soil temperature. Straw, wood chips, and shredded leaves are all good options.
Now comes the ongoing care. This is where the real work (and reward!) comes in.
* Watering: Water your plants regularly, especially during dry spells. Water deeply and less frequently, rather than shallowly and often. Aim to water at the base of the plants to avoid wetting the foliage, which can lead to fungal diseases.
* Weeding: Weeds compete with your vegetables for water, nutrients, and sunlight. Remove weeds regularly by hand or with a hoe.
* Fertilizing: Fertilize your plants regularly with a balanced fertilizer. Follow the instructions on the fertilizer package.
* Pest Control: Keep an eye out for pests and diseases. There are many organic pest control methods you can use, such as insecticidal soap, neem oil, and companion planting.
* Support: Some vegetables, such as tomatoes and cucumbers, need support to grow properly. Use stakes, cages, or trellises to support these plants.
Harvesting Your Vegetables
This is the moment you’ve been waiting for! Harvesting your own homegrown vegetables is incredibly satisfying.
* Harvest at the Right Time: Harvest your vegetables when they are ripe and at their peak flavor. Consult a gardening guide or seed packet for information on when to harvest specific vegetables.
* Handle with Care: Handle your vegetables gently to avoid bruising or damaging them.
* Enjoy the Fruits (and Vegetables!) of Your Labor: Savor the taste of your homegrown vegetables! Use them in your favorite recipes or share them with friends and family.
Troubleshooting Common Problems
Even with the best planning, you might encounter some challenges. Here are a few common problems and how to address them:
* Pests: Identify the pest and use appropriate organic pest control methods.
* Diseases: Identify the disease and take steps to prevent its spread. Remove infected plants and improve air circulation.
* Poor Soil: Amend the soil with organic matter to improve drainage and fertility.
* Lack of Sunlight: Choose a sunnier location or grow vegetables that tolerate partial shade.
* Overwatering: Water less frequently and improve drainage
Conclusion
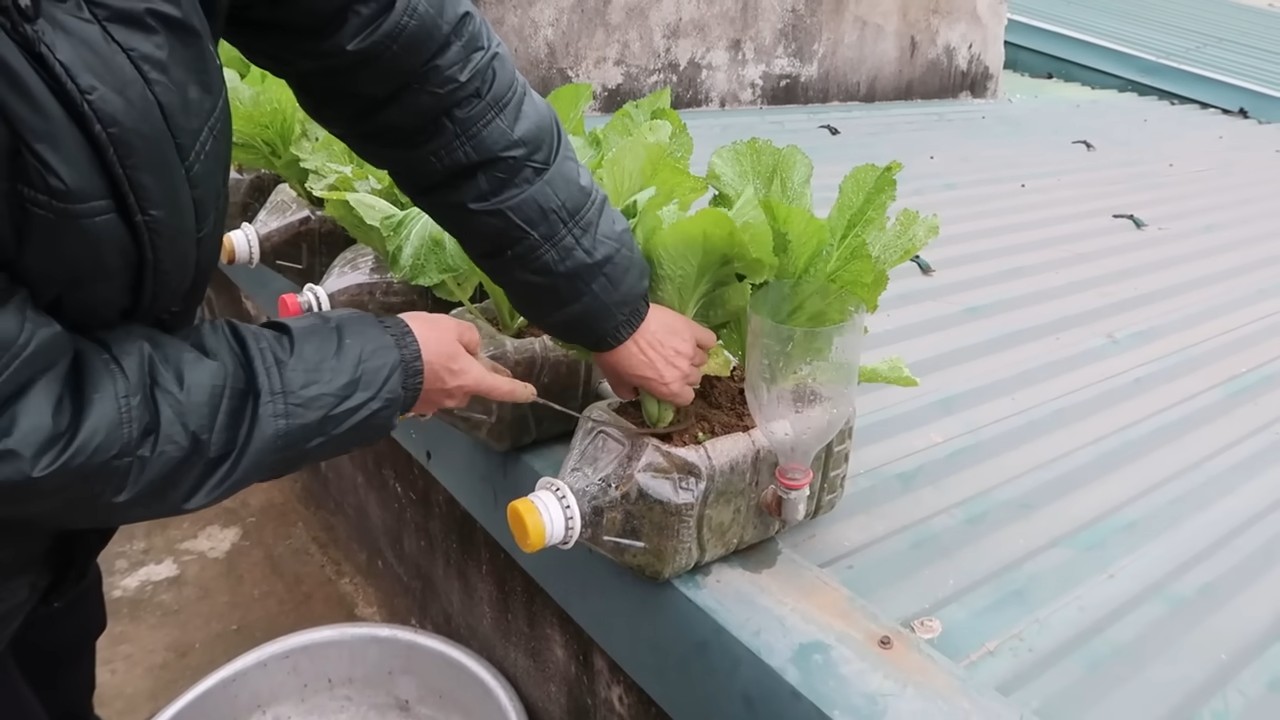
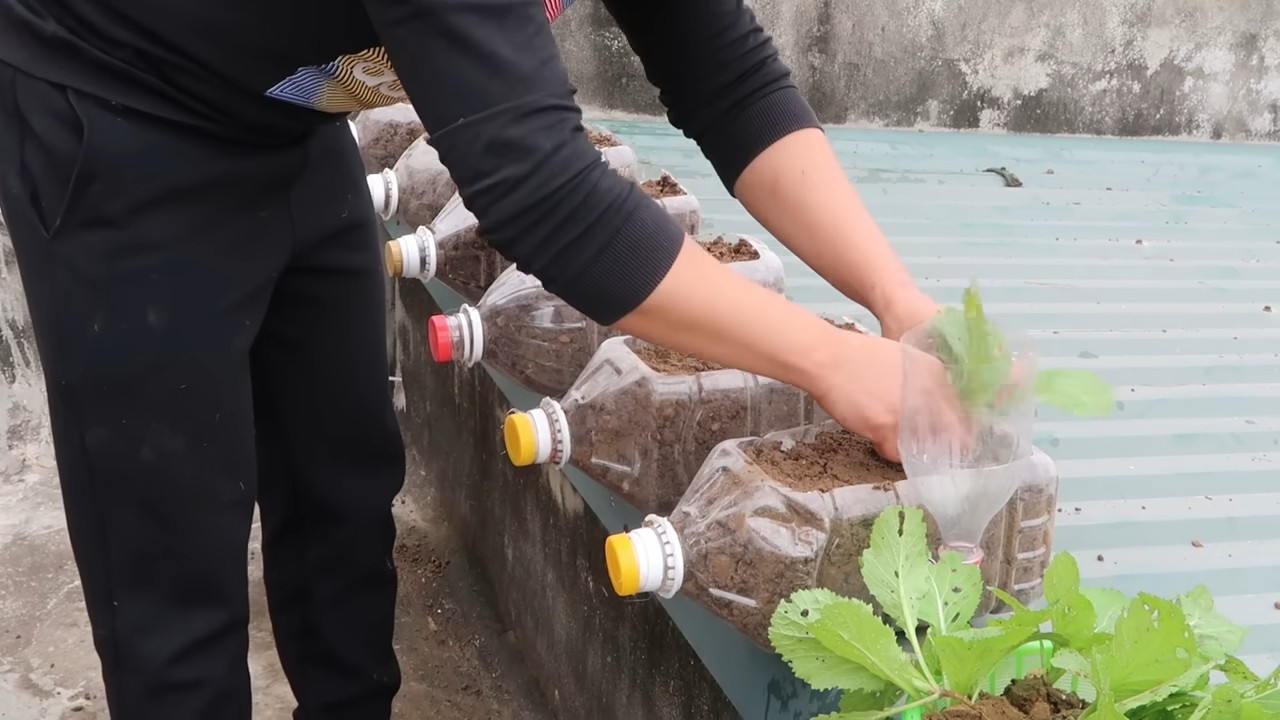
So, there you have it! Taking control of your food source and cultivating your own little patch of green is not only achievable but incredibly rewarding. We’ve explored a simple yet effective DIY trick to help you **grow vegetables at home**, regardless of your space constraints or gardening experience. This isn’t just about saving money; it’s about connecting with nature, understanding where your food comes from, and enjoying the unparalleled taste of freshly harvested produce.
This DIY method offers a fantastic entry point into the world of home gardening. It’s scalable, adaptable, and perfect for beginners. Imagine the satisfaction of serving a salad made entirely from ingredients you nurtured from seed to table. Think of the vibrant colors and intense flavors that store-bought vegetables simply can’t match. This is more than just a recipe; it’s an invitation to a healthier, more sustainable lifestyle.
But don’t stop there! Experiment with different vegetables and herbs. Try companion planting to maximize your yields and deter pests naturally. Consider adding a small composting bin to recycle kitchen scraps and enrich your soil. The possibilities are endless!
This DIY approach to growing vegetables at home is a game-changer for anyone seeking fresh, healthy, and affordable produce. It’s a simple, effective, and deeply satisfying way to connect with nature and take control of your food supply.
We urge you to give this DIY trick a try. Start small, be patient, and don’t be afraid to experiment. The rewards are well worth the effort. And most importantly, share your experiences with us! We’d love to hear about your successes, your challenges, and any variations you’ve discovered along the way. Post photos of your thriving vegetable gardens, share your tips and tricks, and let’s build a community of passionate home gardeners together. Let’s all learn how to **grow vegetables at home** more effectively.
Remember, every seed you plant is an investment in your health, your well-being, and the future of our planet. So, get your hands dirty, embrace the joy of gardening, and start growing your own delicious vegetables today!
Frequently Asked Questions (FAQ)
Q: What are the best vegetables to start with for a beginner using this DIY method?
A: For beginners, we highly recommend starting with easy-to-grow vegetables like lettuce, spinach, radishes, and herbs such as basil, mint, and chives. These vegetables are relatively low-maintenance, quick to mature, and forgiving of beginner mistakes. They also thrive well in containers, making them perfect for small spaces. Avoid vegetables that require a lot of space or have a long growing season, such as corn or pumpkins, when you’re first starting out. Focus on building your confidence and skills with these simpler options before tackling more challenging crops.
Q: What kind of soil should I use for growing vegetables in containers?
A: The best soil for container gardening is a well-draining potting mix specifically formulated for vegetables. Avoid using garden soil, as it tends to be too heavy and compact, which can hinder root growth and drainage. Look for a potting mix that contains ingredients like peat moss, perlite, vermiculite, and compost. These ingredients provide good aeration, drainage, and nutrient retention. You can also amend your potting mix with additional compost or aged manure to further enrich the soil and provide essential nutrients for your vegetables.
Q: How often should I water my container vegetables?
A: Watering frequency depends on several factors, including the type of vegetable, the size of the container, the weather conditions, and the type of soil you’re using. As a general rule, check the soil moisture daily by sticking your finger about an inch into the soil. If the soil feels dry to the touch, it’s time to water. Water deeply until water drains out of the bottom of the container. Avoid overwatering, as this can lead to root rot. During hot, dry weather, you may need to water your vegetables more frequently, possibly even twice a day.
Q: How much sunlight do my vegetables need?
A: Most vegetables require at least 6-8 hours of direct sunlight per day to thrive. However, some vegetables, such as lettuce, spinach, and kale, can tolerate partial shade, especially during the hottest part of the day. When choosing a location for your container garden, consider the amount of sunlight it receives throughout the day. If you don’t have a sunny spot, you can supplement with grow lights.
Q: How do I fertilize my container vegetables?
A: Container vegetables require regular fertilization because the nutrients in the potting mix are quickly depleted. You can use a variety of fertilizers, including liquid fertilizers, granular fertilizers, and slow-release fertilizers. Follow the instructions on the fertilizer label carefully. For liquid fertilizers, apply every 1-2 weeks. For granular fertilizers, apply every 4-6 weeks. Slow-release fertilizers can be applied at planting time and will gradually release nutrients over several months. Organic fertilizers, such as compost tea and fish emulsion, are also excellent choices for feeding your vegetables.
Q: How do I deal with pests and diseases in my vegetable garden?
A: Prevention is key when it comes to pests and diseases. Start by choosing disease-resistant varieties of vegetables. Inspect your plants regularly for signs of pests or diseases. Remove any infected leaves or plants immediately. You can also use organic pest control methods, such as insecticidal soap, neem oil, and diatomaceous earth. Attract beneficial insects to your garden by planting flowers that provide nectar and pollen. Proper watering and fertilization can also help to keep your plants healthy and resistant to pests and diseases.
Q: Can I grow vegetables indoors using this DIY method?
A: Yes, you can grow vegetables indoors using this DIY method, but you’ll need to provide adequate light. A sunny windowsill may be sufficient for some vegetables, but most will require supplemental lighting from grow lights. Choose vegetables that are well-suited for indoor growing, such as lettuce, spinach, herbs, and dwarf varieties of tomatoes and peppers. Ensure that your containers have good drainage and use a well-draining potting mix.
Q: What if I don’t have a lot of space to grow vegetables?
A: This DIY method is perfect for small spaces! You can grow vegetables in containers on balconies, patios, decks, or even indoors. Choose compact varieties of vegetables and use vertical gardening techniques, such as hanging baskets and wall planters, to maximize your space. Even a small container garden can provide you with a surprising amount of fresh produce.
Q: How do I know when my vegetables are ready to harvest?
A: The best way to know when your vegetables are ready to harvest is to consult a gardening guide or seed packet for specific information on each vegetable. Generally, vegetables are ready to harvest when they reach their mature size and color. For example, lettuce is ready to harvest when the leaves are large enough to eat, tomatoes are ready when they are fully colored and slightly soft to the touch, and radishes are ready when they are about an inch in diameter. Harvest your vegetables regularly to encourage continued production.
Q: Can I grow vegetables year-round using this DIY method?
A: With proper planning and care, you can grow vegetables year-round using this DIY method. In colder climates, you can grow vegetables indoors during the winter months using grow lights. You can also extend the growing season by using cold frames, row covers, and greenhouses. Choose vegetables that are suitable for the current season and climate. For example, you can grow cool-season vegetables like lettuce, spinach, and kale in the spring and fall, and warm-season vegetables like tomatoes, peppers, and cucumbers in the summer. By carefully selecting your vegetables and using appropriate techniques, you can enjoy fresh, homegrown produce all year long. Learning how to **grow vegetables at home** is a continuous process, so don’t be afraid to experiment and adapt to your local conditions.
Leave a Comment