

Growing Asparagus at Home might seem like a challenge reserved for seasoned gardeners, but I’m here to tell you it’s totally achievable, even if you’re a beginner! Imagine stepping into your backyard and harvesting your own tender, delicious asparagus spears – fresher than anything you’ll find at the grocery store. Sounds dreamy, right?
Asparagus has a rich history, dating back to ancient Greece and Rome, where it was prized for its medicinal properties and culinary delights. The Romans even developed sophisticated methods for cultivating it! While we might not be building elaborate greenhouses like they did, we can certainly learn from their dedication to this delectable vegetable.
So, why should you try growing asparagus at home? Well, for starters, homegrown asparagus tastes incredible! Plus, it’s a fantastic way to save money in the long run. Asparagus can be quite pricey at the supermarket, and once you establish your own patch, you’ll have a reliable source of this nutritious veggie for years to come. But more importantly, it’s incredibly rewarding to nurture something from the earth and then enjoy the fruits (or rather, spears!) of your labor. This DIY guide will walk you through everything you need to know, from selecting the right variety to harvesting your first crop. Let’s get started!
Growing Asparagus at Home: A Beginner’s Guide
Asparagus, that delicious and slightly earthy spring vegetable, is surprisingly easy to grow at home once you understand its quirks. It’s a long-term commitment, yes, but the reward of fresh, homegrown asparagus spears for years to come is absolutely worth the effort. I’m going to walk you through everything you need to know to successfully cultivate your own asparagus patch.
Choosing the Right Asparagus Variety
Before you even think about digging, you need to select the right asparagus variety for your region and preferences. There are male and female asparagus plants. Female plants produce seeds, which can lead to volunteer asparagus popping up everywhere, potentially weakening the original plant. Male varieties are generally preferred because they focus their energy on spear production.
Here are a few popular and reliable varieties:
* Jersey Knight: This is an all-male hybrid known for its high yields and disease resistance. It’s a great choice for beginners.
* Jersey Giant: Another all-male hybrid, similar to Jersey Knight but slightly larger spears.
* Purple Passion: This variety produces beautiful purple spears that turn green when cooked. It’s sweeter and more tender than green varieties.
* Mary Washington: An older, open-pollinated variety that’s still popular for its reliability and flavor. However, it does produce both male and female plants.
I recommend starting with Jersey Knight or Jersey Giant if you’re new to asparagus growing. They’re reliable and productive.
Preparing the Asparagus Bed
Asparagus needs a dedicated bed because it will be in the same spot for 15-20 years. Choose a location that gets at least 6-8 hours of sunlight per day. Good drainage is also crucial; asparagus roots hate sitting in soggy soil.
Here’s how to prepare the bed:
1. Clear the Area: Remove all grass, weeds, rocks, and debris from the area where you plan to plant your asparagus. This is a crucial first step!
2. Soil Testing: Ideally, get your soil tested to determine its pH and nutrient levels. Asparagus prefers a slightly acidic to neutral soil pH (6.5-7.0). Your local agricultural extension office can provide soil testing services.
3. Amend the Soil: Asparagus is a heavy feeder, so you’ll need to amend the soil generously with organic matter. This will improve drainage, fertility, and water retention.
* Dig a trench about 12-18 inches wide and 12-18 inches deep. The length will depend on how many asparagus crowns you’re planting.
* Mix the excavated soil with plenty of compost, well-rotted manure, and other organic materials like peat moss or leaf mold. Aim for a 50/50 mix of soil and organic matter.
* If your soil test indicates a need for phosphorus or potassium, add bone meal or wood ash to the soil mix.
4. Create a Ridge: At the bottom of the trench, create a ridge of the amended soil about 4-6 inches high. This is where you’ll place the asparagus crowns.
Planting Asparagus Crowns
Asparagus is typically planted from crowns, which are one-year-old dormant plants. You can purchase crowns from nurseries or online retailers.
1. Soak the Crowns: Before planting, soak the asparagus crowns in water for about an hour. This will rehydrate them and give them a good start.
2. Position the Crowns: Place the asparagus crowns on top of the ridge in the trench, spacing them about 12-18 inches apart. The crowns should be positioned with the roots spread out around the ridge.
3. Cover the Crowns: Gently cover the crowns with about 2-3 inches of the amended soil. Don’t bury them too deep initially.
4. Water Thoroughly: Water the newly planted asparagus crowns thoroughly to settle the soil.
Caring for Your Asparagus Patch
Asparagus requires consistent care to thrive. Here’s what you need to do:
1. Watering: Keep the soil consistently moist, especially during dry periods. Water deeply and infrequently, rather than shallowly and frequently.
2. Weeding: Asparagus doesn’t compete well with weeds, so it’s important to keep the bed weed-free. Hand-pull weeds regularly or use a layer of organic mulch to suppress weed growth.
3. Fertilizing: Fertilize your asparagus patch in early spring and again after the harvest season. Use a balanced fertilizer or side-dress with compost.
4. Mulching: Apply a layer of organic mulch, such as straw, wood chips, or shredded leaves, around the asparagus plants. Mulch helps retain moisture, suppress weeds, and regulate soil temperature.
5. Adding Soil: As the asparagus spears emerge and grow, gradually fill in the trench with the remaining amended soil. This will encourage the crowns to develop deeper roots. By the end of the first growing season, the trench should be completely filled in.
6. Fern Growth: Let the asparagus ferns grow and mature throughout the summer and fall. These ferns are essential for nourishing the crowns and building up energy reserves for the following year’s harvest.
7. Fern Management: In late fall or early winter, after the ferns have turned brown and died back, cut them down to the ground. This helps prevent disease and pests from overwintering in the asparagus patch. You can compost the ferns or use them as mulch.
The Waiting Game: Patience is Key
This is the hardest part! You need to resist the urge to harvest asparagus spears in the first year or two after planting. This allows the crowns to establish strong root systems and build up energy reserves.
* Year 1: Do not harvest any spears. Let all the spears grow into ferns.
* Year 2: You can harvest a few spears for a very short period (1-2 weeks) if the plants are vigorous.
* Year 3 and Beyond: You can begin harvesting asparagus spears for a longer period (6-8 weeks) each spring.
Harvesting Asparagus Spears
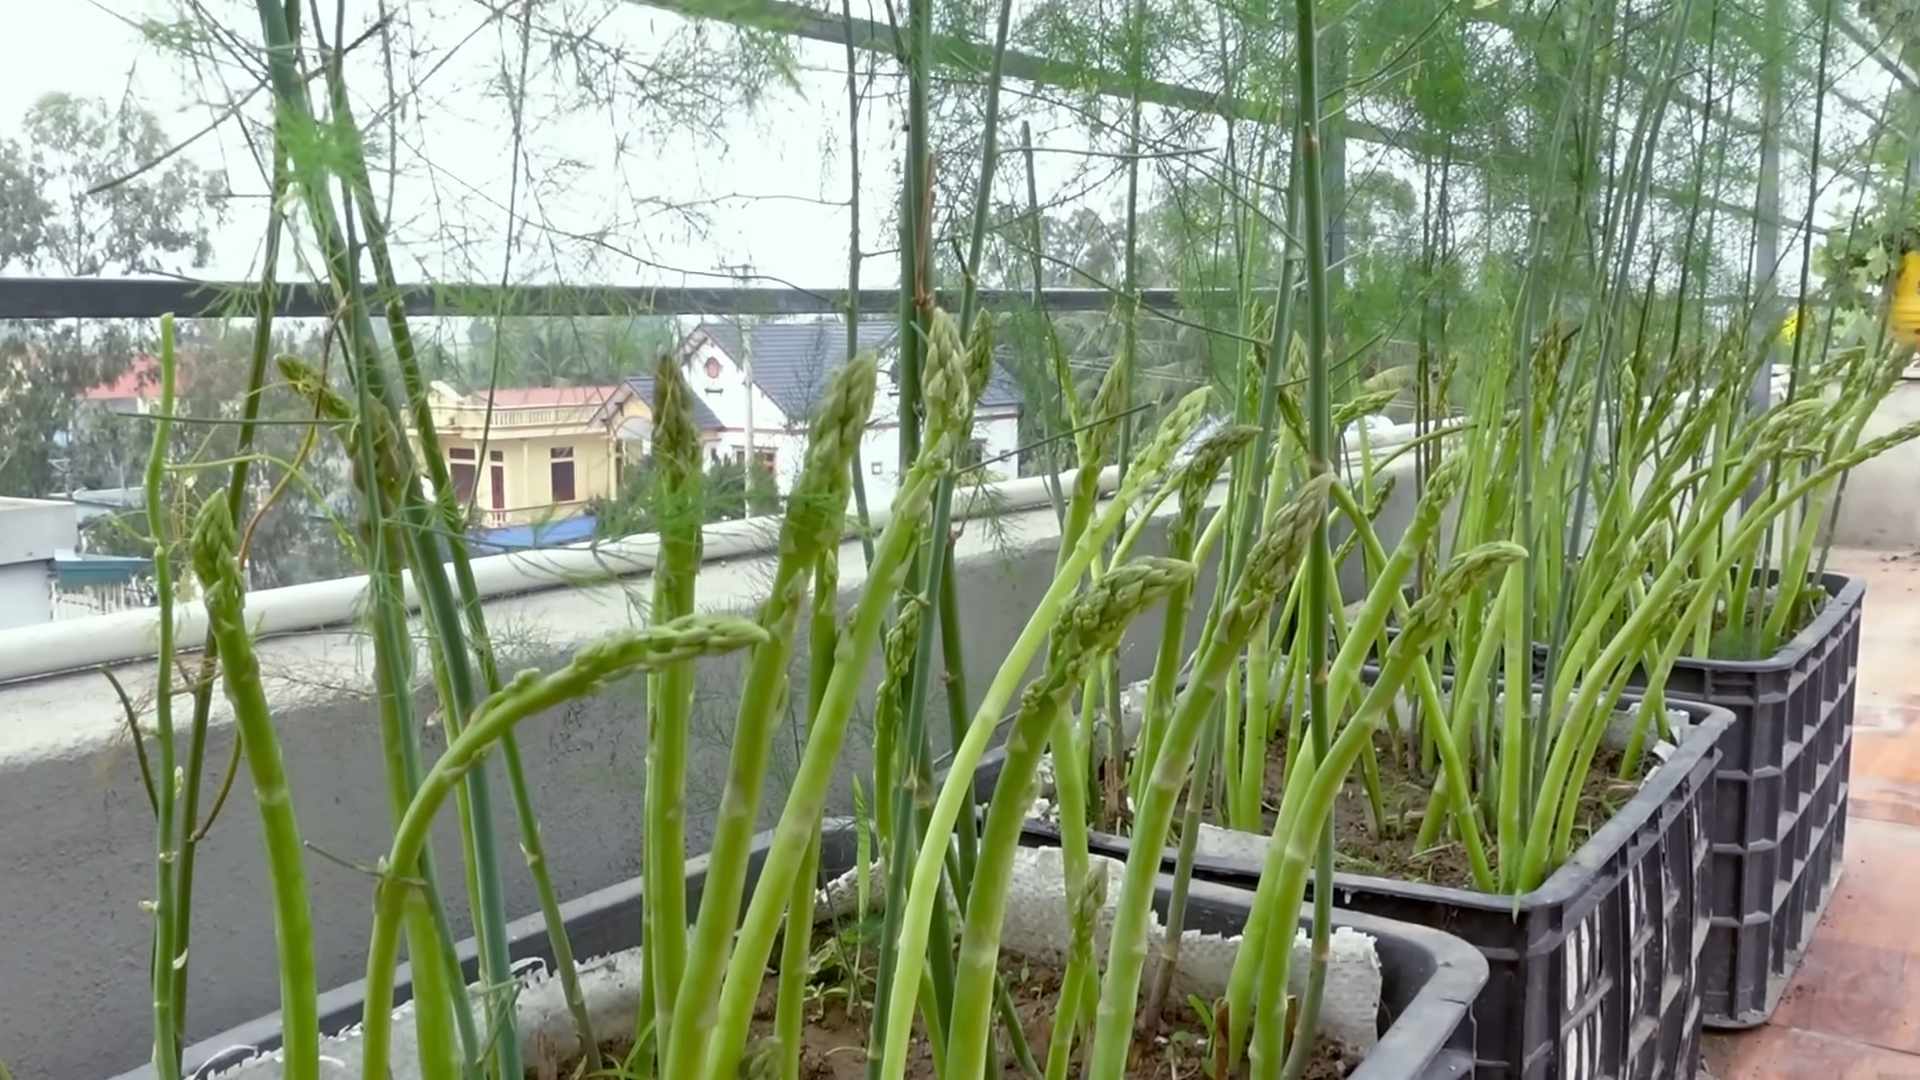
Once your asparagus patch is established, harvesting is the most rewarding part.
1. Timing: Harvest asparagus spears when they are about 6-8 inches tall and the tips are still tightly closed.
2. Method: You can either snap the spears off at ground level or cut them with a sharp knife. If you snap them, they will break off at the point where they are naturally tender.
3. Frequency: Harvest asparagus spears every day or every other day during the peak harvest season.
4. Stop Harvesting: Stop harvesting asparagus spears when the spear production starts to decline or when the spears become thin and spindly. This usually occurs in late spring or early summer.
Dealing with Asparagus Pests and Diseases
Asparagus is relatively pest-resistant, but there are a few potential problems to watch out for:
* Asparagus Beetles: These small, colorful beetles can damage asparagus spears and ferns. Hand-pick them off the plants or use an insecticidal soap.
* Asparagus Rust: This fungal disease causes orange or reddish-brown pustules on the ferns. Choose rust-resistant varieties and ensure good air circulation to prevent rust.
* Crown Rot: This fungal disease can cause the crowns to rot and die. Ensure good drainage and avoid overwatering to prevent crown rot.
Regularly inspect your asparagus patch for signs of pests or diseases and take action promptly to prevent problems from spreading.
Extending the Asparagus Season
While asparagus is primarily a spring vegetable, there are a few things you can do to extend the harvest season:
* Choose Early and Late Varieties: Plant a mix of early and late-maturing varieties to spread out the harvest.
* Cold Frames or Row Covers: Use cold frames or row covers to warm the soil in early spring and encourage earlier spear production.
* Succession Planting: Plant new asparagus crowns in successive years to create a staggered harvest.
Enjoying Your Homegrown Asparagus
Freshly harvested asparagus is a culinary delight. It can be steamed, roasted, grilled, or sautéed. It’s also delicious in salads, soups, and omelets.
Here are a few of my favorite ways to enjoy homegrown asparagus:
* Roasted Asparagus with Parmesan Cheese: Toss asparagus spears with olive oil, salt, and pepper, then roast them in a 400°F oven for 10-15 minutes. Sprinkle with grated Parmesan cheese before serving.
* Grilled Asparagus with Lemon: Grill asparagus spears over medium heat for 5-7 minutes, turning occasionally. Drizzle with lemon juice and olive oil before serving.
* Asparagus and Goat Cheese Tart: Combine asparagus spears with goat cheese, eggs, and cream in a flaky pastry crust. Bake until golden brown.
Growing asparagus at home is a rewarding experience that
Conclusion
So, there you have it! Growing asparagus at home isn’t just a gardening project; it’s an investment in years of delicious, fresh harvests. Forget those limp, expensive spears from the grocery store. Imagine stepping into your backyard and snipping vibrant, tender asparagus, knowing exactly where it came from and how it was grown. This DIY trick, while requiring patience upfront, rewards you with a sustainable source of this culinary delight.
The beauty of growing your own asparagus lies in the control you have over the entire process. You can choose organic methods, ensuring your asparagus is free from harmful pesticides and herbicides. You can tailor the soil to perfection, maximizing its nutrient content and flavor. And you can harvest at the peak of freshness, enjoying asparagus at its absolute best.
But the benefits extend beyond just taste and quality. Growing asparagus is a deeply satisfying experience. It connects you to the natural world, allowing you to witness the miracle of growth firsthand. It’s a project that can be shared with family and friends, fostering a sense of community and shared accomplishment. Plus, a well-maintained asparagus bed is a beautiful addition to any garden, adding texture and visual interest.
Don’t be intimidated by the initial investment of time and effort. Think of it as planting a legacy. With proper care and attention, your asparagus bed can thrive for decades, providing you and your loved ones with a continuous supply of this nutritious and delicious vegetable.
Ready to take your asparagus game to the next level? Consider these variations:
* **Purple Passion Asparagus:** For a sweeter, more tender asparagus with a beautiful purple hue, try planting Purple Passion crowns. They’re a stunning addition to any garden and offer a unique flavor profile.
* **Companion Planting:** Maximize your garden space by planting companion plants alongside your asparagus. Tomatoes, basil, and parsley are excellent choices, as they help deter pests and improve soil health.
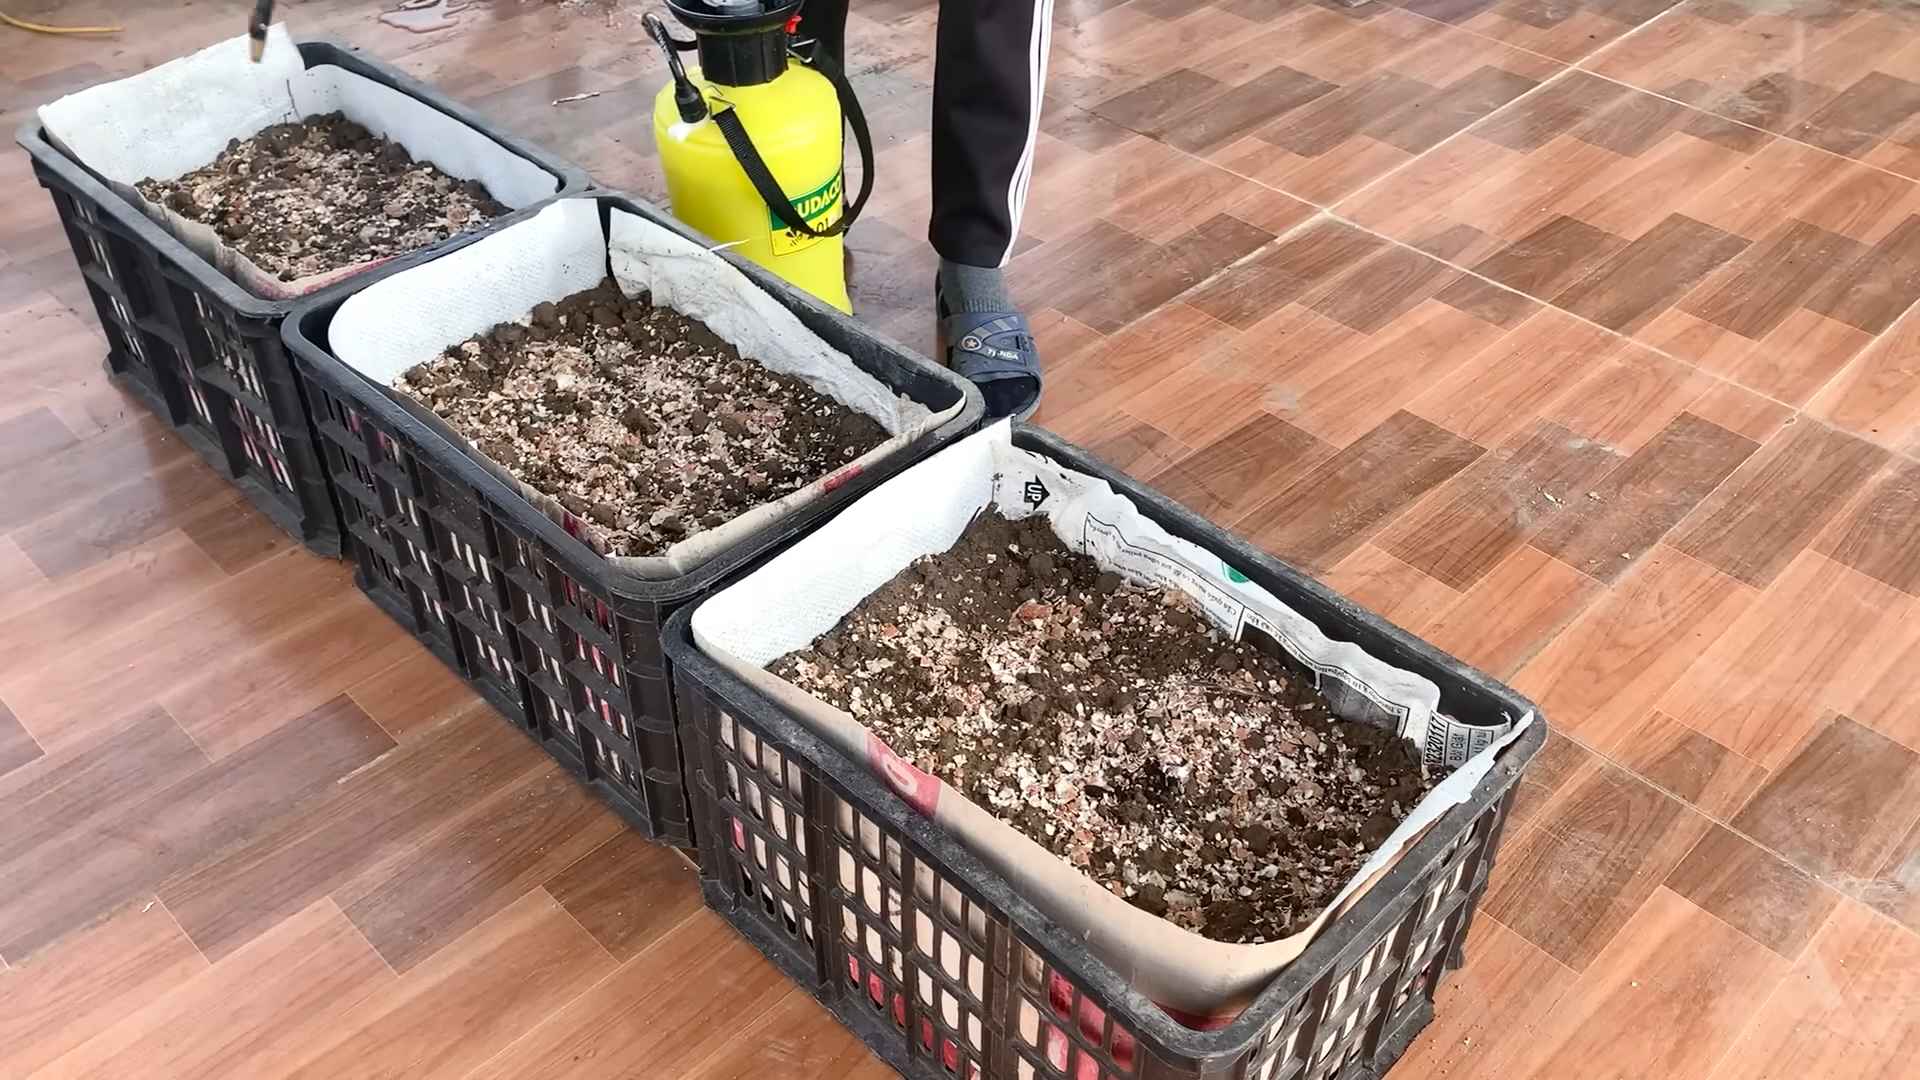
* **Raised Beds:** If you have poor soil or limited space, consider growing your asparagus in raised beds. This allows you to create the perfect growing environment and makes harvesting easier.
* **Forced Asparagus:** For an early spring harvest, try forcing asparagus indoors. This involves digging up mature crowns in the fall and replanting them in containers in a cool, dark location.
We encourage you to embrace this DIY trick and embark on your own asparagus-growing adventure. The rewards are well worth the effort. And remember, gardening is a journey, not a destination. There will be challenges along the way, but with a little patience and perseverance, you’ll be enjoying fresh, homegrown asparagus in no time.
So, grab your gardening gloves, order some asparagus crowns, and get ready to experience the joy of growing your own food. We’re confident that you’ll be amazed by the results.
Don’t forget to share your experiences with us! We’d love to hear about your successes, challenges, and any tips or tricks you’ve discovered along the way. Share your photos and stories on social media using #HomeGrownAsparagus and let’s inspire others to join the asparagus-growing revolution! Let us know if this **growing asparagus** guide helped you.
Frequently Asked Questions (FAQ)
How long does it take to harvest asparagus after planting?
Patience is key when growing asparagus. It typically takes 2-3 years after planting crowns (one-year-old plants) before you can begin harvesting. This allows the plants to establish a strong root system. Harvesting too early can weaken the plants and reduce future yields. If you start from seed, it can take even longer, up to 4 years. In the first year after planting crowns, resist the urge to harvest any spears. In the second year, you can harvest very lightly, picking only a few spears per plant for a short period (around 2 weeks). By the third year, you can enjoy a more substantial harvest, lasting for 6-8 weeks.
What is the best time of year to plant asparagus?
The best time to plant asparagus is in the spring, after the last frost. This gives the plants plenty of time to establish themselves before the winter. You can also plant asparagus in the fall, but it’s important to do so early enough so that the plants have time to develop some roots before the ground freezes. Aim for at least 6 weeks before the first expected frost. Spring planting is generally preferred, especially in colder climates.
What kind of soil is best for growing asparagus?
Asparagus thrives in well-drained, sandy loam soil with a pH between 6.5 and 7.5. Good drainage is crucial, as asparagus roots can rot in soggy soil. Before planting, amend the soil with plenty of organic matter, such as compost or well-rotted manure. This will improve drainage, fertility, and water retention. Avoid heavy clay soils, as they tend to retain too much moisture. If you have clay soil, consider growing asparagus in raised beds.
How deep should I plant asparagus crowns?
Dig trenches that are 6-8 inches deep and 12 inches wide. Create a small mound of soil in the center of the trench and place the asparagus crown on top of the mound, spreading the roots out around it. Cover the crown with 2 inches of soil. As the asparagus spears grow, gradually fill in the trench with soil until it is level with the surrounding ground. This process encourages the development of a strong root system.
How often should I water asparagus?
Asparagus needs consistent moisture, especially during the growing season. Water deeply whenever the top inch of soil feels dry to the touch. Avoid overwatering, as this can lead to root rot. A good rule of thumb is to water thoroughly once or twice a week, depending on the weather conditions. During dry spells, you may need to water more frequently. Mulching around the plants can help retain moisture and suppress weeds.
What kind of fertilizer should I use for asparagus?
Asparagus is a heavy feeder and benefits from regular fertilization. In the spring, before the spears emerge, apply a balanced fertilizer, such as 10-10-10, at a rate of 1 pound per 100 square feet. You can also use a fertilizer specifically formulated for vegetables. Side-dress the plants with compost or well-rotted manure throughout the growing season. After the harvest is complete, fertilize again to help the plants build up energy reserves for the following year.
How do I control weeds in my asparagus bed?
Weeds can compete with asparagus for nutrients and water, so it’s important to keep the bed weed-free. Hand-pull weeds regularly, being careful not to damage the asparagus spears or roots. Mulching around the plants can also help suppress weeds. Avoid using herbicides, as they can harm the asparagus.
How do I deal with asparagus pests and diseases?
Asparagus beetles are a common pest that can damage the spears and foliage. Hand-pick the beetles and their larvae off the plants. You can also use insecticidal soap or neem oil to control them. Asparagus rust is a fungal disease that can cause orange pustules on the spears and foliage. To prevent rust, choose rust-resistant varieties and ensure good air circulation around the plants. Remove and destroy any infected plants.
When should I stop harvesting asparagus?
It’s important to stop harvesting asparagus by late June or early July, depending on your climate. This allows the plants to fern out and replenish their energy reserves for the following year. Allowing the ferns to grow will ensure a healthy and productive asparagus bed for years to come.
How do I overwinter my asparagus bed?
In the fall, after the ferns have turned brown, cut them back to the ground. Remove any debris from the bed and apply a layer of mulch, such as straw or leaves, to protect the crowns from freezing temperatures. In the spring, remove the mulch as soon as the weather warms up.
Can I grow asparagus in containers?
Yes, you can grow asparagus in containers, but it requires a large container (at least 18 inches in diameter and depth) and well-draining potting mix. Choose a dwarf variety of asparagus, such as ‘Pacific Purple’. Water regularly and fertilize every few weeks. Container-grown asparagus may not be as productive as asparagus grown in the ground, but it’s a good option for those with limited space.
How do I know when asparagus is ready to harvest?
Asparagus spears are ready to harvest when they are about 6-8 inches tall and the tips are still tightly closed. Use a sharp knife to cut the spears at ground level. Avoid pulling the spears, as this can damage the crown. Harvest asparagus every day or two during the peak of the season.
Leave a Comment