

Growing bean sprouts peanuts at home might sound like a quirky science experiment, but trust me, it’s a rewarding and surprisingly simple way to add fresh, nutritious greens to your diet! Forget those bland, store-bought sprouts – imagine the satisfaction of harvesting your own crunchy, flavorful bean sprouts, all from the comfort of your kitchen.
Sprouting, in general, has a rich history, dating back thousands of years in various cultures, particularly in Asian cuisine. It was a clever way to preserve and enhance the nutritional value of grains and legumes, especially during long winters or periods of scarcity. Think of it as ancient food hacking! Today, while we have access to a wider variety of foods, the appeal of sprouting remains strong.
Why should you try growing bean sprouts peanuts yourself? Well, for starters, it’s incredibly cost-effective. A handful of peanuts can yield a surprisingly large batch of sprouts. Plus, you have complete control over the growing process, ensuring they’re free from pesticides and other unwanted chemicals. But more importantly, it’s about adding a burst of freshness and vital nutrients to your meals. Bean sprouts are packed with vitamins, minerals, and enzymes, making them a fantastic addition to salads, sandwiches, stir-fries, and more. I’m excited to share some easy DIY tricks and hacks that will have you sprouting like a pro in no time!
DIY: Erdnuss-Sprossen ziehen – So einfach geht’s!
Ich liebe Sprossen! Sie sind knackig, gesund und eine tolle Ergänzung zu Salaten, Sandwiches oder einfach pur als Snack. Und das Beste: Man kann sie super einfach selbst ziehen. Heute zeige ich euch, wie ihr leckere Erdnuss-Sprossen zu Hause züchten könnt. Ja, richtig gelesen, Erdnuss-Sprossen! Sie sind etwas ungewöhnlicher als Mungbohnen- oder Alfalfa-Sprossen, aber mindestens genauso lecker und vollgepackt mit Nährstoffen.
Was du brauchst:
* Rohe, ungesalzene Erdnüsse (mit Haut!) – Achte darauf, dass sie nicht geröstet oder behandelt sind. Bio-Qualität ist immer eine gute Wahl.
* Ein Sprossenglas oder ein anderes Gefäß mit guter Belüftung (z.B. ein Einmachglas mit Gaze oder einem speziellen Sprossendeckel).
* Sauberes Wasser.
* Ein dunkler Ort (z.B. ein Küchenschrank oder eine Schublade).
* Geduld (ca. 3-5 Tage).
Warum Erdnuss-Sprossen?
Erdnuss-Sprossen sind nicht nur lecker, sondern auch unglaublich gesund. Sie sind reich an Proteinen, Ballaststoffen, Vitaminen (vor allem B-Vitamine) und Mineralstoffen wie Magnesium und Eisen. Außerdem sind sie leicht verdaulich und eine tolle Quelle für Energie. Im Vergleich zu rohen Erdnüssen sind Sprossen leichter verdaulich, da der Keimprozess Enzyme freisetzt, die die Nährstoffe aufspalten.
Schritt-für-Schritt-Anleitung: Erdnuss-Sprossen ziehen
Phase 1: Vorbereitung der Erdnüsse
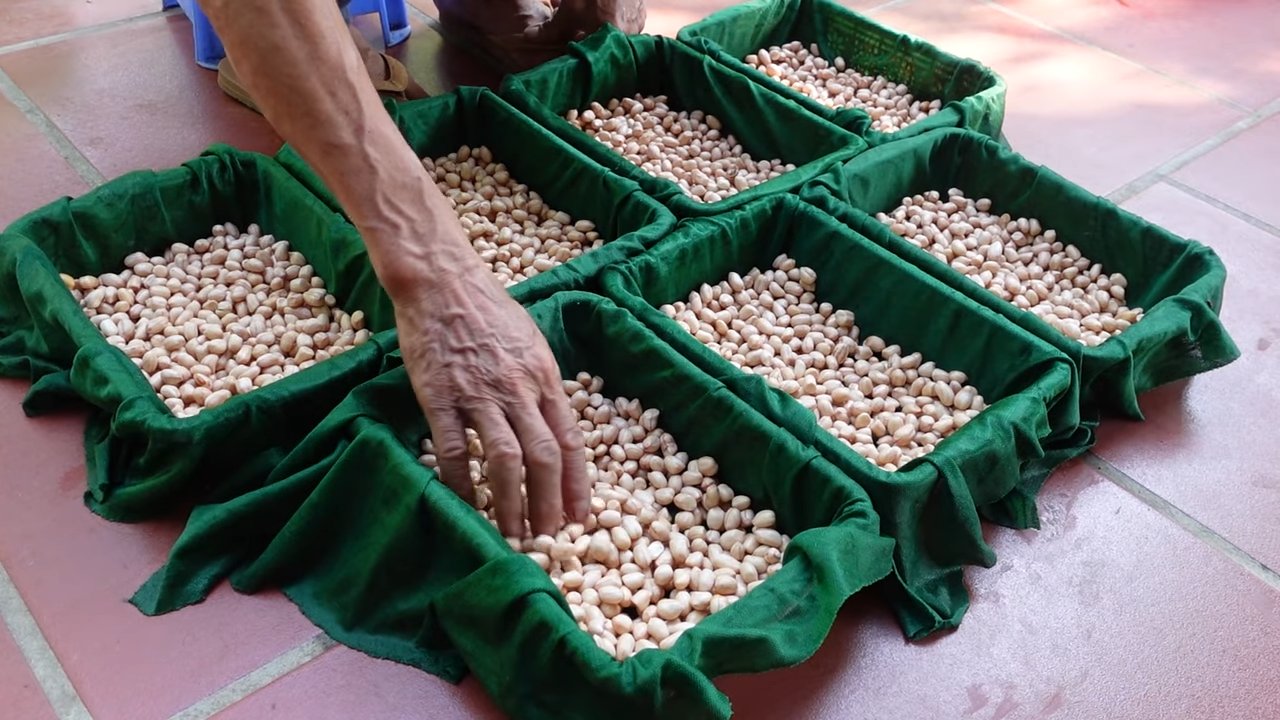
1. Erdnüsse auswählen und sortieren: Nimm dir deine rohen Erdnüsse und sortiere sie sorgfältig aus. Entferne alle beschädigten, verfärbten oder schrumpeligen Erdnüsse. Nur die besten Erdnüsse werden zu gesunden Sprossen. Ich achte immer darauf, dass die Haut intakt ist, da sie eine wichtige Rolle beim Keimprozess spielt.
2. Erdnüsse gründlich waschen: Spüle die ausgewählten Erdnüsse unter fließendem, kaltem Wasser ab. Dadurch werden Staub und eventuelle Verunreinigungen entfernt.
3. Erdnüsse einweichen: Gib die gewaschenen Erdnüsse in eine Schüssel und bedecke sie mit reichlich kaltem Wasser. Die Erdnüsse sollten mindestens 8 Stunden, idealerweise aber 12-24 Stunden einweichen. Das Einweichen weicht die harte Schale auf und aktiviert den Keimprozess. Ich lasse sie meistens über Nacht einweichen. Du wirst sehen, dass die Erdnüsse während des Einweichens etwas aufquellen.
Phase 2: Sprossen im Glas
1. Sprossenglas vorbereiten: Reinige dein Sprossenglas oder das gewählte Gefäß gründlich mit heißem Wasser und Spülmittel. Spüle es anschließend gut aus, um alle Spülmittelreste zu entfernen. Ein sauberes Gefäß ist wichtig, um Schimmelbildung zu vermeiden.
2. Erdnüsse ins Sprossenglas füllen: Gieße das Einweichwasser ab und spüle die Erdnüsse noch einmal gründlich unter fließendem Wasser ab. Fülle die Erdnüsse dann in dein Sprossenglas. Achte darauf, dass das Glas nicht zu voll ist, da die Sprossen noch Platz zum Wachsen brauchen. Ich fülle das Glas meistens nur zu etwa einem Viertel.
3. Sprossenglas abdecken: Verschließe das Sprossenglas mit einem Sprossendeckel, Gaze oder einem Stück Mulltuch, das du mit einem Gummiband befestigst. Wichtig ist, dass das Glas gut belüftet ist, damit die Sprossen nicht schimmeln.
4. Sprossen spülen: Spüle die Erdnüsse im Sprossenglas mindestens zweimal täglich (morgens und abends) mit frischem, kaltem Wasser. Halte das Glas unter den Wasserhahn und lasse das Wasser durch die Gaze oder den Sprossendeckel laufen. Schwenke das Glas dabei leicht, damit alle Erdnüsse gut befeuchtet werden. Lasse das Wasser anschließend vollständig ablaufen. Das regelmäßige Spülen ist entscheidend, um die Sprossen feucht zu halten und Schimmelbildung zu verhindern.
5. Sprossen dunkel lagern: Stelle das Sprossenglas an einen dunklen Ort, z.B. in einen Küchenschrank oder eine Schublade. Dunkelheit fördert das Wachstum der Sprossen und verhindert, dass sie bitter werden. Achte darauf, dass das Glas schräg steht, damit überschüssiges Wasser gut ablaufen kann.
Phase 3: Geduld und Pflege
1. Regelmäßig spülen: Wiederhole das Spülen der Sprossen zweimal täglich für die nächsten 3-5 Tage. Beobachte die Sprossen aufmerksam. Du wirst sehen, wie sie langsam keimen und kleine Wurzeln bilden.
2. Auf Schimmelbildung achten: Kontrolliere die Sprossen täglich auf Anzeichen von Schimmelbildung. Schimmel erkennst du an einem muffigen Geruch oder an weißen, flaumigen Stellen. Wenn du Schimmel entdeckst, solltest du die betroffenen Sprossen sofort entfernen und die restlichen Sprossen gründlich spülen. In schweren Fällen musst du leider die gesamte Charge entsorgen.
3. Licht hinzufügen (optional): Nach 2-3 Tagen, wenn die Sprossen bereits gut gekeimt sind, kannst du sie für ein paar Stunden am Tag an einen hellen Ort stellen (aber nicht in direktes Sonnenlicht). Das Licht fördert die Bildung von Chlorophyll, wodurch die Sprossen grüner und noch nährstoffreicher werden. Ich mache das meistens, weil ich die grüne Farbe mag.
Phase 4: Ernte und Lagerung
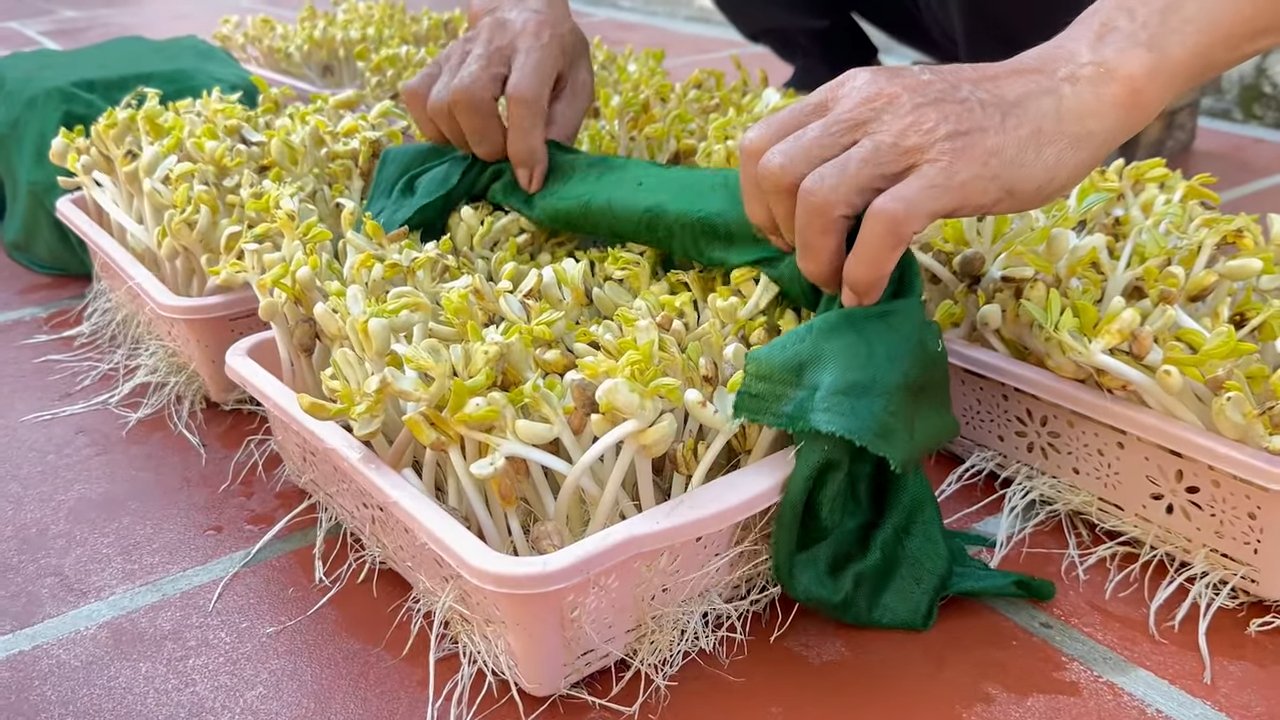
1. Sprossen ernten: Nach 3-5 Tagen sind deine Erdnuss-Sprossen erntereif. Sie sollten kleine Wurzeln und einen kleinen Trieb gebildet haben.
2. Sprossen gründlich spülen: Spüle die Sprossen vor dem Verzehr noch einmal gründlich unter fließendem Wasser ab. Entferne dabei eventuelle Schalenreste.
3. Sprossen trocknen: Lasse die Sprossen gut abtropfen oder tupfe sie mit einem sauberen Küchentuch trocken.
4. Sprossen lagern: Bewahre die Sprossen in einem luftdichten Behälter im Kühlschrank auf. Dort halten sie sich etwa 2-3 Tage. Am besten verzehrst du sie aber so frisch wie möglich.
Tipps und Tricks für perfekte Erdnuss-Sprossen
* Qualität der Erdnüsse: Die Qualität der Erdnüsse ist entscheidend für den Erfolg. Verwende nur rohe, ungesalzene Erdnüsse mit intakter Haut. Bio-Qualität ist empfehlenswert.
* Belüftung: Achte auf eine gute Belüftung des Sprossenglases, um Schimmelbildung zu vermeiden.
* Regelmäßiges Spülen: Das regelmäßige Spülen ist das A und O für gesunde Sprossen. Spüle die Sprossen mindestens zweimal täglich, besser noch öfter.
* Dunkelheit: Lagere die Sprossen während des Keimprozesses an einem dunklen Ort.
* Geduld: Hab Geduld! Der Keimprozess dauert ein paar Tage.
* Geschmack: Erdnuss-Sprossen haben einen leicht nussigen Geschmack. Du kannst sie pur als Snack essen, in Salate mischen oder als Topping für Sandwiches verwenden.
* Variationen: Du kannst auch andere Nüsse oder Samen sprießen lassen, z.B. Sonnenblumenkerne, Mandeln oder Linsen. Die Vorgehensweise ist ähnlich wie bei Erdnüssen.
* Problemlösung: Wenn deine Sprossen schimmeln, liegt das meistens an mangelnder Belüftung oder unzureichendem Spülen. Achte darauf, dass das Sprossenglas gut belüftet ist und spüle die Sprossen regelmäßig.
Was tun, wenn die Sprossen nicht keimen?
Es kann vorkommen, dass die Erdnüsse nicht keimen. Hier sind einige mögliche Ursachen und Lösungen:
* Erdnüsse zu alt: Verwende frische Erdnüsse. Alte Erdnüsse keimen möglicherweise nicht mehr.
* Erdnüsse behandelt: Achte darauf, dass die Erdnüsse unbehandelt sind. Geröstete oder gesalz
Conclusion
So, there you have it! Growing your own bean sprouts from peanuts is not just a fun experiment; it’s a gateway to fresher, healthier, and more flavorful meals. Forget those bland, commercially produced sprouts that lack character. With this simple DIY trick, you can cultivate a vibrant crop of peanut sprouts bursting with nutty goodness, all from the comfort of your own kitchen.
Why is this a must-try? Because it’s incredibly easy, cost-effective, and rewarding. You’re transforming a humble ingredient – peanuts – into a nutritional powerhouse. Peanut sprouts are packed with vitamins, minerals, and enzymes, offering a significant boost to your diet. Plus, the unique flavor profile adds a delightful crunch and subtle sweetness to salads, stir-fries, sandwiches, and more.
But the best part? You’re in control. You decide the level of sprout development, the freshness, and the overall quality. No more worrying about preservatives or questionable growing practices. You’re nurturing your own little garden, one peanut sprout at a time.
Ready to take your peanut sprouting game to the next level? Consider these variations:
* Spice it up: Add a pinch of chili flakes to the soaking water for a subtle kick.
* Go organic: Use organic peanuts to ensure the purest sprouts possible.
* Experiment with containers: Try different sprouting containers to see what works best for you. A mason jar with a sprouting lid is a classic choice, but you can also use a colander lined with cheesecloth or even a specialized sprouting tray.
* Mix and match: Combine peanut sprouts with other types of sprouts, such as mung bean sprouts or alfalfa sprouts, for a diverse and flavorful mix.
* Roast them: Lightly roast your peanut sprouts for a nutty and crunchy snack. Toss them with a little olive oil, salt, and your favorite spices before roasting.
* Peanut Sprout Tea: Dry the sprouts and use them to make a unique and healthy tea.
Don’t be intimidated! This DIY trick is foolproof, even for beginners. Just follow the simple steps outlined above, and you’ll be enjoying your own homegrown peanut sprouts in no time.
We’re confident that once you try growing your own peanut sprouts, you’ll be hooked. The satisfaction of nurturing something from seed (or, in this case, peanut!) to table is truly unparalleled.
So, what are you waiting for? Grab a bag of peanuts and get sprouting! We can’t wait to hear about your experiences. Share your photos, tips, and variations in the comments below. Let’s build a community of peanut sprout enthusiasts! Let us know if you have found a better way to **grow bean sprouts peanuts**.
Frequently Asked Questions (FAQ)
1. What kind of peanuts should I use for sprouting?
The best peanuts for sprouting are raw, unsalted, and unroasted peanuts. Avoid peanuts that have been processed in any way, as these may not sprout properly. Look for peanuts that are specifically labeled as “raw” or “for sprouting.” Organic peanuts are a great choice if you want to avoid pesticides and other chemicals. Make sure the peanuts are fresh and haven’t been sitting on the shelf for too long. Older peanuts may have a lower germination rate.
2. How long does it take for peanut sprouts to grow?
Peanut sprouts typically take 3-5 days to grow to a usable size. The exact time will depend on the temperature and humidity of your environment. Warmer temperatures will generally speed up the sprouting process, while cooler temperatures will slow it down. Keep an eye on your sprouts and harvest them when they reach your desired size.
3. How do I prevent mold from growing on my peanut sprouts?
Mold growth is a common concern when sprouting any type of seed or bean. To prevent mold, it’s crucial to rinse your peanut sprouts thoroughly at least twice a day with fresh, cool water. Ensure proper drainage to prevent water from pooling in the container. Good air circulation is also essential. Avoid overcrowding the sprouts in the container, as this can trap moisture and promote mold growth. If you notice any signs of mold, discard the affected sprouts immediately.
4. Are peanut sprouts safe to eat?
Yes, peanut sprouts are generally safe to eat. However, it’s important to follow proper sprouting techniques to minimize the risk of bacterial contamination. Always use clean water and containers, and rinse the sprouts thoroughly. If you have any concerns about food safety, it’s always best to err on the side of caution and cook the sprouts before eating them. People with peanut allergies should avoid eating peanut sprouts, as they may trigger an allergic reaction.
5. How do I store peanut sprouts?
Peanut sprouts are best consumed fresh, but you can store them in the refrigerator for up to 2-3 days. To store them, rinse them thoroughly and pat them dry with a paper towel. Place them in a clean, airtight container lined with a paper towel to absorb excess moisture. Store them in the crisper drawer of your refrigerator. Check them daily for any signs of spoilage and discard them if they start to smell or look slimy.
6. Can I grow peanut sprouts in soil?
While you can technically grow peanut sprouts in soil, it’s not the most efficient or common method. Sprouting in water is generally easier and faster. If you do choose to grow them in soil, use a well-draining potting mix and keep the soil consistently moist but not waterlogged. Provide adequate sunlight and ventilation.
7. What are the nutritional benefits of peanut sprouts?
Peanut sprouts are a nutritional powerhouse, packed with vitamins, minerals, and enzymes. They are a good source of protein, fiber, and healthy fats. They also contain vitamins B and E, as well as minerals like magnesium, phosphorus, and potassium. Sprouting increases the bioavailability of nutrients, making them easier for your body to absorb. Peanut sprouts are also a good source of antioxidants, which can help protect your cells from damage.
8. Can I use peanut sprouts in cooking?
Absolutely! Peanut sprouts are a versatile ingredient that can be used in a variety of dishes. They can be added to salads, stir-fries, sandwiches, and soups. They can also be eaten raw as a snack. Their nutty flavor and crunchy texture add a unique dimension to any dish. Try experimenting with different recipes to find your favorite ways to use peanut sprouts.
9. My peanut sprouts are bitter. What did I do wrong?
Bitterness in peanut sprouts can sometimes occur due to several factors. One possibility is that the peanuts you used were not fresh or were of poor quality. Another factor could be insufficient rinsing during the sprouting process. Make sure to rinse the sprouts thoroughly at least twice a day to remove any accumulated compounds that can contribute to bitterness. Over-sprouting can also lead to bitterness, so harvest the sprouts when they reach your desired size.
10. Can I grow peanut sprouts indoors year-round?
Yes, you can grow peanut sprouts indoors year-round, regardless of the weather outside. All you need is a suitable container, fresh peanuts, and a little bit of water. Indoor sprouting is a great way to enjoy fresh, healthy sprouts even during the winter months. Just make sure to provide adequate light and ventilation to ensure optimal growth.
Leave a Comment