

Growing Cabbage Without a Garden? Absolutely! I know what you’re thinking: “Cabbage? That’s a farm thing, not a balcony thing!” But trust me, you don’t need acres of land to enjoy the satisfaction of harvesting your own crisp, homegrown cabbage. This DIY guide is your secret weapon to unlocking fresh, delicious cabbage, even if your “garden” is just a sunny windowsill or a small patio.
For centuries, cabbage has been a staple in diets around the world, from the hearty stews of Eastern Europe to the vibrant slaws of North America. Its versatility and nutritional value have made it a beloved vegetable across cultures. But what if you live in an apartment or have limited outdoor space? Does that mean you have to miss out on the joy of growing your own food? Not at all!
That’s where this article comes in. We’re diving deep into the world of container gardening and showing you exactly how to successfully growing cabbage without a garden. Imagine the satisfaction of snipping fresh leaves for your salads or fermenting your own sauerkraut, all from cabbage you nurtured yourself. This DIY trick is a game-changer for urban dwellers and anyone looking to maximize their small spaces. Plus, it’s a fantastic way to reduce your carbon footprint and enjoy fresher, healthier produce. So, let’s get started and transform your limited space into a thriving cabbage patch!
Kohl anbauen ohne Garten: Dein DIY-Guide für den Balkon- oder Terrassenanbau
Hey Gartenfreunde! Wer sagt, dass man einen riesigen Garten braucht, um frischen Kohl anzubauen? Ich zeige euch, wie ihr auch auf dem Balkon oder der Terrasse prächtige Kohlköpfe ernten könnt. Es ist einfacher als ihr denkt und macht super viel Spaß!
Was du brauchst: Die Materialliste
Bevor wir loslegen, hier eine Liste mit allem, was du für dein Kohl-Anbau-Abenteuer brauchst:
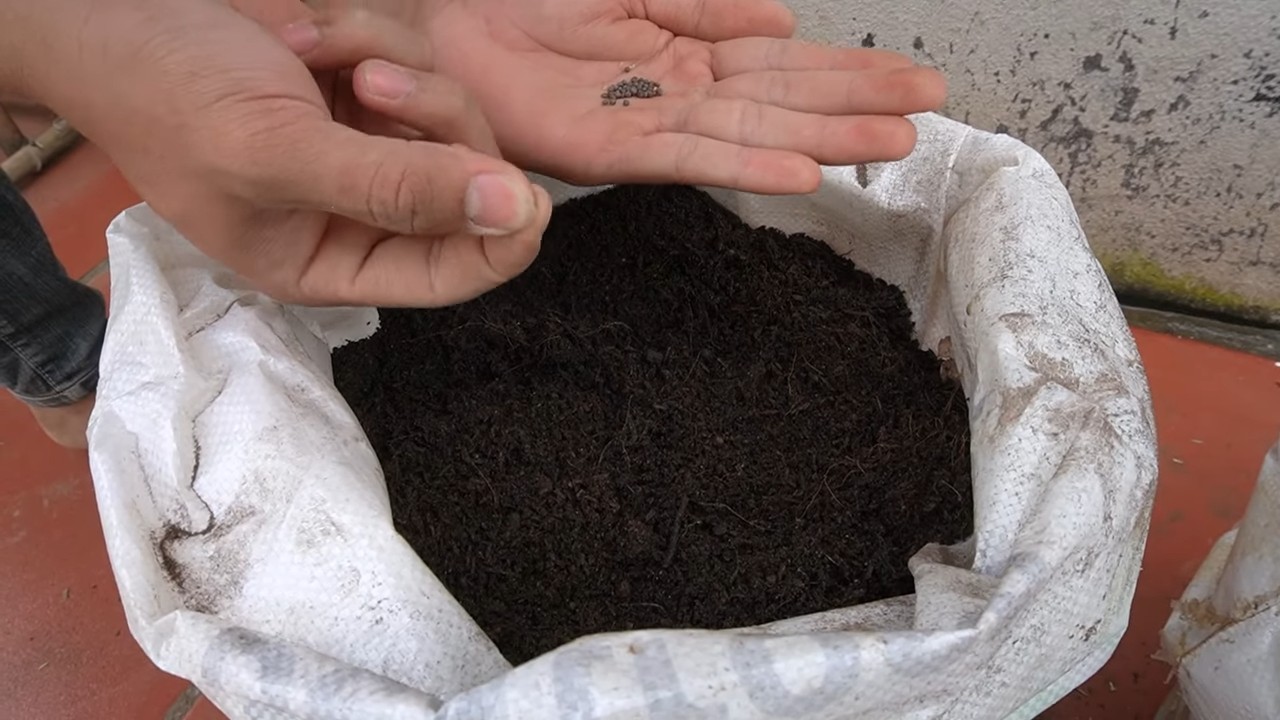
* Kohl-Samen oder Jungpflanzen: Wähle deine Lieblingssorte! Rotkohl, Weißkohl, Wirsing – die Auswahl ist riesig. Jungpflanzen sind einfacher, aber Samen sind günstiger und machen mehr Spaß.
* Große Pflanzgefäße: Kohl braucht Platz! Töpfe oder Kübel mit mindestens 30 Litern Volumen sind ideal. Je größer, desto besser.
* Hochwertige Pflanzerde: Eine gute Basis ist das A und O. Verwende am besten spezielle Gemüseerde oder mische Blumenerde mit Kompost.
* Kompost oder organischer Dünger: Kohl ist ein Starkzehrer und braucht ordentlich Nährstoffe.
* Gießkanne oder Schlauch: Für die regelmäßige Bewässerung.
* Schere oder Messer: Zum Ernten.
* (Optional) Schneckenschutz: Kohl ist leider sehr beliebt bei Schnecken.
* (Optional) Rankhilfe: Bei manchen Kohlsorten kann eine Rankhilfe sinnvoll sein, um die Pflanze zu stützen.
* (Optional) Mulchmaterial: Zum Beispiel Stroh oder Holzhackschnitzel, um die Feuchtigkeit im Boden zu halten und Unkraut zu unterdrücken.
Die Vorbereitung: Der richtige Standort und die Pflanzgefäße
Der Erfolg deines Kohl-Anbauprojekts hängt stark vom Standort und den Pflanzgefäßen ab. Hier ein paar Tipps:
* Sonniger Standort: Kohl liebt die Sonne! Mindestens 6 Stunden direkte Sonneneinstrahlung pro Tag sind ideal.
* Windgeschützter Platz: Zu viel Wind kann die Pflanzen austrocknen und beschädigen.
* Gut durchlässige Erde: Staunässe ist Gift für Kohl. Achte darauf, dass das Wasser gut ablaufen kann.
* Ausreichend große Pflanzgefäße: Wie gesagt, Kohl braucht Platz. Wähle Töpfe oder Kübel mit mindestens 30 Litern Volumen.
* Abzugslöcher: Unbedingt darauf achten, dass die Pflanzgefäße Abzugslöcher haben, damit überschüssiges Wasser ablaufen kann.
* Schwere Töpfe: Volle Kohlköpfe können ganz schön schwer werden. Wähle stabile und schwere Töpfe, damit sie nicht umkippen.
Schritt-für-Schritt-Anleitung: Kohl anbauen auf dem Balkon
Jetzt geht’s ans Eingemachte! Hier ist eine detaillierte Anleitung, wie du deinen eigenen Kohl auf dem Balkon oder der Terrasse anbauen kannst:
1. Samen vorziehen (optional): Wenn du mit Samen startest, solltest du sie am besten im Haus vorziehen. Fülle kleine Anzuchttöpfe mit Anzuchterde und säe die Samen etwa 1 cm tief ein. Halte die Erde feucht und stelle die Töpfe an einen hellen, warmen Ort. Nach etwa 2-3 Wochen sollten die ersten Keimlinge zu sehen sein.
2. Pflanzgefäße vorbereiten: Fülle die Pflanzgefäße mit Pflanzerde. Mische am besten gleich etwas Kompost oder organischen Dünger unter die Erde.
3. Pflanzen oder Pikieren: Wenn du Jungpflanzen gekauft hast, kannst du sie direkt in die Pflanzgefäße setzen. Wenn du Samen vorgezogen hast, musst du die kleinen Pflänzchen pikieren, sobald sie groß genug sind. Das bedeutet, dass du sie vorsichtig aus den Anzuchttöpfen nimmst und in größere Töpfe umpflanzt. Achte darauf, die Wurzeln nicht zu beschädigen.
4. Einpflanzen: Setze die Kohlpflanzen in die Pflanzgefäße. Achte darauf, dass der Wurzelballen vollständig mit Erde bedeckt ist. Der Abstand zwischen den Pflanzen sollte mindestens 40-50 cm betragen, damit sie genügend Platz zum Wachsen haben.
5. Angießen: Gieße die Pflanzen nach dem Einpflanzen gründlich an.
6. Düngen: Kohl ist ein Starkzehrer und braucht regelmäßig Dünger. Dünge die Pflanzen alle 2-3 Wochen mit einem organischen Dünger oder Kompost.
7. Gießen: Gieße die Pflanzen regelmäßig, besonders an heißen Tagen. Die Erde sollte immer leicht feucht sein, aber nicht nass. Vermeide Staunässe.
8. Schnecken bekämpfen: Kohl ist leider sehr beliebt bei Schnecken. Schütze deine Pflanzen mit Schneckenkorn, Schneckenzäunen oder anderen Schneckenabwehrmitteln.
9. Rankhilfe anbringen (optional): Bei manchen Kohlsorten kann eine Rankhilfe sinnvoll sein, um die Pflanze zu stützen.
10. Mulchen (optional): Bedecke die Erde um die Pflanzen mit Mulchmaterial wie Stroh oder Holzhackschnitzel. Das hält die Feuchtigkeit im Boden und unterdrückt Unkraut.
Die Pflege: Was du beachten musst
Damit dein Kohl prächtig gedeiht, ist regelmäßige Pflege wichtig. Hier ein paar Tipps:
* Regelmäßiges Gießen: Achte darauf, dass die Erde immer leicht feucht ist. Gieße am besten morgens oder abends, wenn die Sonne nicht so stark scheint.
* Regelmäßiges Düngen: Kohl ist ein Starkzehrer und braucht regelmäßig Nährstoffe. Dünge die Pflanzen alle 2-3 Wochen mit einem organischen Dünger oder Kompost.
* Unkraut entfernen: Entferne regelmäßig Unkraut, damit es dem Kohl nicht die Nährstoffe wegnimmt.
* Schädlinge bekämpfen: Achte auf Schädlinge wie Schnecken, Kohlweißlinge oder Blattläuse. Bekämpfe sie rechtzeitig mit geeigneten Mitteln.
* Boden lockern: Lockere den Boden regelmäßig auf, damit er gut belüftet ist.
* Verwelkte Blätter entfernen: Entferne regelmäßig verwelkte Blätter, damit die Pflanze ihre Energie in die Bildung des Kohlkopfes stecken kann.
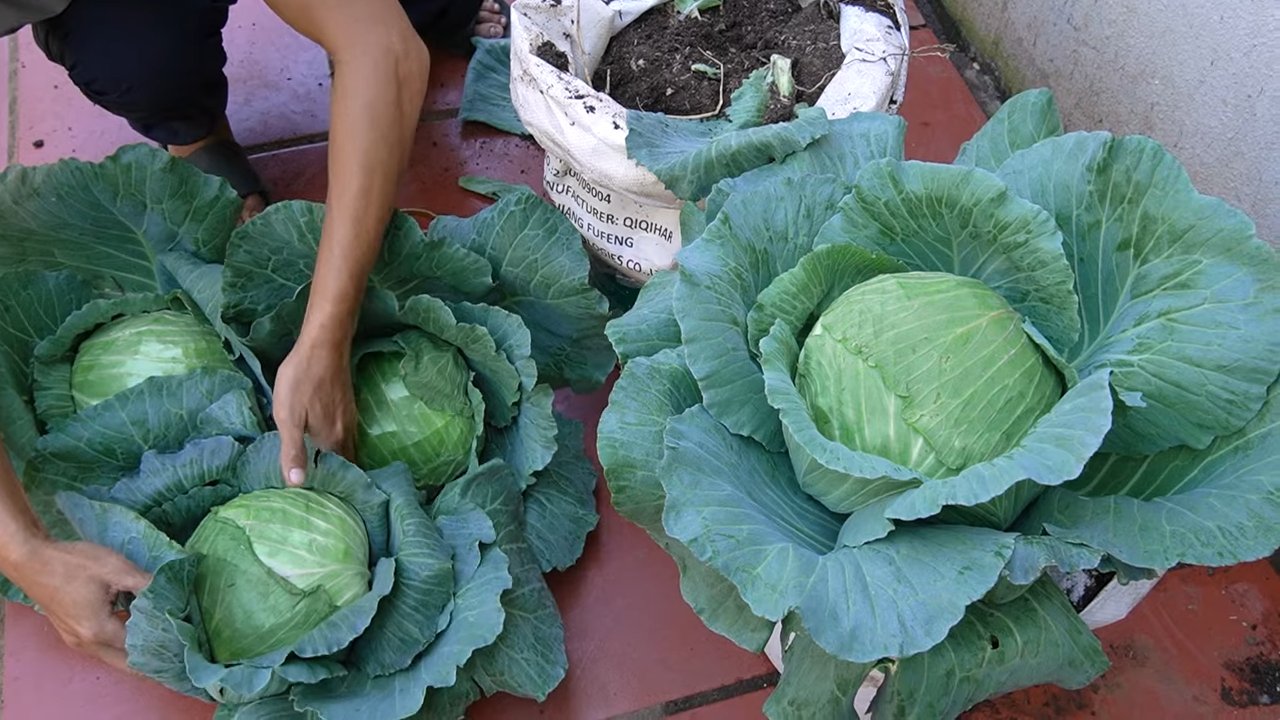
Die Ernte: Wann ist der Kohl reif?
Der Zeitpunkt der Ernte hängt von der Kohlsorte ab. In der Regel ist der Kohl reif, wenn der Kopf fest und geschlossen ist. Drücke leicht auf den Kopf. Wenn er sich fest anfühlt, kannst du ihn ernten.
1. Ernte vorbereiten: Nimm eine scharfe Schere oder ein Messer.
2. Kopf abschneiden: Schneide den Kohlkopf knapp über dem Boden ab.
3. Äußere Blätter entfernen: Entferne die äußeren Blätter, die möglicherweise beschädigt oder welk sind.
4. Genießen: Dein selbst angebauter Kohl ist fertig zum Verzehr!
Häufige Probleme und Lösungen
Auch beim Kohl-Anbau auf dem Balkon können Probleme auftreten. Hier sind einige häufige Probleme und wie du sie lösen kannst:
* Schneckenbefall: Schnecken lieben Kohl! Schütze deine Pflanzen mit Schneckenkorn, Schneckenzäunen oder anderen Schneckenabwehrmitteln.
* Kohlweißlinge: Die Raupen des Kohlweißlings können großen Schaden anrichten. Sammle die Raupen ab oder verwende ein biologisches Insektizid.
* Blattläuse: Blattläuse saugen den Pflanzensaft aus und können die Pflanzen schwächen. Spritze die Pflanzen mit einer Seifenlauge oder einem biologischen Insektizid ab.
* Staunässe: Staunässe kann zu Wurzelfäule führen. Achte darauf, dass das Wasser gut ablaufen kann und gieße nicht zu viel.
* Nährstoffmangel: Nährstoffmangel kann zu gelben Blättern und schlechtem Wachstum führen. Dünge die Pflanzen regelmäßig mit einem organischen Dünger oder Kompost.
Sortenempfehlungen für den Balkon
Nicht alle Kohlsorten eignen sich gleich gut für den Anbau auf dem Balkon. Hier sind ein paar Sorten, die ich empfehlen kann:
* Frühkohl:
Conclusion
So, there you have it! Growing cabbage without a garden isn’t just a whimsical idea; it’s a genuinely achievable and rewarding endeavor. We’ve explored the ins and outs of container gardening, proving that even if you lack a sprawling backyard, you can still enjoy the satisfaction of harvesting your own fresh, crisp cabbage.
Why is this DIY trick a must-try? Because it democratizes gardening. It breaks down the barriers of space and soil limitations, allowing anyone, regardless of their living situation, to participate in the joy of growing their own food. Imagine the pride you’ll feel serving a salad made with cabbage you nurtured from seedling to harvest, all within the confines of your balcony or patio.
Beyond the practical benefits, this method offers a unique connection to nature. It’s a therapeutic activity that allows you to slow down, observe the miracle of growth, and appreciate the simple pleasures of life. Plus, you’ll have access to fresher, more flavorful cabbage than anything you can find at the grocery store.
But the beauty of this DIY approach lies in its adaptability. Feel free to experiment with different varieties of cabbage. Red cabbage adds a vibrant splash of color to your dishes, while savoy cabbage offers a more delicate flavor and texture. You can also try companion planting, adding herbs like rosemary or thyme to your container to deter pests and enhance the flavor of your cabbage. Consider adding marigolds around the base of your cabbage plants; they are known to repel nematodes and other harmful insects.
Don’t be afraid to get creative with your container choices. While we’ve discussed the importance of size and drainage, the aesthetic is entirely up to you. Use repurposed buckets, decorative planters, or even grow bags – whatever suits your style and space. Just remember to ensure adequate drainage to prevent waterlogging, which can be detrimental to your cabbage plants.
And speaking of space, even if you have a small balcony, you can still maximize your growing potential by utilizing vertical gardening techniques. Consider using stacked planters or hanging baskets to create a lush, green oasis.
The key takeaway here is that growing cabbage without a garden is not only possible but also incredibly rewarding. It’s a chance to connect with nature, enjoy fresh, homegrown produce, and add a touch of green to your living space.
We wholeheartedly encourage you to give this DIY trick a try. Start small, learn as you go, and don’t be discouraged by the occasional setback. Gardening is a journey, and every mistake is an opportunity to learn and improve.
Once you’ve harvested your first head of homegrown cabbage, we’d love to hear about your experience! Share your photos, tips, and stories with us in the comments below. Let’s create a community of urban gardeners who are passionate about growing their own food, one container at a time. Your success story might just inspire someone else to embark on their own gardening adventure. So, grab your seeds, soil, and containers, and get ready to experience the joy of growing your own delicious, garden-fresh cabbage, even without a traditional garden! Let’s see those beautiful container gardens!
Frequently Asked Questions (FAQ)
What is the best time of year to plant cabbage in containers?
The best time to plant cabbage depends on your climate. In cooler regions, start seeds indoors 6-8 weeks before the last expected frost and transplant them outdoors after the danger of frost has passed. In warmer climates, you can plant cabbage in the fall for a winter harvest. Cabbage thrives in cooler temperatures, so avoid planting during the hottest months of the year. Consider your local climate and growing season when determining the optimal planting time.
How much sunlight does container-grown cabbage need?
Cabbage requires at least 6 hours of direct sunlight per day to thrive. Choose a location for your containers that receives ample sunlight throughout the day. If you live in a particularly hot climate, some afternoon shade may be beneficial to prevent the leaves from scorching. Monitor your plants closely and adjust their location as needed to ensure they are receiving adequate sunlight.
What type of soil is best for growing cabbage in containers?
Use a well-draining potting mix that is rich in organic matter. Avoid using garden soil, as it can become compacted in containers and hinder drainage. A good potting mix will provide the necessary nutrients and aeration for healthy root growth. You can also amend your potting mix with compost or other organic materials to further improve its fertility.
How often should I water my container-grown cabbage?
Water your cabbage regularly, especially during hot and dry weather. The soil should be kept consistently moist but not waterlogged. Check the soil moisture level regularly by sticking your finger into the soil. If the top inch feels dry, it’s time to water. Avoid overhead watering, as this can increase the risk of fungal diseases. Instead, water at the base of the plant.
What kind of fertilizer should I use for my cabbage plants?
Cabbage is a heavy feeder and requires regular fertilization. Use a balanced fertilizer that is specifically formulated for vegetables. Follow the instructions on the fertilizer package carefully. You can also supplement with organic fertilizers such as compost tea or fish emulsion. Fertilize your cabbage plants every 2-3 weeks during the growing season.
How do I protect my cabbage plants from pests and diseases?
Cabbage plants are susceptible to a variety of pests and diseases, including cabbage worms, aphids, and clubroot. Inspect your plants regularly for signs of infestation or disease. Handpick any pests that you find. You can also use organic pest control methods such as insecticidal soap or neem oil. To prevent diseases, ensure good air circulation around your plants and avoid overhead watering. Crop rotation can also help to reduce the risk of soilborne diseases.
When is cabbage ready to harvest?
Cabbage is typically ready to harvest when the head is firm and compact. The size of the head will vary depending on the variety. To harvest, use a sharp knife to cut the head from the stem. Leave a few outer leaves on the plant to protect the remaining stem. You can store harvested cabbage in the refrigerator for several weeks.
Can I grow different varieties of cabbage in containers?
Yes, you can grow different varieties of cabbage in containers. Consider the size of the mature plant when choosing varieties. Smaller varieties, such as dwarf cabbage, are better suited for container gardening. You can also grow different colored cabbages, such as red or purple cabbage, to add visual interest to your garden.
What are some common problems when growing cabbage in containers and how can I solve them?
Some common problems include pest infestations (cabbage worms, aphids), diseases (clubroot, black rot), and nutrient deficiencies. Regularly inspect your plants for pests and diseases and take appropriate action. Ensure proper drainage to prevent root rot. Fertilize regularly to provide the necessary nutrients. If you encounter specific problems, research the symptoms and implement appropriate solutions.
Can I grow cabbage indoors if I don’t have a balcony or patio?
While it’s more challenging, growing cabbage indoors is possible with the right conditions. You’ll need a very sunny location, ideally a south-facing window, and supplemental lighting may be necessary. Ensure good air circulation and monitor for pests and diseases. Container size and proper watering are even more critical indoors. Be aware that indoor-grown cabbage may not reach the same size as outdoor-grown cabbage.

Leave a Comment