

Growing Chili Peppers in Bottles might sound like something out of a science fiction movie, but trust me, it’s a surprisingly simple and incredibly rewarding way to spice up your life – literally! Have you ever dreamed of having a vibrant, fiery garden, even if you’re short on space or dealing with less-than-ideal soil? Well, this DIY trick is your answer!
The concept of container gardening, including using unconventional containers like bottles, has roots stretching back centuries. From ancient hanging gardens to resourceful communities repurposing materials during times of scarcity, humans have always found innovative ways to cultivate food. Today, with growing concerns about food security and a desire for fresh, homegrown produce, the practice is experiencing a major resurgence.
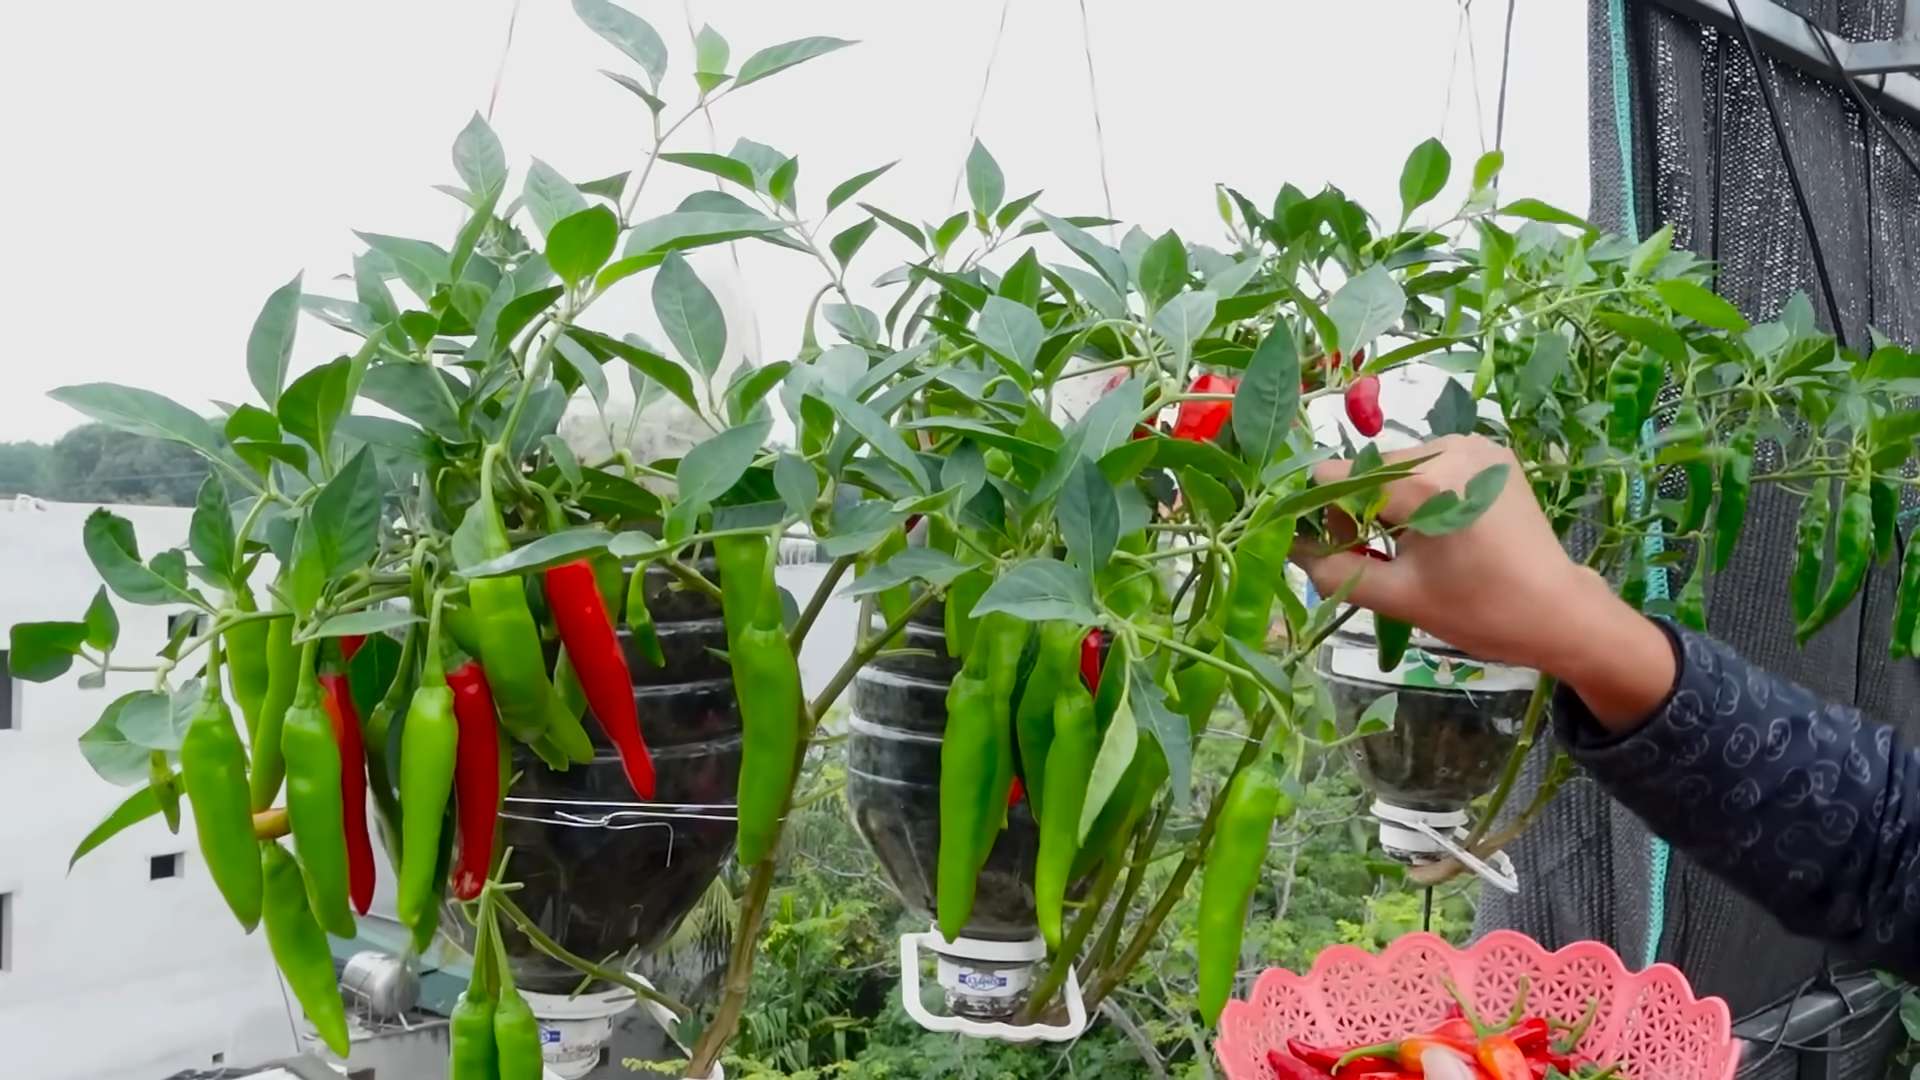
But why chili peppers, and why bottles? Well, chili peppers are a fantastic choice for container gardening because they thrive in warm environments and don’t require vast amounts of space. And bottles? They’re readily available, often free, and offer excellent drainage when properly prepared. Plus, let’s be honest, a wall of colorful chili peppers growing in repurposed bottles is a total conversation starter! I’m going to show you how to make the most of your space and enjoy a bountiful harvest of delicious chili peppers, all while being eco-friendly. This DIY project is perfect for beginners and seasoned gardeners alike. Let’s get started on growing chili peppers in bottles!
Growing Chili Peppers in Bottles: A Fun and Space-Saving DIY Project
Hey there, fellow chili enthusiasts! Are you itching to grow your own fiery peppers but short on garden space? Or maybe you just want a cool, unique way to display your plants? Well, you’ve come to the right place! I’m going to walk you through how to grow chili peppers in bottles – it’s a surprisingly easy and rewarding DIY project. Trust me, even if you don’t have a green thumb, you can totally nail this.
What You’ll Need
Before we dive in, let’s gather our supplies. This is a pretty low-cost project, which is always a win!
* Plastic Bottles: Think soda bottles, water bottles, juice bottles – anything that’s relatively sturdy and clear. I usually go for 2-liter bottles, but smaller ones work too, especially for smaller pepper varieties. Make sure they’re clean!
* Chili Pepper Seeds or Seedlings: This is the fun part! Choose your favorite chili pepper variety. From mild Jalapeños to scorching Habaneros, the choice is yours. You can start from seeds or buy small seedlings from a nursery. I’ve had success with both.
* Potting Mix: Don’t skimp on this! Use a good quality potting mix that’s well-draining. Avoid garden soil, as it can compact too much in a container.
* Scissors or a Utility Knife: For cutting the bottles. Be careful!
* Drill or Nail and Hammer: To create drainage holes.
* Water: Obviously!
* Optional:
* Gravel or Small Stones: For drainage at the bottom of the bottle.
* Plant Food: A balanced liquid fertilizer to give your peppers a boost.
* Gloves: To protect your hands.
* Labels: To keep track of your pepper varieties.
* Decorative Paint: To personalize your bottles.
Preparing the Bottles
This is where we transform those empty bottles into mini-planters.
1. Clean the Bottles: Wash the bottles thoroughly with soap and water to remove any residue. Rinse them well and let them dry completely. This is important to prevent any mold or bacteria from affecting your plants.
2. Cut the Bottles: There are a few ways to do this, depending on the look you’re going for.
* Method 1: Hanging Planter: Cut the bottle in half horizontally. You’ll be using the bottom half as the planter and the top half as a sort of humidity dome (optional).
* Method 2: Standing Planter: Cut a large rectangular opening in the side of the bottle, leaving the bottom intact. This creates a window for your plant to grow out of.
* Method 3: Stacked Planter: Cut the bottom off one bottle and the top off another. Invert the top bottle into the bottom bottle to create a self-watering system (more on this later).
I usually go with Method 1 or 2, as they’re the simplest. If you’re using a utility knife, be extra careful and use a cutting board.
3. Create Drainage Holes: This is crucial! Chili peppers don’t like sitting in soggy soil. Use a drill or a nail and hammer to create several drainage holes in the bottom of the bottle. I usually make about 4-5 holes, depending on the size of the bottle.
4. (Optional) Decorate the Bottles: If you want to add a personal touch, now’s the time to paint or decorate your bottles. Use acrylic paint or permanent markers. Let the paint dry completely before moving on.
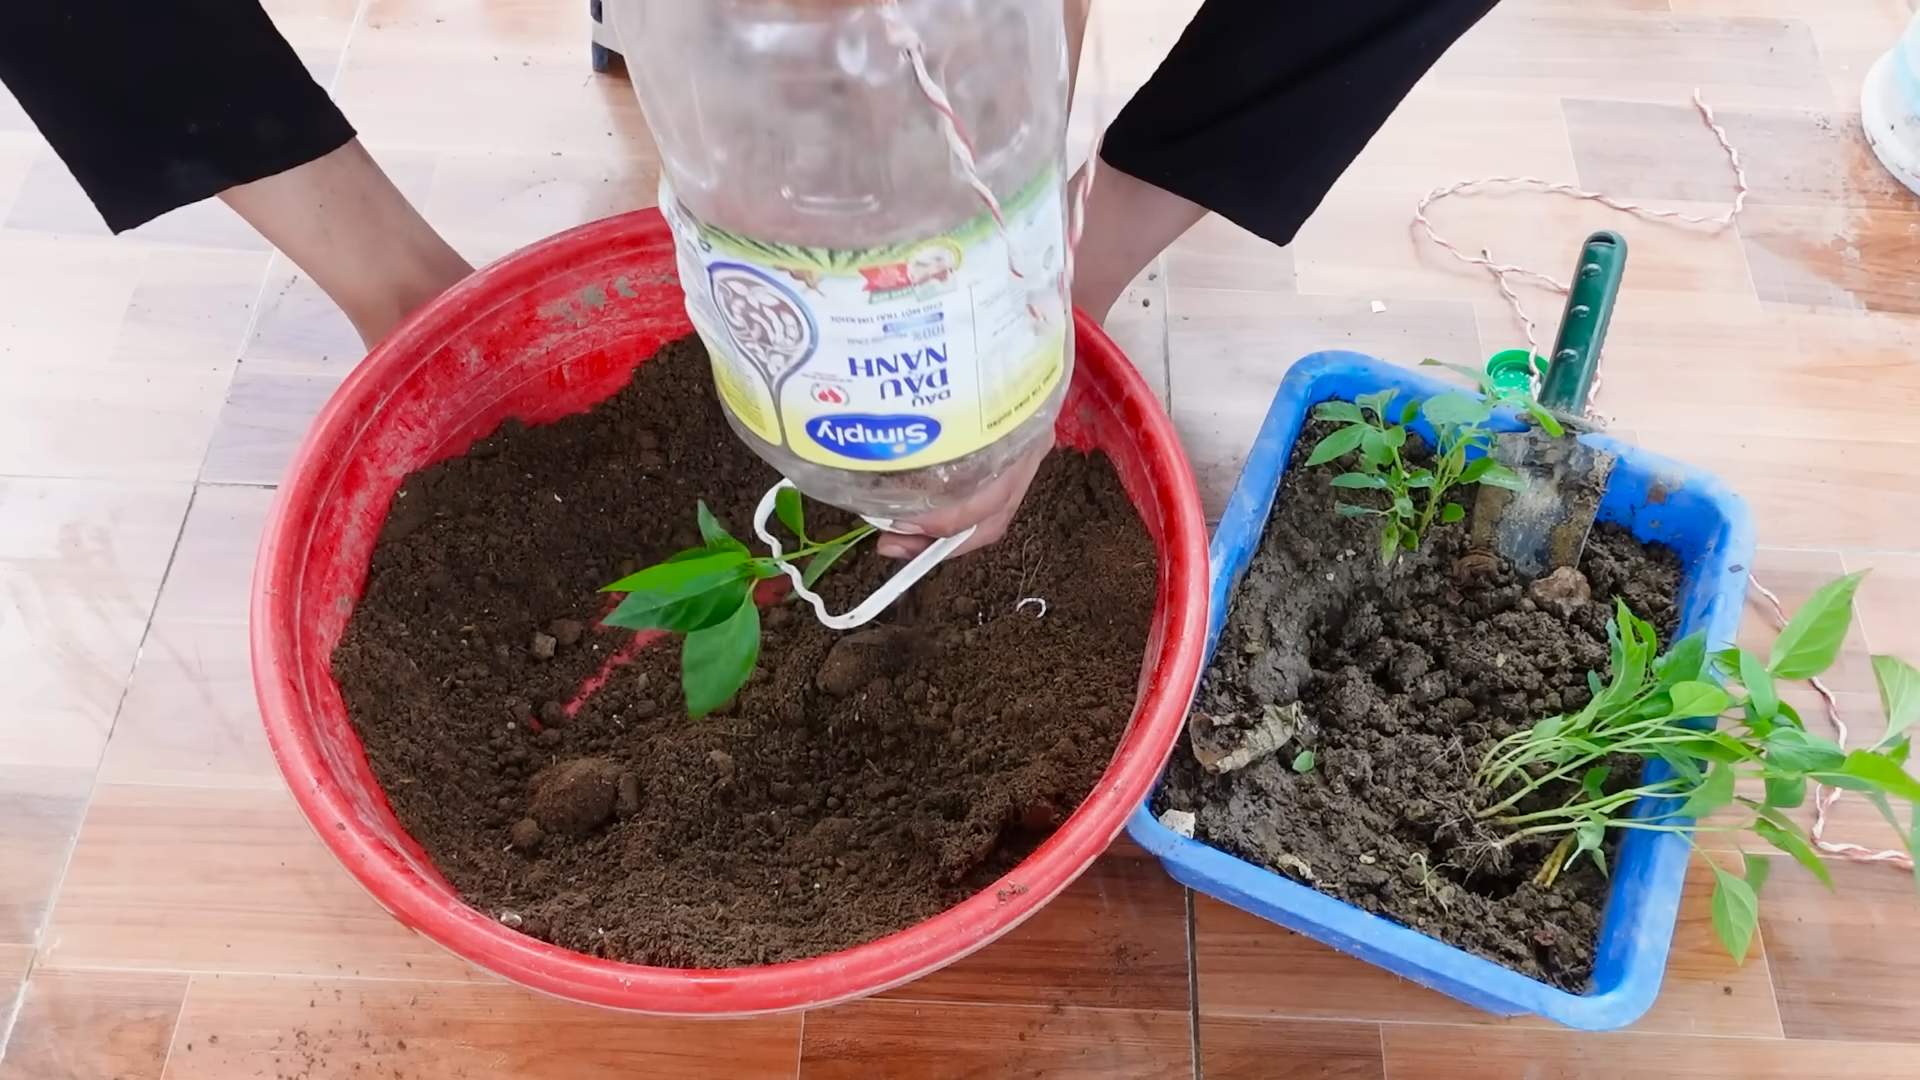
Planting Your Chili Peppers
Now for the exciting part – getting those peppers planted!
1. Add Drainage Material (Optional): If you’re using gravel or small stones, place a layer at the bottom of the bottle. This will help improve drainage and prevent the potting mix from clogging the drainage holes.
2. Fill with Potting Mix: Fill the bottle with potting mix, leaving about an inch or two of space at the top. Gently tap the bottle to settle the soil.
3. Plant the Seeds or Seedlings:
* From Seeds: Make a small indentation in the soil and sow a few seeds. Cover them lightly with potting mix and water gently. Keep the soil moist but not soggy.
* From Seedlings: Gently remove the seedling from its container. Loosen the roots slightly and place the seedling in the center of the bottle. Fill in around the seedling with potting mix and water gently.
I usually plant one seedling per bottle, but you can plant more if you’re using a larger bottle.
4. Water Thoroughly: Water the soil until it’s evenly moist. Don’t overwater!
5. (Optional) Create a Humidity Dome: If you cut the bottle using Method 1, you can place the top half of the bottle over the bottom half to create a humidity dome. This will help the seeds germinate or the seedlings establish themselves. Remove the dome once the plants start to grow.
Caring for Your Chili Peppers
Now that your peppers are planted, it’s time to give them the TLC they need to thrive.
1. Sunlight: Chili peppers need plenty of sunlight – at least 6-8 hours per day. Place your bottles in a sunny location, such as a windowsill, balcony, or patio. If you don’t have enough natural light, you can supplement with a grow light.
2. Watering: Water your chili peppers regularly, but don’t overwater. The soil should be moist but not soggy. Check the soil moisture by sticking your finger into the soil. If the top inch of soil is dry, it’s time to water.
3. Fertilizing: Feed your chili peppers with a balanced liquid fertilizer every 2-3 weeks. Follow the instructions on the fertilizer label. I like to use a fertilizer that’s specifically formulated for tomatoes and peppers.
4. Pest Control: Keep an eye out for pests, such as aphids, spider mites, and whiteflies. If you see any pests, treat them with an insecticidal soap or neem oil.
5. Pruning: Prune your chili peppers to encourage bushier growth and more fruit production. Pinch off the tips of the branches to promote branching. You can also remove any yellow or dead leaves.
6. Pollination: Chili peppers are self-pollinating, but you can help them along by gently shaking the plants or using a small brush to transfer pollen from one flower to another. This is especially important if you’re growing your peppers indoors.
Harvesting Your Chili Peppers
The moment you’ve been waiting for – harvesting your peppers!
1. When to Harvest: The time to harvest your chili peppers depends on the variety and your personal preference. Generally, peppers are ready to harvest when they’ve reached their mature size and color.
2. How to Harvest: Use scissors or pruning shears to cut the peppers from the plant. Be careful not to damage the plant.
3. Enjoy Your Harvest: Use your fresh chili peppers in your favorite recipes. You can also dry them, freeze them, or make chili oil.
Troubleshooting
Even with the best care, you might encounter some problems along the way. Here are a few common issues and how to fix them:
* Yellowing Leaves: This could be a sign of overwatering, underwatering, or nutrient deficiency. Adjust your watering schedule and fertilize your plants.
* Drooping Leaves: This could be a sign of underwatering or heat stress. Water your plants and move them to a cooler location.
* Lack of Fruit: This could be a sign of insufficient sunlight, poor pollination, or nutrient deficiency. Make sure your plants are getting enough sunlight, hand-pollinate the flowers, and fertilize your plants.
* Pests: Treat pests with insecticidal soap or neem oil.
Advanced Techniques: Self-Watering Bottle Planter
Want to take your bottle gardening to the next level? Try creating a self-watering planter! This is especially useful if you tend to forget to water your plants.
1. Cut the Bottles: Cut the bottom off one bottle and the top off another.
2. Invert the Top Bottle: Invert the top bottle (the one with the cap) into the bottom bottle.
3. Add a Wick: Place a cotton rope or strip of fabric through the neck of the inverted bottle, so that one end is submerged in the water in the bottom bottle and the other end is in the potting mix in the top bottle. This will act as a wick, drawing water up to the roots of the plant.
4. Fill with Potting Mix: Fill the top bottle with potting mix.
5. Plant Your Chili Pepper: Plant your chili pepper seedling in the potting mix.
6
Conclusion
So, there you have it! Growing chili peppers in bottles isn’t just a quirky gardening experiment; it’s a surprisingly effective and space-saving method that can bring a fiery touch to even the smallest of living spaces. We’ve walked you through the process, from selecting the right bottle and preparing the soil to nurturing your seedlings and harvesting your spicy bounty.
Why is this DIY trick a must-try? Because it democratizes chili pepper cultivation. You don’t need a sprawling garden or expensive equipment. All you need is a recycled bottle, some basic gardening supplies, and a little patience. It’s an incredibly rewarding experience to watch those tiny seeds sprout and transform into vibrant plants laden with colorful, flavorful peppers. Plus, it’s a fantastic way to reduce waste and contribute to a more sustainable lifestyle.
Beyond the practical benefits, growing chili peppers in bottles offers a unique aesthetic appeal. Imagine a sunny windowsill adorned with rows of bottles, each showcasing a different variety of chili pepper, from the fiery habanero to the milder jalapeño. It’s a conversation starter, a testament to your green thumb, and a beautiful addition to any home.
Ready to take your chili pepper game to the next level? Consider these variations and suggestions:
* Experiment with different bottle sizes and shapes: While standard plastic bottles work well, you can also use glass bottles, mason jars, or even repurposed containers like milk jugs. Just ensure they have adequate drainage.
* Try different chili pepper varieties: From sweet bell peppers to scorching ghost peppers, the possibilities are endless. Research the specific needs of each variety to ensure optimal growth.
* Add companion plants: Basil, oregano, and marigolds are excellent companion plants for chili peppers, helping to deter pests and improve flavor.
* Get creative with your bottle decorations: Paint your bottles, add labels, or even create miniature trellises to support your plants.
* Consider hydroponics: For a more advanced approach, explore hydroponic systems using nutrient-rich water instead of soil.
Growing chili peppers in bottles is more than just a gardening project; it’s an opportunity to connect with nature, learn new skills, and enjoy the fruits (or rather, the peppers!) of your labor. It’s a chance to experience the satisfaction of nurturing a plant from seed to harvest, all within the confines of a recycled bottle.
We are confident that you will find this method of growing chili peppers both enjoyable and productive. Don’t be afraid to experiment, adapt, and personalize the process to suit your own preferences and resources.
Now, it’s your turn! We encourage you to try this DIY trick and share your experience with us. Post photos of your bottle gardens on social media using #BottleChiliPeppers and tag us so we can see your amazing creations. We can’t wait to see what you grow!
Frequently Asked Questions (FAQ)
What type of bottles are best for growing chili peppers?
The best bottles for growing chili peppers are typically made of plastic, as they are lightweight, durable, and readily available. However, glass bottles can also be used, especially for aesthetic purposes. The size of the bottle depends on the chili pepper variety; smaller varieties like Thai chilies can thrive in smaller bottles (1-2 liters), while larger varieties like bell peppers may require larger bottles (3-5 liters). Ensure the bottle is clean and has drainage holes at the bottom to prevent waterlogging.
How do I prepare the soil for growing chili peppers in bottles?
The ideal soil for chili peppers is well-draining and rich in nutrients. A good mix consists of equal parts potting soil, compost, and perlite or vermiculite. The potting soil provides a base for the plant, the compost adds essential nutrients, and the perlite or vermiculite improves drainage and aeration. Avoid using garden soil, as it can be too heavy and may contain pests or diseases. Before planting, moisten the soil mix thoroughly.
How often should I water my chili pepper plants in bottles?
Watering frequency depends on several factors, including the climate, the size of the bottle, and the type of soil. Generally, chili pepper plants need to be watered when the top inch of soil feels dry to the touch. Avoid overwatering, as this can lead to root rot. During hot weather, you may need to water daily, while during cooler weather, you may only need to water every few days. Ensure the water drains freely from the drainage holes at the bottom of the bottle.
What kind of sunlight do chili pepper plants need?
Chili pepper plants thrive in full sunlight, requiring at least 6-8 hours of direct sunlight per day. If you are growing your plants indoors, place them near a sunny window or use grow lights to supplement natural light. Insufficient sunlight can lead to leggy growth, reduced flowering, and smaller peppers. Rotate the bottles regularly to ensure all sides of the plant receive adequate sunlight.
How do I fertilize my chili pepper plants in bottles?
Chili pepper plants are heavy feeders and benefit from regular fertilization. Use a balanced liquid fertilizer (e.g., 10-10-10) diluted to half strength every 2-3 weeks. Alternatively, you can use a slow-release granular fertilizer at the time of planting. Avoid over-fertilizing, as this can burn the roots. During the flowering and fruiting stages, you can switch to a fertilizer with a higher phosphorus content to promote pepper production.
How do I protect my chili pepper plants from pests and diseases?
Regularly inspect your plants for signs of pests and diseases. Common pests include aphids, spider mites, and whiteflies. These can be controlled with insecticidal soap or neem oil. Diseases such as powdery mildew and fungal infections can be prevented by ensuring good air circulation and avoiding overwatering. If you notice any signs of disease, remove the affected leaves or plants immediately.
When and how do I harvest my chili peppers?
The time to harvest chili peppers depends on the variety and your personal preference. Generally, peppers are ready to harvest when they have reached their mature color and size. Use scissors or pruning shears to cut the peppers from the plant, leaving a small stem attached. Handle the peppers carefully to avoid bruising.
Can I overwinter my chili pepper plants in bottles?
Yes, you can overwinter your chili pepper plants in bottles, especially if you live in a colder climate. Before the first frost, bring your plants indoors and place them in a sunny location. Reduce watering and fertilization during the winter months. You may need to prune the plants back to encourage new growth in the spring.
What are some common problems when growing chili peppers in bottles and how can I fix them?
Some common problems include:
* Yellowing leaves: This can be caused by overwatering, underwatering, nutrient deficiencies, or pest infestations. Adjust your watering schedule, fertilize regularly, and inspect for pests.
* Lack of flowering: This can be caused by insufficient sunlight, over-fertilizing with nitrogen, or extreme temperatures. Provide adequate sunlight, use a balanced fertilizer, and maintain a consistent temperature.
* Pepper drop: This can be caused by inconsistent watering, extreme temperatures, or lack of pollination. Water regularly, maintain a consistent temperature, and hand-pollinate the flowers if necessary.
* Root rot: This is caused by overwatering and poor drainage. Ensure the bottle has adequate drainage holes and avoid overwatering.
Can I grow different varieties of chili peppers in the same bottle?
While it’s technically possible to grow different varieties of chili peppers in the same bottle, it’s generally not recommended. Different varieties may have different growth rates, nutrient requirements, and susceptibility to pests and diseases. Growing them together can lead to competition and reduced yields. It’s best to grow each variety in its own separate bottle.
Leave a Comment