

Growing Gourds Indoors might sound like a whimsical dream, conjuring images of sprawling vines taking over your living room. But trust me, it’s a surprisingly achievable and rewarding DIY project! For centuries, gourds have held a special place in cultures around the world, from being used as practical tools like bowls and dippers to becoming cherished decorative items and musical instruments. Think of the vibrant Day of the Dead decorations in Mexico or the intricate carvings on gourds in African art – these traditions highlight the gourd’s versatility and beauty.
But why should you consider growing gourds indoors? Well, maybe you live in an apartment with limited outdoor space, or perhaps your growing season is too short to allow gourds to fully mature outside. Whatever the reason, I’m here to show you that with a little know-how and some clever DIY tricks, you can successfully cultivate these fascinating plants right in the comfort of your own home. Imagine the satisfaction of harvesting your own unique gourds, ready to be transformed into birdhouses, ornaments, or even just eye-catching decorations. This article will provide you with the essential tips and hacks to make growing gourds indoors a fun and fulfilling experience. Let’s get started!
Growing Gourds Indoors: A Comprehensive DIY Guide
Okay, so you want to grow gourds indoors? Awesome! It’s totally doable, and I’m here to walk you through the whole process. It might seem a little intimidating at first, but trust me, with a little patience and the right setup, you’ll be harvesting your own homegrown gourds in no time. Let’s get started!
Choosing Your Gourd Variety
First things first, you need to decide what kind of gourd you want to grow. Not all gourds are created equal, especially when it comes to indoor growing. Some varieties are just too big and sprawling for a confined space. Here are a few good options to consider:
* Miniature Gourds: These are your best bet for indoor growing. They come in all sorts of fun shapes and colors, and they don’t require a ton of space. Think about growing apple gourds, pear gourds, or even swan gourds.
* Ornamental Gourds: These are grown for their decorative appeal. They’re usually smaller and easier to manage indoors than larger varieties.
* Luffa Gourds (Loofah): Yes, the same ones you use in the shower! These can be grown indoors, but they do require a bit more space and a sturdy trellis.
Gathering Your Supplies
Before you even think about planting, you need to make sure you have everything you need. Here’s a checklist to get you started:
* Gourd Seeds: Obviously! Make sure you get them from a reputable source.
* Seed Starting Trays or Small Pots: These are perfect for getting your seeds started.
* Seed Starting Mix: This is a light, airy soil mix that’s ideal for seedlings.
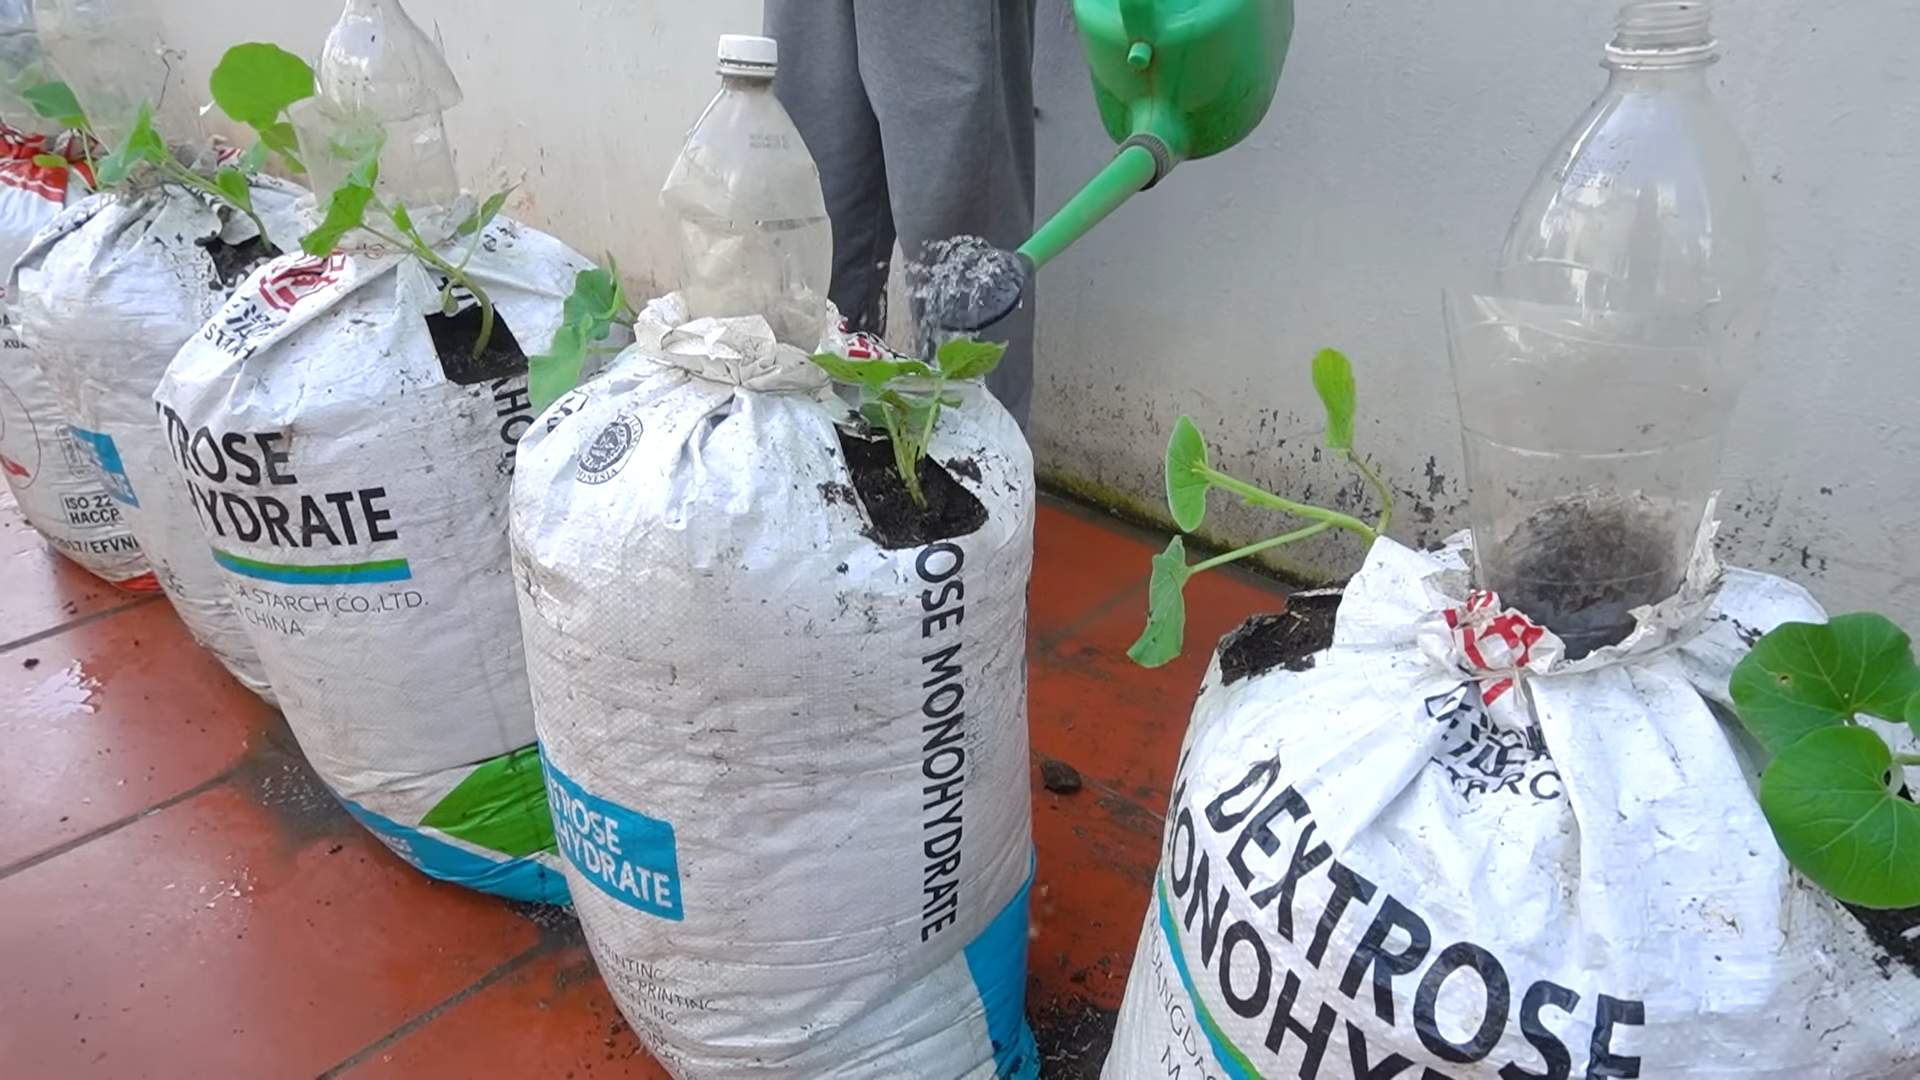
* Larger Pots: Once your seedlings are big enough, you’ll need to transplant them into larger pots. Aim for at least 5-gallon pots, but bigger is always better.
* Potting Soil: Use a good quality potting soil that drains well.
* Grow Lights: Gourds need a lot of light, especially indoors. Invest in some good quality grow lights. LED grow lights are energy-efficient and work great.
* Trellis or Support System: Gourds are vines, so they need something to climb on. A trellis, stakes, or even a sturdy tomato cage will work.
* Fertilizer: A balanced fertilizer will help your gourds grow strong and healthy.
* Watering Can or Hose: For watering, of course!
* Spray Bottle: For misting your seedlings.
* Gloves: To protect your hands.
* Pruning Shears: For trimming and shaping your gourd vines.
Starting Your Seeds
Okay, now for the fun part! Let’s get those seeds started.
1. Soak Your Seeds: Soak your gourd seeds in warm water for 24 hours before planting. This will help soften the seed coat and improve germination rates.
2. Prepare Your Seed Starting Trays: Fill your seed starting trays or small pots with seed starting mix. Moisten the mix with water, but don’t soak it.
3. Plant Your Seeds: Plant your seeds about 1 inch deep in the soil. Place one or two seeds in each cell or pot.
4. Cover and Mist: Gently cover the seeds with soil and mist the surface with water.
5. Provide Warmth: Gourds need warmth to germinate. Place your seed starting trays in a warm location, such as on top of your refrigerator or on a heat mat.
6. Wait Patiently: Germination usually takes about 7-14 days. Keep the soil moist but not soggy.
Transplanting Your Seedlings
Once your seedlings have developed a few sets of true leaves (the leaves that look like miniature versions of the adult leaves), it’s time to transplant them into larger pots.
1. Prepare Your Larger Pots: Fill your larger pots with potting soil.
2. Carefully Remove Seedlings: Gently remove the seedlings from the seed starting trays, being careful not to damage the roots.
3. Plant Seedlings: Plant each seedling in its own pot, making sure the top of the root ball is level with the soil surface.
4. Water Thoroughly: Water the seedlings thoroughly after transplanting.
5. Provide Support: Install your trellis or support system in the pot.
Providing the Right Environment
Gourds need the right environment to thrive indoors. Here’s what you need to keep in mind:
* Light: Gourds need at least 6-8 hours of direct light per day. If you don’t have enough natural light, use grow lights. Position the grow lights about 6-12 inches above the plants.
* Temperature: Gourds prefer warm temperatures, between 70-80°F (21-27°C).
* Humidity: Gourds like moderate humidity. You can increase humidity by misting your plants regularly or using a humidifier.
* Air Circulation: Good air circulation is important to prevent fungal diseases. Use a fan to circulate the air around your plants.
Watering and Fertilizing
Watering and fertilizing are crucial for healthy gourd growth.
1. Watering: Water your gourds regularly, keeping the soil consistently moist but not soggy. Water when the top inch of soil feels dry to the touch. Avoid overwatering, as this can lead to root rot.
2. Fertilizing: Fertilize your gourds every 2-3 weeks with a balanced fertilizer. Follow the instructions on the fertilizer label.
Pruning and Training
Pruning and training are important for managing your gourd vines and encouraging fruit production.
1. Pruning: Prune your gourd vines to remove any dead or damaged leaves and stems. You can also prune to control the size and shape of the vines.
2. Training: Train your gourd vines to climb your trellis or support system. Use plant ties or clips to secure the vines to the support.
Pollinating Your Gourds
Gourds are typically pollinated by bees and other insects. Since you’re growing them indoors, you’ll need to hand-pollinate them.
1. Identify Male and Female Flowers: Male flowers have a long, thin stem, while female flowers have a small, immature gourd at the base.
2. Pollinate in the Morning: Pollinate your gourds in the morning, when the flowers are open.
3. Transfer Pollen: Use a small paintbrush or cotton swab to transfer pollen from the male flower to the female flower. Gently brush the pollen onto the stigma (the sticky part) of the female flower.
4. Repeat Daily: Repeat the pollination process daily until the female flower starts to develop into a gourd.
Dealing with Pests and Diseases
Even indoors, your gourds can be susceptible to pests and diseases. Here are a few common problems and how to deal with them:
* Aphids: These tiny insects suck the sap from plants. You can control aphids by spraying them with insecticidal soap or neem oil.
* Spider Mites: These tiny pests create webs on plants and suck the sap. You can control spider mites by spraying them with insecticidal soap or neem oil. Increasing humidity can also help.
* Powdery Mildew: This fungal disease causes a white, powdery coating on leaves. You can prevent powdery mildew by providing good air circulation and avoiding overhead watering. Treat powdery mildew with a fungicide.
* Root Rot: This fungal disease causes roots to rot. You can prevent root rot by avoiding overwatering and using well-draining soil.
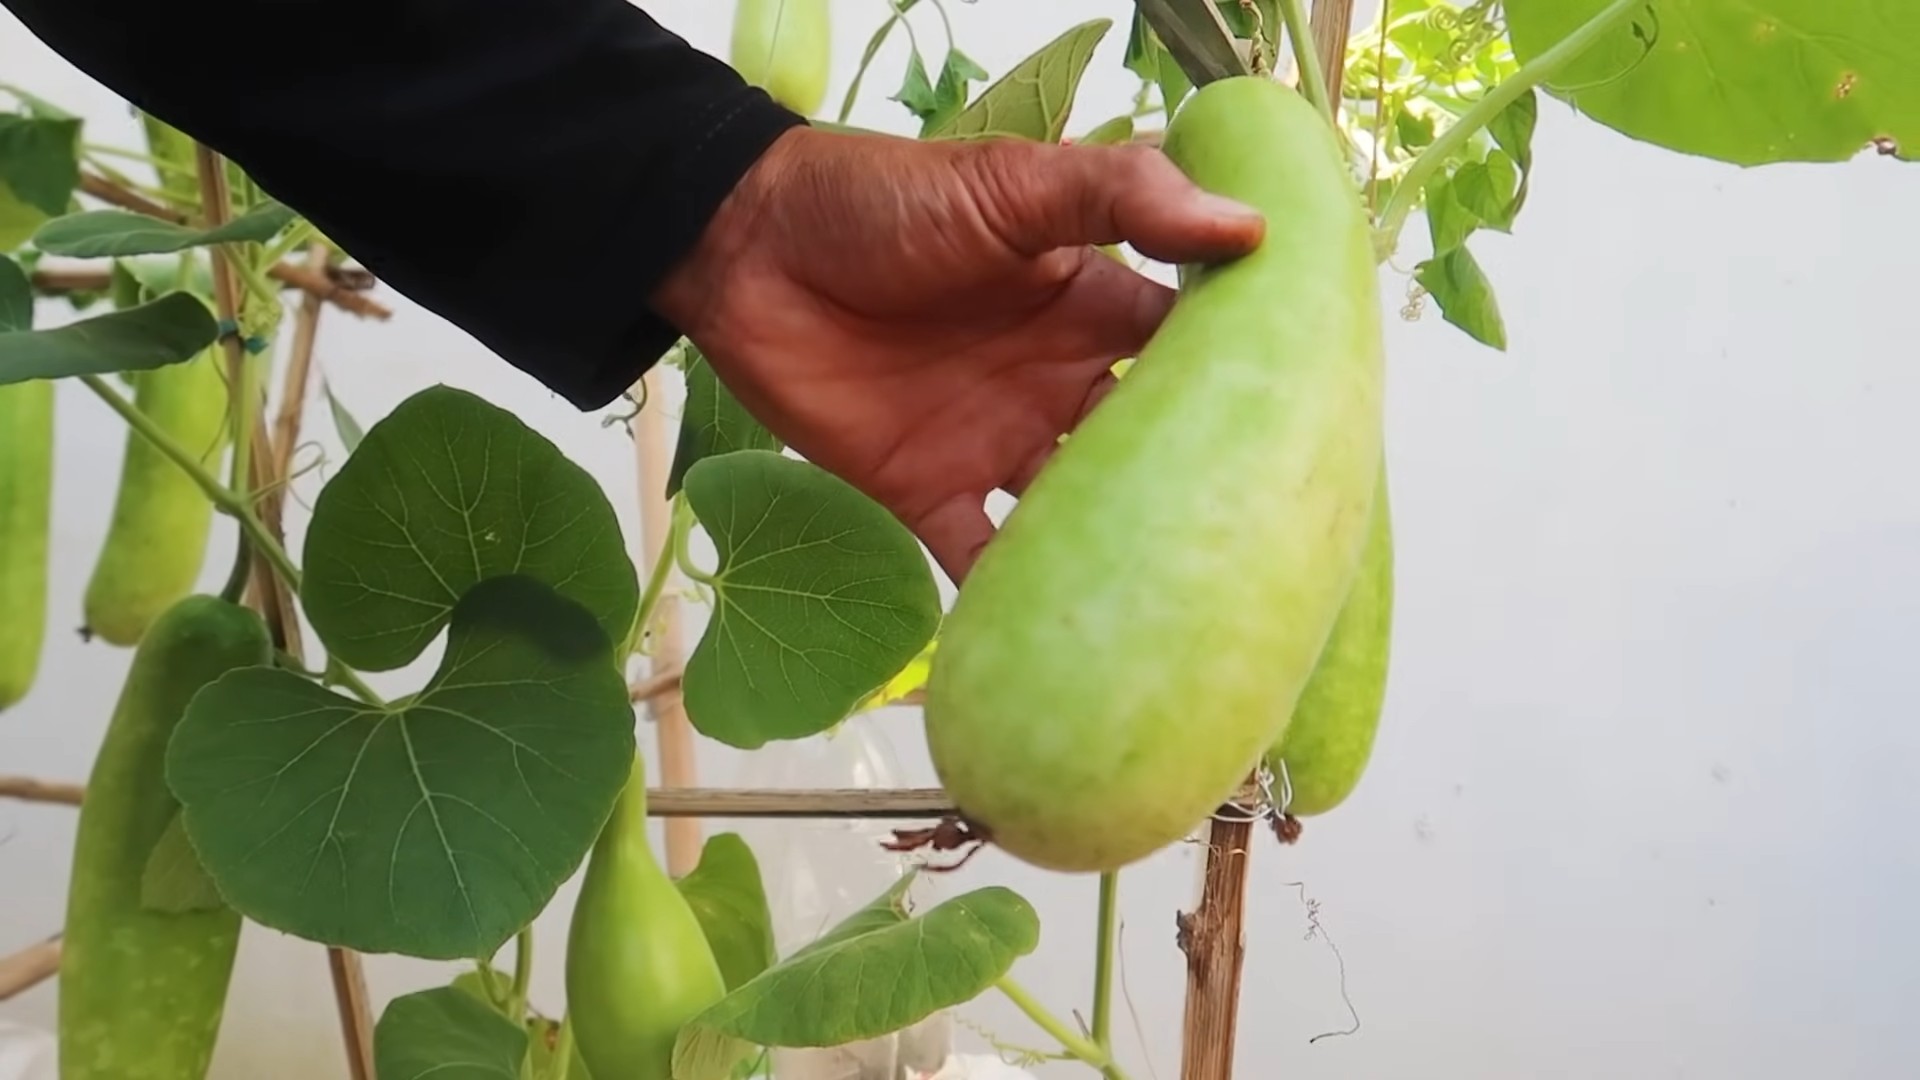
Harvesting Your Gourds
The time it takes for gourds to mature depends on the variety. Generally, gourds are ready to harvest when the stem connecting the gourd to the vine starts to dry out and turn brown.
1. Cut the Stem: Use pruning shears to cut the stem about 2 inches above the gourd.
2. Handle with Care: Handle the gourds carefully to avoid bruising them.
3. Curing Your Gourds: Curing is essential for preserving your gourds. Place the gourds in a warm, dry, well-ventilated area for several weeks until the outer skin hardens. Turn the gourds regularly to ensure even drying.
Enjoying Your Homegrown Gourds
Once your gourds are cured, you can use them for all sorts of crafts and decorations. Paint them, carve them, or simply display them as is. The possibilities are endless!
Growing gourds indoors can be a rewarding experience. With a little bit of effort, you can enjoy the beauty and bounty of these unique plants year-round. Happy growing!
Conclusion
So, there you have it! Growing gourds indoors might seem like a whimsical endeavor, but with a little patience, the right setup, and these simple DIY tricks, you can cultivate your own miniature gourd patch right in your home. Forget relying solely on the unpredictable outdoor elements; indoor gourd growing puts you firmly in control of the environment, allowing you to nurture these fascinating plants from seed to harvest, regardless of the season.
Why is this a must-try? Because it opens up a world of creative possibilities. Imagine adorning your home with unique, handcrafted decorations grown with your own two hands. Think of the satisfaction of gifting personalized gourds to friends and family, each one a testament to your green thumb and artistic flair. And let’s not forget the sheer joy of watching these unusual plants thrive under your care.
But the benefits extend beyond mere aesthetics. Growing gourds indoors offers a fantastic educational opportunity, especially for children. It’s a hands-on lesson in botany, patience, and the wonders of nature. Plus, it’s a rewarding way to connect with the earth, even when you’re confined to the indoors.
Ready to take your indoor gourd growing to the next level? Consider experimenting with different gourd varieties. Bottle gourds, birdhouse gourds, and ornamental gourds all offer unique shapes and sizes, allowing you to create a diverse and visually stunning collection. You can also explore different training techniques to shape your gourds as they grow. Try using trellises or supports to guide their vines and create interesting patterns.
Another fun variation is to incorporate companion planting into your indoor gourd garden. Herbs like basil and marigolds can help deter pests and attract beneficial insects, creating a healthier and more vibrant growing environment. You can also experiment with different soil mixes and fertilizers to optimize your gourd’s growth and yield.
Don’t be afraid to get creative with your gourd projects after harvest. From painting and carving to crafting birdhouses and musical instruments, the possibilities are endless. Let your imagination run wild and transform your homegrown gourds into unique works of art.
We strongly encourage you to embark on this exciting journey of growing gourds indoors. It’s a rewarding and fulfilling experience that will bring beauty, creativity, and a touch of nature into your home. And most importantly, don’t keep your success (or your challenges!) to yourself. Share your experiences, tips, and photos with us in the comments below. We’d love to see your indoor gourd gardens and learn from your unique perspectives. Let’s create a community of indoor gourd enthusiasts and inspire others to discover the magic of growing these fascinating plants indoors. So, grab your seeds, prepare your pots, and get ready to experience the joy of growing gourds indoors!
Frequently Asked Questions (FAQ)
What are the best gourd varieties to grow indoors?
While many gourd varieties can be grown indoors, some are better suited than others due to their size and growth habits. Smaller ornamental gourds, such as apple gourds, pear gourds, and spoon gourds, are excellent choices for indoor growing. These varieties tend to be more compact and easier to manage in a limited space. Bottle gourds and birdhouse gourds can also be grown indoors, but they require more space and a sturdy support system due to their larger size and vigorous growth. Consider starting with smaller varieties and gradually experimenting with larger ones as you gain experience. Always check the seed packet for specific information on the size and growth requirements of each variety.
How much light do gourds need when grown indoors?
Gourds are sun-loving plants and require plenty of light to thrive. Ideally, they need at least 6-8 hours of direct sunlight per day. If you don’t have a sunny window, you can supplement with artificial grow lights. Full-spectrum LED grow lights are an excellent option as they provide the necessary wavelengths of light for healthy plant growth. Position the grow lights about 6-12 inches above the plants and adjust as needed to prevent scorching. Monitor your plants closely and adjust the light intensity and duration as needed based on their growth and appearance. Pale or leggy growth can indicate insufficient light.
What type of soil is best for growing gourds indoors?
Gourds prefer well-draining soil that is rich in organic matter. A good potting mix for gourds should consist of equal parts of peat moss, perlite, and compost. Peat moss helps retain moisture, perlite improves drainage, and compost provides essential nutrients. You can also add a slow-release fertilizer to the soil mix to provide a steady supply of nutrients throughout the growing season. Avoid using heavy clay soils, as they can become waterlogged and lead to root rot. Ensure that your pots have drainage holes to prevent water from accumulating at the bottom.
How often should I water my indoor gourds?
Watering frequency depends on several factors, including the size of the pot, the type of soil, and the ambient temperature and humidity. Generally, you should water your gourds when the top inch of soil feels dry to the touch. Water thoroughly until water drains out of the drainage holes. Avoid overwatering, as this can lead to root rot. During hot and dry periods, you may need to water more frequently. Check the soil moisture regularly and adjust your watering schedule accordingly. Consider using a moisture meter to accurately assess the soil moisture level.
How do I pollinate my gourds indoors?
Gourds are typically pollinated by insects, such as bees and butterflies. Since these pollinators may not be present indoors, you will need to hand-pollinate your gourds. To hand-pollinate, use a small paintbrush or cotton swab to collect pollen from the male flowers (those with a long, slender stem) and transfer it to the female flowers (those with a small, immature gourd at the base). The best time to hand-pollinate is in the morning when the flowers are fully open. Repeat the process for several days to ensure successful pollination. You can identify male and female flowers by their appearance. Male flowers have a stamen covered in pollen, while female flowers have a pistil and a small, immature gourd at the base.
What are some common pests and diseases that affect indoor gourds?
Common pests that can affect indoor gourds include aphids, spider mites, and whiteflies. These pests can suck the sap from the plants, causing them to weaken and become discolored. To control these pests, you can use insecticidal soap, neem oil, or horticultural oil. Apply these treatments according to the manufacturer’s instructions. Common diseases that can affect indoor gourds include powdery mildew and fungal leaf spots. These diseases can cause white, powdery patches or dark spots to appear on the leaves. To prevent these diseases, ensure good air circulation and avoid overwatering. You can also use a fungicide to control these diseases.
How long does it take for gourds to mature indoors?
The time it takes for gourds to mature indoors depends on the variety and growing conditions. Generally, it takes about 90-120 days from planting to harvest. However, some varieties may mature faster or slower. Monitor your gourds closely and harvest them when they are fully mature and the skin is hard and dry. You can test the maturity of a gourd by tapping it. A mature gourd will sound hollow.
How do I cure gourds after harvesting them indoors?
Curing is an essential step in preserving gourds after harvest. To cure gourds, wash them with soapy water and dry them thoroughly. Then, place them in a well-ventilated area with good air circulation. Avoid placing them in direct sunlight, as this can cause them to crack. Turn the gourds regularly to ensure even drying. The curing process can take several weeks to several months, depending on the size and thickness of the gourd. A properly cured gourd will be hard, lightweight, and resistant to decay.
Can I grow gourds indoors year-round?
Yes, you can grow gourds indoors year-round, provided you have the right growing conditions. With adequate light, temperature, and humidity, you can successfully cultivate gourds indoors regardless of the season. However, you may need to adjust your growing practices based on the time of year. For example, you may need to provide supplemental heat during the winter months and increase ventilation during the summer months.
Leave a Comment