

Growing Kohlrabi on Balcony? Absolutely! Imagine stepping onto your balcony and harvesting fresh, crisp kohlrabi, ready to be enjoyed in a salad or stir-fry. Sounds dreamy, right? Well, it doesn’t have to be just a dream! This often-overlooked vegetable, with its unique flavor and texture, is surprisingly well-suited for container gardening, making it perfect for balcony spaces.
Kohlrabi, sometimes called a “German turnip,” has a fascinating history, dating back to the Roman Empire. While not as widely cultivated as other vegetables, it’s a staple in many European cuisines and is gaining popularity worldwide for its nutritional benefits and versatility. But why should you bother growing it on your balcony? Well, for starters, fresh, homegrown produce always tastes better! Plus, with concerns about food miles and the desire for more sustainable living, growing kohlrabi on balcony is a fantastic way to reduce your environmental impact and connect with nature, even in a small space.
In this DIY guide, I’ll walk you through everything you need to know to successfully cultivate kohlrabi on your balcony, from choosing the right containers and soil to providing the proper care and harvesting your delicious crop. Get ready to transform your balcony into a mini-vegetable garden and enjoy the satisfaction of growing your own food!
Growing Kohlrabi on Your Balcony: A Beginner’s Guide
Hey there, fellow balcony gardeners! I’m so excited to share my experience growing kohlrabi right here on my little urban oasis. Kohlrabi, sometimes called a German turnip, is a fantastic and often overlooked vegetable. It’s got a mild, slightly sweet flavor, and the texture is somewhere between a turnip and a broccoli stem. Plus, it’s packed with nutrients! The best part? It’s totally doable to grow in containers on your balcony. Let’s dive in!
Choosing the Right Kohlrabi Variety
First things first, you need to pick your kohlrabi variety. Not all kohlrabi are created equal, especially when it comes to container gardening. Here are a few of my favorites that thrive in pots:
* Early White Vienna: This is a classic choice. It matures quickly (around 45-55 days) and produces a mild-flavored, pale green bulb. It’s reliable and a great option for beginners.
* Early Purple Vienna: Similar to the white variety, but with a beautiful purple skin. The flavor is just as good, and the color adds a nice visual element to your balcony garden.
* Grand Duke: This hybrid variety is known for its disease resistance and uniform bulb size. It’s a good choice if you’ve had issues with pests or diseases in the past.
* Kossak: If you’re looking for a larger kohlrabi, Kossak is the way to go. It can grow quite large without becoming woody or tough. Just make sure you have a big enough container!
Gathering Your Supplies
Before you start planting, you’ll need to gather all your supplies. This will make the whole process much smoother and more enjoyable. Here’s what you’ll need:
* Kohlrabi seeds: Choose your variety based on the recommendations above.
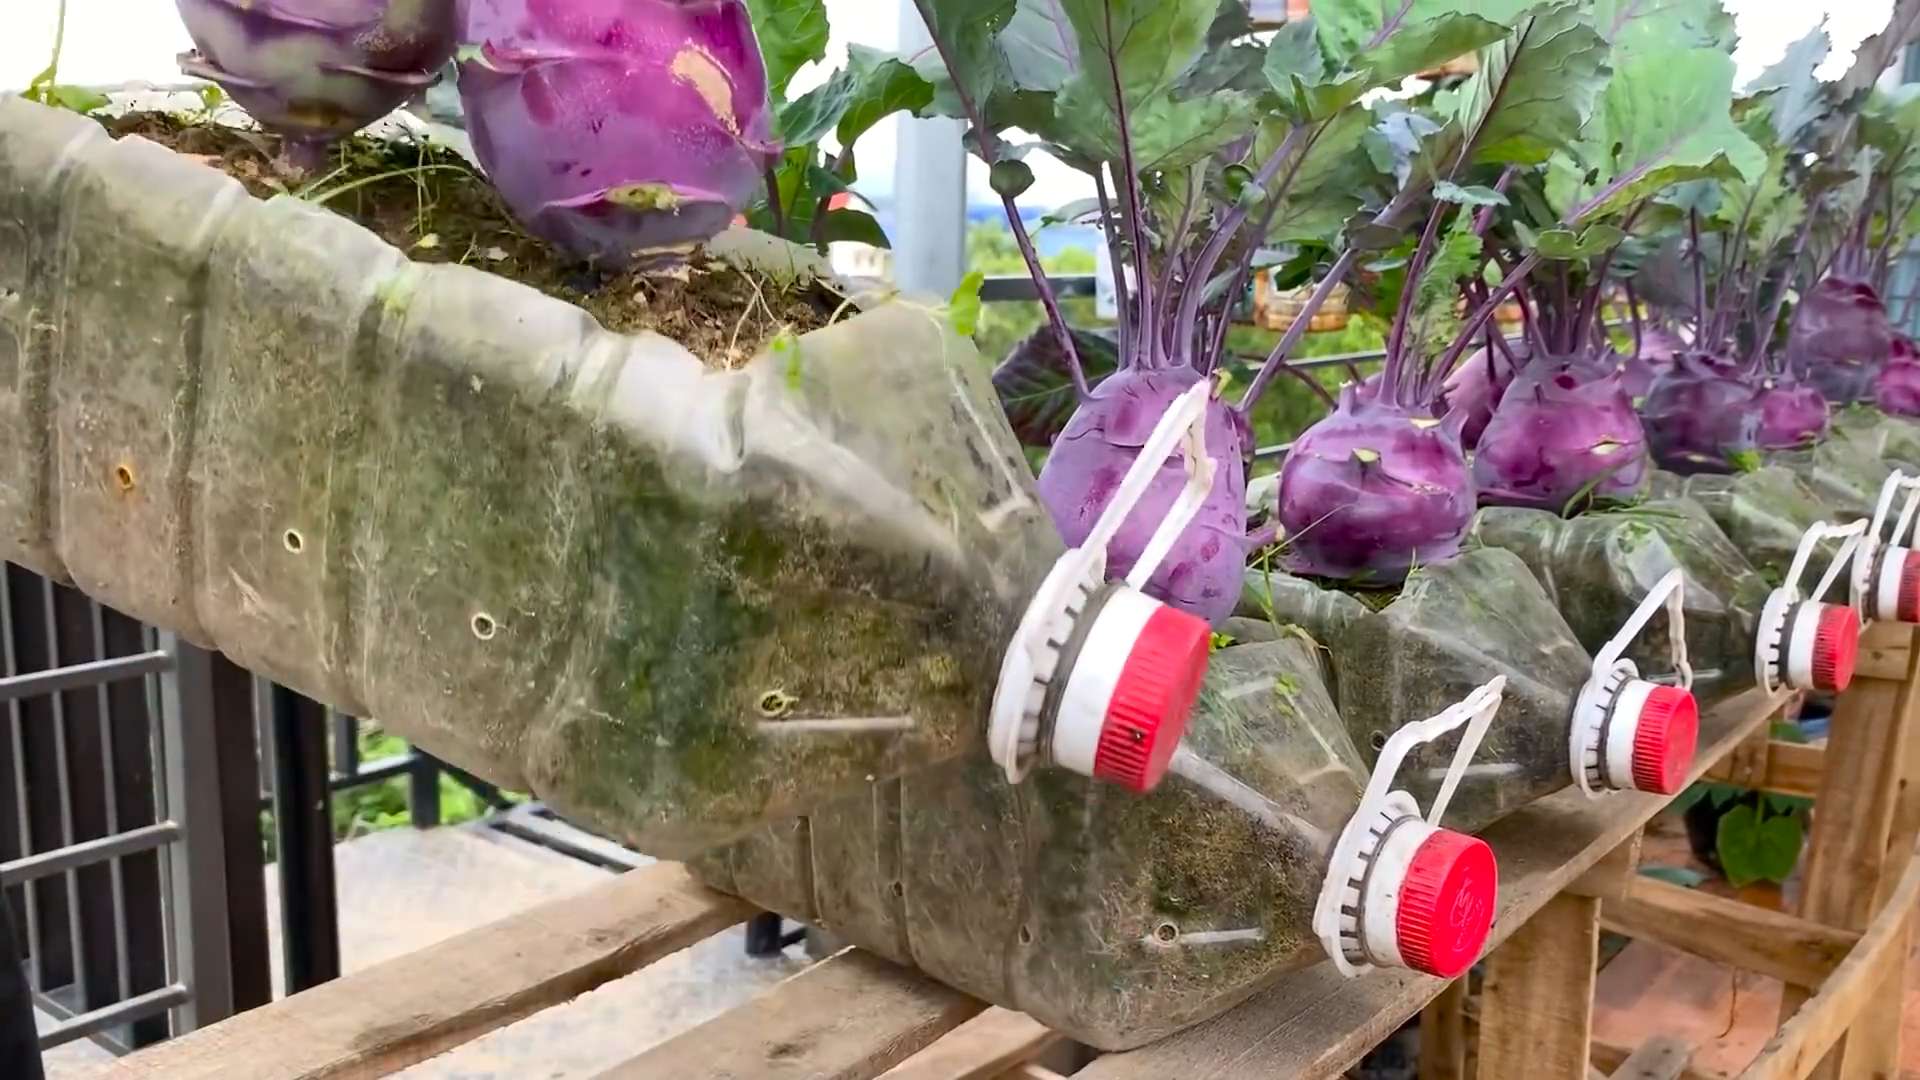
* Containers: I recommend using containers that are at least 12 inches in diameter and 12 inches deep. This will give the kohlrabi roots plenty of room to grow. Fabric pots are also a great option, as they allow for better drainage and aeration.
* Potting mix: Use a high-quality potting mix that is well-draining and contains plenty of organic matter. Avoid using garden soil, as it can become compacted in containers.
* Fertilizer: Kohlrabi are heavy feeders, so you’ll need to fertilize them regularly. I like to use a balanced, slow-release fertilizer or a liquid fertilizer diluted to half strength.
* Watering can or hose: You’ll need a way to water your kohlrabi plants regularly.
* Trowel: A small trowel will be helpful for planting and transplanting.
* Optional:
* Seed starting tray and dome (if you’re starting seeds indoors)
* Grow lights (if you’re starting seeds indoors and don’t have enough natural light)
* Mulch (to help retain moisture and suppress weeds)
Starting Your Kohlrabi Seeds
You can either direct sow your kohlrabi seeds into your containers or start them indoors. Starting them indoors gives you a head start on the growing season, especially if you live in a cooler climate.
Starting Seeds Indoors (Optional)
1. Fill your seed starting tray with potting mix: Moisten the potting mix before planting.
2. Sow the seeds: Plant the seeds about 1/4 inch deep and 1 inch apart.
3. Cover the seeds: Gently cover the seeds with potting mix.
4. Water the seeds: Water the seeds gently to avoid disturbing them.
5. Cover the tray with a dome: This will help to create a humid environment that is ideal for germination.
6. Place the tray in a warm location: Kohlrabi seeds germinate best at temperatures between 65 and 75 degrees Fahrenheit.
7. Provide light: Once the seeds germinate, remove the dome and provide them with plenty of light. If you don’t have enough natural light, you can use grow lights.
8. Thin the seedlings: Once the seedlings have their first true leaves, thin them to one plant per cell.
9. Harden off the seedlings: Before transplanting the seedlings outdoors, you’ll need to harden them off. This means gradually exposing them to outdoor conditions over a period of about a week. Start by placing them in a sheltered location for a few hours each day, and gradually increase the amount of time they spend outdoors.
Direct Sowing Seeds
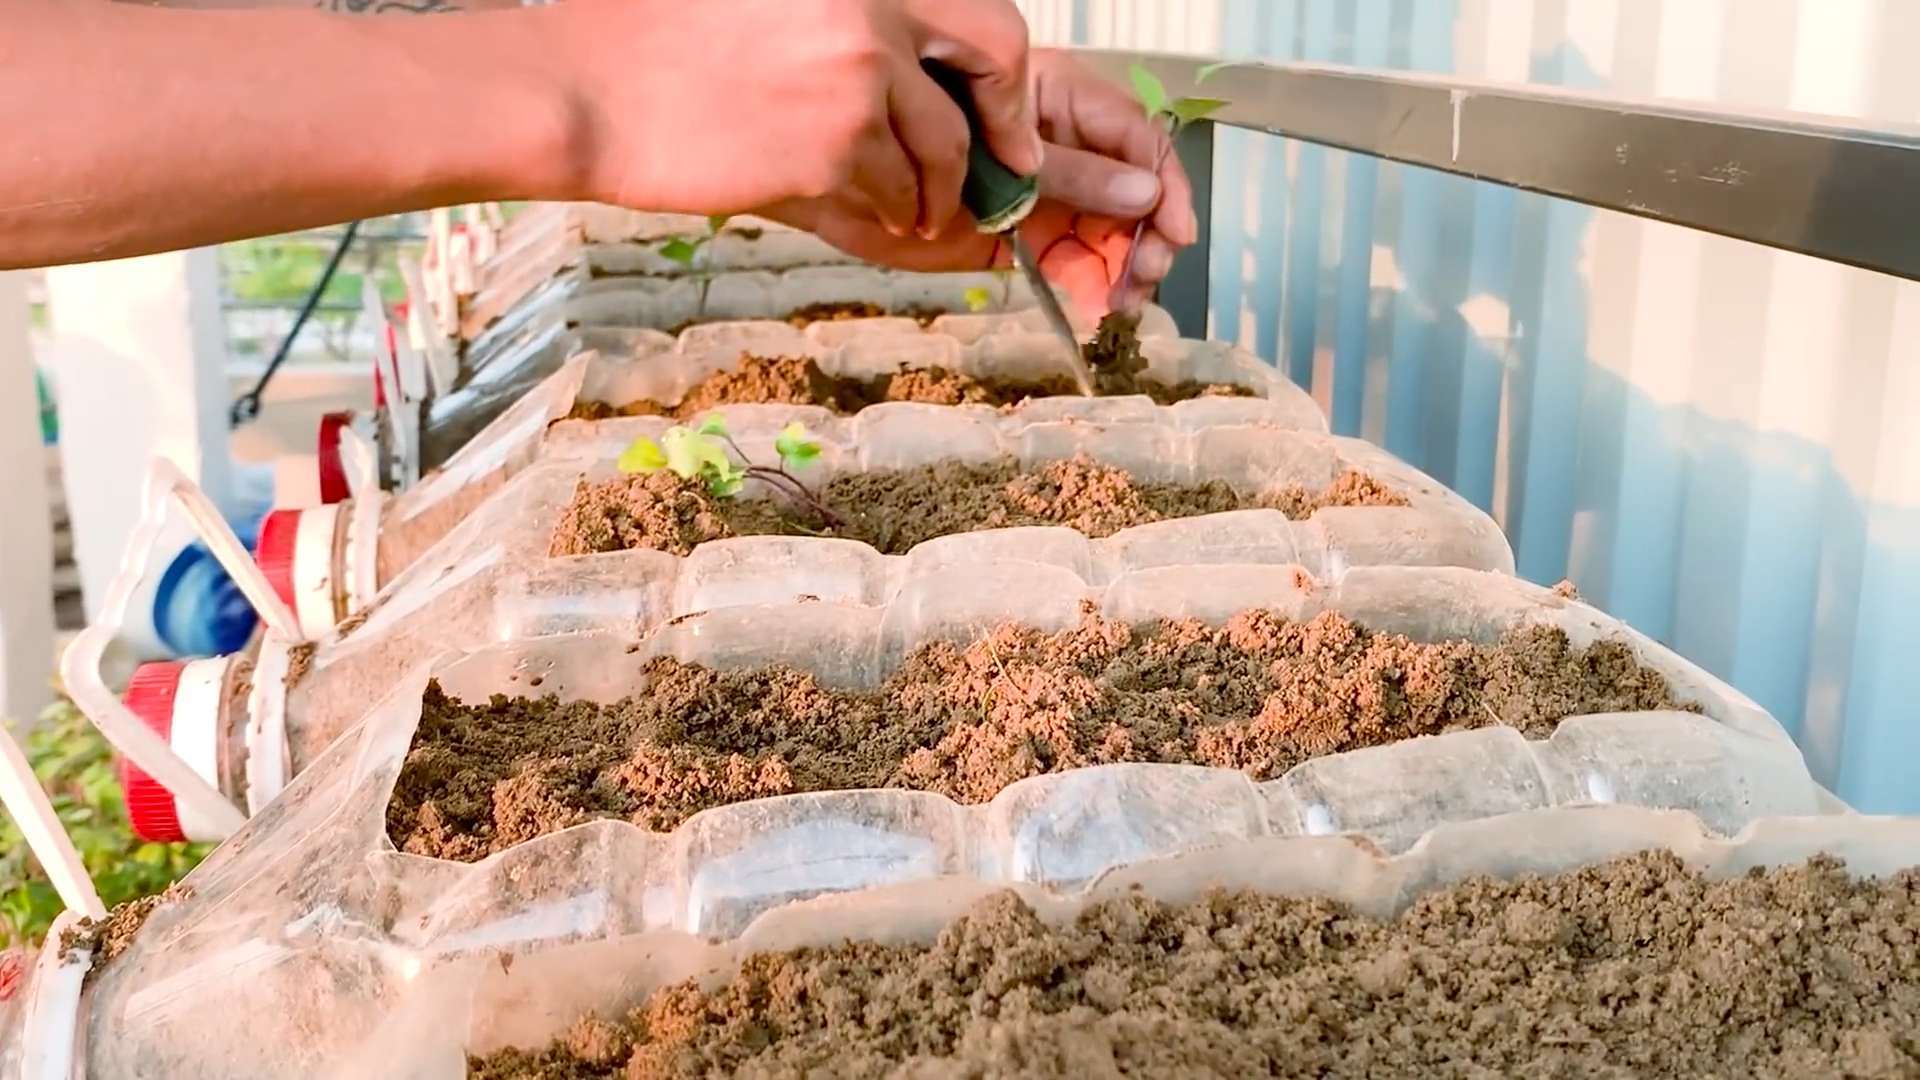
1. Prepare your containers: Fill your containers with potting mix, leaving about an inch of space at the top.
2. Sow the seeds: Plant the seeds about 1/4 inch deep and 2-3 inches apart.
3. Cover the seeds: Gently cover the seeds with potting mix.
4. Water the seeds: Water the seeds gently to avoid disturbing them.
5. Thin the seedlings: Once the seedlings have their first true leaves, thin them to one plant per container, spacing them about 6-8 inches apart.
Transplanting Your Kohlrabi Seedlings (If Started Indoors)
Once your seedlings have been hardened off, they’re ready to be transplanted into your containers.
1. Prepare your containers: Fill your containers with potting mix, leaving about an inch of space at the top.
2. Dig a hole: Dig a hole in the potting mix that is large enough to accommodate the root ball of the seedling.
3. Remove the seedling from the tray: Gently remove the seedling from the seed starting tray, being careful not to damage the roots.
4. Place the seedling in the hole: Place the seedling in the hole and gently backfill with potting mix.
5. Water the seedling: Water the seedling thoroughly.
6. Space the plants: Space the plants about 6-8 inches apart in the container.
Caring for Your Kohlrabi Plants
Now that your kohlrabi plants are in their containers, it’s time to start caring for them. Here’s what you need to do:
* Watering: Kohlrabi plants need consistent moisture, but they don’t like to be waterlogged. Water them deeply whenever the top inch of soil feels dry to the touch. Avoid overhead watering, as this can lead to fungal diseases.
* Fertilizing: Kohlrabi are heavy feeders, so you’ll need to fertilize them regularly. I like to use a balanced, slow-release fertilizer or a liquid fertilizer diluted to half strength. Fertilize every 2-3 weeks.
* Sunlight: Kohlrabi plants need at least 6 hours of sunlight per day. Place your containers in a sunny location on your balcony.
* Weeding: Keep your containers free of weeds. Weeds can compete with your kohlrabi plants for nutrients and water.
* Pest control: Kohlrabi plants can be susceptible to pests such as aphids, cabbage worms, and flea beetles. Inspect your plants regularly for pests and take action if you see any. You can use insecticidal soap or neem oil to control pests.
* Mulching: Add a layer of mulch around your kohlrabi plants to help retain moisture and suppress weeds. Straw, wood chips, or shredded leaves are all good options.
Harvesting Your Kohlrabi
The best part of growing kohlrabi is harvesting it! Kohlrabi is typically ready to harvest about 45-60 days after planting, depending on the variety.
1. Check the size: The bulb should be about 2-3 inches in diameter. Don’t let it get too big, or it will become tough and woody.
2. Harvest: To harvest, simply cut the bulb from the plant at the base of the stem.
3. Enjoy: You can eat the bulb raw or cooked. It’s delicious in salads, stir-fries, and soups. The leaves are also edible and can be used like spinach or kale.
Troubleshooting
Even with the best care, you might encounter some problems while growing kohlrabi. Here are a few common issues and how to deal with them:
* Bolting: Bolting is when the plant starts to flower prematurely. This can happen if the plant is stressed by heat, drought, or lack of nutrients. To prevent bolting, make sure your kohlrabi plants are well-watered, fertilized, and protected from extreme heat.
* Cracking: Cracking can occur if the soil is too dry or if the plant is exposed to sudden changes in moisture levels. To prevent cracking, water your kohlrabi plants regularly and consistently.
* Pests: As mentioned earlier, kohlrabi plants can
Conclusion
So, there you have it! Growing kohlrabi on your balcony is not only possible, it’s surprisingly rewarding. We’ve walked through the steps, from selecting the right variety to troubleshooting common issues, and hopefully, you’re feeling confident and ready to embark on your own balcony kohlrabi adventure.
Why is this DIY trick a must-try? Because it brings fresh, delicious, and nutritious produce right to your doorstep, regardless of whether you have a sprawling garden or just a small outdoor space. Imagine stepping onto your balcony and harvesting crisp, juicy kohlrabi for a salad, stir-fry, or even just a healthy snack. It’s a fantastic way to connect with nature, reduce your carbon footprint, and enjoy the satisfaction of growing your own food. Plus, it’s a great conversation starter!
But don’t stop there! Feel free to experiment with different kohlrabi varieties. ‘Early White Vienna’ and ‘Purple Vienna’ are popular choices, but there are also more unusual varieties like ‘Superschmelz’ known for its large size, and ‘Kossak’ which is resistant to bolting. You can also try companion planting. Marigolds can help deter pests, while herbs like dill and chamomile can attract beneficial insects. Consider adding a small trellis for support if your kohlrabi plants start to get top-heavy.
The key to successful balcony kohlrabi growing is consistent care and attention. Regular watering, proper fertilization, and vigilant pest control are essential. But the effort is well worth it when you taste the difference between store-bought kohlrabi and the fresh, homegrown variety.
We encourage you to give this DIY kohlrabi growing trick a try. It’s a fun, educational, and delicious way to enhance your balcony garden. And most importantly, don’t be afraid to experiment and learn along the way. Every balcony is different, and what works for one person may not work for another.
Once you’ve harvested your first kohlrabi, we’d love to hear about your experience! Share your photos, tips, and challenges in the comments below. Let’s create a community of balcony kohlrabi growers and learn from each other. What variety did you grow? What challenges did you face? What are your favorite ways to eat your homegrown kohlrabi? Your insights could help other aspiring balcony gardeners succeed.
Growing your own food, even in a small space, is an incredibly empowering experience. So, grab your seeds, pots, and soil, and get ready to enjoy the delicious rewards of growing kohlrabi on your balcony. Happy gardening!
Frequently Asked Questions (FAQ)
What is the best time of year to plant kohlrabi on a balcony?
The best time to plant kohlrabi depends on your climate. Generally, kohlrabi is a cool-season crop, so it thrives in spring and fall. For a spring crop, start seeds indoors 4-6 weeks before the last expected frost. You can then transplant them to your balcony containers a few weeks after the frost has passed. For a fall crop, sow seeds directly into your containers in late summer or early fall, about 6-8 weeks before the first expected frost. In warmer climates, you can grow kohlrabi throughout the winter. Consider your local climate and average frost dates when planning your planting schedule.
What size container is needed for growing kohlrabi on a balcony?
Kohlrabi needs adequate space for its roots to develop. A container that is at least 12 inches in diameter and 12 inches deep is recommended for each plant. Larger containers are always better, as they provide more room for root growth and help retain moisture. If you’re planning to grow multiple kohlrabi plants in the same container, make sure to space them at least 6-8 inches apart. Using a well-draining potting mix is also crucial to prevent root rot.
How often should I water kohlrabi grown in containers on a balcony?
Kohlrabi needs consistent moisture to thrive, especially when grown in containers on a balcony, where they can dry out quickly. Water your kohlrabi plants deeply whenever the top inch of soil feels dry to the touch. This may mean watering daily, especially during hot and sunny weather. Avoid overwatering, as this can lead to root rot. Check the drainage holes in your containers to ensure that excess water can escape. Mulching around the base of the plants can help retain moisture and reduce the need for frequent watering.
What type of fertilizer is best for kohlrabi grown in containers?
Kohlrabi benefits from regular fertilization to support healthy growth and bulb development. Use a balanced fertilizer with an NPK ratio of around 10-10-10 or 14-14-14. You can also use a fertilizer specifically formulated for vegetables. Apply the fertilizer according to the package instructions, usually every 2-3 weeks. Alternatively, you can use a slow-release fertilizer at planting time, which will gradually release nutrients over several months. Avoid over-fertilizing, as this can lead to excessive foliage growth at the expense of bulb development.
How do I protect my kohlrabi plants from pests on a balcony?
Balcony gardens are generally less susceptible to pests than in-ground gardens, but kohlrabi can still be affected by aphids, cabbage worms, and flea beetles. Regularly inspect your plants for signs of pests. Handpick any pests you find and dispose of them. You can also use insecticidal soap or neem oil to control infestations. Companion planting with marigolds or nasturtiums can help deter pests. Covering your plants with row covers can also provide a physical barrier against pests.
Why is my kohlrabi bulb not growing?
There are several reasons why your kohlrabi bulb might not be growing properly. Insufficient sunlight, inadequate watering, poor soil fertility, and overcrowding can all contribute to stunted growth. Make sure your plants are getting at least 6 hours of direct sunlight per day. Water them regularly and fertilize them as needed. Thin out your plants if they are too crowded. Also, ensure that the soil is well-draining and rich in organic matter. If you address these issues, your kohlrabi bulbs should start to develop properly.
How do I know when my kohlrabi is ready to harvest?
Kohlrabi is best harvested when the bulb is about 2-3 inches in diameter. At this size, it will be tender and flavorful. If you let it grow too large, it can become tough and woody. Check the variety you are growing, as some varieties are meant to be harvested at a larger size. To harvest, simply cut the bulb from the stem just above the soil line. You can also harvest the leaves, which are edible and can be used like spinach or kale.
Can I grow kohlrabi in partial shade on a balcony?
While kohlrabi prefers full sun (at least 6 hours of direct sunlight per day), it can tolerate partial shade, especially in hot climates. However, plants grown in partial shade may not produce as large or as many bulbs as those grown in full sun. If your balcony only receives partial shade, try to position your kohlrabi plants where they will get the most sunlight possible. You may also need to adjust your watering and fertilization schedule accordingly.
Are kohlrabi leaves edible?
Yes, kohlrabi leaves are edible and nutritious. They taste similar to kale or collard greens and can be used in salads, stir-fries, soups, and other dishes. Choose young, tender leaves for the best flavor and texture. Older leaves can be tougher and more fibrous. Wash the leaves thoroughly before using them. You can also sauté them with garlic and olive oil for a simple and delicious side dish.
How do I store harvested kohlrabi?
To store harvested kohlrabi, remove the leaves and store the bulbs in the refrigerator. They will keep for several weeks if stored properly. You can also store the leaves separately in a plastic bag in the refrigerator. Use the leaves within a few days, as they will wilt quickly. Kohlrabi can also be frozen. To freeze, peel and chop the bulbs, then blanch them in boiling water for 2-3 minutes. Drain and cool them quickly in ice water, then pack them into freezer bags or containers. Frozen kohlrabi will keep for up to 8 months.

Leave a Comment