

Growing Potatoes in Containers: Unlock the secrets to a bountiful harvest, even without a sprawling garden! Have you ever dreamt of digging up your own homegrown potatoes, bursting with flavor and freshness? Imagine the satisfaction of serving a meal featuring potatoes you nurtured from tiny seed potatoes to plump, delicious spuds. This isn’t just a dream; it’s an achievable reality with container gardening!
Potatoes have a rich history, dating back thousands of years to the Andes Mountains of South America, where they were a staple food source for the Inca civilization. Today, they’re a global favorite, and you don’t need acres of land to enjoy them. In fact, growing potatoes in containers is a fantastic way to bring a touch of that agricultural heritage to your own balcony, patio, or even a sunny windowsill.
Why should you try this DIY trick? Well, for starters, it’s incredibly space-saving. Apartment dwellers and those with limited garden space can rejoice! Plus, container gardening offers better control over soil quality and pest management, leading to healthier, more productive plants. I’m going to show you how to easily grow potatoes in containers, so you can enjoy fresh, homegrown potatoes all season long. Let’s get started!
Growing Potatoes in Containers: A Bountiful Harvest on Your Patio!
Hey there, fellow gardening enthusiasts! I’m so excited to share one of my favorite DIY gardening hacks with you: growing potatoes in containers! It’s a fantastic way to enjoy fresh, homegrown potatoes even if you don’t have a sprawling garden. Plus, it’s super satisfying to dig into that container and unearth your own little treasure trove of spuds. Let’s get started!
Choosing the Right Container and Potato Variety
Before we dive into the nitty-gritty, let’s talk about the essentials: the container and the potato variety. These choices will significantly impact your success.
* Container Size: This is crucial! You’ll need a container that’s at least 15 gallons in size. Think large buckets, trash cans (with drainage holes, of course!), grow bags, or even repurposed storage bins. The deeper the container, the more potatoes you’ll harvest. I personally prefer using 20-gallon grow bags because they’re breathable and easy to move around.
* Drainage: Absolutely essential! Potatoes hate sitting in soggy soil. Make sure your container has plenty of drainage holes at the bottom. If you’re using a container without pre-made holes, drill several yourself.
* Potato Variety: Not all potatoes are created equal when it comes to container gardening. Look for “early” or “mid-season” varieties. These tend to mature faster and produce smaller plants, making them ideal for containers. Some of my favorites include:
* Yukon Gold: These are buttery and delicious, perfect for roasting or mashing.
* Red Pontiac: These have a beautiful red skin and a creamy texture. Great for potato salad.
* Irish Cobbler: A classic early variety with a slightly nutty flavor.
* Fingerling Potatoes: These are fun and unique, with a firm texture and distinctive shape.
* Seed Potatoes: You’ll need seed potatoes, which are potatoes specifically grown for planting. You can find these at your local garden center or online. Avoid using potatoes from the grocery store, as they may have been treated to prevent sprouting.
Preparing Your Seed Potatoes
Now that you’ve got your container and seed potatoes, it’s time to get them ready for planting. This process is called “chitting” or “sprouting.”
* Why Chit? Chitting encourages the seed potatoes to sprout before planting, giving them a head start and resulting in earlier and more abundant harvests.
* How to Chit:
1. Place your seed potatoes in a cool, bright location (but not in direct sunlight). An unheated garage or a well-lit windowsill works well.
2. Arrange the potatoes so that the “eyes” (small buds) are facing upwards.
3. Over the next few weeks, the eyes will begin to sprout. You’re looking for short, green sprouts, about 1/2 to 1 inch long.
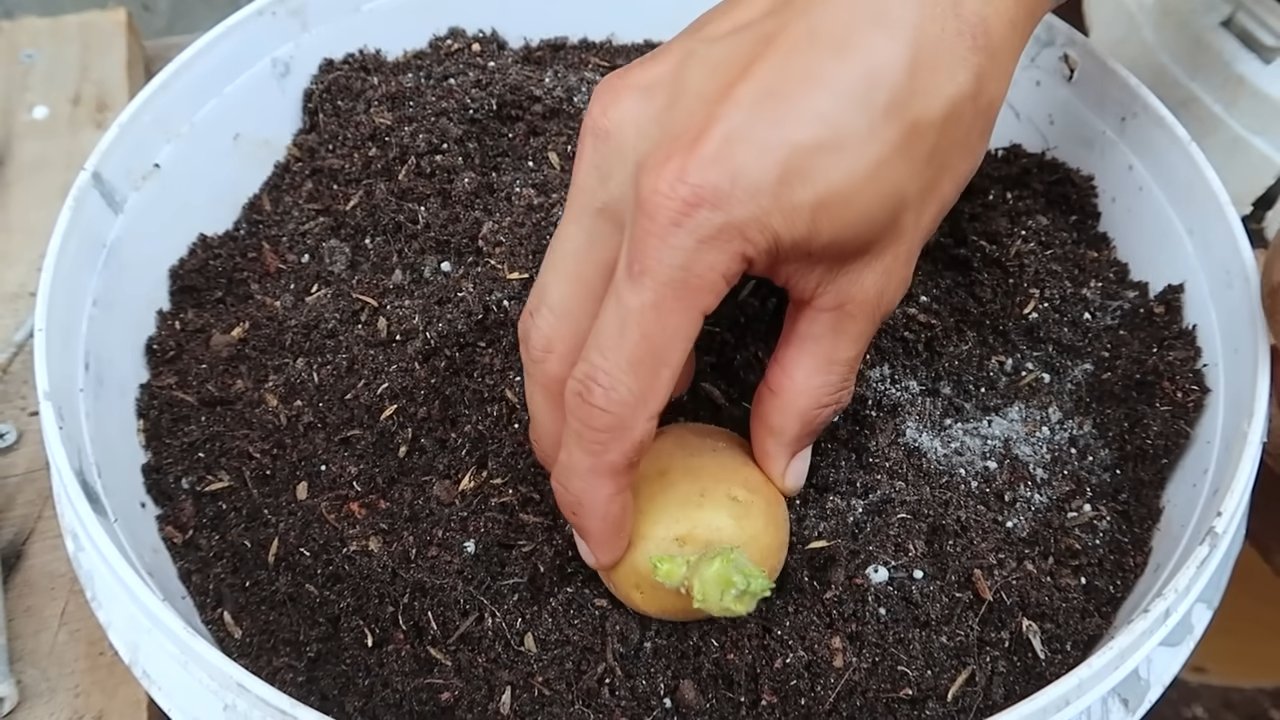
4. If your seed potatoes are large (bigger than an egg), you can cut them into pieces, making sure each piece has at least one or two eyes. Let the cut pieces dry for a day or two before planting to prevent rotting.
Planting Your Potatoes
Alright, the fun part! Let’s get those potatoes in the ground (or, in this case, the container!).
1. Prepare the Soil: Use a well-draining potting mix. Avoid using garden soil, as it can be too heavy and compact for containers. I like to mix equal parts potting mix, compost, and perlite for optimal drainage and nutrients.
2. Initial Planting: Fill the container with about 4-6 inches of your potting mix.
3. Plant the Seed Potatoes: Place the seed potatoes (or potato pieces) on top of the soil, with the sprouts facing upwards. Space them about 8-10 inches apart if you’re planting multiple potatoes in the same container.
4. Cover with Soil: Cover the seed potatoes with another 4-6 inches of potting mix.
5. Water Thoroughly: Water the container well until the water drains out of the bottom.
“Hilling” Your Potatoes
This is where the magic happens! “Hilling” is the process of adding more soil to the container as the potato plants grow. This encourages the plants to produce more potatoes along the stems.
1. Wait for Growth: Once the potato plants have grown about 6-8 inches tall, it’s time to hill.
2. Add More Soil: Add another 4-6 inches of potting mix to the container, covering the stems of the plants, leaving only the top few leaves exposed.
3. Repeat: Continue this process every few weeks as the plants grow, until you’ve filled the container almost to the top.
4. Why Hill? Potatoes form along the underground stems of the plant. By covering the stems with soil, you encourage the plant to produce more potatoes along the buried portion of the stem.
Caring for Your Potato Plants
Now that your potatoes are planted and hilled, it’s time to provide them with the care they need to thrive.
* Sunlight: Potatoes need at least 6-8 hours of sunlight per day. Place your container in a sunny location.
* Watering: Keep the soil consistently moist, but not soggy. Water deeply whenever the top inch of soil feels dry to the touch. Avoid overwatering, as this can lead to rot.
* Fertilizing: Potatoes are heavy feeders. Fertilize them every few weeks with a balanced fertilizer, following the instructions on the package. I like to use a liquid fertilizer diluted to half strength.
* Pest Control: Keep an eye out for pests like aphids, potato beetles, and flea beetles. Handpick them off the plants or use an organic insecticide if necessary.
* Disease Prevention: Potatoes can be susceptible to diseases like blight. To prevent disease, ensure good air circulation around the plants, avoid overhead watering, and remove any diseased leaves promptly.
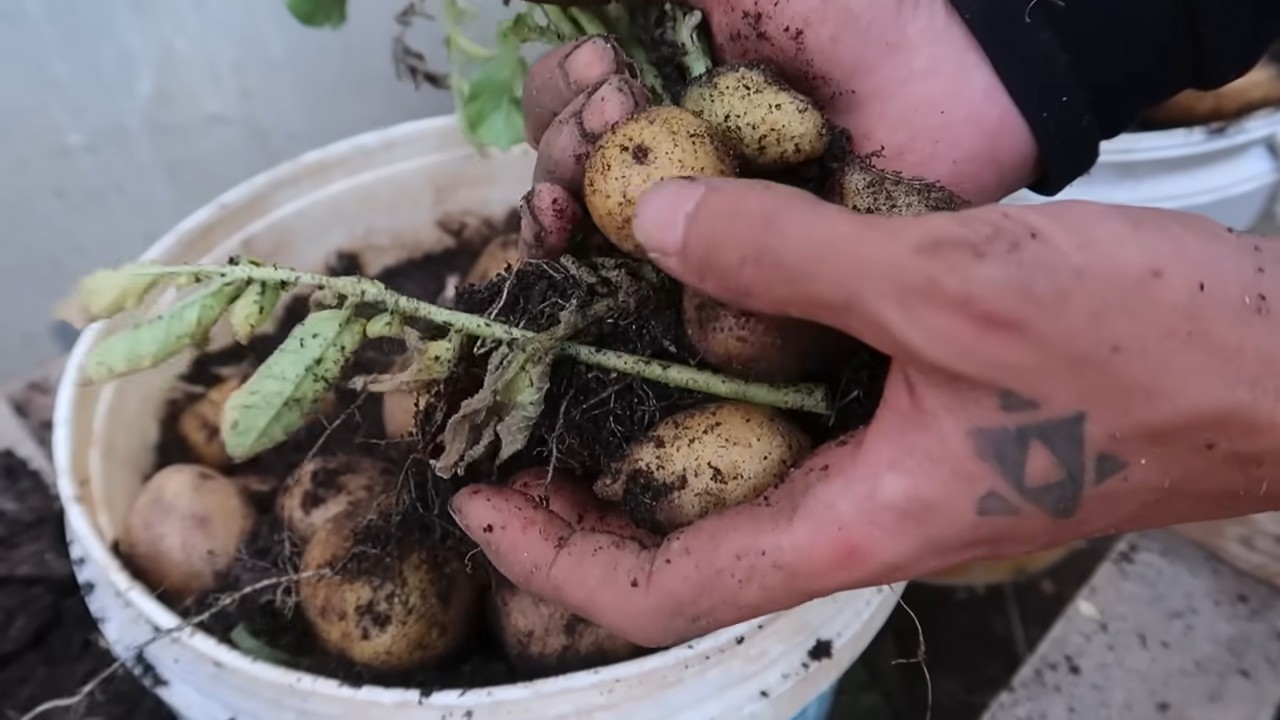
Harvesting Your Potatoes
The moment you’ve been waiting for! Harvesting your homegrown potatoes is incredibly rewarding.
* When to Harvest: You can start harvesting “new potatoes” (small, immature potatoes) about 2-3 weeks after the plants flower. These are delicious and have a thin skin. For mature potatoes, wait until the plants have flowered and the foliage starts to die back. This usually takes about 80-100 days from planting.
* How to Harvest:
1. Stop watering the plants a week or two before harvesting to allow the potatoes to dry out slightly.
2. Gently tip the container over and carefully sift through the soil to find the potatoes.
3. Alternatively, you can reach into the container and carefully dig around the plants to harvest the potatoes.
4. Be careful not to damage the potatoes during harvesting.
* Curing and Storing: After harvesting, cure the potatoes by spreading them out in a cool, dark, and well-ventilated place for about a week. This allows the skins to harden and helps prevent rot. Store the cured potatoes in a cool, dark, and dry place, such as a root cellar or a basement. They should last for several months.
Troubleshooting
Even with the best planning, sometimes things don’t go exactly as expected. Here are a few common problems you might encounter and how to address them:
* No Potatoes: If your plants are growing well but not producing potatoes, it could be due to several factors:
* Insufficient Sunlight: Make sure your plants are getting enough sunlight.
* Lack of Nutrients: Fertilize regularly with a balanced fertilizer.
* Overwatering: Avoid overwatering, as this can lead to rot.
* Incorrect Potato Variety: Make sure you’re using a variety that’s suitable for container gardening.
* Yellowing Leaves: Yellowing leaves can indicate several problems:
* Overwatering: Allow the soil to dry out slightly between waterings.
* Nutrient Deficiency: Fertilize with a balanced fertilizer.
* Disease: Remove any diseased leaves promptly and treat with an appropriate fungicide if necessary.
* Pests: Keep an eye out for pests and take action promptly to prevent them from damaging your plants.
Enjoy Your Homegrown Potatoes!
There you have it! Growing potatoes in containers is a simple and rewarding way to enjoy fresh, homegrown potatoes. With a little bit of planning and care, you can harvest a bountiful crop of spuds right on your patio or balcony. So, grab a container, some seed potatoes, and get planting! I promise, you won’t be disappointed. Happy gardening!
Conclusion
So, there you have it! Growing potatoes in containers is not just a gardening trend; it’s a genuinely rewarding and accessible way to enjoy fresh, homegrown potatoes, even if you’re short on space. We’ve explored the simplicity of the process, the joy of the harvest, and the sheer satisfaction of nurturing your own food from seed (or rather, seed potato!) to table.
But why is this DIY trick a must-try? Beyond the obvious benefit of delicious, organically grown potatoes, container gardening offers unparalleled control over your growing environment. You dictate the soil composition, the watering schedule, and the sun exposure, minimizing the risks associated with traditional in-ground gardening, such as soilborne diseases and pests. Plus, let’s be honest, there’s something incredibly satisfying about watching those vibrant green potato plants thrive in their designated containers, a testament to your green thumb.
Think of the possibilities! Imagine harvesting a bounty of creamy Yukon Golds for a decadent potato salad, or digging up some firm red potatoes for a hearty stew. The flavor of homegrown potatoes is simply unmatched – a taste of sunshine and earth that you won’t find in any supermarket.
And the fun doesn’t stop there. Feel free to experiment with different potato varieties to discover your favorites. Try growing fingerling potatoes for a gourmet touch, or explore the vibrant colors of purple potatoes for a visually stunning dish. You can also adjust the size of your containers to suit your space and desired yield. Smaller containers are perfect for patios and balconies, while larger containers can accommodate more plants and produce a larger harvest.
Consider adding companion plants to your potato containers to further enhance your growing experience. Marigolds can help deter pests, while basil can improve the flavor of your potatoes. Get creative and personalize your container garden to reflect your own unique style and preferences.
We wholeheartedly encourage you to embark on this potato-growing adventure. It’s a fantastic way to connect with nature, learn about the food you eat, and enjoy the fruits (or rather, tubers!) of your labor. Don’t be intimidated by the prospect of gardening – growing potatoes in containers is surprisingly easy, even for beginners.
Once you’ve harvested your first crop of homegrown potatoes, we’d love to hear about your experience! Share your photos, tips, and recipes with us in the comments below. Let’s create a community of container potato growers and inspire others to discover the joys of this rewarding DIY project. Remember, the best way to learn is by doing, so grab some seed potatoes, a few containers, and get ready to experience the magic of growing your own food. You’ll be amazed at how easy and rewarding it is to grow your own potatoes in containers.
Frequently Asked Questions (FAQ)
What kind of container is best for growing potatoes?
The ideal container for growing potatoes should be large enough to accommodate the growing tubers and provide adequate drainage. A container that is at least 15 gallons in size is recommended, but larger is generally better. Consider using a container that is at least 18 inches in diameter and 18 inches deep. You can use plastic pots, fabric grow bags, or even repurposed containers like old trash cans or barrels, as long as they have drainage holes. Fabric grow bags are particularly popular because they allow for good aeration and drainage, which can help prevent root rot. Avoid using containers that are too shallow, as this can restrict root growth and reduce your yield.
What type of soil should I use for growing potatoes in containers?
Potatoes need well-draining, nutrient-rich soil to thrive. A good potting mix specifically formulated for vegetables is ideal. Avoid using garden soil, as it can be too heavy and compact, hindering drainage and root growth. You can also create your own potting mix by combining equal parts of peat moss (or coconut coir), perlite, and compost. The peat moss or coconut coir helps retain moisture, the perlite improves drainage, and the compost provides essential nutrients. Adding a slow-release fertilizer to the potting mix at planting time can also help ensure that your potatoes receive the nutrients they need throughout the growing season.
How often should I water my potato plants in containers?
Watering frequency depends on several factors, including the size of the container, the weather conditions, and the type of soil you’re using. Generally, you should water your potato plants whenever the top inch of soil feels dry to the touch. During hot, dry weather, you may need to water them daily. Avoid overwatering, as this can lead to root rot. Ensure that the container has adequate drainage holes to prevent water from pooling at the bottom. A good way to check if your plants need water is to stick your finger into the soil – if it feels dry, it’s time to water.
How much sunlight do potato plants need?
Potato plants need at least six hours of direct sunlight per day to thrive. Choose a location for your container garden that receives plenty of sunlight throughout the day. If you live in a particularly hot climate, you may need to provide some afternoon shade to prevent the plants from overheating. If you don’t have a sunny location, you can supplement with grow lights. Rotate the containers regularly to ensure that all sides of the plants receive adequate sunlight.
How do I “hill” potatoes in containers?
“Hilling” is the process of adding more soil to the container as the potato plants grow. This encourages the plants to produce more tubers along the buried stems. Start by filling the container about halfway with soil when you plant the seed potatoes. As the plants grow, gradually add more soil to the container, covering the stems up to the bottom leaves. Repeat this process every few weeks until the container is nearly full. This technique maximizes potato production within the limited space of a container.
When and how do I harvest my potatoes?
You can begin harvesting “new potatoes” (small, immature potatoes) about 7-8 weeks after planting. To harvest new potatoes, carefully dig around the edges of the container and remove a few potatoes, leaving the rest of the plants to continue growing. For a full harvest of mature potatoes, wait until the plants have flowered and the foliage begins to die back. This usually takes about 10-12 weeks. Once the foliage has died back, stop watering the plants and allow the soil to dry out slightly. Then, carefully dump the contents of the container onto a tarp or sheet and sort through the soil to find the potatoes.
What are some common pests and diseases that affect potato plants in containers?
Common pests that can affect potato plants include aphids, potato beetles, and flea beetles. You can control these pests by handpicking them off the plants, using insecticidal soap, or applying neem oil. Common diseases include early blight, late blight, and potato scab. To prevent these diseases, use disease-resistant potato varieties, ensure good air circulation around the plants, and avoid overwatering. If you notice any signs of disease, remove the affected leaves or plants immediately.
Can I grow potatoes in containers indoors?
While it’s possible to grow potatoes indoors, it can be challenging to provide them with the necessary sunlight and growing conditions. You’ll need to use strong grow lights and ensure that the plants receive at least 12-14 hours of light per day. You’ll also need to monitor the temperature and humidity levels carefully. Growing potatoes outdoors in containers is generally easier and more successful.
What are some good potato varieties to grow in containers?
Some good potato varieties for container gardening include Yukon Gold, Red Norland, fingerling potatoes (such as Russian Banana), and Kennebec. These varieties are relatively compact and produce well in containers. Choose varieties that are suited to your local climate and growing conditions.
Can I reuse the soil from my potato containers?
It’s generally not recommended to reuse the soil from your potato containers for growing potatoes again, as it may contain disease pathogens or pests that can affect future crops. However, you can reuse the soil for other plants that are not susceptible to the same diseases. Before reusing the soil, amend it with fresh compost and fertilizer to replenish the nutrients.
Leave a Comment