

Growing Red Cabbage might seem intimidating, but trust me, it’s a rewarding experience that adds vibrant color and delicious flavor to your garden and kitchen! Have you ever admired those stunning red cabbages at the farmer’s market and wished you could grow your own? Well, you absolutely can, and I’m here to share some simple DIY tricks and hacks that will make the process a breeze.
Cabbage, in general, has a rich history, dating back to ancient times, with various cultures appreciating its nutritional value and versatility. Red cabbage, with its striking hue, is not just a pretty face; it’s packed with antioxidants and vitamins. But let’s be honest, sometimes growing vegetables can feel like a daunting task, especially when space is limited or you’re facing common garden pests. That’s where these DIY solutions come in!
I’ve learned over the years that you don’t need a sprawling farm to enjoy fresh, homegrown produce. Whether you’re a seasoned gardener or just starting out, these tips will help you overcome common challenges and maximize your yield. From clever container gardening techniques to natural pest control methods, I’ll show you how to successfully growing red cabbage, even in small spaces. So, grab your gardening gloves, and let’s get started on this colorful and delicious adventure!

Growing Vibrant Red Cabbage: A DIY Guide for the Home Gardener
Hey there, fellow gardening enthusiasts! I’m so excited to share my tried-and-true method for growing gorgeous, deep-red cabbages right in your own backyard. It’s easier than you might think, and the reward of harvesting your own homegrown veggies is simply unbeatable. Let’s dive in!
Choosing the Right Variety and Starting Seeds
Before we get our hands dirty, let’s talk about choosing the right red cabbage variety. There are a few popular options, each with its own unique characteristics.
* ‘Red Acre’: This is a classic choice, known for its compact size and excellent flavor. It matures relatively quickly, making it a great option for shorter growing seasons.
* ‘Ruby Perfection’: As the name suggests, this variety produces beautifully round, deep-red heads. It’s also known for its good storage capabilities.
* ‘Red Express’: If you’re looking for a super-early variety, ‘Red Express’ is your best bet. It matures in just around 60 days!
Once you’ve chosen your variety, it’s time to start the seeds. I prefer to start my cabbage seeds indoors, about 6-8 weeks before the last expected frost. This gives them a head start and ensures a stronger, healthier plant.
Here’s how I do it:
1. Gather your supplies: You’ll need seed starting trays or small pots, a good quality seed starting mix, red cabbage seeds, and a spray bottle filled with water.
2. Fill the trays/pots: Moisten the seed starting mix and fill your trays or pots, leaving about half an inch of space at the top.
3. Sow the seeds: Make a small indentation (about ¼ inch deep) in the center of each cell or pot. Place 2-3 seeds in each indentation and gently cover them with the seed starting mix.
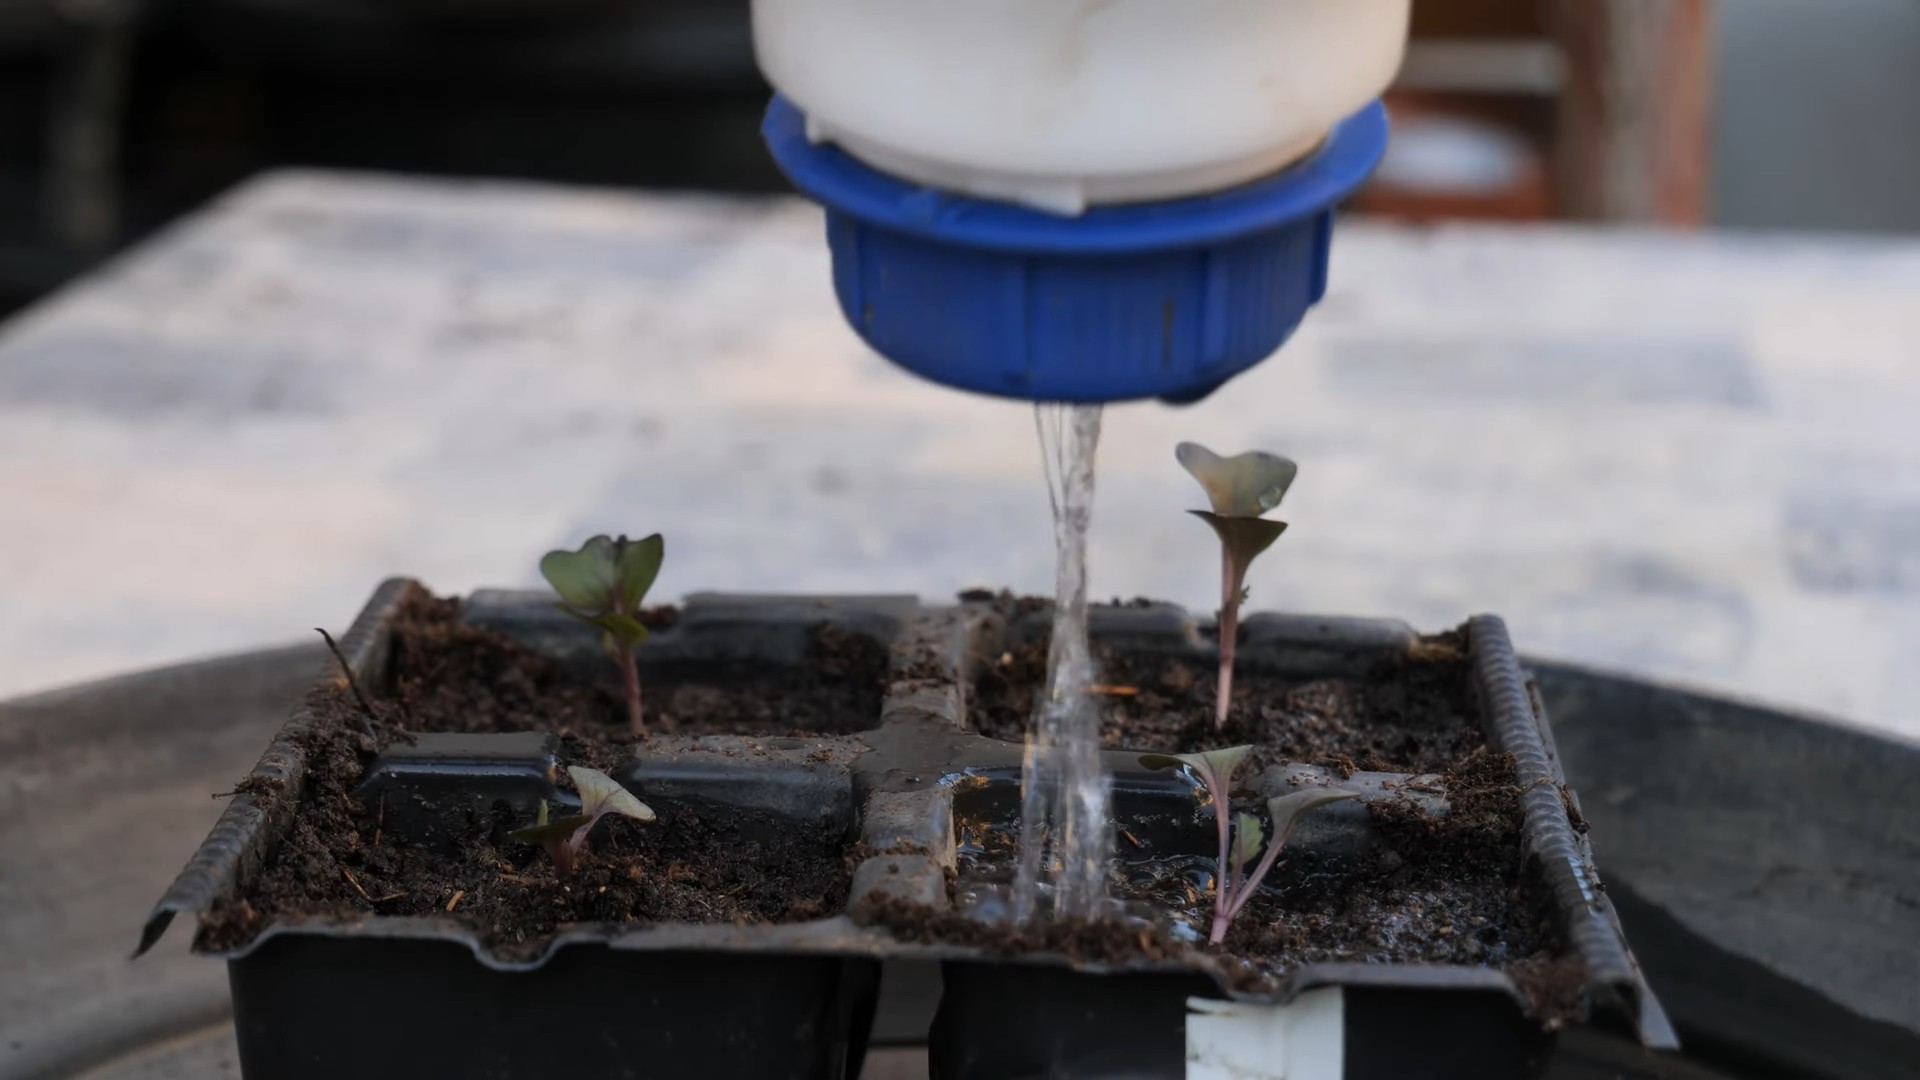
4. Water gently: Use the spray bottle to gently water the soil. You want to moisten it without disturbing the seeds.
5. Provide warmth and light: Place the trays or pots in a warm location (around 70-75°F) and provide plenty of light. A sunny windowsill or a grow light will work perfectly.
6. Keep the soil moist: Check the soil daily and water as needed to keep it consistently moist. Don’t let it dry out!
7. Thin the seedlings: Once the seedlings have developed their first true leaves (the second set of leaves), thin them to one plant per cell or pot. Choose the strongest, healthiest seedling and snip off the others at the soil line.
Preparing the Garden Bed
While your cabbage seedlings are growing indoors, it’s time to prepare the garden bed. Red cabbages thrive in well-drained soil that is rich in organic matter.
* Choose a sunny location: Cabbages need at least 6 hours of sunlight per day.
* Amend the soil: Dig in plenty of compost or well-rotted manure to improve the soil’s fertility and drainage. I also like to add a slow-release organic fertilizer at this stage.
* Check the soil pH: Red cabbages prefer a slightly acidic soil pH (around 6.0-6.8). You can test your soil pH using a soil testing kit and amend it accordingly. If your soil is too alkaline, you can add sulfur to lower the pH.
* Ensure good drainage: Cabbages don’t like to sit in soggy soil, so make sure your garden bed has good drainage. If your soil is heavy clay, consider adding sand or perlite to improve drainage.
Transplanting the Seedlings
Once the danger of frost has passed and your seedlings have developed several sets of true leaves, it’s time to transplant them into the garden.
1. Harden off the seedlings: Before transplanting, you’ll need to harden off the seedlings. This means gradually exposing them to outdoor conditions over a period of 7-10 days. Start by placing them in a sheltered location outdoors for a few hours each day, gradually increasing the amount of time they spend outside.
2. Choose a cloudy day: Transplanting on a cloudy day will help reduce stress on the seedlings.
3. Dig holes: Dig holes that are slightly larger than the root balls of the seedlings. Space the holes about 18-24 inches apart.
4. Gently remove the seedlings: Carefully remove the seedlings from their trays or pots, being careful not to damage the roots.
5. Plant the seedlings: Place the seedlings in the holes and gently backfill with soil. Make sure the top of the root ball is level with the surrounding soil.
6. Water thoroughly: Water the seedlings thoroughly after planting.
7. Mulch: Apply a layer of mulch around the plants to help retain moisture, suppress weeds, and regulate soil temperature. I like to use straw or shredded leaves.
Caring for Your Red Cabbage Plants
Now that your red cabbage plants are in the ground, it’s important to provide them with the care they need to thrive.
* Water regularly: Cabbages need consistent moisture, especially during hot, dry weather. Water deeply whenever the top inch of soil feels dry.
* Fertilize: Feed your cabbage plants every few weeks with a balanced organic fertilizer.
* Weed regularly: Keep the garden bed free of weeds, which can compete with the cabbage plants for nutrients and water.
* Protect from pests: Cabbages are susceptible to a few common pests, such as cabbage worms, aphids, and flea beetles. Inspect your plants regularly and take action if you see any signs of infestation. I prefer to use organic pest control methods, such as insecticidal soap or neem oil.
* Monitor for diseases: Cabbages can also be affected by certain diseases, such as black rot and clubroot. Choose disease-resistant varieties and practice good garden hygiene to prevent these problems.
Harvesting Your Red Cabbage
The moment you’ve been waiting for! Red cabbages are typically ready to harvest about 70-100 days after transplanting, depending on the variety.
* Check for firmness: The heads should feel firm and solid when you squeeze them gently.
* Cut the head: Use a sharp knife to cut the head from the stem, leaving a few outer leaves attached.
* Store properly: Red cabbages can be stored in a cool, dry place for several weeks.
Troubleshooting Common Problems
Even with the best care, you might encounter a few problems along the way. Here are some common issues and how to address them:
* Cabbage worms: These green caterpillars can quickly devour cabbage leaves. Handpick them off the plants or use Bacillus thuringiensis (Bt), a natural bacteria that is effective against cabbage worms.
* Aphids: These tiny insects suck sap from the leaves, causing them to curl and distort. Spray the plants with insecticidal soap or neem oil.
* Flea beetles: These small, jumping beetles can create tiny holes in the leaves. Cover the plants with row covers to prevent flea beetles from reaching them.
* Heads splitting: This can happen if the plants receive too much water after a period of drought. Water regularly and consistently to prevent splitting.
* Lack of head formation: This can be caused by a lack of nutrients or sunlight. Make sure your plants are getting enough fertilizer and at least 6 hours of sunlight per day.
Enjoying Your Homegrown Red Cabbage
Now that you’ve harvested your beautiful red cabbages, it’s time to enjoy them! Red cabbage is incredibly versatile and can be used in a variety of dishes.
* Salads: Shredded red cabbage adds a vibrant color and crunchy texture to salads.
* Slaws: Red cabbage is a classic ingredient in coleslaw.
* Stir-fries: Add chopped red cabbage to your favorite stir-fry for a healthy and colorful boost.
* Pickling: Red cabbage can be pickled for a tangy and delicious condiment.
* Roasting: Roasted red cabbage is a surprisingly delicious side dish.
I hope this guide has inspired you to grow your own red cabbages. It’s a rewarding experience that will provide you with fresh, healthy, and delicious vegetables for your table. Happy gardening!
Conclusion
So, there you have it! Growing red cabbage at home, while it might seem daunting at first, is a surprisingly rewarding experience. It’s a chance to connect with your food, nurture something beautiful from seed to harvest, and ultimately, enjoy the vibrant flavors and health benefits of this incredible vegetable.
Why is this DIY trick a must-try? Because beyond the satisfaction of growing your own food, you’re gaining access to red cabbage that’s fresher, potentially more nutritious (depending on your growing practices), and certainly more flavorful than anything you’ll find at the grocery store. Think about it: no long transport times, no chemical treatments, just pure, unadulterated red cabbage goodness. Plus, you’re reducing your carbon footprint by cutting out the transportation and packaging involved in commercially grown produce.
But the real magic lies in the control you have over the entire process. You can choose organic methods, ensuring your red cabbage is free from harmful pesticides and herbicides. You can select varieties that are best suited to your local climate and soil conditions. And you can harvest your cabbage at its peak ripeness, maximizing its flavor and nutritional value.
Don’t be afraid to experiment! Try different companion planting strategies to deter pests naturally. Plant your red cabbage alongside herbs like rosemary or thyme, or flowers like marigolds, to create a thriving and balanced garden ecosystem.
Consider variations in your growing approach. If you’re short on space, try growing red cabbage in containers. Choose a large pot with good drainage and use a high-quality potting mix. Container gardening allows you to move your plants around to take advantage of sunlight and protect them from extreme weather.
Another variation is to experiment with different red cabbage varieties. Some varieties are more compact and suitable for smaller gardens, while others are known for their exceptional color or flavor. ‘Red Acre’ is a popular choice for its early maturity and good storage qualities. ‘Ruby Ball’ is another excellent option, known for its deep red color and resistance to splitting. ‘Red Drumhead’ is a larger variety that’s perfect for making sauerkraut.
And speaking of sauerkraut, growing your own red cabbage opens up a world of culinary possibilities. Imagine making homemade sauerkraut with cabbage you grew yourself – the flavor is simply unmatched! You can also use your homegrown red cabbage in salads, slaws, stir-fries, soups, and countless other dishes. Its vibrant color adds a beautiful touch to any meal, and its slightly peppery flavor complements a wide range of ingredients.
Growing red cabbage is more than just a gardening project; it’s an investment in your health, your well-being, and your connection to the natural world. It’s a chance to learn new skills, challenge yourself, and reap the rewards of your hard work.
So, what are you waiting for? Grab some seeds or seedlings, prepare your soil, and get ready to embark on your red cabbage growing adventure. We’re confident that you’ll be amazed by the results.
We encourage you to try this DIY trick and share your experience with us! Post photos of your red cabbage plants on social media using #HomeGrownRedCabbage and tell us about your successes and challenges. We’d love to hear your tips and tricks for growing the best red cabbage possible. Let’s create a community of red cabbage enthusiasts and inspire others to grow their own food!
FAQ
What is the best time of year to plant red cabbage?
The best time to plant red cabbage depends on your climate. In general, red cabbage is a cool-season crop, so it’s best to plant it in the spring or fall. For a spring crop, start seeds indoors 6-8 weeks before the last expected frost. Transplant seedlings outdoors 2-3 weeks before the last frost. For a fall crop, sow seeds directly into the garden in mid-summer, about 6-8 weeks before the first expected frost. In warmer climates, you can grow red cabbage throughout the winter.
How much sunlight does red cabbage need?
Red cabbage needs at least 6 hours of sunlight per day to thrive. Choose a location in your garden that receives full sun. If you’re growing red cabbage in containers, make sure to place them in a sunny spot.
What kind of soil is best for red cabbage?
Red cabbage prefers well-drained, fertile soil with a pH between 6.0 and 7.0. Amend your soil with compost or other organic matter to improve its drainage and fertility. Red cabbage also benefits from a soil rich in nitrogen, so consider adding a nitrogen-rich fertilizer or amendment.
How often should I water red cabbage?
Red cabbage needs consistent moisture to grow properly. Water your plants regularly, especially during dry periods. Aim to keep the soil consistently moist but not waterlogged. Mulching around your plants can help to retain moisture and suppress weeds.
What are some common pests and diseases that affect red cabbage?
Red cabbage can be susceptible to a variety of pests and diseases, including cabbage worms, aphids, flea beetles, and clubroot. To prevent pest and disease problems, practice good garden hygiene. Remove any diseased or infested plants promptly. Use row covers to protect your plants from pests. Consider using organic pest control methods, such as insecticidal soap or neem oil, to control pests. Ensure proper soil drainage and avoid overwatering to prevent fungal diseases like clubroot. Crop rotation is also crucial to prevent soil-borne diseases from building up.
How long does it take for red cabbage to mature?
Red cabbage typically takes 70-90 days to mature, depending on the variety and growing conditions. You’ll know your red cabbage is ready to harvest when the head is firm and tightly packed.
How do I harvest red cabbage?
To harvest red cabbage, use a sharp knife to cut the head from the stem. Leave a few outer leaves on the plant to protect the remaining stem. You can harvest the entire head at once, or you can harvest individual leaves as needed.
How do I store red cabbage?
Red cabbage can be stored in the refrigerator for several weeks. Wrap the head in plastic wrap or store it in a plastic bag to prevent it from drying out. You can also store red cabbage in a root cellar or other cool, dark place.
Can I grow red cabbage in containers?
Yes, you can grow red cabbage in containers. Choose a large pot with good drainage and use a high-quality potting mix. Make sure to provide your plants with plenty of sunlight and water.
What are some good companion plants for red cabbage?
Good companion plants for red cabbage include herbs like rosemary, thyme, and dill; flowers like marigolds and nasturtiums; and vegetables like onions, garlic, and carrots. These plants can help to deter pests, attract beneficial insects, and improve the overall health of your red cabbage plants. Avoid planting red cabbage near other members of the brassica family, such as broccoli, cauliflower, and kale, as they can attract the same pests and diseases.
How can I encourage deeper red color in my red cabbage?
The acidity of the soil can affect the color of red cabbage. More acidic soil tends to produce deeper red colors. You can amend your soil with acidic materials like pine needles or coffee grounds to lower the pH. Also, cooler temperatures can enhance the red pigmentation.
Is red cabbage good for you?
Yes! Red cabbage is packed with nutrients, including vitamins C and K, fiber, and antioxidants. It’s also a good source of glucosinolates, which have been linked to cancer prevention. Adding red cabbage to your diet can help to boost your immune system, improve your digestion, and protect against chronic diseases.
Leave a Comment