

Growing Water Spinach Bottles: Unlock the secrets to a thriving garden, even without a sprawling backyard! Have you ever dreamed of harvesting fresh, vibrant greens right from your windowsill? I’m here to tell you, it’s easier than you think! This DIY guide will walk you through the surprisingly simple process of growing water spinach, also known as Ong Choy, using recycled bottles.
Water spinach has a rich history, deeply rooted in Asian cuisine and culture. For centuries, it’s been a staple in stir-fries, soups, and salads, prized for its delicious flavor and impressive nutritional value. But you don’t need to travel to Asia to enjoy this leafy green. With a few simple steps, you can cultivate your own supply at home.
Why should you try this DIY trick? Well, for starters, it’s incredibly space-saving, perfect for apartment dwellers or anyone with limited gardening space. Plus, it’s a fantastic way to recycle plastic bottles, turning waste into a source of fresh, healthy food. Imagine the satisfaction of snipping off fresh water spinach leaves for your dinner, knowing you grew them yourself! This method of growing water spinach bottles is not only cost-effective but also environmentally friendly. Let’s dive in and discover how to transform those empty bottles into miniature water spinach gardens!
Water Spinach in Bottles: A DIY Guide for Urban Gardeners
Hello dear gardening friends! Do you have limited space but still crave fresh, crispy vegetables? Then I have just the thing for you today: Growing water spinach (also known as Kangkong or Morning Glory) in bottles! Yes, you read that right. This method is super space-saving, easy to implement, and will provide you with delicious, homegrown water spinach in no time. Let’s get started!
What You Need: The Material List
Before we begin, here’s a list of everything you’ll need for your bottle water spinach project:
- Empty plastic bottles: 1.5-liter or 2-liter bottles work best. The larger the bottle, the more space the roots will have. Make sure they are clean.
- Scissors or a utility knife: For cutting the bottles. Be careful!
- Drill or nail and hammer: To create drainage holes.
- Soil: Regular potting soil or a mix of potting soil and compost is ideal.
- Water spinach seeds or cuttings: Seeds are easier to find, but cuttings grow faster.
- Water: For watering, of course!
- Optional: Liquid fertilizer for vegetables (for later, once the water spinach starts growing).
- Optional: Gravel or expanded clay for drainage.
The Preparation: Preparing the Bottles
This step is crucial to ensure your water spinach feels at home in its new bottle dwelling.
- Clean the bottles: Thoroughly rinse the empty plastic bottles with water and dish soap to remove any residue. Dry them well.
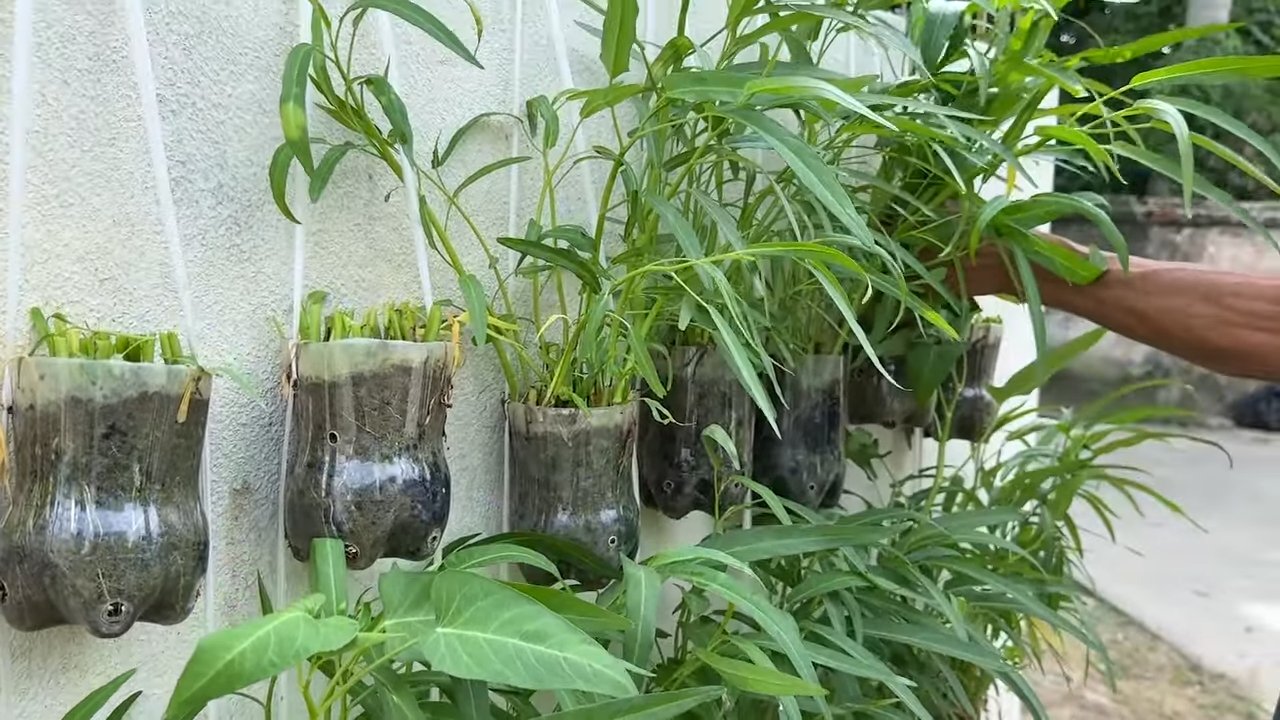
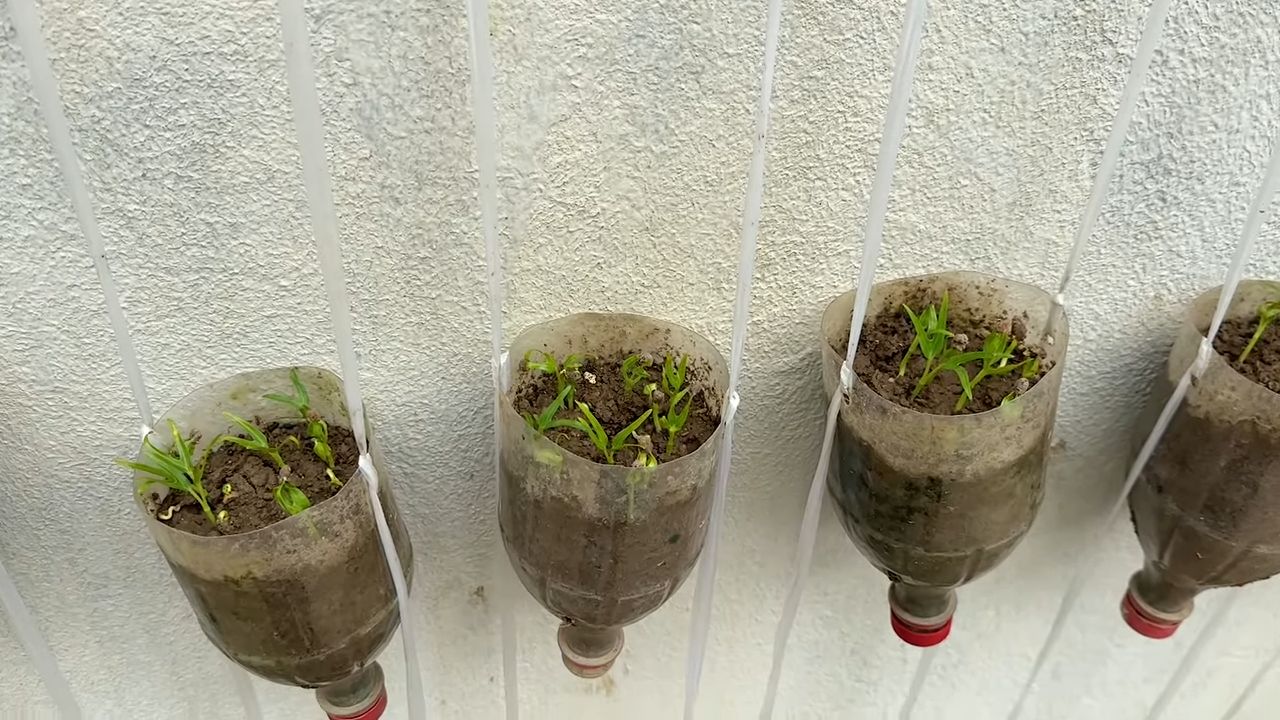
- Cut the bottles: Cut the bottles about one-third from the top. You can save the cut-off tops to use later as mini greenhouses if you are propagating cuttings.
- Drill drainage holes: Drill or use a nail and hammer to make several small holes in the bottom of the bottles. These holes are important to allow excess water to drain and prevent root rot.
- Optional: Add drainage layer: Add a thin layer of gravel or expanded clay to the bottom of the bottles. This will improve drainage.
Planting: Sow Seeds or Set Cuttings
Now comes the exciting part: we’ll get the water spinach into the soil!
Option 1: Using Seeds
- Fill the bottles with soil: Fill the prepared bottles with soil, leaving about 2-3 cm from the top.
- Sow the seeds: Evenly distribute the water spinach seeds over the soil. Press them down lightly.
- Cover with soil: Cover the seeds with a thin layer of soil (about 0.5 cm).
- Water gently: Water the soil carefully so that it is well-moistened. Be sure not to wash away the seeds.
- Place in a warm spot: Place the bottles in a warm and bright location. Water spinach loves warmth!
Option 2: Using Cuttings
- Prepare the cuttings: Cut healthy 10-15 cm long cuttings from an already grown water spinach plant. Remove the lower leaves so the cuttings can focus their energy on rooting.
- Fill the bottles with soil: Fill the prepared bottles with soil, leaving about 2-3 cm from the top.
- Pre-poke holes: Poke small holes in the soil with a pen or your finger.
- Insert the cuttings: Place the cuttings in the holes and press the soil down lightly.
- Water gently: Water the soil carefully so that it is well-moistened.
- Increase humidity: Cover the bottles with the cut-off tops (mini greenhouse) or mist the cuttings regularly with water to increase humidity. This encourages root formation.
Care: Watering, Fertilizing, and Harvesting
To help your water spinach thrive, it needs proper care.
- Watering: Keep the soil consistently moist, but not soggy. Water spinach loves moisture, but standing water should be avoided. Water early in the morning or late in the evening when the sun isn’t shining directly on the plants.
- Fertilizing: Once the plants are a bit bigger (about 10-15 cm), you can fertilize them regularly with a liquid vegetable fertilizer. Follow the instructions on the package.
- Location: Water spinach needs plenty of sunlight. Place the bottles in a sunny spot, like a balcony, terrace, or a sunny window.
- Harvesting: You can start harvesting water spinach once it reaches about 20-30 cm tall. Simply cut the stems with scissors. The plant will continue to grow, and you can harvest it again.
- Pests: Watch for pests like aphids or spider mites. If you spot them, treat the plants with a natural insecticide or rinse off the pests.
Extra Tips for Perfect Water Spinach
- Variety: There are different varieties of water spinach. Research which one is best suited for your region.
- Support for climbing: Water spinach is a climbing plant. You can offer it some support, like a small bamboo stick or a piece of wire.
- Regular harvesting: Regular harvesting encourages more growth.
- Creativity: You can also paint or label the bottles to make your mini garden even more personal.
Common Problems and Solutions
- Yellow leaves: Yellow leaves can indicate a nutrient deficiency. Fertilize the plants with a liquid fertilizer.
- Poor drainage: If water isn’t draining properly, the roots may rot. Check the drainage holes and consider adding a drainage layer.
- Pests: If pests are present, act quickly. Use a natural insecticide or rinse the pests off.
- Slow growth: Slow growth could be due to insufficient sunlight or nutrients. Move the plants to a sunnier location and fertilize regularly.
Why Grow Water Spinach in Bottles? The Benefits
- Space-saving: Perfect for small balconies or terraces.
- Easy: Great for beginners.
- Sustainable: Recycle plastic bottles and grow your own vegetables.
- Fresh: Always have fresh water spinach on hand.
- Healthy: Water spinach is rich in vitamins and minerals.
Recipes with Water Spinach: Kitchen Inspiration
Water spinach is versatile in the kitchen. Here are a few ideas:
- Stir-fried water spinach with garlic: A classic in Asian cuisine.
- Water spinach soup: A light and healthy soup.
- Water spinach salad: A refreshing side dish.
- Water spinach in curry: A tasty and spicy meal.
- Water spinach as a side dish to meat or fish: A healthy and delicious complement.
I hope this guide helps you start your own water spinach project. Enjoy the process and your fresh greens!
Conclusion
So, there you have it! Growing water spinach in bottles is not just a quirky gardening experiment; it’s a genuinely effective and rewarding way to cultivate fresh, nutritious greens right in your own home, regardless of space constraints. We’ve walked you through the simple steps, highlighting the ease and accessibility of this method. Forget complicated setups or expensive equipment. All you need are some recycled bottles, water, nutrient solution, and a little bit of patience to unlock a continuous supply of this delicious vegetable.
Why is this DIY trick a must-try? Because it democratizes access to fresh produce. It empowers you to take control of your food source, even if you live in an apartment with limited outdoor space. It’s an incredibly sustainable practice, repurposing materials that would otherwise end up in landfills. And, let’s be honest, it’s just plain fun! Watching those vibrant green shoots emerge from your repurposed bottles is a truly satisfying experience.
But the beauty of this method lies in its adaptability. Feel free to experiment with different bottle sizes and shapes. Consider using a variety of nutrient solutions to see which yields the best results. You can even try different varieties of water spinach to discover your favorite flavor profile. Perhaps you want to try adding an air pump to the water to increase oxygenation and promote even faster growth. The possibilities are endless!
Don’t be afraid to get creative and personalize your bottle garden. You could paint the bottles to add a splash of color to your space, or even create a vertical garden by hanging them on a wall or balcony. Imagine the visual appeal of a thriving wall of water spinach, providing both beauty and sustenance.
We are confident that once you try growing water spinach in bottles, you’ll be hooked. It’s a simple, sustainable, and satisfying way to enjoy fresh, homegrown greens. So, gather your supplies, follow our guide, and get ready to harvest your own delicious water spinach.
We encourage you to embark on this exciting gardening adventure and share your experiences with us! Post photos of your bottle gardens on social media using #BottleWaterSpinach and let us know what tips and tricks you discover along the way. We can’t wait to see your creations and learn from your experiences. Let’s build a community of bottle gardeners, sharing our knowledge and inspiring others to grow their own food.
This method of growing water spinach is not only efficient but also a fantastic way to introduce children to the wonders of gardening and the importance of sustainable living. It’s a hands-on learning experience that will foster a lifelong appreciation for nature and healthy eating.
So, what are you waiting for? Dive into the world of bottle gardening and discover the joy of growing your own water spinach. You’ll be amazed at how easy and rewarding it is. Happy growing!
Frequently Asked Questions (FAQ)
What kind of bottles are best for growing water spinach?
The best bottles for growing water spinach are those made of food-grade plastic, such as those used for water, soda, or juice. Avoid using bottles that have contained harsh chemicals or cleaning products. Clear or translucent bottles are preferable, as they allow sunlight to reach the roots. The size of the bottle will depend on your space and desired yield, but bottles ranging from 1 to 3 liters are generally a good starting point. Make sure to thoroughly clean and rinse the bottles before use to remove any residue.
What kind of nutrient solution should I use?
A balanced hydroponic nutrient solution is ideal for growing water spinach in bottles. These solutions are specifically formulated to provide the essential nutrients that plants need to thrive in a soilless environment. You can find hydroponic nutrient solutions at most garden centers or online retailers. Follow the instructions on the packaging carefully to ensure that you are using the correct concentration. Alternatively, you can create your own nutrient solution using readily available ingredients, but this requires more research and precision. Remember to change the nutrient solution every 1-2 weeks to prevent nutrient depletion and the buildup of harmful bacteria.
How much sunlight does water spinach need?
Water spinach thrives in full sunlight, requiring at least 6-8 hours of direct sunlight per day. If you don’t have access to a sunny outdoor space, you can supplement with artificial grow lights. Position the grow lights close to the plants to provide adequate illumination. Insufficient sunlight can lead to stunted growth and pale leaves. Rotate the bottles regularly to ensure that all sides of the plants receive equal exposure to sunlight.
How often should I water the water spinach?
Since water spinach is grown in water in this method, you don’t need to “water” it in the traditional sense. However, you need to monitor the water level in the bottles and replenish it as needed. The water level should always be high enough to cover the roots. Check the water level daily, especially during hot weather, as evaporation can occur quickly. In addition to replenishing the water, you should also change the nutrient solution every 1-2 weeks to provide fresh nutrients to the plants.
How long does it take for water spinach to grow?
Water spinach is a fast-growing vegetable. You can typically start harvesting leaves within 3-4 weeks of planting the seeds or cuttings. The exact time will depend on factors such as temperature, sunlight, and nutrient availability. Continue harvesting leaves regularly to encourage further growth. With proper care, you can enjoy a continuous supply of water spinach for several months.
How do I harvest water spinach?
Harvesting water spinach is simple. Use scissors or a sharp knife to cut the stems about 4-6 inches from the top. This will encourage the plant to produce new shoots from the cut stems. You can harvest leaves as needed, but avoid removing more than one-third of the plant at a time. Regular harvesting will promote bushier growth and a more abundant yield.
Can I grow water spinach indoors?
Yes, you can grow water spinach indoors, but you will need to provide adequate lighting. Place the bottles near a sunny window that receives at least 6-8 hours of direct sunlight per day. If you don’t have enough natural light, you can supplement with artificial grow lights. Indoor growing can be a great option for those who live in colder climates or have limited outdoor space.
What are some common problems when growing water spinach in bottles?
Some common problems when growing water spinach in bottles include algae growth, nutrient deficiencies, and pest infestations. Algae growth can be prevented by keeping the bottles clean and avoiding excessive sunlight exposure. Nutrient deficiencies can be addressed by using a balanced hydroponic nutrient solution and changing it regularly. Pest infestations can be controlled by using organic pest control methods, such as neem oil or insecticidal soap. Regularly inspect your plants for any signs of problems and take action promptly to prevent them from escalating.
Is growing water spinach in bottles sustainable?
Yes, growing water spinach in bottles is a very sustainable practice. It repurposes materials that would otherwise end up in landfills, reduces the need for transportation of produce, and minimizes water usage compared to traditional gardening methods. By growing your own food, you can reduce your carbon footprint and contribute to a more sustainable food system.
Can I use cuttings instead of seeds to grow water spinach?
Yes, you can easily propagate water spinach from cuttings. Simply take cuttings from healthy stems, about 4-6 inches long, and remove the lower leaves. Place the cuttings in water until roots develop, which usually takes about a week. Once the roots are about an inch long, you can transplant the cuttings into the bottles. Growing from cuttings is a faster way to get started than growing from seeds.


Leave a Comment