

Growing water spinach containers is easier than you might think, and trust me, you’ll be hooked once you taste the fresh, homegrown goodness! Imagine stepping out to your patio or balcony and snipping off vibrant, leafy greens for a delicious stir-fry or salad. No more trips to the Asian market – you’ll have a constant supply right at your fingertips.
Water spinach, also known as Ong Choy or Kang Kong, has been a staple in Asian cuisine for centuries. From the bustling streets of Bangkok to the serene rice paddies of Vietnam, this versatile vegetable has nourished generations. It’s not just delicious; it’s packed with vitamins and minerals, making it a healthy addition to any diet.
But why bother with growing water spinach containers yourself? Well, store-bought water spinach can sometimes be a bit…lacking. It might be wilted, bruised, or just not as flavorful as you’d hoped. Plus, there’s the satisfaction of knowing exactly where your food comes from and that it’s free from harmful pesticides. In this article, I’m going to share my favorite DIY tricks and hacks for cultivating thriving water spinach right in your own home, even if you have limited space. Get ready to unleash your inner gardener and enjoy the freshest, most flavorful water spinach you’ve ever tasted!
Growing Water Spinach (Kangkong) in Containers: A Beginner’s Guide
Hey there, fellow gardening enthusiasts! I’m so excited to share my experience with growing water spinach, also known as kangkong or ong choy, in containers. It’s surprisingly easy, even if you don’t have a huge backyard. This leafy green is packed with nutrients and adds a delicious, slightly nutty flavor to stir-fries, soups, and salads. Plus, it grows incredibly fast, giving you a rewarding harvest in just a few weeks! Let’s dive into how you can grow your own kangkong at home.
What You’ll Need
Before we get started, let’s gather all the necessary supplies. Trust me, having everything ready beforehand will make the process much smoother.
* Water Spinach Seeds: You can find these online or at your local Asian grocery store. Look for varieties specifically suited for container gardening if possible.
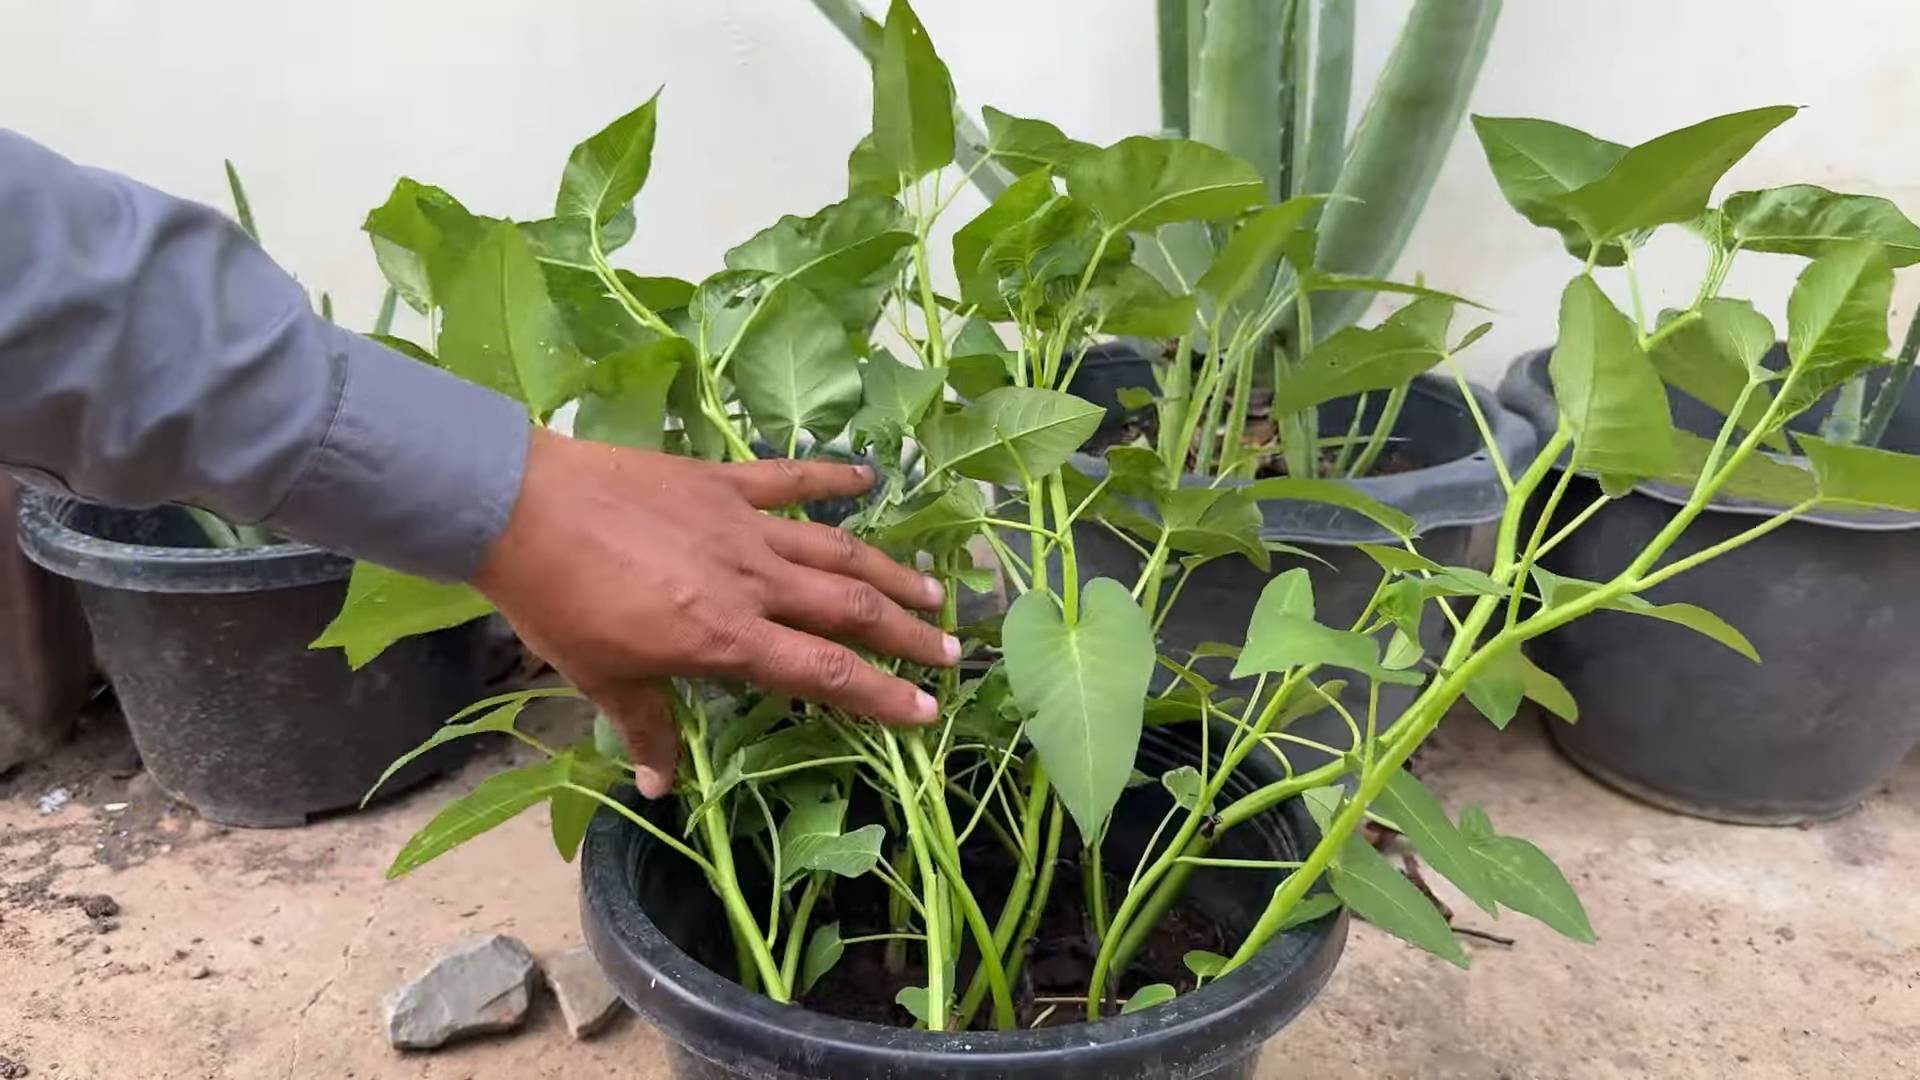
* Containers: Choose containers that are at least 12 inches deep and wide. Water spinach loves water, so a container without drainage holes is actually preferable, but we’ll talk about managing drainage later. I’ve had success with large plastic tubs, buckets, and even repurposed storage containers.
* Potting Mix: Use a good quality potting mix that retains moisture well. Avoid garden soil, as it can become compacted in containers.
* Fertilizer: A balanced liquid fertilizer or slow-release fertilizer will help your kangkong thrive. I prefer using a liquid fertilizer every couple of weeks.
* Water: Obviously! You’ll need plenty of water to keep your water spinach happy.
* Sunlight: Water spinach needs at least 6 hours of sunlight per day. Choose a sunny spot on your balcony, patio, or even indoors near a bright window.
* Optional:
* Seed Starting Tray: For pre-sprouting seeds (optional but recommended).
* Heat Mat: To speed up germination (especially in cooler climates).
* Watering Can or Hose: For easy watering.
* Gloves: To keep your hands clean.
Preparing Your Containers
This step is crucial for creating the ideal environment for your kangkong to flourish.
1. Clean Your Containers: If you’re using recycled containers, make sure to clean them thoroughly with soap and water to remove any dirt or debris.
2. Consider Drainage (or Lack Thereof): Water spinach thrives in moist conditions, so you can actually get away with using containers without drainage holes. However, this requires careful monitoring to prevent waterlogging. If you’re using containers with drainage holes, you’ll need to water more frequently. I personally prefer using containers *without* drainage holes, but I’m very careful not to overwater.
3. Add Potting Mix: Fill your containers with potting mix, leaving about an inch or two of space at the top. Gently pat down the soil to remove any air pockets.
Sowing the Seeds
Now comes the fun part – planting the seeds!
1. Pre-Sprouting (Optional but Recommended): To speed up germination, you can pre-sprout your water spinach seeds. Soak the seeds in warm water for 24 hours. Then, place them on a damp paper towel in a sealed plastic bag or container. Keep the paper towel moist and place the bag in a warm location. You should see sprouts emerge within a few days.
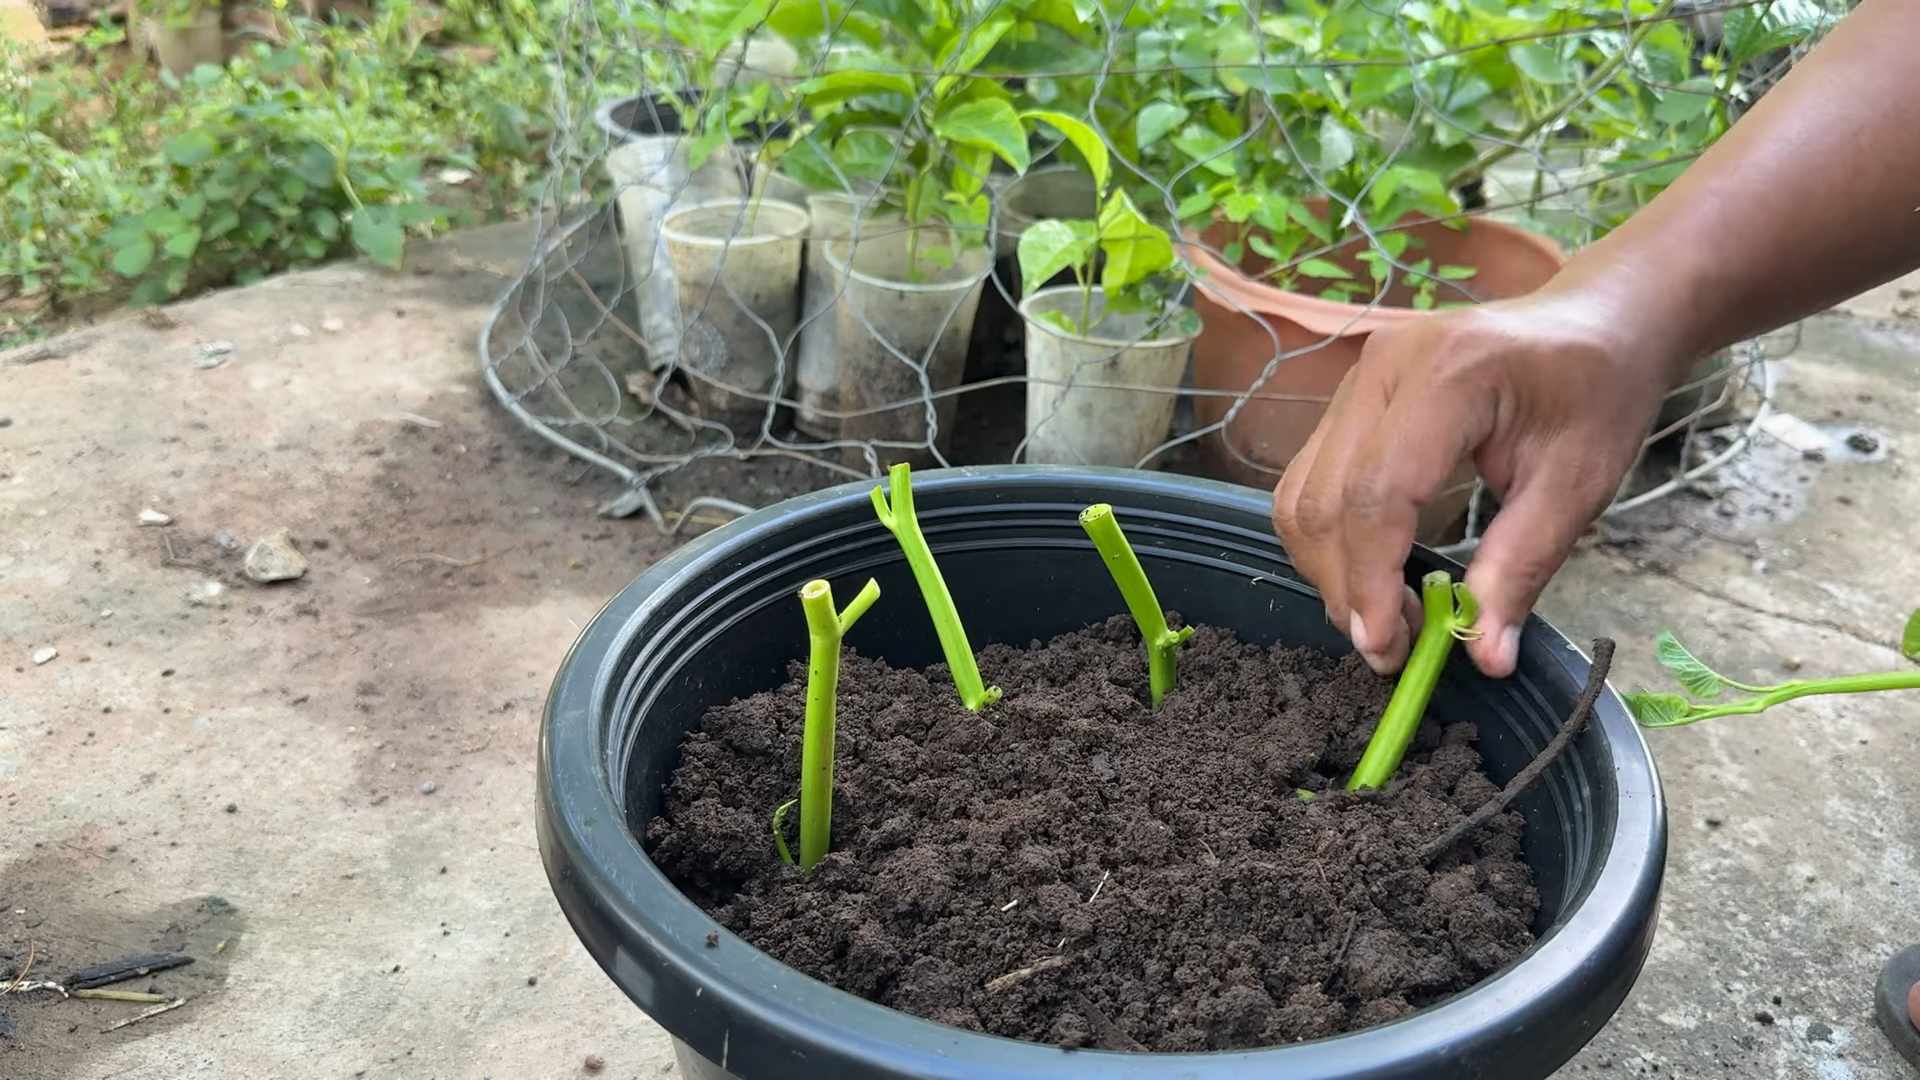
2. Sowing Directly into Containers: If you’re not pre-sprouting, you can sow the seeds directly into the containers. Make small holes about half an inch deep and an inch apart. Place 2-3 seeds in each hole and cover them with potting mix.
3. Water Gently: Water the soil gently to avoid disturbing the seeds. Use a watering can with a rose head or a gentle spray from a hose.
4. Provide Warmth: Water spinach germinates best in warm temperatures (around 70-80°F). If you’re in a cooler climate, you can use a heat mat to speed up germination.
Caring for Your Water Spinach
Consistent care is key to a bountiful harvest.
1. Watering: Water spinach loves water, so keep the soil consistently moist. Check the soil moisture daily and water whenever the top inch feels dry. If you’re using containers without drainage holes, be careful not to overwater. The soil should be moist but not soggy.
2. Sunlight: Ensure your water spinach receives at least 6 hours of sunlight per day. If you’re growing indoors, place the containers near a bright window or use grow lights.
3. Fertilizing: Feed your water spinach with a balanced liquid fertilizer every two weeks. Follow the instructions on the fertilizer package. You can also use a slow-release fertilizer when planting.
4. Pest Control: Water spinach is relatively pest-resistant, but keep an eye out for aphids, spider mites, and snails. If you spot any pests, you can try spraying them with insecticidal soap or neem oil. Handpicking snails is also effective.
5. Weeding: Remove any weeds that may sprout in your containers. Weeds can compete with your water spinach for nutrients and water.
Harvesting Your Water Spinach
The best part – enjoying the fruits (or rather, leaves) of your labor!
1. When to Harvest: You can start harvesting your water spinach about 4-6 weeks after planting. The leaves should be about 6-8 inches long.
2. How to Harvest: Use scissors or a sharp knife to cut the stems about 2-3 inches above the soil line. This will encourage the plant to produce new shoots.
3. Harvesting Technique: You can harvest the entire plant at once or harvest individual stems as needed. I prefer to harvest individual stems, as this allows the plant to continue producing new growth.
4. Post-Harvest Care: After harvesting, water the plants well and fertilize them to encourage new growth.
Troubleshooting
Even with the best care, you might encounter some challenges. Here are a few common issues and how to address them:
* Yellowing Leaves: This could be a sign of overwatering, underwatering, or nutrient deficiency. Check the soil moisture and adjust your watering accordingly. If the soil is consistently moist, you may be overwatering. If the soil is dry, you may be underwatering. If the leaves are yellowing all over, it could be a sign of nutrient deficiency. Try fertilizing with a balanced liquid fertilizer.
* Slow Growth: Slow growth could be due to insufficient sunlight, cool temperatures, or nutrient deficiency. Make sure your water spinach is getting at least 6 hours of sunlight per day. If you’re in a cooler climate, you can use a heat mat to warm the soil. Try fertilizing with a balanced liquid fertilizer.
* Pests: As mentioned earlier, keep an eye out for aphids, spider mites, and snails. Spray with insecticidal soap or neem oil for aphids and spider mites. Handpick snails.
* Leggy Growth: If your water spinach is growing tall and spindly with few leaves, it’s likely not getting enough sunlight. Move it to a sunnier location or use grow lights.
Tips for Success
Here are a few extra tips to help you grow the best water spinach possible:
* Succession Planting: To ensure a continuous harvest, sow new seeds every 2-3 weeks.
* Pinching: Pinching off the tips of the stems will encourage bushier growth.
* Water Quality: Use filtered or dechlorinated water if possible. Tap water can sometimes contain chemicals that can harm your plants.
* Observe Your Plants: Pay attention to your plants and learn to recognize the signs of stress. The sooner you identify a problem, the easier it will be to fix it.
* Enjoy the Process: Gardening should be enjoyable! Don’t be afraid to experiment and learn from your mistakes.
Section: Advanced Techniques for Maximizing Your Harvest
Once you’ve mastered the basics, you can try these advanced techniques to boost your water spinach production:
1. Hydroponics: Water spinach is incredibly well-suited for hydroponic systems. You can grow it in a simple Kratky setup (passive hydroponics) or a more complex recirculating system. Hydroponics allows for faster growth and higher yields. I’ve experimented with a simple Kratky setup using a plastic tub and nutrient solution, and the results were amazing!
2. Aquaponics: If you have a fish tank, you can integrate water spinach into an aquaponic system. The fish waste provides nutrients for the plants, and the plants filter the water for the fish. It’s a symbiotic relationship that can be very rewarding.
3. Vertical Gardening: If you’re short on space, consider growing water spinach vertically. You can use hanging baskets, wall planters, or even build your own vertical garden structure.
4.
Conclusion
So, there you have it! Growing water spinach in containers is not just a gardening project; it’s a gateway to fresh, delicious, and nutritious greens right at your fingertips. This simple DIY trick transforms any sunny balcony, patio, or even a well-lit indoor space into a thriving edible garden. Forget those wilted, overpriced bunches at the grocery store. Imagine stepping outside and harvesting crisp, vibrant water spinach whenever you need it for your stir-fries, soups, or salads.
Why is this a must-try? Because it’s incredibly rewarding. Watching those tiny seeds sprout and rapidly transform into lush, leafy greens is a truly satisfying experience. It’s also remarkably easy and cost-effective. With just a few basic supplies – a container, some soil, water, and sunlight – you can cultivate a continuous supply of this versatile vegetable. Plus, you’re in complete control of the growing environment, ensuring your water spinach is free from harmful pesticides and chemicals.
But the benefits don’t stop there. Growing your own food connects you to nature, promotes sustainability, and encourages healthier eating habits. It’s a fantastic way to reduce your carbon footprint and contribute to a more environmentally friendly lifestyle. And let’s not forget the sheer joy of sharing your homegrown bounty with friends and family!
Looking for variations? Absolutely! Experiment with different container sizes and shapes to find what works best for your space. Try adding slow-release fertilizer to the soil for an extra boost of nutrients. You can also explore different growing mediums, such as hydroponics, for a more advanced approach. Consider companion planting with herbs like basil or mint to deter pests and enhance the flavor of your water spinach. For those in cooler climates, a small greenhouse or even a sunny windowsill can extend your growing season. You can even try growing different varieties of water spinach, each with its own unique flavor and texture. Some varieties are more heat-tolerant, while others are better suited for cooler temperatures.
Don’t be intimidated if you’re a beginner gardener. Growing water spinach in containers is surprisingly forgiving. Just remember to provide plenty of sunlight, water, and nutrients, and you’ll be well on your way to a successful harvest.
We wholeheartedly encourage you to give this DIY trick a try. It’s a fun, educational, and ultimately delicious way to enhance your gardening skills and enjoy the freshest possible water spinach. Once you’ve experienced the satisfaction of harvesting your own homegrown greens, you’ll never look at store-bought vegetables the same way again.
And most importantly, we want to hear about your experience! Share your photos, tips, and stories in the comments below. Let us know what worked well for you, what challenges you faced, and any creative variations you tried. Together, we can build a community of water spinach enthusiasts and inspire others to embrace the joys of homegrown food. So, grab your containers, seeds, and get ready to embark on a rewarding gardening adventure! Let’s get growing!
Frequently Asked Questions (FAQs)
What kind of container is best for growing water spinach?
The ideal container for growing water spinach should be at least 12 inches deep and wide to provide ample space for the roots to develop. Plastic tubs, large pots, or even repurposed containers like old buckets or storage bins can work well. Ensure the container has drainage holes to prevent waterlogging, which can lead to root rot. If you’re using a container without drainage holes, you’ll need to be extra careful with watering to avoid overwatering. Dark-colored containers can absorb more heat, which can be beneficial in cooler climates but may overheat the soil in hotter regions. Consider using lighter-colored containers or providing shade during the hottest part of the day.
What type of soil should I use?
Water spinach thrives in rich, well-draining soil. A good potting mix amended with compost or other organic matter is ideal. Avoid using heavy clay soil, as it can become waterlogged and hinder root growth. You can also create your own soil mix by combining equal parts potting soil, compost, and perlite or vermiculite for improved drainage. The pH of the soil should be slightly acidic to neutral, around 6.0 to 7.0. You can test the pH of your soil using a soil testing kit and amend it accordingly if necessary.
How much sunlight does water spinach need?
Water spinach requires at least 6 hours of direct sunlight per day to thrive. If you’re growing it indoors, place it near a sunny window or use grow lights to supplement natural light. Insufficient sunlight can result in leggy growth and reduced yields. If you live in a particularly hot climate, providing some afternoon shade can help prevent the leaves from scorching. Observe your plants closely and adjust their position as needed to ensure they’re receiving adequate sunlight.
How often should I water my water spinach?
Water spinach is a water-loving plant, so it needs to be watered frequently to keep the soil consistently moist. Check the soil moisture daily and water whenever the top inch feels dry to the touch. In hot weather, you may need to water it more than once a day. Avoid letting the soil dry out completely, as this can stress the plants and reduce their growth. You can also use a self-watering container or add a layer of mulch to help retain moisture in the soil.
How do I fertilize water spinach?
Water spinach is a heavy feeder and benefits from regular fertilization. Use a balanced liquid fertilizer diluted to half strength every two to three weeks. You can also add slow-release fertilizer to the soil at planting time. Avoid over-fertilizing, as this can lead to excessive vegetative growth at the expense of leaf production. Organic fertilizers, such as compost tea or fish emulsion, are also excellent options.
When can I harvest my water spinach?
You can start harvesting water spinach about 4 to 6 weeks after planting. Harvest the stems and leaves when they are about 6 to 8 inches long. Cut the stems a few inches above the soil line, and the plant will continue to produce new growth. Regular harvesting encourages bushier growth and prolongs the harvest period. You can harvest water spinach multiple times throughout the growing season.
What are some common pests and diseases that affect water spinach?
Water spinach is generally resistant to pests and diseases, but it can be susceptible to aphids, spider mites, and fungal diseases like powdery mildew. Inspect your plants regularly for signs of infestation or disease and take action promptly. You can control aphids and spider mites with insecticidal soap or neem oil. Prevent fungal diseases by ensuring good air circulation and avoiding overwatering.
Can I grow water spinach indoors?
Yes, you can grow water spinach indoors, provided you can provide adequate sunlight or use grow lights. Choose a sunny window that receives at least 6 hours of direct sunlight per day. If you don’t have enough natural light, use grow lights to supplement. Keep the soil consistently moist and fertilize regularly. Indoor-grown water spinach may not grow as vigorously as outdoor-grown plants, but you can still harvest a decent amount of greens.
Is water spinach safe to eat?
Yes, water spinach is safe to eat when grown properly. However, it’s important to source your seeds from a reputable supplier and avoid growing it in contaminated soil or water. Water spinach can accumulate heavy metals from the soil, so it’s essential to ensure the growing environment is clean and free from pollutants. Wash the leaves thoroughly before eating to remove any dirt or debris.
How do I store harvested water spinach?
Harvested water spinach is best used fresh, but you can store it in the refrigerator for a few days. Wrap the leaves in a damp paper towel and place them in a plastic bag or container. Store them in the crisper drawer of your refrigerator. Avoid storing water spinach near ethylene-producing fruits, such as apples or bananas, as this can cause it to spoil more quickly.

Leave a Comment