

Harvesting bean sprouts quickly can feel like a superpower for any home gardener, transforming your kitchen into a miniature, self-sufficient farm! Imagine, fresh, crunchy bean sprouts gracing your salads, stir-fries, and sandwiches, all thanks to your own green thumb and a few clever tricks. But let’s be honest, the traditional methods can be a bit… tedious. Waiting days, even weeks, for those tiny sprouts to reach their peak can test even the most patient gardener.
Sprouting, in its essence, is an ancient practice. Cultures across the globe, from Asia to the Middle East, have long recognized the nutritional powerhouse packed within these tiny seedlings. They represent new life, a burst of energy, and a readily available source of vitamins and minerals, especially crucial during times of scarcity. Think of it as nature’s fast food, but the healthy, delicious kind!
That’s where this DIY guide comes in. We’re not just talking about growing bean sprouts; we’re talking about harvesting bean sprouts quickly and efficiently. We’ll explore simple, yet effective hacks that will dramatically reduce your sprouting time, maximize your yield, and minimize the effort involved. No more waiting around! I’m going to share my favorite tips and tricks that I’ve learned over the years, so you can enjoy a constant supply of fresh, homegrown bean sprouts. Get ready to unlock the secrets to rapid sprouting and elevate your home gardening game!
DIY Bean Sprout Harvesting Hack: From Seed to Salad in Days!
Okay, let’s be honest, store-bought bean sprouts are… fine. But nothing beats the fresh, crisp taste of homegrown sprouts, especially when you can harvest them quickly and easily. I’m going to share my favorite method for getting a bountiful harvest of bean sprouts in just a few days, using materials you probably already have at home. Get ready to ditch those limp, flavorless sprouts forever!
What You’ll Need: The Essential Sprouting Toolkit
Before we dive in, let’s gather our supplies. This is a pretty low-tech operation, which is part of why I love it so much.
* Sprouting Beans: Mung beans are the classic choice, and they sprout reliably. You can find them at most grocery stores or Asian markets. Make sure they are intended for sprouting, not cooking.
* Wide-Mouth Jar: A quart-sized mason jar works perfectly. You can also use a clean glass jar from pickles or pasta sauce.
* Sprouting Lid or Cheesecloth: A sprouting lid is ideal because it allows for easy rinsing and drainage. If you don’t have one, a piece of cheesecloth secured with a rubber band will do the trick.
* Water: Filtered water is best, but tap water that’s been sitting out for a while to let the chlorine dissipate is also fine.
* Dark Location: A cupboard, drawer, or even a covered box will work. Darkness is key for encouraging long, white sprouts.
* Shallow Dish or Tray: To catch any drips from the jar.
* Optional: A small amount of hydrogen peroxide (3%) can help prevent mold.
The Sprouting Process: A Step-by-Step Guide
Now for the fun part! Let’s get those beans sprouting.
1. Rinse the Beans: Place about 1/4 cup of mung beans in your wide-mouth jar. Rinse them thoroughly with cool water, removing any debris or broken beans. This is important for preventing mold growth.
2. Soak the Beans: Fill the jar with cool water, ensuring the beans are completely submerged. They’ll expand significantly as they soak. Cover the jar with your sprouting lid or cheesecloth and secure it with a rubber band. Let the beans soak for 8-12 hours, or overnight. I usually do this before I go to bed so they are ready in the morning.
3. Drain and Rinse: After soaking, drain the water completely. Rinse the beans thoroughly with fresh, cool water. This is crucial for removing any accumulated starches and preventing spoilage.
4. Invert and Drain: Place the jar upside down in your shallow dish or tray at a slight angle. This allows excess water to drain out while still providing the beans with the humidity they need to sprout. The angle is important; you don’t want the beans sitting in a pool of water.
5. Darkness is Your Friend: Place the jar in your chosen dark location. This encourages the sprouts to grow long and white, rather than short and green.
6. Rinse and Drain (Twice a Day): This is the most important step for successful sprouting! Rinse and drain the beans twice a day, every day. This keeps them hydrated and prevents mold growth. Use cool, fresh water each time. I usually do this in the morning and evening.
7. Optional Hydrogen Peroxide Treatment: If you’re concerned about mold, you can add a teaspoon of 3% hydrogen peroxide to the rinsing water once a day. This will help kill any mold spores without harming the sprouts.
8. Observe and Enjoy the Growth: Within a day or two, you’ll start to see tiny sprouts emerging from the beans. Continue rinsing and draining twice a day, and watch them grow!
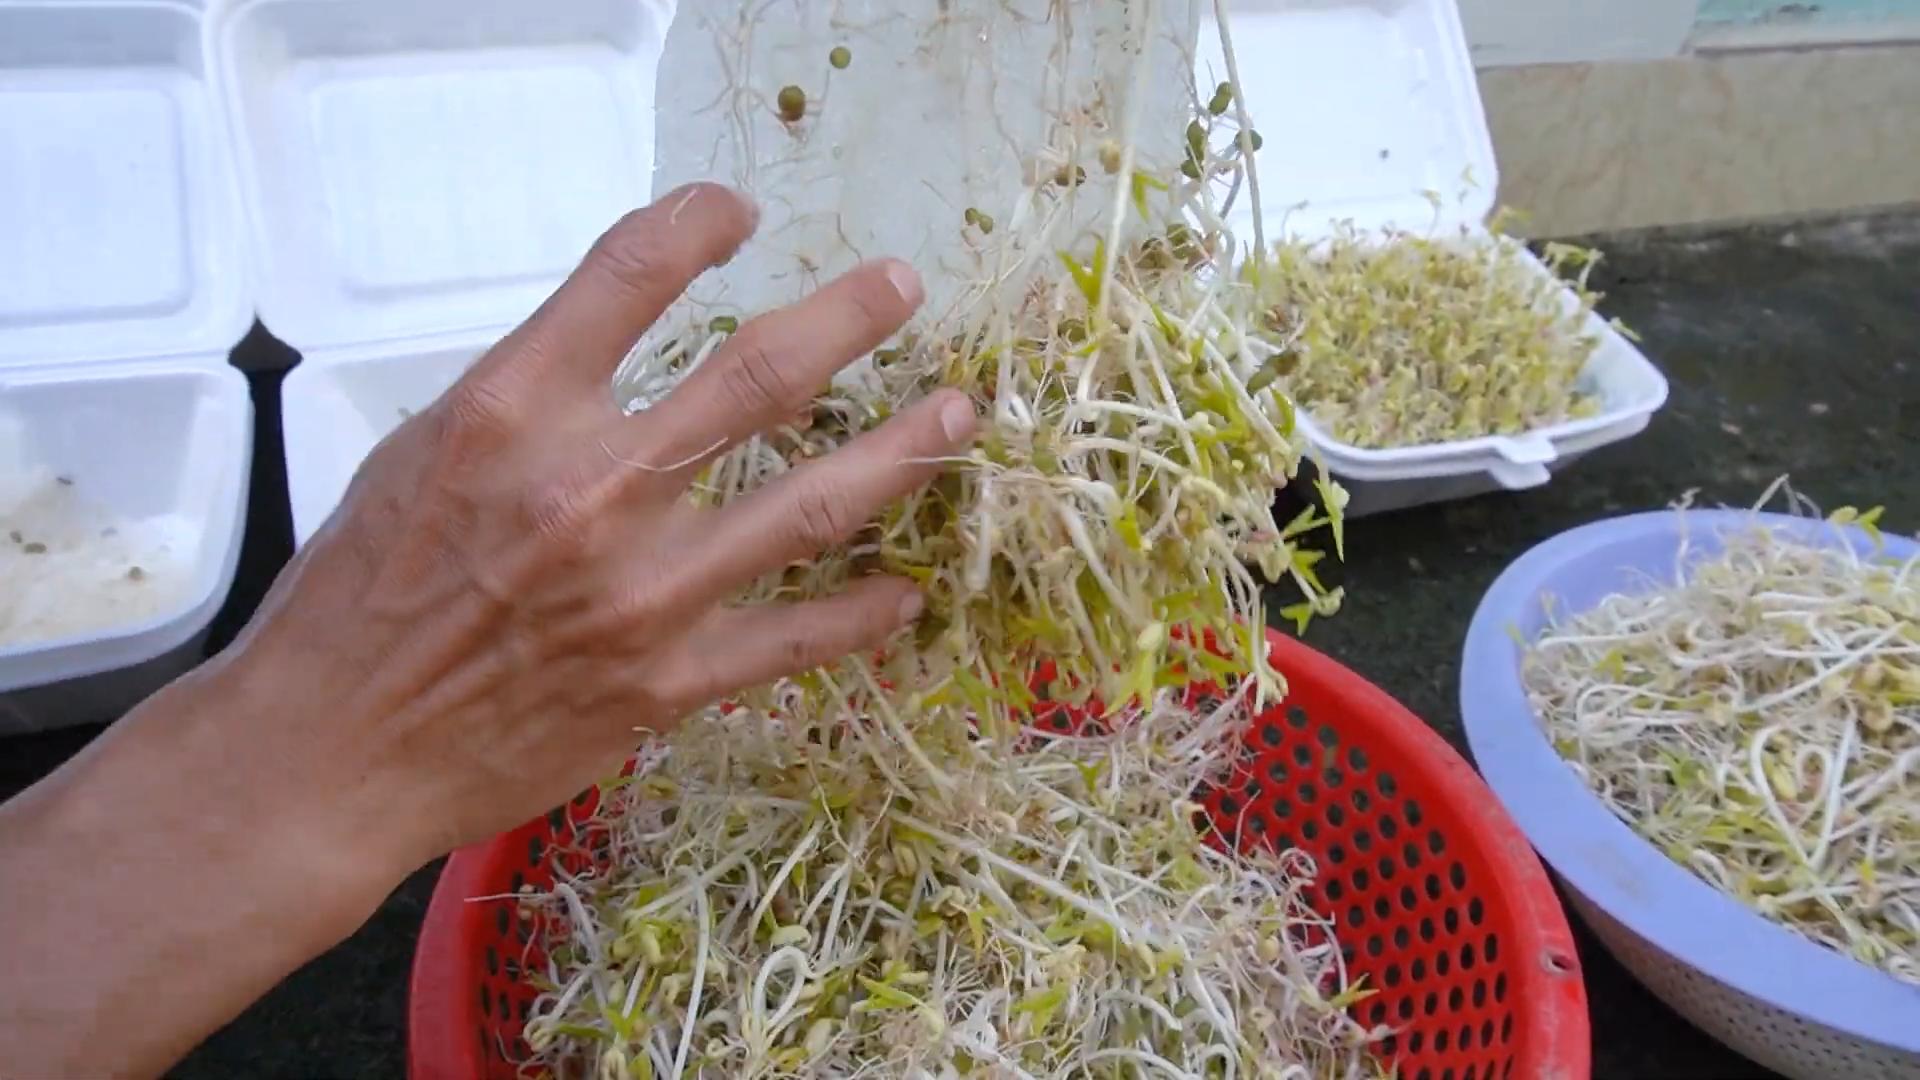
9. Harvest Time: Your bean sprouts will be ready to harvest in about 3-5 days, depending on your preference. I like them when they’re about 1-2 inches long.
Harvesting and Storing Your Bean Sprouts: Keeping Them Fresh
Okay, so you’ve got a jar full of beautiful, crunchy bean sprouts. Now what?
1. Final Rinse: Before harvesting, give your sprouts one last thorough rinse. This will remove any remaining seed husks.
2. Harvesting: You can either harvest the entire batch at once or harvest as needed. To harvest, simply remove the sprouts from the jar.
3. Drying: Gently pat the sprouts dry with a clean paper towel. This will help them stay fresh longer.
4. Storage: Store your bean sprouts in an airtight container in the refrigerator. They should last for about a week. I like to line the container with a paper towel to absorb any excess moisture.
Troubleshooting: Common Sprouting Problems and Solutions
Even with the best intentions, sometimes things can go wrong. Here are some common sprouting problems and how to fix them:
* Mold Growth: This is the most common problem. If you see any fuzzy white or gray mold, discard the entire batch. To prevent mold, make sure you’re rinsing and draining the beans thoroughly twice a day. You can also add a small amount of hydrogen peroxide to the rinsing water. Using clean equipment is also key.
* Slow Growth: If your sprouts are growing slowly, it could be due to temperature. Bean sprouts prefer a temperature of around 70-75°F (21-24°C). If your house is too cold, try placing the jar in a slightly warmer location.
* Rotting Beans: If the beans are rotting instead of sprouting, it’s likely due to overwatering or poor drainage. Make sure you’re draining the jar completely after each rinse.
* Bitter Taste: A bitter taste can be caused by insufficient rinsing. Make sure you’re rinsing the sprouts thoroughly twice a day.
Beyond the Basics: Tips and Tricks for Sprouting Success
Here are a few extra tips and tricks I’ve learned over the years that can help you become a sprouting pro:
* Use High-Quality Beans: The quality of your beans will directly impact your sprouting success. Choose beans that are specifically intended for sprouting and are free from damage or discoloration.
* Experiment with Different Beans: While mung beans are the most common choice, you can also sprout other types of beans, such as adzuki beans, lentils, and chickpeas. Each type of bean has a slightly different flavor and texture.
* Sprout in Small Batches: It’s better to sprout in small batches so you can use them up before they go bad. A 1/4 cup of dry beans will yield a surprising amount of sprouts.
* Use a Sprouting Tower: If you’re serious about sprouting, consider investing in a sprouting tower. These multi-tiered systems allow you to sprout multiple types of beans at the same time.
* Eat Your Sprouts Raw or Cooked: Bean sprouts can be eaten raw in salads, sandwiches, and wraps. They can also be cooked in stir-fries, soups, and stews.
* Don’t Overcrowd the Jar: Using too many beans in the jar can lead to overcrowding and poor air circulation, which can increase the risk of mold growth. Stick to about 1/4 cup of dry beans per quart-sized jar.
* Keep it Clean: Make sure your jar, lid, and any other equipment you use are thoroughly cleaned before each batch of sprouts. This will help prevent the growth of bacteria and mold.
* Adjust to Your Climate: Sprouting times can vary depending on your climate. In warmer climates, sprouts may grow faster. In cooler climates, they may take a bit longer.
* Don’t Give Up: Sprouting can be a bit tricky at first, but don’t give up! With a little practice, you’ll be able to grow your own delicious and nutritious bean sprouts in no time.
Using Your Homegrown Bean Sprouts: Culinary Inspiration
Now that you have a bounty of fresh bean sprouts, let’s talk about how to use them! They’re incredibly versatile and can add a delightful crunch and freshness to a variety of dishes.
* Salads: Add bean sprouts to your favorite salads for a boost of nutrients and a satisfying crunch. They pair well with Asian-inspired dressings and ingredients like shredded carrots, cucumbers, and sesame seeds.
* Sandwiches and Wraps: Bean sprouts make a great addition to sandwiches and wraps. They add a refreshing crunch and a subtle nutty flavor.
* Stir-Fries: Bean sprouts are a classic ingredient in stir-fries. Add them towards the end of cooking to maintain their crispness.
* Soups and Noodles: Bean sprouts can be added to soups and noodle dishes for added texture and flavor. They’re especially delicious in pho and ramen.
* Spring Rolls: Bean sprouts are a key ingredient in fresh spring rolls. They add a refreshing crunch and a subtle sweetness.

Conclusion
So, there you have it! Harvesting bean sprouts quickly doesn’t have to be a chore. By implementing this simple, yet effective DIY trick, you can say goodbye to tedious, time-consuming methods and hello to a bountiful harvest of fresh, crunchy bean sprouts in a fraction of the time. This method not only streamlines the process but also minimizes damage to the delicate sprouts, ensuring you get the highest quality yield possible.
Think about it: no more painstakingly picking through tangled masses, no more accidentally breaking off sprouts, and no more spending hours to get a small bowlful. This DIY approach is a game-changer, especially if you’re a regular consumer of bean sprouts in salads, stir-fries, or as a healthy snack. It’s efficient, cost-effective, and environmentally friendly, reducing food waste and promoting a more sustainable lifestyle.
But the beauty of this method lies not only in its speed but also in its adaptability. Feel free to experiment with different container sizes and mesh types to find what works best for your specific needs and the quantity of bean sprouts you’re growing. For example, if you’re growing larger quantities, consider using a larger container with a wider mesh surface. Or, if you prefer smaller, more delicate sprouts, you might opt for a finer mesh.
Don’t be afraid to get creative! You can even try adding a layer of cheesecloth beneath the mesh for an extra layer of protection and to prevent any sprouts from slipping through. Another variation could involve using a colander with larger holes and lining it with a thin, clean cloth before placing the sprouts inside. This provides a similar effect to the mesh but allows for easier cleaning.
The key is to find a system that works best for you and your growing conditions. Remember to always use clean water and equipment to prevent contamination and ensure the health and safety of your bean sprouts.
We are confident that once you try this DIY trick, you’ll never go back to the old way of harvesting bean sprouts. It’s a simple, effective, and rewarding method that will save you time and effort while providing you with a constant supply of fresh, delicious sprouts.
So, what are you waiting for? Give this DIY trick a try and experience the difference for yourself! We encourage you to share your experiences, tips, and variations in the comments below. Let’s build a community of sprout enthusiasts and learn from each other. Tell us how this method worked for you, what modifications you made, and any other helpful hints you’ve discovered. Your feedback is invaluable and will help others discover the joy of quickly and efficiently harvesting their own bean sprouts. Happy sprouting!
Frequently Asked Questions (FAQ)
What type of bean sprouts does this DIY trick work best for?
This DIY trick is versatile and works well for a variety of bean sprouts, including mung bean sprouts, soybean sprouts, and lentil sprouts. The key is to adjust the mesh size and container size based on the size and delicacy of the sprouts. For smaller sprouts like lentil sprouts, a finer mesh is recommended to prevent them from falling through. For larger sprouts like soybean sprouts, a larger mesh size will suffice. The method is generally applicable to any type of bean sprout grown using a similar sprouting method.
How often should I harvest my bean sprouts?
The ideal harvesting time depends on your personal preference and the desired size of the sprouts. Generally, bean sprouts are ready to harvest within 3-5 days of sprouting. You can harvest them when they reach your desired length and thickness. Check them daily and harvest when they look plump and have a good crunch. Overgrown sprouts can become bitter and less palatable.
What if my bean sprouts are too tangled to easily separate using this method?
If your bean sprouts are heavily tangled, gently loosen them with your fingers before attempting to lift them out with the mesh. You can also try soaking the sprouts in cool water for a few minutes to help them separate more easily. Avoid pulling or tugging forcefully, as this can damage the delicate sprouts. Patience is key!
How do I clean the mesh or container after harvesting?
Thoroughly clean the mesh and container with warm, soapy water after each harvest. Rinse well to remove any soap residue. You can also sanitize the equipment with a diluted bleach solution (1 tablespoon of bleach per gallon of water) to prevent the growth of bacteria or mold. Allow the equipment to air dry completely before storing it. Proper cleaning is essential for maintaining hygiene and preventing contamination in future sprouting batches.
Can I use this method for other types of sprouts, like alfalfa or broccoli sprouts?
While this method is primarily designed for bean sprouts, it can potentially be adapted for other types of sprouts with some modifications. The key is to consider the size and delicacy of the sprouts. For smaller sprouts like alfalfa or broccoli sprouts, a very fine mesh or cheesecloth lining is essential to prevent them from falling through. You may also need to adjust the watering and harvesting techniques to suit the specific needs of the sprouts. Experimentation is encouraged to find what works best for different types of sprouts.
What are some common problems I might encounter when growing bean sprouts, and how can I fix them?
Some common problems include mold growth, uneven sprouting, and bitter-tasting sprouts. Mold growth is usually caused by poor hygiene or inadequate ventilation. Ensure you are using clean water and equipment, and provide adequate airflow around the sprouts. Uneven sprouting can be caused by inconsistent watering or temperature. Ensure the sprouts are kept consistently moist and at a stable temperature. Bitter-tasting sprouts can be a sign of overgrowth or exposure to light. Harvest the sprouts when they are young and tender, and keep them in a dark environment during the sprouting process.
How long can I store harvested bean sprouts, and what’s the best way to store them?
Harvested bean sprouts can be stored in the refrigerator for up to a week. To store them properly, rinse them thoroughly and pat them dry with a paper towel. Place them in a sealed container or plastic bag lined with a paper towel to absorb excess moisture. This will help prevent them from becoming slimy or spoiling. Avoid storing them in water, as this can promote bacterial growth.
Is it safe to eat raw bean sprouts?
While bean sprouts are generally safe to eat, there is a small risk of foodborne illness associated with consuming raw sprouts. This is because sprouts are grown in warm, moist conditions that can promote the growth of bacteria like Salmonella and E. coli. To minimize the risk, purchase sprouts from a reputable source, wash them thoroughly before eating, and consider cooking them lightly to kill any potential bacteria. Individuals with weakened immune systems, pregnant women, and young children should exercise extra caution and consider cooking sprouts thoroughly before consumption.
Can I reuse the water I use to rinse the bean sprouts?
It is not recommended to reuse the water used to rinse bean sprouts. This water may contain bacteria or other contaminants that could potentially contaminate future batches of sprouts. Always use fresh, clean water for rinsing and soaking bean sprouts.
What are the nutritional benefits of eating bean sprouts?
Bean sprouts are a nutritious addition to any diet. They are low in calories and fat and are a good source of vitamins, minerals, and fiber. They are particularly rich in vitamin C, vitamin K, and folate. They also contain antioxidants that can help protect against cell damage. Incorporating bean sprouts into your diet can contribute to overall health and well-being.

Leave a Comment