

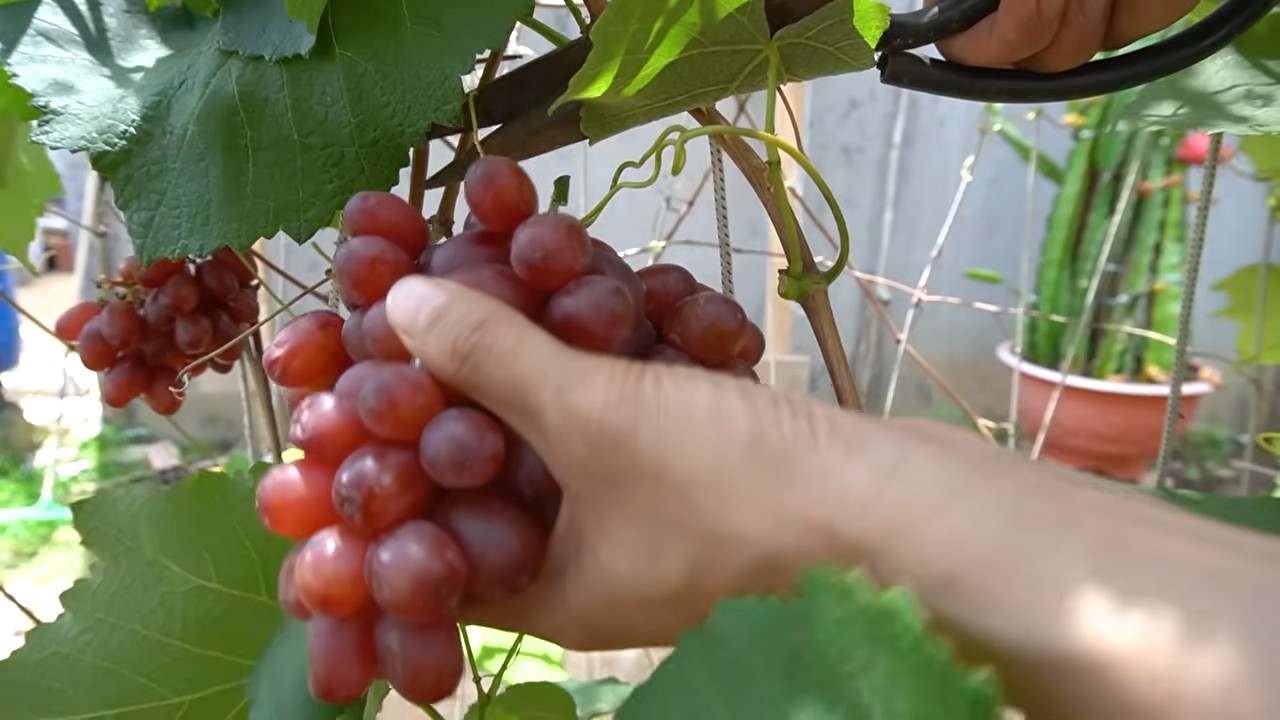
Homegrown grapes, bursting with flavor and sunshine, are a true testament to the joys of home gardening. Imagine plucking juicy, sweet grapes straight from your own backyard vine – a far cry from the often bland, store-bought variety. But the dream of a bountiful grape harvest can sometimes feel out of reach, especially if you’re new to the world of viticulture. Don’t worry, I’m here to help!
Growing your own grapes isn’t just about the taste; it’s about connecting with a tradition that stretches back millennia. From ancient civilizations celebrating Dionysus, the Greek god of wine, to the sun-drenched vineyards of modern-day Europe, grapes have held a special place in human culture. Now, you can bring a piece of that history to your own home.
This DIY guide is packed with simple yet effective tricks and hacks to help you cultivate thriving grapevines, even if you have limited space or experience. We’ll cover everything from choosing the right grape variety for your climate to protecting your precious fruit from pests and diseases. Why settle for ordinary when you can enjoy the extraordinary taste and satisfaction of homegrown grapes? Let’s get started and transform your garden into a miniature vineyard!
DIY Bird-Proof Grape Protection: Save Your Harvest!
Okay, grape lovers, let’s talk about a problem we all face: birds. Those feathered fiends can decimate a promising grape harvest faster than you can say “chardonnay.” I’ve tried everything – scarecrows (they laughed), shiny ribbons (they used them as nesting material), even those annoying ultrasonic devices (which, I suspect, only annoyed my neighbors). Finally, I landed on a DIY solution that actually works, and I’m excited to share it with you! This method is relatively inexpensive, customizable to your vineyard size, and, most importantly, keeps those pesky birds away from your precious grapes.
Materials You’ll Need:
Before we dive in, let’s gather our supplies. This is a project you can tackle over a weekend, and the satisfaction of enjoying your own bird-free grapes is totally worth it.
* Bird Netting: This is the star of the show. Choose a netting with a small mesh size (around 3/4 inch or smaller) to prevent even the smallest birds from getting through. I prefer black netting because it’s less visible and blends in better with the vineyard. Measure your grapevines carefully to determine how much netting you’ll need. It’s always better to overestimate than underestimate!
* PVC Pipe (Optional, but Recommended): This will create a frame to support the netting and keep it from directly touching the grapes. This is especially important for larger grapevines. The diameter of the pipe depends on the size of your vines; 1/2 inch or 3/4 inch is usually sufficient.
* PVC Pipe Fittings (Optional, but Recommended): Elbows, tees, and end caps will help you construct a sturdy frame.
* Zip Ties: These are your best friends for securing the netting to the frame or directly to the grapevine.
* Clips or Clothes Pins: These are handy for temporarily holding the netting in place while you’re working.
* Measuring Tape: Essential for accurate measurements.
* Scissors or Utility Knife: For cutting the netting and zip ties.
* Gloves: Protect your hands from scratches and snags.
* Ladder or Step Stool: Depending on the height of your grapevines.
* Ground Stakes or Anchors (Optional): To secure the bottom of the netting to the ground, especially in windy areas.
* Wire or Twine (Optional): For extra support and securing the netting.
Planning Your Protection Strategy:
Before you start cutting and assembling, take some time to plan your approach. Consider these factors:
* Vine Size and Shape: Are your grapevines young and small, or mature and sprawling? This will influence the size and shape of your netting enclosure.
* Vineyard Layout: Are your grapevines planted in rows, or are they scattered throughout your garden? This will determine how you’ll configure the netting.
* Bird Pressure: How severe is the bird problem in your area? If you have a lot of birds, you’ll need a more robust and secure netting system.
* Accessibility: You’ll still need to access your grapevines for pruning, spraying, and harvesting. Make sure your netting system allows for easy access.
Building a PVC Frame (Optional, but Highly Recommended):
If you’re opting for a PVC frame, here’s how to build it:
1. Measure and Cut the PVC Pipe: Measure the height and width of your grapevine. Cut the PVC pipe into sections that will create a frame slightly larger than the grapevine. I usually add about 6-12 inches to each dimension to allow for growth and easy access.
2. Assemble the Frame: Use the PVC fittings to connect the pipe sections and create a rectangular or square frame around the grapevine. Make sure the frame is sturdy and stable. You can use PVC cement to permanently join the fittings, or leave them unglued for easier disassembly and storage.
3. Test the Fit: Place the frame around the grapevine to ensure it fits properly and provides adequate clearance. Adjust the dimensions as needed.
Applying the Bird Netting:
Now for the main event: applying the bird netting! This is where your patience and attention to detail will pay off.
1. Drape the Netting: Carefully drape the bird netting over the grapevine or the PVC frame. Make sure the netting completely covers the grapes and extends to the ground.
2. Secure the Top: Use zip ties to secure the netting to the PVC frame (if you’re using one) or directly to the grapevine branches. Start at the top and work your way down. Pull the zip ties tight to ensure the netting is snug and secure.
3. Secure the Sides: Use zip ties to secure the netting along the sides of the grapevine or frame. Again, make sure the netting is taut and covers all the grapes.
4. Secure the Bottom: This is crucial to prevent birds from sneaking underneath the netting. You have several options here:
* Bury the Netting: Dig a shallow trench around the base of the grapevine and bury the bottom edge of the netting. This is a very effective method, but it can be time-consuming.
* Use Ground Stakes or Anchors: Use ground stakes or anchors to secure the bottom edge of the netting to the ground. This is a quicker and easier option, but it may not be as secure as burying the netting.
* Use Rocks or Bricks: Place rocks or bricks along the bottom edge of the netting to weigh it down and prevent birds from lifting it.
* Combine Methods: For maximum protection, you can combine several of these methods. For example, you could bury the netting along the front and sides of the grapevine and use ground stakes along the back.
5. Check for Gaps: Once the netting is in place, carefully inspect it for any gaps or holes. Pay particular attention to the corners and edges. Use zip ties or wire to close any gaps.
6. Create Access Points (Optional): If you need to access the grapevine for pruning, spraying, or harvesting, you can create access points in the netting. Simply cut a small opening in the netting and secure the edges with clips or clothes pins. This will allow you to easily open and close the netting as needed.
Alternative Netting Methods:
While the PVC frame method is my preferred approach, here are a few alternative netting methods you can try:
* Direct Netting: If you don’t want to build a frame, you can simply drape the netting directly over the grapevine and secure it to the branches. This is a simpler and less expensive option, but it may not provide as much protection as a frame. Be careful not to damage the grapes when applying the netting.
* Individual Netting Bags: For smaller grapevines or individual bunches of grapes, you can use individual netting bags. These bags are easy to apply and remove, and they provide excellent protection. However, they can be time-consuming to install if you have a large vineyard.
* Row Covers: For grapevines planted in rows, you can use row covers. These covers are made of lightweight fabric or netting and are designed to protect entire rows of plants. They are a good option for larger vineyards.
Maintenance and Care:
Once your bird netting is in place, it’s important to maintain it properly to ensure its effectiveness.
* Regular Inspections: Regularly inspect the netting for any damage, such as tears or holes. Repair any damage immediately to prevent birds from getting through.
* Tighten Zip Ties: Over time, the zip ties may loosen. Tighten them as needed to keep the netting secure.
* Remove Debris: Remove any leaves, twigs, or other debris that may accumulate on the netting. This will help to prevent the netting from sagging or tearing.
* Store Properly: When the grape harvest is over, carefully remove the netting and store it in a dry place. This will help to prolong its lifespan.
Troubleshooting:
Even with the best planning and execution, you may encounter some challenges along the way. Here are a few common problems and how to solve them:
* Birds Getting Under the Netting: This is usually due to gaps at the bottom of the netting. Make sure the bottom edge of the netting is securely anchored to the ground.
* Netting Tearing: This can be caused by wind, branches, or animals. Repair any tears immediately to prevent birds from getting through. Use a heavier-duty netting if tearing is a persistent problem.
* Difficulty Accessing the Grapes: If you find it difficult to access the grapes for pruning, spraying, or harvesting, create access points in the netting as described above.
* Netting Sagging: This can be caused by heavy rain or snow. Use additional support, such as wire or twine, to keep the netting from sagging.
Enjoy Your Bird-Free Grapes!
With a little effort and ingenuity, you can protect your grape harvest from
Conclusion
So, there you have it! Transforming your homegrown grapes into delectable raisins is not only incredibly satisfying but also a fantastic way to preserve the fruits of your labor and enjoy their sweetness long after the harvest season. This simple DIY trick unlocks a world of flavor and allows you to control every aspect of the process, from the initial grape selection to the final, chewy raisin.
Why is this a must-try? Because store-bought raisins often contain added sugars, preservatives, and oils that can detract from their natural goodness. By making your own, you’re ensuring a pure, wholesome snack that’s bursting with concentrated grape flavor. Plus, the aroma that fills your home during the drying process is simply divine! It’s a sensory experience that connects you to the land and the bounty it provides.
But the beauty of this DIY raisin-making adventure lies in its adaptability. Feel free to experiment with different grape varieties to discover your favorite flavor profile. Some grapes, like Thompson Seedless, are naturally sweeter and produce plump, juicy raisins. Others, like Concord grapes, offer a more tart and complex flavor. Don’t be afraid to mix and match to create your own signature blend.
Consider adding a touch of spice to your raisins for an extra layer of flavor. A sprinkle of cinnamon, nutmeg, or even a pinch of chili powder can elevate your homemade raisins to gourmet status. You can also infuse them with citrus zest, such as lemon or orange, for a bright and refreshing twist.
And if you’re feeling adventurous, try dipping your finished raisins in melted dark chocolate for a truly decadent treat. These chocolate-covered raisins make a wonderful gift or a special indulgence for yourself.
The key to successful raisin-making is patience. The drying process takes time, but the end result is well worth the wait. Keep a close eye on your grapes as they dry, and adjust the drying time as needed to achieve your desired level of chewiness.
We wholeheartedly encourage you to embark on this rewarding DIY project. It’s a simple, sustainable, and delicious way to enjoy the fruits of your garden. And most importantly, it’s a chance to connect with nature and create something truly special with your own two hands.
So, gather your homegrown grapes, follow our simple instructions, and prepare to be amazed by the transformation. Once you’ve tasted your own homemade raisins, you’ll never go back to store-bought again.
Don’t forget to share your raisin-making adventures with us! We’d love to hear about your experiences, your favorite grape varieties, and any creative variations you’ve tried. Tag us in your photos and videos on social media, and let’s inspire others to embrace the joy of DIY raisin-making. Let’s all enjoy the benefits of **homegrown grapes** in a new and delicious way!
Frequently Asked Questions (FAQ)
What types of grapes work best for making raisins?
While you can technically use any type of grape to make raisins, some varieties are better suited for the task than others. Seedless grapes, such as Thompson Seedless, are a popular choice because they are easy to eat and produce plump, juicy raisins. Other good options include Sultana, Black Corinth, and Muscat grapes. These varieties are known for their sweetness, thin skins, and high sugar content, which makes them ideal for drying. However, don’t let that limit you! Experiment with different grape varieties from your garden to discover your personal favorite. Even seeded grapes can be used; just be aware that the raisins will contain seeds.
How long does it take to make raisins?
The drying time for raisins can vary depending on several factors, including the grape variety, the drying method, and the weather conditions. In general, it takes anywhere from a few days to several weeks to make raisins. Sun-drying is the most traditional method and can take the longest, typically 1-3 weeks. Using a dehydrator can significantly speed up the process, often taking just 12-36 hours. Oven-drying is another option, but it requires careful monitoring and can take around 6-12 hours. The key is to check the raisins regularly and adjust the drying time as needed to achieve your desired level of chewiness.
How do I know when the raisins are done?
The best way to determine if your raisins are done is to check their texture. They should be shriveled and leathery, but still slightly pliable. When you squeeze them, they should feel firm but not hard. If they are still sticky or juicy, they need to dry for longer. It’s better to err on the side of caution and dry them a little longer than necessary, as under-dried raisins can spoil more easily. Once you think they are done, let a few cool completely. This will give you a better indication of their final texture.
How should I store homemade raisins?
Proper storage is essential to maintain the quality and freshness of your homemade raisins. Once the raisins are completely dry and cooled, store them in an airtight container in a cool, dark, and dry place. A pantry or cupboard is ideal. You can also store them in the refrigerator for longer shelf life. Properly stored raisins can last for several months. If you notice any signs of mold or spoilage, discard them immediately.
Can I freeze homemade raisins?
Yes, you can freeze homemade raisins to extend their shelf life even further. To freeze them, spread them out in a single layer on a baking sheet and freeze for a few hours until solid. Then, transfer them to an airtight freezer bag or container. Frozen raisins can last for up to a year. When you’re ready to use them, simply thaw them at room temperature or add them directly to your recipes.
What if my raisins get moldy?
Mold growth on raisins is usually a sign that they were not dried properly or were stored in a humid environment. Unfortunately, moldy raisins should be discarded immediately. Do not attempt to salvage them by washing or heating them, as the mold spores may still be present. To prevent mold growth, ensure that your raisins are completely dry before storing them and store them in an airtight container in a cool, dry place.
Can I use a microwave to dry grapes into raisins?
While technically possible, using a microwave to make raisins is not recommended. The microwave can dry the grapes unevenly, resulting in some raisins being overcooked and others being undercooked. It’s also difficult to control the drying process in a microwave, which can lead to a less desirable texture and flavor. Sun-drying, dehydrating, or oven-drying are all better options for making high-quality raisins.
What can I do with my homemade raisins?
The possibilities are endless! You can enjoy them as a healthy snack, add them to your breakfast cereal or oatmeal, bake them into cookies, muffins, or bread, sprinkle them on salads, or use them in savory dishes like tagines and curries. They are also a great addition to trail mix and energy bars. Get creative and experiment with different ways to incorporate your homemade raisins into your favorite recipes.
Are homemade raisins healthier than store-bought raisins?
Homemade raisins are often considered healthier than store-bought raisins because you have complete control over the ingredients and the drying process. You can avoid added sugars, preservatives, and oils that are commonly found in commercially produced raisins. By making your own, you’re ensuring a pure, wholesome snack that’s packed with natural sweetness and nutrients.
What if I don’t have a dehydrator?
No problem! You can still make delicious homemade raisins without a dehydrator. Sun-drying is the most traditional method and works well in warm, sunny climates. Oven-drying is another option, and it’s a good choice if you don’t have a lot of space or time. Simply spread the grapes out on a baking sheet and bake them at a low temperature (around 200°F or 93°C) for several hours, checking them regularly until they are shriveled and leathery.

Leave a Comment