

Hydroponic celery growing routine might sound intimidating, but trust me, it’s a surprisingly simple and rewarding way to bring fresh, crisp celery right to your kitchen! Forget those limp, store-bought stalks – imagine the vibrant flavor and satisfying crunch of celery you’ve nurtured yourself, all without the need for soil.
For centuries, humans have sought innovative ways to cultivate food, and hydroponics, while a more modern approach, is rooted in that same desire for efficiency and control. While large-scale hydroponic farms are relatively new, the basic principles have been around for a while. The idea of growing plants without soil has been explored in various forms throughout history, from the Hanging Gardens of Babylon to floating gardens in ancient China. Now, we can bring that ingenuity into our homes!
Why should you dive into a hydroponic celery growing routine? Well, for starters, it’s incredibly space-saving, perfect for apartment dwellers or anyone with limited garden space. Plus, you have complete control over the nutrients your celery receives, resulting in healthier, more flavorful produce. And let’s be honest, there’s something deeply satisfying about watching your plants thrive in a system you’ve created yourself. This DIY guide will walk you through every step, from setting up your hydroponic system to harvesting your delicious, home-grown celery. Get ready to ditch the dirt and embrace the future of fresh!

DIY Hydroponic Celery: From Kitchen Scraps to Crunchy Stalks!
Hey there, fellow plant enthusiasts! Ever looked at the sad, leftover celery base after chopping it up for a soup and thought, “There has to be a better way?” Well, you’re in luck! I’m going to walk you through how to regrow celery hydroponically, right from those kitchen scraps. It’s a fun, easy, and surprisingly rewarding project. Plus, you get fresh celery! Let’s dive in!
What You’ll Need
Before we get started, let’s gather our supplies. Don’t worry, you probably have most of this stuff lying around already.
* Celery Base: The star of the show! Choose a healthy-looking base with tightly packed stalks.
* Shallow Dish or Bowl: Something to hold the celery base and water.
* Water: Tap water is fine, but filtered or dechlorinated water is even better.
* Hydroponic Nutrients: This is crucial for healthy growth. I recommend a balanced nutrient solution specifically formulated for leafy greens.
* Net Pot: This will hold the celery base in our hydroponic setup.
* Hydroponic Growing Medium: Coco coir, perlite, or rockwool are all great options.
* Opaque Container: A bucket, tub, or even a repurposed plastic container will work. This will be our reservoir.
* Air Pump and Air Stone: To oxygenate the nutrient solution. This is essential for root health.
* Timer (Optional): For automating the air pump.
* Grow Lights (Optional): If you don’t have a sunny spot, grow lights will be your best friend.
* pH Meter (Optional): To monitor the pH of your nutrient solution.
* pH Up/Down Solutions (Optional): To adjust the pH if needed.
Phase 1: Rooting the Celery Base
This is where the magic begins! We’re going to coax those celery cells into producing new roots.
1. Prepare the Celery Base: Carefully trim the top of the celery base, leaving about 2-3 inches of the stalks intact. This will encourage new growth. Remove any loose or decaying outer stalks.
2. Place in Water: Put the celery base in your shallow dish or bowl. Add enough water to cover the bottom inch or so of the base. Be careful not to submerge the entire base, as this can lead to rot.
3. Find a Sunny Spot: Place the dish in a bright, sunny windowsill. If you don’t have a sunny spot, you can use grow lights. I’ve had success with both!
4. Change the Water Regularly: Change the water every 1-2 days to prevent bacteria growth and keep the water fresh.
5. Wait for Roots: Be patient! It usually takes about 5-7 days for roots to start appearing. You’ll see small, white roots emerging from the bottom of the celery base.
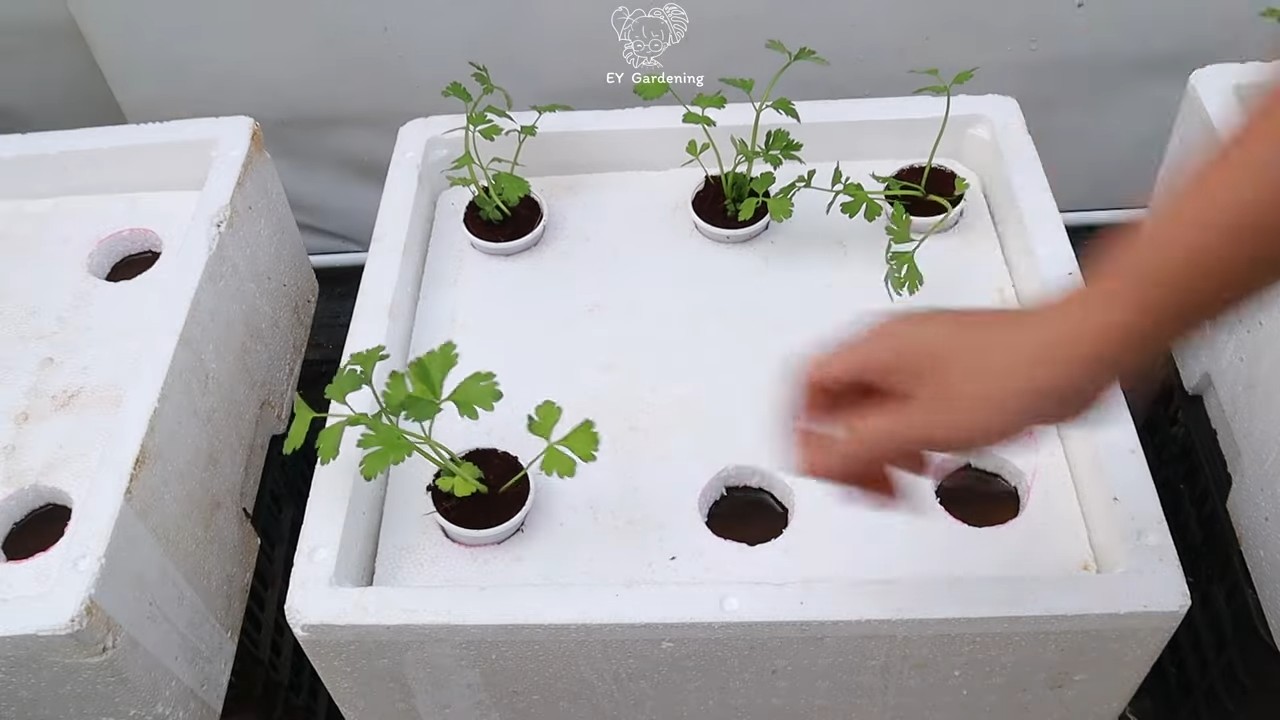
Phase 2: Setting Up Your Hydroponic System
Now that we have roots, it’s time to move our celery to its new hydroponic home! We’ll be using a simple Deep Water Culture (DWC) system.
1. Prepare the Reservoir: Clean your opaque container thoroughly. This will be our reservoir for the nutrient solution.
2. Drill a Hole (If Needed): If your container doesn’t have a pre-made hole for the air pump tubing, you’ll need to drill one. Make sure the hole is large enough to accommodate the tubing.
3. Prepare the Net Pot: Fill the net pot with your chosen hydroponic growing medium (coco coir, perlite, or rockwool). Moisten the medium with water.
4. Mix the Nutrient Solution: Follow the instructions on your hydroponic nutrient solution to mix it properly. I usually start with a half-strength solution to avoid shocking the young roots.
5. Fill the Reservoir: Pour the nutrient solution into the reservoir, leaving a few inches of space at the top.
6. Install the Air Pump and Air Stone: Connect the air pump to the air stone with the tubing. Place the air stone at the bottom of the reservoir. Plug in the air pump. You should see bubbles rising to the surface, indicating that the nutrient solution is being oxygenated.
7. Check the pH (Optional): Use your pH meter to check the pH of the nutrient solution. The ideal pH for celery is between 6.0 and 6.5. If the pH is too high or too low, use pH up or down solutions to adjust it accordingly.
Hey there, fellow plant enthusiasts! Ever looked at the sad, leftover celery base after chopping it up for a soup and thought, “There has to be a better way?” Well, you’re in luck! I’m going to walk you through how to regrow celery hydroponically, right from those kitchen scraps. It’s a fun, easy, and surprisingly rewarding project. Plus, you get fresh celery! Let’s dive in!
What You’ll Need
Before we get started, let’s gather our supplies. Don’t worry, you probably have most of this stuff lying around already.
* Celery Base: The star of the show! Choose a healthy-looking base with tightly packed stalks.
* Shallow Dish or Bowl: Something to hold the celery base and water.
* Water: Tap water is fine, but filtered or dechlorinated water is even better.
* Hydroponic Nutrients: This is crucial for healthy growth. I recommend a balanced nutrient solution specifically formulated for leafy greens.
* Net Pot: This will hold the celery base in our hydroponic setup.
* Hydroponic Growing Medium: Coco coir, perlite, or rockwool are all great options.
* Opaque Container: A bucket, tub, or even a repurposed plastic container will work. This will be our reservoir.
* Air Pump and Air Stone: To oxygenate the nutrient solution. This is essential for root health.
* Timer (Optional): For automating the air pump.
* Grow Lights (Optional): If you don’t have a sunny spot, grow lights will be your best friend.
* pH Meter (Optional): To monitor the pH of your nutrient solution.
* pH Up/Down Solutions (Optional): To adjust the pH if needed.
Phase 1: Rooting the Celery Base
This is where the magic begins! We’re going to coax those celery cells into producing new roots.
1. Prepare the Celery Base: Carefully trim the top of the celery base, leaving about 2-3 inches of the stalks intact. This will encourage new growth. Remove any loose or decaying outer stalks.
2. Place in Water: Put the celery base in your shallow dish or bowl. Add enough water to cover the bottom inch or so of the base. Be careful not to submerge the entire base, as this can lead to rot.
3. Find a Sunny Spot: Place the dish in a bright, sunny windowsill. If you don’t have a sunny spot, you can use grow lights. I’ve had success with both!
4. Change the Water Regularly: Change the water every 1-2 days to prevent bacteria growth and keep the water fresh.
5. Wait for Roots: Be patient! It usually takes about 5-7 days for roots to start appearing. You’ll see small, white roots emerging from the bottom of the celery base.
Phase 2: Setting Up Your Hydroponic System
Now that we have roots, it’s time to move our celery to its new hydroponic home! We’ll be using a simple Deep Water Culture (DWC) system.
1. Prepare the Reservoir: Clean your opaque container thoroughly. This will be our reservoir for the nutrient solution.
2. Drill a Hole (If Needed): If your container doesn’t have a pre-made hole for the air pump tubing, you’ll need to drill one. Make sure the hole is large enough to accommodate the tubing.
3. Prepare the Net Pot: Fill the net pot with your chosen hydroponic growing medium (coco coir, perlite, or rockwool). Moisten the medium with water.
4. Mix the Nutrient Solution: Follow the instructions on your hydroponic nutrient solution to mix it properly. I usually start with a half-strength solution to avoid shocking the young roots.
5. Fill the Reservoir: Pour the nutrient solution into the reservoir, leaving a few inches of space at the top.
6. Install the Air Pump and Air Stone: Connect the air pump to the air stone with the tubing. Place the air stone at the bottom of the reservoir. Plug in the air pump. You should see bubbles rising to the surface, indicating that the nutrient solution is being oxygenated.
7. Check the pH (Optional): Use your pH meter to check the pH of the nutrient solution. The ideal pH for celery is between 6.0 and 6.5. If the pH is too high or too low, use pH up or down solutions to adjust it accordingly.
Phase 3: Transplanting and Growing
Time to get our celery settled into its new home and watch it flourish!
1. Gently Transplant: Carefully remove the celery base from the water. Gently place it into the net pot, making sure the roots are surrounded by the growing medium.
2. Position the Net Pot: Place the net pot into the reservoir, ensuring that the bottom of the net pot is submerged in the nutrient solution. The roots should be dangling in the solution.
3. Provide Light: Place the hydroponic system in a bright, sunny location. If you don’t have enough natural light, use grow lights. I usually keep my grow lights on for 14-16 hours per day.
4. Monitor the Water Level: Check the water level in the reservoir regularly and add more nutrient solution as needed. The water level should always be high enough to reach the bottom of the net pot.
5. Change the Nutrient Solution: Change the nutrient solution every 1-2 weeks to prevent nutrient buildup and maintain optimal growing conditions.
6. Monitor for Pests and Diseases: Keep an eye out for any signs of pests or diseases. If you notice any problems, address them promptly.
7. Adjust Nutrients as Needed: As your celery grows, you may need to adjust the nutrient concentration. Observe the plant’s growth and adjust accordingly. Yellowing leaves can indicate a nutrient deficiency.
Troubleshooting Tips
Even with the best planning, things can sometimes go awry. Here are a few common issues and how to address them:
* Rotting Celery Base: This is usually caused by overwatering or poor air circulation. Make sure the base isn’t completely submerged in water during the rooting phase. Ensure good air circulation around the plant.
* Yellowing Leaves: This can be a sign of nutrient deficiency. Try increasing the concentration of your nutrient solution. It could also be a pH issue, so double-check that.
* Slow Growth: This could be due to insufficient light, low nutrient levels, or a pH imbalance. Make sure your celery is getting enough light and that your nutrient solution is properly balanced.
* Algae Growth: Algae can grow in the nutrient solution if it’s exposed to too much light. Use an opaque container to prevent light from reaching the solution.
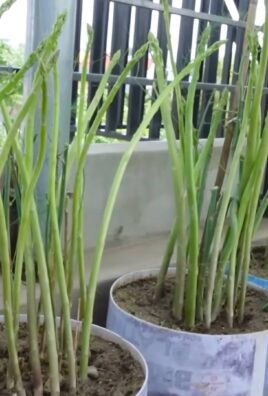
Harvesting Your Hydroponic Celery
After a few weeks, you should have a thriving celery plant! You can harvest individual stalks as needed, or harvest the entire plant at once.
1. Harvest Individual Stalks: Simply cut off the outer stalks as they reach the desired size. This will allow the inner stalks to continue growing.
2. Harvest the Entire Plant: If you want to harvest the entire plant, carefully remove it from the net pot. Cut the stalks at the base of the plant.
3. Enjoy Your Harvest: Wash the celery stalks thoroughly and enjoy them in salads, soups, or as a healthy snack!
Advanced Techniques (Optional)
Want to take your hydroponic celery growing to the next level? Here are a few advanced techniques to consider:
* pH Control: Regularly monitor and adjust the pH of your nutrient solution to ensure optimal nutrient uptake.
* EC Monitoring: Use an EC (electrical conductivity) meter to measure the concentration of nutrients in your solution. This will help you fine-tune your nutrient levels.
* CO2 Enrichment: Adding CO2 to the growing environment can boost plant growth, especially in enclosed spaces.
* Different Hydroponic Systems: Experiment with other hydroponic systems, such as Nutrient Film Technique (NFT) or ebb and flow systems.
Growing celery hydroponically is a rewarding experience. It’s a great way to reduce food waste, grow your own fresh produce, and learn about the fascinating world of hydroponics. So, grab that celery base, gather your supplies, and get growing! Happy gardening!
Conclusion
So, there you have it! Mastering the art of hydroponic celery growing is not just a fun experiment; it’s a gateway to fresher, more flavorful celery right at your fingertips. We’ve walked through the steps, demystified the process, and hopefully, inspired you to ditch the store-bought stalks and embrace the rewarding world of DIY hydroponics.
Why is this a must-try? Because beyond the sheer satisfaction of nurturing your own food, hydroponic celery offers several compelling advantages. You’re in complete control of the growing environment, minimizing the risk of pests and diseases that often plague traditional soil-based gardening. This translates to healthier, cleaner celery, free from harmful pesticides. Plus, the accelerated growth rates associated with hydroponics mean you’ll be harvesting crisp, juicy celery much sooner than you would with conventional methods. And let’s not forget the space-saving aspect – hydroponics is perfect for urban dwellers or anyone with limited outdoor space.
But the beauty of hydroponics lies in its adaptability. Feel free to experiment with different nutrient solutions to fine-tune the flavor profile of your celery. Some growers swear by adding a touch of Epsom salts to the nutrient mix for enhanced magnesium uptake, resulting in sweeter, more vibrant stalks. Others prefer to use organic nutrient solutions for a truly natural and sustainable approach. You can also explore different hydroponic systems, from simple Kratky setups to more advanced deep water culture (DWC) or nutrient film technique (NFT) systems, depending on your space, budget, and level of commitment.
Consider growing different varieties of celery to discover your personal favorite. Pascal celery is a classic choice known for its robust flavor and crisp texture, while Golden Self-Blanching celery offers a milder, sweeter taste. Experimenting with different varieties will not only broaden your culinary horizons but also help you understand how different cultivars respond to hydroponic conditions.
Don’t be afraid to get creative with your hydroponic setup. Repurpose old containers, build your own grow lights, and customize your system to suit your specific needs and preferences. The possibilities are endless!
Ultimately, the success of your hydroponic celery growing venture hinges on your willingness to learn, experiment, and adapt. Pay close attention to your plants, monitor their growth, and adjust your nutrient solution and environmental conditions as needed. Remember, every plant is unique, and what works for one grower may not work for another.
We are confident that with a little patience and perseverance, you’ll be enjoying delicious, homegrown celery in no time. So, grab your seeds, gather your supplies, and embark on this exciting hydroponic adventure.
We’d love to hear about your experiences! Share your tips, tricks, and triumphs in the comments below. Let’s build a community of hydroponic celery enthusiasts and learn from each other. Don’t forget to post pictures of your thriving celery plants – we can’t wait to see what you create! Happy growing!
Frequently Asked Questions (FAQ)
What is the best nutrient solution for hydroponic celery?
The ideal nutrient solution for hydroponic celery should be specifically formulated for leafy greens and contain a balanced ratio of macronutrients (nitrogen, phosphorus, potassium) and micronutrients (iron, manganese, zinc, copper, boron, molybdenum). Look for commercially available hydroponic nutrient solutions that are labeled for lettuce, spinach, or other leafy vegetables. These solutions typically provide the necessary nutrients for healthy celery growth. Follow the manufacturer’s instructions carefully when mixing and applying the nutrient solution. It’s also a good idea to monitor the pH and EC (electrical conductivity) of the nutrient solution regularly and adjust as needed to maintain optimal growing conditions. A pH range of 6.0 to 6.5 is generally recommended for hydroponic celery.
How often should I change the nutrient solution in my hydroponic system?
The frequency of nutrient solution changes depends on several factors, including the size of your system, the number of plants you’re growing, and the rate at which the plants are consuming nutrients. As a general rule, it’s best to change the nutrient solution every 1-2 weeks. This helps to prevent the buildup of salts and other impurities that can inhibit plant growth. It also ensures that the plants have access to a fresh supply of nutrients. If you notice any signs of nutrient deficiencies, such as yellowing leaves or stunted growth, it may be necessary to change the nutrient solution more frequently. Regularly monitoring the pH and EC of the nutrient solution can also help you determine when it’s time for a change.
What kind of lighting is required for hydroponic celery?
Celery requires adequate lighting to thrive in a hydroponic system. While natural sunlight is ideal, it’s often necessary to supplement with artificial grow lights, especially if you’re growing indoors or during the winter months. LED grow lights are a popular choice for hydroponics due to their energy efficiency and long lifespan. Choose a grow light that provides a full spectrum of light, including both blue and red wavelengths, to support healthy vegetative growth. The intensity of the light will depend on the size of your growing area and the distance between the light and the plants. As a general guideline, aim for at least 14-16 hours of light per day for hydroponic celery.
How long does it take to grow celery hydroponically?
One of the advantages of hydroponic celery growing is the faster growth rate compared to traditional soil-based gardening. Under optimal conditions, you can expect to harvest celery in about 80-100 days from seed. However, the exact time frame can vary depending on factors such as the variety of celery, the temperature, the lighting, and the nutrient solution. Starting with transplants instead of seeds can shorten the growing time by a few weeks. Monitor your plants closely and harvest when the stalks are firm, crisp, and reach the desired size.
What are some common problems I might encounter when growing hydroponic celery, and how can I fix them?
Like any type of gardening, hydroponic celery growing can present its own set of challenges. Some common problems include nutrient deficiencies, pest infestations, and diseases. Nutrient deficiencies can manifest as yellowing leaves, stunted growth, or other abnormal symptoms. To address nutrient deficiencies, ensure that you’re using a balanced nutrient solution and that the pH and EC are within the optimal range. Pest infestations, such as aphids or spider mites, can damage the plants and reduce yields. To prevent pest infestations, maintain a clean growing environment and inspect your plants regularly. If you spot any pests, treat them with an appropriate insecticide or horticultural oil. Diseases, such as fungal infections, can also affect hydroponic celery. To prevent diseases, ensure that your plants have good air circulation and avoid overwatering. If you notice any signs of disease, treat them with an appropriate fungicide.
Can I grow celery from a store-bought stalk hydroponically?
Yes, you can! This is a great way to propagate celery and get a head start on your hydroponic garden. Simply cut off the bottom 2-3 inches of a store-bought celery stalk and place it in a shallow dish of water. Make sure the cut end is submerged in water, but the top of the stalk remains dry. Place the dish in a sunny location and change the water every day or two. After a few days, you should start to see new roots emerging from the bottom of the stalk. Once the roots are about an inch long, you can transplant the celery into your hydroponic system. This method is a fun and easy way to recycle celery scraps and grow your own fresh celery at home.
Is hydroponic celery growing organic?
Whether or not your hydroponic celery is considered “organic” depends on the nutrient solutions and pest control methods you use. While the hydroponic system itself doesn’t inherently qualify as organic (as it doesn’t involve soil), you can use certified organic nutrient solutions and pest control products to grow celery in a way that aligns with organic principles. Look for nutrient solutions that are specifically labeled as “organic” and avoid using synthetic pesticides or herbicides. By choosing organic inputs and following sustainable growing practices, you can produce hydroponic celery that is both healthy and environmentally friendly.


Leave a Comment