

Indoor mushroom growing might sound like something reserved for seasoned horticulturalists, but trust me, it’s a surprisingly accessible and rewarding DIY project for anyone! Forget trekking to the grocery store for those gourmet fungi; imagine harvesting your own delicious, fresh mushrooms right from your kitchen counter.
Mushrooms have a rich history, revered in ancient cultures for their medicinal properties and culinary delights. From the shiitake traditions of East Asia to the truffle hunts of Europe, these fascinating fungi have captivated us for centuries. Now, you can bring that magic home!
Why should you try indoor mushroom growing? Well, beyond the sheer satisfaction of cultivating your own food, it’s a fantastic way to reduce your carbon footprint, experiment with new flavors, and impress your friends with your newfound green thumb (or, should I say, “mycelial” thumb?). Plus, it’s a great way to recycle coffee grounds and other kitchen waste! This article will guide you through simple, effective DIY tricks and hacks to successfully grow mushrooms indoors, even if you’ve never grown anything before. Get ready to embark on a fun and flavorful adventure!
Growing Gourmet Mushrooms at Home: A Beginner’s Guide
Hey there, fellow fungi fanatics! Ever dreamt of harvesting your own delicious mushrooms right in your kitchen? Well, dream no more! I’m going to walk you through a simple and rewarding method for growing gourmet mushrooms indoors. It’s easier than you think, and the taste of freshly grown mushrooms is simply unbeatable.
What You’ll Need: The Essential Supplies
Before we dive in, let’s gather our supplies. This is crucial for a smooth and successful growing experience. Don’t worry, most of these items are readily available online or at your local garden supply store.
* Mushroom Spawn: This is the heart of our operation! Choose a variety that suits your taste and growing conditions. Oyster mushrooms are a great choice for beginners because they’re fast-growing and relatively forgiving. You can find spawn in various forms, like grain spawn, sawdust spawn, or plug spawn. I personally prefer grain spawn for this method.
* Growing Substrate: This is the food source for your mushrooms. Straw, hardwood sawdust, coffee grounds, and even cardboard can be used. For oyster mushrooms, pasteurized straw is an excellent and readily available option.
* Growing Bags or Buckets: You’ll need something to contain your substrate and spawn. Specialized mushroom growing bags with filter patches are ideal, but you can also use food-grade buckets with lids.
* Spray Bottle: For misting and maintaining humidity.
* Bleach or Hydrogen Peroxide: For sanitizing your work area and equipment.
* Gloves: To keep everything clean and prevent contamination.
* Rubbing Alcohol: For sanitizing tools.
* Large Pot or Container: For pasteurizing the straw.
* Thermometer: To monitor the temperature during pasteurization.
* Optional: A humidity tent or greenhouse to maintain optimal humidity levels. A simple clear plastic bag can work in a pinch!
Preparing the Substrate: Pasteurization is Key
The most important step in mushroom cultivation is preparing a clean and nutritious substrate. Pasteurization eliminates competing organisms that could hinder mushroom growth.
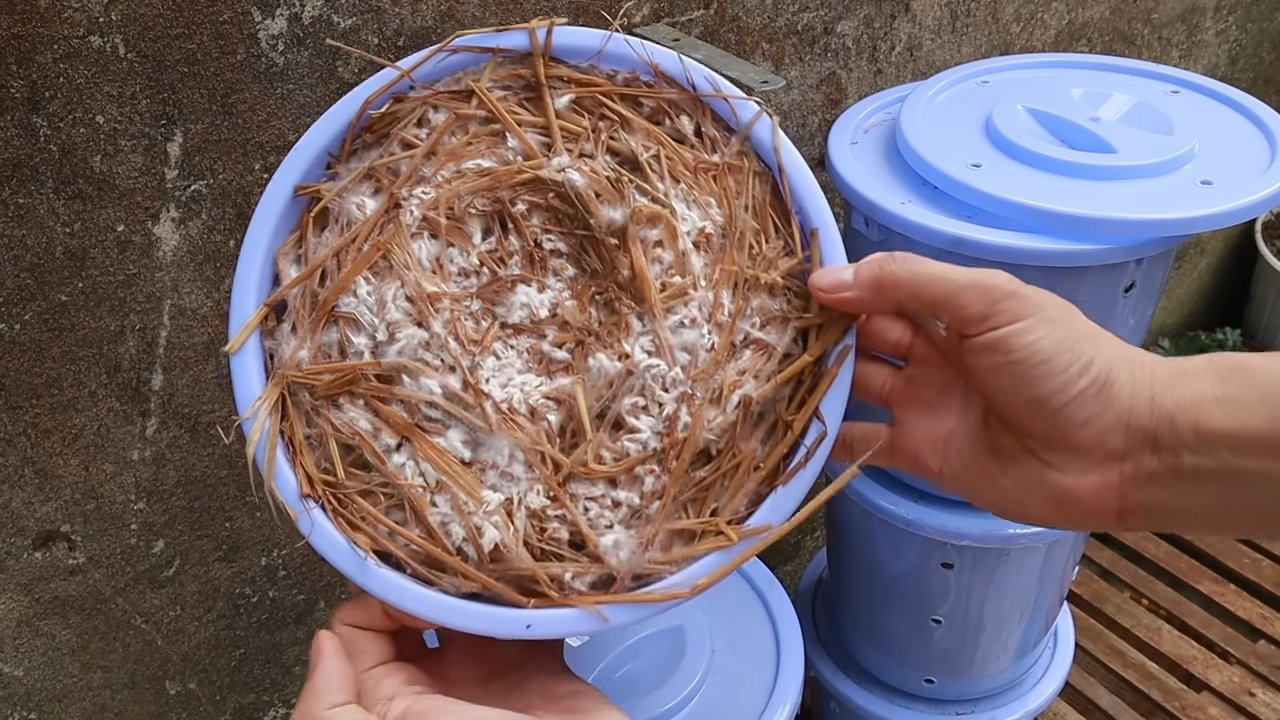
1. Chop the Straw: Cut the straw into smaller pieces, about 2-3 inches long. This makes it easier to pack into the growing container and allows the mycelium (the mushroom’s root system) to colonize it more effectively.
2. Soak the Straw: Place the chopped straw in a large pot or container and cover it with water. Let it soak for at least 24 hours. This hydrates the straw, making it more receptive to pasteurization.
3. Pasteurize the Straw: Drain the soaked straw and place it back in the pot. Add fresh water until the straw is submerged. Heat the water to 160-180°F (71-82°C) and maintain this temperature for 60-90 minutes. Use a thermometer to ensure accurate temperature control. This process kills off unwanted bacteria and fungi without completely sterilizing the straw, leaving beneficial microbes that can aid in mushroom growth.
4. Drain and Cool: Carefully drain the hot straw and allow it to cool completely. You want the straw to be moist but not dripping wet. Squeeze a handful of straw; it should feel damp, and only a few drops of water should come out. This is crucial because too much moisture can lead to anaerobic conditions and contamination.
Inoculation: Introducing the Mushroom Spawn
Now comes the exciting part – introducing the mushroom spawn to the prepared substrate! This is where the magic begins.
1. Sanitize Your Work Area: Before you start, thoroughly clean and sanitize your work surface with bleach or hydrogen peroxide. This minimizes the risk of contamination.
2. Sanitize Your Hands and Tools: Wash your hands thoroughly with soap and water, and then put on your gloves. Sanitize your gloves and any tools you’ll be using (like a spoon or scoop) with rubbing alcohol.
3. Layer the Spawn and Substrate: In your growing bag or bucket, create alternating layers of pasteurized straw and mushroom spawn. Start with a layer of straw, then sprinkle a layer of spawn, followed by another layer of straw, and so on. Aim for about 5-10% spawn by weight of the straw. For example, if you have 10 pounds of straw, use about 0.5 to 1 pound of spawn.
4. Mix Thoroughly (Optional): Some growers prefer to mix the spawn and straw thoroughly. This can speed up colonization, but it also increases the risk of contamination if your sanitation isn’t perfect. I usually prefer layering, especially for beginners.
5. Seal the Bag or Bucket: If using a growing bag, seal it tightly with a zip tie or heat sealer. If using a bucket, snap the lid on securely. If your bag doesn’t have a filter patch, you’ll need to make a few small holes (about ¼ inch) for air exchange. Cover the holes with micropore tape to prevent contamination.
Incubation: The Mycelium Takes Over
During incubation, the mycelium will spread throughout the substrate, colonizing it and preparing it for fruiting.
1. Find a Dark, Warm Place: Place your inoculated bag or bucket in a dark, warm location with a temperature of around 65-75°F (18-24°C). A closet, basement, or spare room works well.
2. Monitor Colonization: Check the bag or bucket regularly for signs of colonization. You should see white, fuzzy growth spreading throughout the straw. This is the mycelium.
3. Be Patient: Colonization can take anywhere from 2-4 weeks, depending on the mushroom variety, temperature, and spawn rate. Don’t disturb the bag or bucket during this time.
4. Look for Contamination: Keep an eye out for any signs of contamination, such as green, black, or orange mold. If you see contamination, it’s best to discard the entire bag or bucket to prevent it from spreading.
Fruiting: Time to Harvest!
Once the substrate is fully colonized, it’s time to trigger fruiting, which is when the mushrooms start to form.
1. Increase Humidity: Mushrooms need high humidity to fruit properly. If you’re using a growing bag, you can simply mist the inside of the bag with water several times a day. If you’re using a bucket, you can place it inside a humidity tent or a large clear plastic bag. Mist the inside of the tent or bag regularly to maintain high humidity.
2. Introduce Light: Mushrooms also need light to fruit, although not as much as plants. Indirect sunlight or artificial light is sufficient. Place the bag or bucket in a location with some light exposure.
3. Increase Air Exchange: Mushrooms need fresh air to fruit. If you’re using a growing bag, you can cut a few slits in the bag to allow for air exchange. If you’re using a bucket, you can crack the lid open slightly.
4. Maintain Temperature: Maintain a temperature of around 60-70°F (15-21°C) for optimal fruiting.
5. Watch for Pinning: After a few days, you should start to see small mushroom “pins” forming on the surface of the substrate. These are the baby mushrooms!
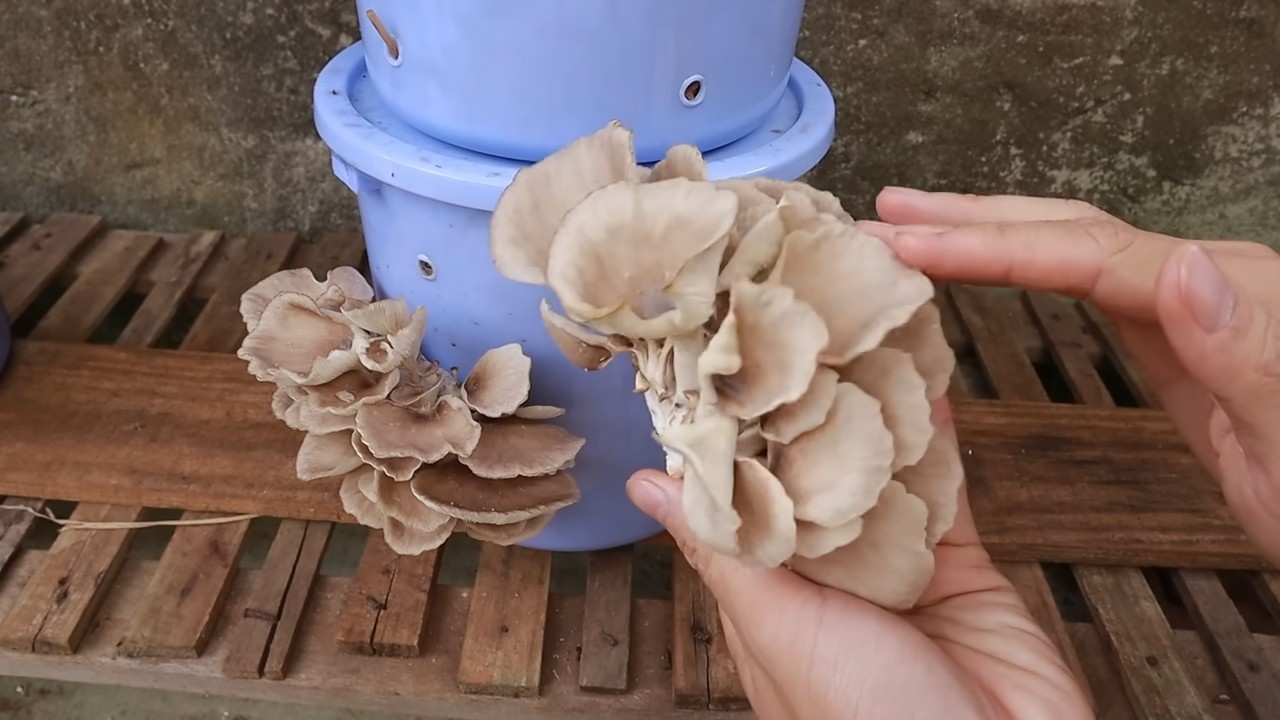
6. Harvest the Mushrooms: Harvest the mushrooms when they are fully developed but before they start to drop spores. The caps should be firm and slightly curled under. To harvest, gently twist or cut the mushrooms off at the base.
Post-Harvest: Encouraging Subsequent Flushes
After harvesting your first flush of mushrooms, you can encourage subsequent flushes by following these steps:
1. Soak the Substrate: After harvesting, soak the substrate in water for 12-24 hours. This rehydrates the substrate and provides the mushrooms with the moisture they need to fruit again.
2. Drain the Substrate: Drain the soaked substrate and return it to its original location.
3. Repeat Fruiting Conditions: Repeat the fruiting conditions described above (high humidity, light, and air exchange).
4. Expect Multiple Flushes: You can typically get 2-3 flushes of mushrooms from a single bag or bucket. Each flush will likely be smaller than the previous one.
Troubleshooting: Common Issues and Solutions
Even with the best preparation, you might encounter some challenges along the way. Here are a few common issues and how to address them:
* Contamination: If you see mold or other unwanted growth, it’s likely contamination. Discard the affected bag or bucket to prevent it from spreading. Prevention is key – always sanitize your work area and equipment thoroughly.
* Slow Colonization: Slow colonization can be caused by low temperatures, poor spawn quality, or insufficient moisture. Make sure the temperature is within the optimal range, use high-quality spawn, and ensure the substrate is properly hydrated.
* No Fruiting: If the substrate
Conclusion
So, there you have it! Mastering the art of indoor mushroom growing is not only achievable but also incredibly rewarding. Forget those expensive, pre-packaged mushrooms from the grocery store. Imagine the satisfaction of harvesting your own fresh, flavorful fungi right in your home. This DIY trick empowers you to cultivate a sustainable food source, reduce your carbon footprint, and impress your friends and family with your newfound mycological prowess.
But why is this a must-try? Beyond the obvious cost savings and environmental benefits, growing your own mushrooms offers an unparalleled connection to your food. You control every aspect of the process, from the substrate to the humidity, ensuring the highest quality and freshest possible product. The taste difference between a store-bought mushroom and a freshly harvested, home-grown one is simply undeniable. It’s a flavor explosion that will elevate your culinary creations to a whole new level.
And the possibilities are endless! Once you’ve mastered the basics, you can experiment with different mushroom varieties. Start with the easy-to-grow oyster mushrooms, known for their delicate flavor and rapid growth. Then, venture into the world of shiitake, known for their rich, umami taste, or the visually stunning lion’s mane, prized for its unique texture and potential cognitive benefits. You can even try your hand at growing more challenging varieties like maitake or enoki, each offering its own distinct flavor profile and culinary applications.
Consider these variations to personalize your indoor mushroom growing experience:
* Vertical Gardening: Maximize your space by utilizing vertical growing systems. Stackable shelves or hanging planters are ideal for creating a mushroom haven in even the smallest apartments.
* Composting: Integrate your mushroom growing with your composting efforts. Spent mushroom substrate makes an excellent addition to your compost pile, enriching it with valuable nutrients for your garden.
* Mushroom Teas and Extracts: Explore the medicinal properties of mushrooms by creating your own teas and extracts. Many mushroom varieties are known for their immune-boosting and antioxidant properties.
* Gourmet Mushroom Blends: Create your own custom mushroom blends for specific dishes. Combine different varieties to achieve the perfect balance of flavor and texture.
Don’t be intimidated by the perceived complexity of mushroom cultivation. With a little research, patience, and the right resources, anyone can successfully grow mushrooms indoors. The initial setup may require some investment, but the long-term benefits far outweigh the costs. You’ll not only save money on groceries but also gain a valuable new skill and a deeper appreciation for the natural world.
So, what are you waiting for? Take the plunge and embark on your own indoor mushroom growing adventure. We encourage you to try this DIY trick and share your experiences with us. Post photos of your mushroom harvests, share your favorite recipes, and let us know what challenges you encountered and how you overcame them. Your insights will help other aspiring mushroom growers and contribute to a thriving community of home mycologists. Let’s cultivate a world where fresh, sustainable, and delicious mushrooms are accessible to everyone!
Frequently Asked Questions (FAQ)
What are the easiest mushrooms to grow indoors for beginners?
Oyster mushrooms are widely considered the easiest mushrooms to grow indoors for beginners. They are fast-growing, relatively tolerant of environmental fluctuations, and can thrive on a variety of substrates, including straw, coffee grounds, and even cardboard. Shiitake mushrooms are another good option, although they require a bit more patience and attention to detail. Avoid more complex varieties like morels or truffles when starting out.
What kind of space do I need to grow mushrooms indoors?
You don’t need a lot of space to grow mushrooms indoors. A small closet, a spare room, or even a corner of your basement can be sufficient. The key is to provide a dark, humid environment with good ventilation. A dedicated grow tent can be helpful for maintaining optimal conditions, but it’s not essential. Consider the size of your growing area when choosing your mushroom variety and substrate.
What is the best substrate for growing mushrooms indoors?
The best substrate depends on the mushroom variety you’re growing. Oyster mushrooms thrive on straw, coffee grounds, and cardboard. Shiitake mushrooms prefer hardwood logs or sawdust. Other common substrates include coco coir, vermiculite, and perlite. It’s important to sterilize or pasteurize your substrate before inoculation to prevent contamination from other fungi or bacteria.
How do I maintain the proper humidity for indoor mushroom growing?
Maintaining proper humidity is crucial for successful mushroom cultivation. Aim for a humidity level of 80-90%. You can achieve this by misting your growing area regularly with a spray bottle, using a humidifier, or placing your mushrooms in a humidity tent or fruiting chamber. Monitor the humidity levels with a hygrometer and adjust your methods accordingly.
How long does it take to grow mushrooms indoors?
The time it takes to grow mushrooms indoors varies depending on the variety and growing conditions. Oyster mushrooms can typically be harvested within a few weeks of inoculation, while shiitake mushrooms may take several months. Factors such as temperature, humidity, and light can also affect the growth rate. Be patient and monitor your mushrooms closely for signs of maturity.
What are some common problems encountered when growing mushrooms indoors, and how can I prevent them?
Common problems include contamination, pests, and insufficient humidity. To prevent contamination, sterilize or pasteurize your substrate thoroughly and maintain a clean growing environment. Pests such as fungus gnats can be controlled with sticky traps or beneficial nematodes. Ensure adequate humidity by misting regularly or using a humidifier. Monitor your mushrooms closely for any signs of disease or pests and take action promptly.
Can I use spent coffee grounds for growing mushrooms?
Yes, spent coffee grounds are an excellent substrate for growing certain types of mushrooms, particularly oyster mushrooms. Coffee grounds are rich in nutrients and provide a readily available food source for the mycelium. Be sure to sterilize or pasteurize the coffee grounds before inoculation to prevent contamination. Mix the coffee grounds with other substrates such as straw or sawdust for optimal results.
How do I know when my mushrooms are ready to harvest?
The signs of maturity vary depending on the mushroom variety. Oyster mushrooms are typically ready to harvest when the caps are fully formed and the edges begin to curl upwards. Shiitake mushrooms are ready when the caps have flattened out and the gills are visible. Harvest your mushrooms before they release their spores to prevent a mess and maintain optimal flavor.
Are there any safety precautions I should take when growing mushrooms indoors?
While most cultivated mushrooms are safe to eat, it’s important to properly identify your mushrooms before consumption. Never eat wild mushrooms unless you are absolutely certain of their identity. Wear gloves when handling mushroom substrate to prevent skin irritation. Ensure adequate ventilation in your growing area to prevent the buildup of spores, which can cause allergic reactions in some individuals.
What can I do with the spent mushroom substrate after harvesting?
Spent mushroom substrate is a valuable resource that can be used in a variety of ways. It makes an excellent addition to your compost pile, enriching it with valuable nutrients for your garden. You can also use it as a soil amendment to improve drainage and water retention. Alternatively, you can simply discard it in your yard waste bin.
Leave a Comment