

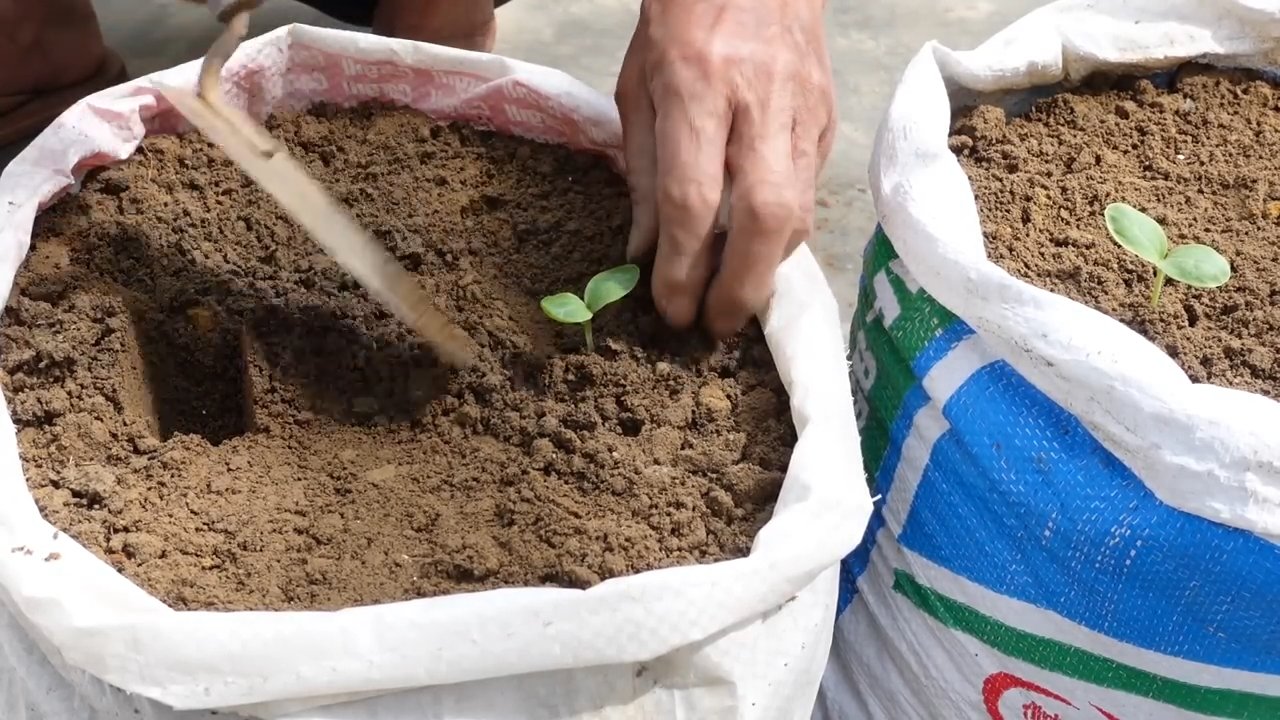
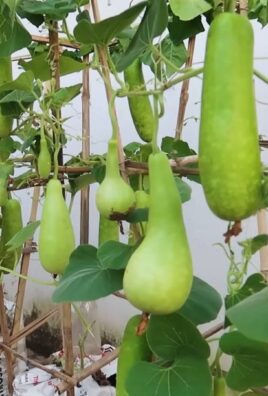
Long squash harvest season is upon us, and if you’re anything like me, you’re probably staring at a garden overflowing with these delicious, versatile vegetables! But what happens when you’ve got more squash than you know what to do with? Don’t let your hard work go to waste! This isn’t just about picking vegetables; it’s about maximizing your yield and enjoying the fruits (or rather, vegetables) of your labor for weeks, even months, to come.
For centuries, cultures around the world have relied on squash as a staple food source, developing ingenious methods for preserving and utilizing every part of the plant. From the ancient Incas who dried squash into nutrient-rich snacks to the Native Americans who incorporated it into stews and breads, the humble squash has a rich and fascinating history. We can learn so much from these traditions!
That’s why I’ve put together this guide packed with easy and effective DIY tricks and hacks to help you manage your abundant long squash harvest. We’ll explore everything from proper harvesting techniques to creative storage solutions and even some delicious recipe ideas. Whether you’re a seasoned gardener or just starting out, these tips will empower you to make the most of your bounty and enjoy fresh, homegrown squash long after the growing season ends. Let’s dive in and transform that squash overload into a culinary adventure!
Lange Schlangenkürbisse ernten und haltbar machen: Mein DIY-Guide
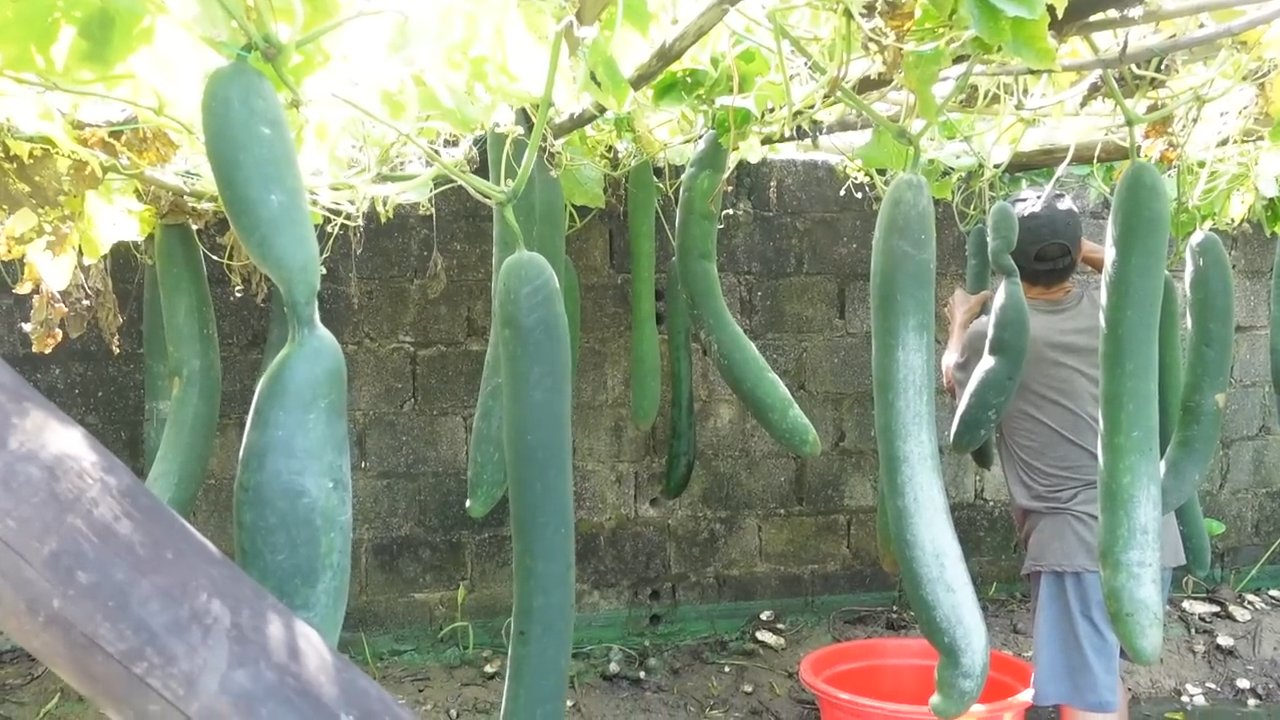
Hallo ihr Lieben! Die Schlangenkürbisse hängen prall und lang im Garten? Super! Dann ist es Zeit für die Ernte und die Frage: Was mache ich bloß mit all den Kürbissen? Keine Sorge, ich zeige euch, wie ihr eure lange Schlangenkürbis-Ernte optimal nutzt und haltbar macht. Von der richtigen Erntetechnik bis hin zu leckeren Rezepten und Konservierungsmethoden – hier findet ihr alles, was ihr wissen müsst.
Die richtige Erntezeit und -technik
Bevor wir loslegen, ist es wichtig, den richtigen Zeitpunkt für die Ernte zu kennen. Schlangenkürbisse sind nämlich nicht gleich Schlangenkürbisse.
* **Reife erkennen:** Ein reifer Schlangenkürbis hat eine feste Schale, die sich nicht mehr leicht mit dem Fingernagel eindrücken lässt. Die Farbe sollte intensiv sein, je nach Sorte. Achtet auch auf den Stielansatz: Er sollte trocken und leicht verholzt sein.
* **Der richtige Zeitpunkt:** Am besten erntet ihr eure Schlangenkürbisse an einem trockenen Tag. So vermeidet ihr, dass Feuchtigkeit in die Schnittstelle eindringt und Fäulnis verursacht.
* **Schonend ernten:** Verwendet ein scharfes Messer oder eine Gartenschere, um den Kürbis vom Stiel zu trennen. Lasst dabei unbedingt einen Stielansatz von etwa 5-10 cm am Kürbis. Das verlängert die Haltbarkeit.
Schritt-für-Schritt-Anleitung zur Ernte
1. **Vorbereitung:** Sucht euch einen trockenen Tag für die Ernte aus. Legt euch ein scharfes Messer oder eine Gartenschere bereit.
2. **Kürbis auswählen:** Sucht euch die reifen Kürbisse aus (siehe oben).
3. **Schneiden:** Schneidet den Kürbis mit dem Messer oder der Schere ab. Achtet darauf, den Stielansatz nicht zu beschädigen.
4. **Reinigen:** Entfernt vorsichtig Erde oder Schmutz von der Schale. Verwendet dazu am besten ein weiches Tuch.
5. **Lagerung (kurzfristig):** Lagert die geernteten Kürbisse an einem kühlen, trockenen und gut belüfteten Ort. Ideal ist ein Keller oder eine Speisekammer.
Schlangenkürbisse haltbar machen: Meine besten Methoden
Okay, die Ernte ist im Kasten. Aber wie bewahre ich die Pracht jetzt auf, damit ich auch im Winter noch was davon habe? Hier kommen meine bewährtesten Methoden:
1. Lagerung im Ganzen
Die einfachste Methode ist die Lagerung im Ganzen. Aber auch hier gibt es ein paar Dinge zu beachten:
* **Der richtige Lagerort:** Wie schon erwähnt, ist ein kühler, trockener und gut belüfteter Ort ideal. Die Temperatur sollte zwischen 10 und 15 Grad Celsius liegen. Vermeidet direkte Sonneneinstrahlung.
* **Vorbereitung:** Bevor ihr die Kürbisse einlagert, solltet ihr sie gründlich auf Beschädigungen untersuchen. Beschädigte Kürbisse solltet ihr nicht lagern, da sie schnell faulen können.
* **Lagerung:** Legt die Kürbisse nebeneinander auf ein Regal oder eine Palette. Achtet darauf, dass sie sich nicht berühren, damit die Luft gut zirkulieren kann.
* **Kontrolle:** Kontrolliert die Kürbisse regelmäßig auf Fäulnisstellen. Entfernt befallene Kürbisse sofort, um eine Ausbreitung zu verhindern.
2. Einfrieren
Einfrieren ist eine tolle Option, wenn ihr die Kürbisse später für Suppen, Pürees oder Aufläufe verwenden möchtet.
* **Vorbereitung:** Wascht die Kürbisse gründlich und entfernt die Kerne.
* **Schneiden:** Schneidet das Kürbisfleisch in Würfel oder Scheiben.
* **Blanchieren (optional):** Blanchiert die Kürbisstücke kurz in kochendem Wasser (ca. 2-3 Minuten). Das stoppt die Enzymaktivität und erhält die Farbe und den Geschmack.
* **Abkühlen:** Lasst die Kürbisstücke nach dem Blanchieren gut abkühlen.
* **Verpacken:** Füllt die Kürbisstücke in Gefrierbeutel oder -dosen. Achtet darauf, möglichst wenig Luft in den Behältern zu lassen.
* **Einfrieren:** Friert die Kürbisstücke schnell ein.
3. Einlegen in Essig oder Öl
Eingelegte Schlangenkürbisse sind eine leckere Beilage zu Fleisch, Käse oder Brot.
* **Vorbereitung:** Wascht die Kürbisse gründlich und entfernt die Kerne.
* **Schneiden:** Schneidet das Kürbisfleisch in dünne Scheiben oder Würfel.
* **Salzen:** Bestreut die Kürbisstücke mit Salz und lasst sie für ca. 30 Minuten ziehen. Das entzieht ihnen Wasser und macht sie knackiger.
* **Abspülen:** Spült die Kürbisstücke gründlich ab und tupft sie trocken.
* **Einlegen:** Legt die Kürbisstücke in sterilisierte Gläser. Fügt nach Belieben Kräuter, Gewürze, Knoblauch oder Chili hinzu.
* **Aufgießen:** Gießt die Gläser mit Essig oder Öl auf, bis die Kürbisstücke vollständig bedeckt sind.
* **Verschließen:** Verschließt die Gläser fest und lagert sie an einem kühlen, dunklen Ort.
**Rezept für eingelegte Schlangenkürbisse in Essig:**
* Schlangenkürbis
* Weißweinessig
* Wasser
* Zucker
* Salz
* Pfefferkörner
* Senfsaat
* Lorbeerblätter
* Knoblauchzehen
* Chilischoten (optional)
**Zubereitung:**
1. Kürbis vorbereiten (siehe oben).
2. Essig, Wasser, Zucker und Salz in einem Topf aufkochen.
3. Pfefferkörner, Senfsaat und Lorbeerblätter hinzufügen.
4. Kürbisstücke, Knoblauch und Chili in sterilisierte Gläser füllen.
5. Mit dem Essigsud aufgießen.
6. Gläser verschließen und an einem kühlen, dunklen Ort lagern.
**Rezept für eingelegte Schlangenkürbisse in Öl:**
* Schlangenkürbis
* Olivenöl
* Knoblauchzehen
* Chilischoten
* Rosmarin
* Thymian
* Salz
* Pfeffer
**Zubereitung:**
1. Kürbis vorbereiten (siehe oben).
2. Knoblauch und Chili fein hacken.
3. Kürbisstücke, Knoblauch, Chili und Kräuter in sterilisierte Gläser füllen.
4. Mit Olivenöl aufgießen.
5. Gläser verschließen und an einem kühlen, dunklen Ort lagern.
4. Chutney oder Relish kochen
Chutneys und Relishes sind eine tolle Möglichkeit, Schlangenkürbisse zu verarbeiten und ihnen einen würzigen Geschmack zu verleihen.
* **Vorbereitung:** Wascht die Kürbisse gründlich und entfernt die Kerne.
* **Schneiden:** Schneidet das Kürbisfleisch in kleine Würfel.
* **Kochen:** Kocht die Kürbiswürfel mit Essig, Zucker, Gewürzen und anderen Zutaten (z.B. Zwiebeln, Äpfel, Rosinen) zu einem Chutney oder Relish.
* **Abfüllen:** Füllt das heiße Chutney oder Relish in sterilisierte Gläser.
* **Verschließen:** Verschließt die Gläser fest und lagert sie an einem kühlen, dunklen Ort.
**Rezept für Schlangenkürbis-Chutney:**
* Schlangenkürbis
* Zwiebeln
* Äpfel
* Rosinen
* Brauner Zucker
* Apfelessig
* Ingwer
* Chili
* Currypulver
* Salz
* Pfeffer
**Zubereitung:**
1. Kürbis, Zwiebeln und Äpfel würfeln.
2. Alle Zutaten in einem Topf vermischen und unter Rühren aufkochen.
3. Bei schwacher Hitze
Conclusion
So, you’ve got a bumper crop of long squash and are wondering how to make the most of it? Forget bland, repetitive meals! This DIY trick for preserving and transforming your long squash harvest is a game-changer. We’re not just talking about another squash recipe; we’re talking about unlocking a world of culinary possibilities with a single, simple method: creating long squash noodles, or “swoodles,” and then freezing them for later use.
Why is this a must-try? Because it addresses the core problem of abundance. When you’re faced with a mountain of long squash, the sheer volume can be overwhelming. Roasting the same squash dish night after night gets old fast. This method allows you to process a large quantity of squash efficiently, transforming it into a versatile ingredient that can be used in countless ways. Think of it as future-proofing your meals!
Beyond the practicality, this DIY trick elevates the flavor and texture of your long squash. By creating noodles, you increase the surface area, allowing for better absorption of sauces and seasonings. The freezing process, surprisingly, can even improve the texture, making the swoodles slightly firmer and less watery than freshly spiralized squash.
But the real magic lies in the versatility. Imagine tossing your frozen long squash noodles into a stir-fry for a healthy and satisfying meal. Picture them simmering in a flavorful tomato sauce, mimicking pasta without the carbs. Envision them as the base for a vibrant salad, topped with grilled chicken or tofu. The possibilities are truly endless.
Variations and Suggestions:
* Spice it up: Before freezing, consider lightly sautéing your swoodles with garlic, herbs, or spices to add an extra layer of flavor. A touch of red pepper flakes can bring a welcome warmth to your future dishes.
* Blanching for Texture: While not strictly necessary, blanching the swoodles for a minute or two before freezing can help preserve their color and texture even further. Just be sure to shock them in ice water immediately afterward to stop the cooking process.
* Different Squash Varieties: While this method works particularly well with long squash varieties like butternut or spaghetti squash, feel free to experiment with other types. Just adjust the spiralizing technique as needed.
* Sauce it before freezing: For a quick meal, consider freezing the swoodles with a portion of your favorite sauce. This creates a convenient, ready-to-go meal that can be heated up in minutes.
We wholeheartedly encourage you to try this DIY trick for yourself. It’s a simple, effective, and delicious way to make the most of your long squash harvest. Don’t let those beautiful squashes go to waste! Embrace the swoodle revolution and discover a whole new world of culinary possibilities.
And most importantly, we want to hear about your experience! Share your photos, recipes, and tips in the comments below. Let’s build a community of long squash enthusiasts and inspire each other with creative ways to use this amazing vegetable. What are you waiting for? Get spiralizing!
Frequently Asked Questions (FAQ)
Q: What kind of long squash works best for making swoodles?
A: While you can use various long squash varieties, butternut squash and spaghetti squash are excellent choices. Butternut squash offers a slightly sweeter flavor and a firmer texture, making it ideal for dishes where you want the swoodles to hold their shape well. Spaghetti squash, on the other hand, has a more delicate flavor and a stringy texture that naturally lends itself to noodle-like strands. Other options include zucchini (though it tends to be more watery) and even certain types of gourds, depending on their texture and flavor profile. Experiment to find your favorite!
Q: Do I need a special spiralizer to make long squash noodles?
A: While a dedicated spiralizer can make the process faster and easier, it’s not strictly necessary. You can also use a vegetable peeler to create wide ribbons of squash, or a julienne peeler to create thinner strands. If you’re using a vegetable peeler, simply peel the squash into long, thin strips. For a julienne peeler, run it along the length of the squash to create thin, noodle-like strands. Keep in mind that these methods may require a bit more effort and patience than using a spiralizer. A mandoline with a julienne blade is another option, but exercise extreme caution when using a mandoline.
Q: How long can I store the frozen long squash noodles?
A: Properly frozen long squash noodles can last for up to 2-3 months in the freezer without significant loss of quality. To ensure optimal storage, make sure the swoodles are completely cooled before freezing them in airtight containers or freezer bags. Remove as much air as possible from the bags to prevent freezer burn. Label the containers or bags with the date of freezing so you can keep track of how long they’ve been stored.
Q: Will the frozen long squash noodles get mushy when I cook them?
A: Freezing can sometimes affect the texture of vegetables, but there are ways to minimize the risk of mushiness. Avoid overcooking the swoodles when you thaw and reheat them. Thawing them in the refrigerator overnight is the best way to preserve the texture. If you’re cooking them directly from frozen, add them to your dish towards the end of the cooking process and cook them just until they’re heated through. Sautéing them in a hot pan with a little oil can also help to prevent them from becoming too soft.
Q: Can I use the frozen long squash noodles in raw dishes, like salads?
A: While you can technically use thawed long squash noodles in raw dishes, the texture may not be as appealing as freshly spiralized squash. Freezing can make the swoodles slightly softer, so they may not have the same crispness as fresh noodles. If you do use them in a salad, consider adding a vinaigrette or dressing that will help to firm them up a bit. You might also want to pat them dry with a paper towel before adding them to the salad to remove any excess moisture.
Q: What are some creative ways to use long squash noodles besides pasta substitutes?
A: The possibilities are endless! Try adding them to soups and stews for a healthy and flavorful boost. Use them as a base for stir-fries, or incorporate them into frittatas and omelets. You can even use them to make long squash noodle fritters or pancakes. Get creative and experiment with different flavors and cuisines. Consider adding them to spring rolls, using them as a filling for dumplings, or even grilling them for a smoky flavor.
Q: How do I prevent the long squash noodles from being too watery after thawing?
A: Long squash naturally contains a high amount of water, which can be released during the freezing and thawing process. To minimize this, try salting the swoodles lightly before freezing. The salt will help to draw out some of the excess moisture. You can also blanch them briefly before freezing, as this will help to firm up the texture and reduce the amount of water they release. After thawing, pat the swoodles dry with a paper towel to remove any excess moisture before using them in your recipes.
Q: Can I refreeze long squash noodles after thawing them?
A: It’s generally not recommended to refreeze thawed vegetables, as this can compromise their texture and flavor. Refreezing can also increase the risk of bacterial growth. It’s best to only thaw as much as you need for a particular recipe and use the thawed swoodles within a day or two.
Q: What if my long squash is too hard to spiralize?
A: Some long squash varieties can be quite dense and difficult to spiralize, especially if they’re not fully ripe. If you’re having trouble, try microwaving the squash for a few minutes to soften it slightly. Pierce the squash in several places with a fork before microwaving to prevent it from exploding. Start with 2-3 minutes and check the squash for softness. You want it to be slightly softened but not fully cooked. Alternatively, you can roast the squash for a short period of time to soften it.
Q: Can I use this method for other vegetables besides long squash?
A: Absolutely! This DIY trick can be adapted for other vegetables as well. Zucchini, carrots, and sweet potatoes are all great candidates for spiralizing and freezing. Just keep in mind that the texture and flavor of the resulting noodles may vary depending on the vegetable you use. Experiment and see what works best for you!

Leave a Comment