

Mushroom Growing Routine: Unlock the Secrets to Cultivating Your Own Fungi Feast!
Have you ever dreamt of strolling into your backyard and harvesting a bounty of fresh, flavorful mushrooms? Imagine the satisfaction of adding homegrown shiitakes to your stir-fry or sautéing delicate oyster mushrooms for a gourmet omelet. Well, dream no more! This DIY guide will empower you to transform your garden (or even a small corner of your home) into a thriving mushroom farm.
The art of mushroom cultivation has a rich history, dating back centuries in various cultures. From ancient Chinese medicinal practices to European culinary traditions, mushrooms have been prized for their unique flavors and health benefits. Today, with a growing interest in sustainable living and locally sourced food, more and more people are discovering the joys of growing their own mushrooms.
Why should you embark on this fungal adventure? Because a well-planned mushroom growing routine not only provides you with delicious, organic food but also offers a fascinating and rewarding hobby. Plus, it’s a fantastic way to recycle organic waste and enrich your garden soil. Many people find that the cost of buying mushrooms at the grocery store adds up quickly, and they are often not as fresh as what you can grow yourself. I’m here to show you how to save money, eat healthier, and have fun all at the same time! Let’s dive into the essential steps and simple tricks to create your perfect mushroom growing routine and enjoy a continuous harvest of these amazing fungi.
DIY Mushroom Growing at Home: A Beginner’s Guide
Okay, so you want to grow your own mushrooms? Awesome! It’s a surprisingly rewarding hobby, and nothing beats the taste of fresh, homegrown fungi. This guide will walk you through a simple, beginner-friendly method using readily available materials. We’re going to focus on growing oyster mushrooms, as they are relatively easy to cultivate and quite forgiving.
What You’ll Need
Before we dive in, let’s gather our supplies. This is crucial for a smooth and successful growing experience.
* **Oyster Mushroom Spawn:** This is essentially the “seed” of the mushroom. You can purchase it online from reputable mushroom suppliers. Look for grain spawn or sawdust spawn.
* **Substrate:** This is the material the mushrooms will grow on. For oyster mushrooms, straw is an excellent choice. You can also use coffee grounds, but we’ll stick with straw for this guide.
* **Large Plastic Bag:** A heavy-duty garbage bag will work perfectly. Make sure it’s clean and free of any holes.
* **Spray Bottle:** For misting the mushrooms.
* **Hydrogen Peroxide (3%):** This helps to sterilize the straw.
* **Lime (Agricultural Lime):** Also for sterilizing the straw.
* **Large Pot or Container:** For pasteurizing the straw.
* **Thermometer:** To monitor the water temperature during pasteurization.
* **Gloves:** To keep everything clean.
* **Face Mask:** To avoid inhaling dust or spores.
* **Drill or Knife:** To create ventilation holes in the bag.
* **Rubbing Alcohol:** For sanitizing surfaces and tools.
Preparing the Substrate (Straw)
This is arguably the most important step. We need to pasteurize the straw to kill off any competing organisms that could hinder mushroom growth. Think of it like weeding your garden before planting.
1. **Chop the Straw:** Cut the straw into smaller pieces, about 2-4 inches long. This will make it easier to pack into the bag and for the mycelium (mushroom roots) to colonize. I usually use garden shears for this.
2. **Lime Bath (Optional but Recommended):** This step helps to raise the pH of the straw, making it less hospitable to unwanted molds. Fill a large container with water and add agricultural lime. The ratio is usually about 1 tablespoon of lime per gallon of water. Soak the chopped straw in this lime water for 12-24 hours. This step is optional, but I’ve found it significantly reduces contamination.
3. **Pasteurization:** This is where we kill off the bad stuff. Drain the straw from the lime water (if you used it). Now, fill a large pot or container with water and bring it to a temperature of 160-180°F (71-82°C). This is crucial! Don’t let it boil, as that will destroy the nutrients in the straw.
4. **Submerge the Straw:** Carefully submerge the straw in the hot water. You might need to weigh it down with a brick or a heavy pot lid to keep it fully submerged.
5. **Maintain the Temperature:** Keep the water temperature between 160-180°F (71-82°C) for 60-90 minutes. Use your thermometer to monitor the temperature closely. I usually set a timer and check on it every 15 minutes.
6. **Drain and Cool:** After pasteurization, carefully remove the straw from the hot water and let it drain thoroughly. You want the straw to be moist but not soaking wet. It should feel like a wrung-out sponge. This is really important! Excess moisture can lead to contamination. Let the straw cool down to room temperature before moving on to the next step. This can take several hours.
Inoculating the Substrate
Now for the fun part – introducing the mushroom spawn to the straw!
1. **Sanitize Everything:** Before you start, thoroughly sanitize your work surface, your hands (wear gloves!), and the plastic bag with rubbing alcohol. This will minimize the risk of contamination.
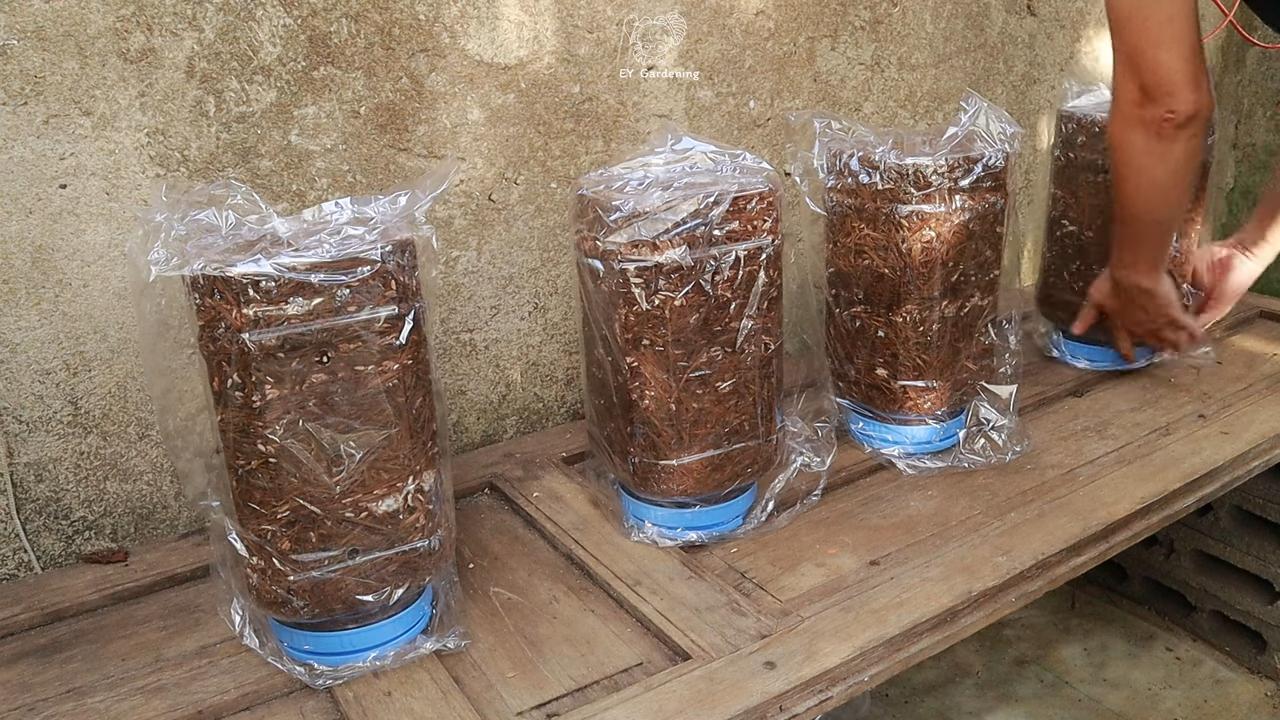
2. **Layering:** We’re going to layer the straw and spawn in the plastic bag. Start with a layer of pasteurized straw at the bottom of the bag.
3. **Add Spawn:** Sprinkle a generous layer of oyster mushroom spawn over the straw. Aim for about 5-10% spawn by weight of the straw. So, if you have 10 pounds of straw, use about 0.5-1 pound of spawn.
4. **Repeat:** Continue layering straw and spawn until the bag is almost full. Leave a few inches of space at the top.
5. **Seal the Bag:** Fold the top of the bag over and secure it with tape or a rubber band. Don’t seal it completely airtight, as the mushrooms need air to breathe.
6. **Ventilation:** Drill or cut small holes (about ¼ inch in diameter) in the bag for ventilation. Space them a few inches apart all around the bag. This is essential for gas exchange.
Incubation
This is the period where the mycelium colonizes the straw. Think of it as the mushroom roots spreading throughout the substrate.
1. **Location:** Place the bag in a dark, warm, and humid location. A basement, closet, or spare room works well. The ideal temperature is between 65-75°F (18-24°C).
2. **Monitor:** Check the bag regularly for signs of contamination. Look for green, black, or other unusual molds. If you see any contamination, it’s best to discard the bag to prevent it from spreading.
3. **Wait:** Be patient! It usually takes 2-3 weeks for the mycelium to fully colonize the straw. You’ll know it’s ready when the straw is covered in a white, fluffy growth.
Fruiting
This is when the mushrooms start to grow!
1. **Light:** Once the bag is fully colonized, move it to a location with indirect light. Direct sunlight can dry out the mushrooms.
2. **Humidity:** Maintain high humidity around the bag. You can do this by misting the bag with water several times a day. A humidity of 80-90% is ideal. You can also use a humidity tent or place the bag in a greenhouse.
3. **Airflow:** Ensure good airflow around the bag. This will help prevent mold growth.
4. **Initiation:** You should start to see small mushroom “pins” forming within a few days. These are the baby mushrooms!
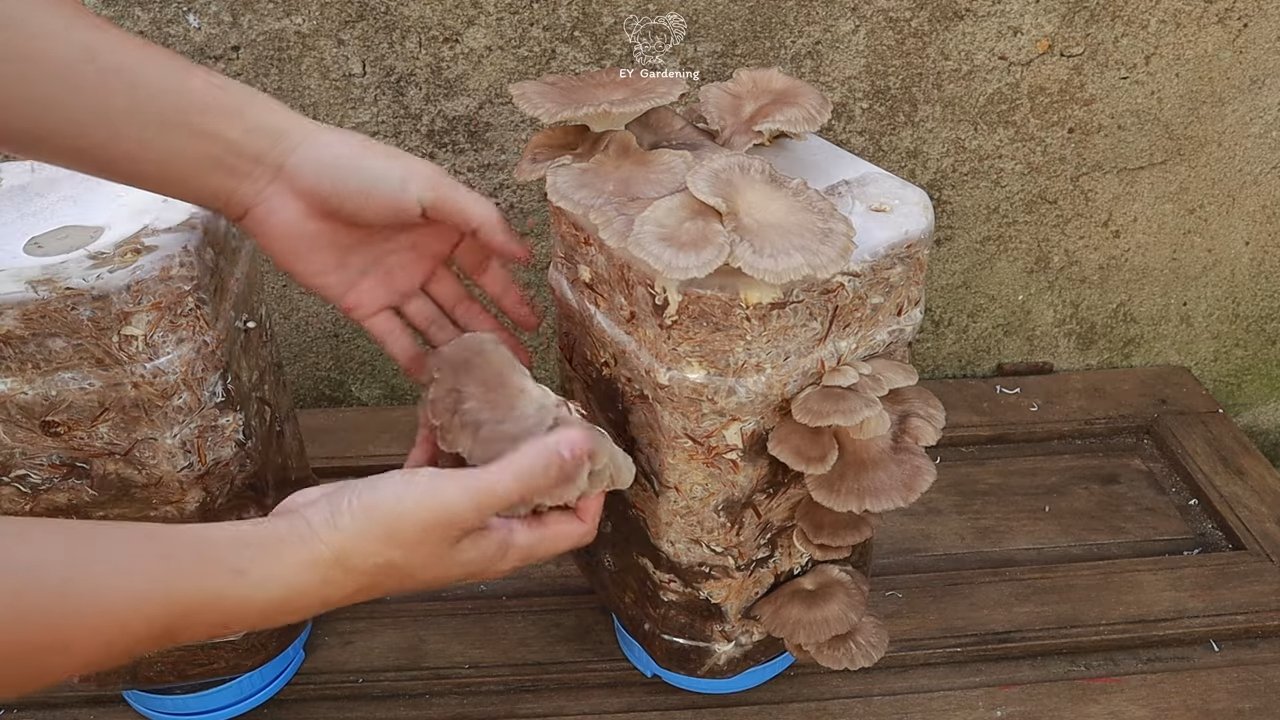
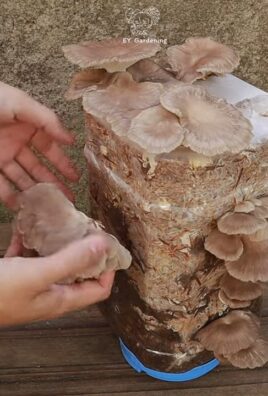
5. **Harvest:** Harvest the mushrooms when the caps are fully developed but before they start to drop spores. This is usually when the edges of the caps start to curl upwards. To harvest, simply twist and pull the mushrooms from the bag.
Subsequent Flushes
After harvesting your first flush of mushrooms, you can often get several more flushes from the same bag.
1. **Soaking:** After harvesting, soak the bag in cold water for 12-24 hours. This will rehydrate the substrate and encourage new growth.
2. **Repeat:** Drain the bag and return it to its fruiting location. Repeat the misting and airflow steps.
3. **Expectations:** Each subsequent flush will likely produce fewer mushrooms than the first. Eventually, the substrate will be exhausted, and you’ll need to start a new bag.
Troubleshooting
Even with the best preparation, things can sometimes go wrong. Here are a few common problems and how to address them:
* **Contamination:** If you see green, black, or other unusual molds, it’s likely that your substrate was not properly pasteurized. Discard the bag to prevent the contamination from spreading.
* **Slow Colonization:** This could be due to low temperatures, poor spawn quality, or insufficient moisture. Make sure the temperature is within the ideal range (65-75°F), use high-quality spawn, and mist the bag regularly.
* **Dry Mushrooms:** If the mushrooms are drying out, increase the humidity around the bag by misting more frequently or using a humidity tent.
* **No Pinning:** This could be due to insufficient light, low humidity, or poor airflow. Move the bag to a location with indirect light, increase the humidity, and ensure good airflow.
Tips for Success
* Cleanliness is Key: Always sanitize your work surfaces, tools, and hands to minimize the risk of contamination.
* Use High-Quality Spawn: Purchase your spawn from a reputable supplier to ensure its viability.
Okay, so you want to grow your own mushrooms? Awesome! It’s a surprisingly rewarding hobby, and nothing beats the taste of fresh, homegrown fungi. This guide will walk you through a simple, beginner-friendly method using readily available materials. We’re going to focus on growing oyster mushrooms, as they are relatively easy to cultivate and quite forgiving.
What You’ll Need
Before we dive in, let’s gather our supplies. This is crucial for a smooth and successful growing experience.
* **Oyster Mushroom Spawn:** This is essentially the “seed” of the mushroom. You can purchase it online from reputable mushroom suppliers. Look for grain spawn or sawdust spawn.
* **Substrate:** This is the material the mushrooms will grow on. For oyster mushrooms, straw is an excellent choice. You can also use coffee grounds, but we’ll stick with straw for this guide.
* **Large Plastic Bag:** A heavy-duty garbage bag will work perfectly. Make sure it’s clean and free of any holes.
* **Spray Bottle:** For misting the mushrooms.
* **Hydrogen Peroxide (3%):** This helps to sterilize the straw.
* **Lime (Agricultural Lime):** Also for sterilizing the straw.
* **Large Pot or Container:** For pasteurizing the straw.
* **Thermometer:** To monitor the water temperature during pasteurization.
* **Gloves:** To keep everything clean.
* **Face Mask:** To avoid inhaling dust or spores.
* **Drill or Knife:** To create ventilation holes in the bag.
* **Rubbing Alcohol:** For sanitizing surfaces and tools.
Preparing the Substrate (Straw)
This is arguably the most important step. We need to pasteurize the straw to kill off any competing organisms that could hinder mushroom growth. Think of it like weeding your garden before planting.
1. **Chop the Straw:** Cut the straw into smaller pieces, about 2-4 inches long. This will make it easier to pack into the bag and for the mycelium (mushroom roots) to colonize. I usually use garden shears for this.
2. **Lime Bath (Optional but Recommended):** This step helps to raise the pH of the straw, making it less hospitable to unwanted molds. Fill a large container with water and add agricultural lime. The ratio is usually about 1 tablespoon of lime per gallon of water. Soak the chopped straw in this lime water for 12-24 hours. This step is optional, but I’ve found it significantly reduces contamination.
3. **Pasteurization:** This is where we kill off the bad stuff. Drain the straw from the lime water (if you used it). Now, fill a large pot or container with water and bring it to a temperature of 160-180°F (71-82°C). This is crucial! Don’t let it boil, as that will destroy the nutrients in the straw.
4. **Submerge the Straw:** Carefully submerge the straw in the hot water. You might need to weigh it down with a brick or a heavy pot lid to keep it fully submerged.
5. **Maintain the Temperature:** Keep the water temperature between 160-180°F (71-82°C) for 60-90 minutes. Use your thermometer to monitor the temperature closely. I usually set a timer and check on it every 15 minutes.
6. **Drain and Cool:** After pasteurization, carefully remove the straw from the hot water and let it drain thoroughly. You want the straw to be moist but not soaking wet. It should feel like a wrung-out sponge. This is really important! Excess moisture can lead to contamination. Let the straw cool down to room temperature before moving on to the next step. This can take several hours.
Inoculating the Substrate
Now for the fun part – introducing the mushroom spawn to the straw!
1. **Sanitize Everything:** Before you start, thoroughly sanitize your work surface, your hands (wear gloves!), and the plastic bag with rubbing alcohol. This will minimize the risk of contamination.
2. **Layering:** We’re going to layer the straw and spawn in the plastic bag. Start with a layer of pasteurized straw at the bottom of the bag.
3. **Add Spawn:** Sprinkle a generous layer of oyster mushroom spawn over the straw. Aim for about 5-10% spawn by weight of the straw. So, if you have 10 pounds of straw, use about 0.5-1 pound of spawn.
4. **Repeat:** Continue layering straw and spawn until the bag is almost full. Leave a few inches of space at the top.
5. **Seal the Bag:** Fold the top of the bag over and secure it with tape or a rubber band. Don’t seal it completely airtight, as the mushrooms need air to breathe.
6. **Ventilation:** Drill or cut small holes (about ¼ inch in diameter) in the bag for ventilation. Space them a few inches apart all around the bag. This is essential for gas exchange.
Incubation
This is the period where the mycelium colonizes the straw. Think of it as the mushroom roots spreading throughout the substrate.
1. **Location:** Place the bag in a dark, warm, and humid location. A basement, closet, or spare room works well. The ideal temperature is between 65-75°F (18-24°C).
2. **Monitor:** Check the bag regularly for signs of contamination. Look for green, black, or other unusual molds. If you see any contamination, it’s best to discard the bag to prevent it from spreading.
3. **Wait:** Be patient! It usually takes 2-3 weeks for the mycelium to fully colonize the straw. You’ll know it’s ready when the straw is covered in a white, fluffy growth.
Fruiting
This is when the mushrooms start to grow!
1. **Light:** Once the bag is fully colonized, move it to a location with indirect light. Direct sunlight can dry out the mushrooms.
2. **Humidity:** Maintain high humidity around the bag. You can do this by misting the bag with water several times a day. A humidity of 80-90% is ideal. You can also use a humidity tent or place the bag in a greenhouse.
3. **Airflow:** Ensure good airflow around the bag. This will help prevent mold growth.
4. **Initiation:** You should start to see small mushroom “pins” forming within a few days. These are the baby mushrooms!
5. **Harvest:** Harvest the mushrooms when the caps are fully developed but before they start to drop spores. This is usually when the edges of the caps start to curl upwards. To harvest, simply twist and pull the mushrooms from the bag.
Subsequent Flushes
After harvesting your first flush of mushrooms, you can often get several more flushes from the same bag.
1. **Soaking:** After harvesting, soak the bag in cold water for 12-24 hours. This will rehydrate the substrate and encourage new growth.
2. **Repeat:** Drain the bag and return it to its fruiting location. Repeat the misting and airflow steps.
3. **Expectations:** Each subsequent flush will likely produce fewer mushrooms than the first. Eventually, the substrate will be exhausted, and you’ll need to start a new bag.
Troubleshooting
Even with the best preparation, things can sometimes go wrong. Here are a few common problems and how to address them:
* **Contamination:** If you see green, black, or other unusual molds, it’s likely that your substrate was not properly pasteurized. Discard the bag to prevent the contamination from spreading.
* **Slow Colonization:** This could be due to low temperatures, poor spawn quality, or insufficient moisture. Make sure the temperature is within the ideal range (65-75°F), use high-quality spawn, and mist the bag regularly.
* **Dry Mushrooms:** If the mushrooms are drying out, increase the humidity around the bag by misting more frequently or using a humidity tent.
* **No Pinning:** This could be due to insufficient light, low humidity, or poor airflow. Move the bag to a location with indirect light, increase the humidity, and ensure good airflow.
Tips for Success
* Cleanliness is Key: Always sanitize your work surfaces, tools, and hands to minimize the risk of contamination.
* Use High-Quality Spawn: Purchase your spawn from a reputable supplier to ensure its viability.
* Maintain Proper Humidity: Oyster mushrooms need high humidity to thrive. Mist the bag regularly or use a humidity tent.
* Be Patient: Mushroom growing takes time. Don’t get discouraged if you don’t see results immediately.
* Experiment: Once you’ve mastered the basics, try experimenting with different substrates and growing conditions.
Growing your own mushrooms is a fun and rewarding experience. With a little patience and attention to detail, you can enjoy
Conclusion
So, there you have it! Mastering a simple mushroom growing routine can unlock a world of culinary and horticultural possibilities right in your own home. This isn’t just about saving money on store-bought mushrooms; it’s about connecting with the natural world, understanding the fascinating life cycle of fungi, and enjoying the unparalleled freshness and flavor of homegrown produce.
Why is this DIY mushroom growing routine a must-try? Because it’s accessible, rewarding, and surprisingly easy to integrate into your existing lifestyle. Forget the complicated setups and expensive equipment you might have imagined. With a few readily available materials and a little patience, you can cultivate a thriving mushroom patch that provides you with a continuous supply of delicious fungi.
Think of the possibilities! Imagine adding freshly harvested oyster mushrooms to your stir-fries, enriching your risottos with the earthy notes of shiitake, or simply sautéing a handful of your own homegrown mushrooms for a delectable side dish. The flavor difference between store-bought and homegrown mushrooms is truly remarkable – a difference you’ll taste in every bite.
But the benefits extend beyond the kitchen. Growing mushrooms is a fantastic way to recycle organic waste, turning coffee grounds, cardboard, and straw into a valuable resource. It’s also a fascinating educational experience for children and adults alike, offering a hands-on lesson in biology and sustainability.
Looking for variations? Consider experimenting with different mushroom species. Oyster mushrooms are a great starting point due to their ease of cultivation and rapid growth, but once you’ve mastered the basics, you can branch out to shiitake, lion’s mane, or even wine cap mushrooms. Each species requires slightly different conditions, so be sure to research their specific needs before you begin.
You can also adapt the growing medium to suit your preferences and available resources. Straw, wood chips, coffee grounds, and even old cotton clothing can all be used as substrates for mushroom cultivation. Experiment with different combinations to find what works best for you and your chosen mushroom species.
Don’t be afraid to get creative with your growing environment. While a dark, humid space is ideal, you can easily adapt a basement, closet, or even a shaded corner of your garden to create a suitable mushroom growing habitat. Just be sure to maintain consistent temperature and humidity levels for optimal growth.
We encourage you to embark on this exciting journey and discover the joys of growing your own mushrooms. It’s a rewarding experience that will transform the way you think about food and connect you with the natural world in a whole new way.
So, grab your supplies, follow our simple mushroom growing routine, and get ready to harvest your own delicious fungi. And most importantly, don’t forget to share your experiences with us! We’d love to hear about your successes, challenges, and creative adaptations. Share your photos, tips, and stories in the comments below, and let’s build a community of passionate mushroom growers together. Happy growing!
Frequently Asked Questions (FAQ)
What are the easiest types of mushrooms to grow for beginners?
Oyster mushrooms are generally considered the easiest mushrooms to grow for beginners. They are fast-growing, relatively tolerant of varying conditions, and can be cultivated on a wide range of substrates, including straw, coffee grounds, and cardboard. Shiitake mushrooms are another popular choice, although they require a bit more patience as they take longer to fruit.
What kind of environment do mushrooms need to grow?
Mushrooms thrive in dark, humid environments with good air circulation. The ideal temperature range varies depending on the species, but most mushrooms prefer temperatures between 60°F and 75°F (15°C and 24°C). Humidity levels should be maintained at around 80-90% to prevent the substrate from drying out. A basement, closet, or shaded outdoor area can all be suitable growing environments.
How long does it take to grow mushrooms?
The time it takes to grow mushrooms varies depending on the species and growing conditions. Oyster mushrooms can typically be harvested within a few weeks of inoculation, while shiitake mushrooms may take several months to fruit. Factors such as temperature, humidity, and substrate quality can also affect the growth rate.
What kind of substrate should I use for growing mushrooms?
The best substrate for growing mushrooms depends on the species you are cultivating. Oyster mushrooms can be grown on a wide range of substrates, including straw, coffee grounds, cardboard, and wood chips. Shiitake mushrooms typically require a wood-based substrate, such as hardwood logs or sawdust. Be sure to research the specific substrate requirements for your chosen mushroom species.
How do I prevent contamination in my mushroom growing setup?
Contamination is a common challenge in mushroom cultivation, but it can be minimized by following proper hygiene practices. Sterilize your substrate before inoculation to kill any competing organisms. Use clean tools and equipment, and avoid introducing contaminants into your growing environment. Maintain good air circulation to prevent the growth of mold and bacteria. If you notice any signs of contamination, such as mold or discoloration, remove the affected area immediately.
How do I know when my mushrooms are ready to harvest?
Mushrooms are typically ready to harvest when the caps have fully expanded and the gills are visible. The exact timing varies depending on the species, but generally, you should harvest your mushrooms before they begin to drop spores. Gently twist or cut the mushrooms from the substrate, being careful not to damage the surrounding mycelium.
Can I reuse the substrate after harvesting mushrooms?
Yes, you can often get multiple flushes of mushrooms from a single substrate. After harvesting the first flush, rehydrate the substrate by soaking it in water for a few hours. Then, return it to its growing environment and wait for the next flush to appear. The number of flushes you can get depends on the substrate quality and growing conditions. Eventually, the substrate will become depleted of nutrients and will no longer produce mushrooms. At this point, you can compost the spent substrate and use it to enrich your garden soil.
What are some common problems I might encounter when growing mushrooms?
Some common problems you might encounter when growing mushrooms include contamination, slow growth, and lack of fruiting. Contamination can be prevented by following proper hygiene practices. Slow growth can be caused by inadequate temperature, humidity, or substrate quality. Lack of fruiting can be caused by insufficient light, poor air circulation, or improper substrate preparation. Researching the specific needs of your chosen mushroom species and carefully monitoring your growing environment can help you avoid these problems.
Is it safe to eat homegrown mushrooms?
Yes, it is generally safe to eat homegrown mushrooms, provided that you have correctly identified the species and followed proper cultivation practices. Only consume mushrooms that you are 100% certain are edible. If you are unsure about the identity of a mushroom, do not eat it. It is also important to cook your homegrown mushrooms thoroughly before eating them, as some species can be toxic when raw.
Leave a Comment