

Regrow Enoki Mushrooms at Home? Absolutely! Imagine harvesting a fresh batch of those delicate, snow-white Enoki mushrooms right from your kitchen counter. It sounds like something out of a fairy tale, doesn’t it? But trust me, it’s entirely achievable, and I’m here to guide you through the process with this simple DIY guide.
Enoki mushrooms, also known as golden needle mushrooms, have a rich history in East Asian cuisine, particularly in Japan, China, and Korea. They’ve been cultivated for centuries, prized for their unique texture and subtle, slightly fruity flavor. Traditionally, they were grown in the wild on the stumps of hackberry trees, but now, you can bring that tradition indoors!
Why bother learning to regrow Enoki mushrooms at home? Well, for starters, it’s incredibly rewarding to nurture your own food. Plus, store-bought Enoki can sometimes be a bit pricey, and you’re never quite sure how long they’ve been sitting on the shelf. With this DIY trick, you’ll have access to fresh, flavorful mushrooms whenever you need them. More importantly, it’s a fantastic way to reduce food waste and embrace a more sustainable lifestyle. So, let’s dive in and discover how easy it is to cultivate these culinary delights in your own home!
Regrow Your Own Enoki Mushrooms: A Fun and Frugal DIY Project!
Hey mushroom lovers! Ever bought a pack of enoki mushrooms and felt bad tossing the little root cluster after using the delicate caps? Well, I’ve got some exciting news: you can actually regrow those enoki mushrooms right at home! It’s a surprisingly simple and rewarding project, and I’m here to guide you through every step. Get ready to impress your friends with your mushroom-growing prowess!
What You’ll Need
Before we dive in, let’s gather our supplies. Don’t worry, you probably already have most of these lying around:
* Enoki Mushroom Stems/Root Cluster: This is the star of the show! Save the base of your store-bought enoki mushrooms after cooking with the caps. The fresher, the better.
* Cardboard: Plain, unprinted cardboard is ideal. Think cereal boxes, shipping boxes, or even toilet paper rolls. Avoid anything with glossy coatings or heavy inks.
* Coffee Grounds: Used coffee grounds are a fantastic nutrient source for mushrooms. Make sure they’re cool and not moldy.
* Spray Bottle: For misting and keeping things moist.
* Container: A clean plastic container with a lid or a resealable plastic bag will work perfectly.
* Hydrogen Peroxide (3%): This is optional, but it can help prevent mold contamination.
* Gloves: To keep things sanitary.
* Patience: Mushroom growing takes time, so be prepared to wait a few weeks.
Preparing the Substrate
The substrate is the foundation for your mushroom growth, providing the necessary nutrients and moisture. We’ll be using a mix of cardboard and coffee grounds, which enoki mushrooms absolutely love.
1. Tear the Cardboard: Rip the cardboard into small pieces, about 1-2 inches in size. The smaller the pieces, the easier it will be for the mushrooms to colonize. Remove any tape or staples.
2. Pasteurize the Cardboard: This step helps eliminate competing molds and bacteria. There are a couple of ways to do this:
* Microwave Method: Place the cardboard pieces in a microwave-safe bowl and add enough water to completely submerge them. Microwave on high for 2-3 minutes, or until the water boils. Let it cool completely before handling.
* Boiling Water Method: Place the cardboard pieces in a heat-resistant container and pour boiling water over them. Let them soak for about an hour, then drain thoroughly.
3. Mix the Substrate: In a clean bowl or container, combine the pasteurized cardboard and used coffee grounds. A good ratio is about 2 parts cardboard to 1 part coffee grounds. Mix well, ensuring the coffee grounds are evenly distributed throughout the cardboard.
4. Adjust Moisture Level: The substrate should be moist but not soaking wet. Squeeze a handful of the mixture; it should feel damp and hold its shape without dripping. If it’s too dry, add a little water and mix. If it’s too wet, squeeze out the excess moisture.
Inoculating the Substrate
This is where the magic happens! We’ll be introducing the enoki mushroom culture to the prepared substrate.
1. Prepare the Enoki Stems: Gently rinse the enoki mushroom stems under cool water to remove any debris. If you see any signs of mold, discard those stems.
2. Optional: Hydrogen Peroxide Dip: To further reduce the risk of contamination, you can dip the enoki stems in a diluted hydrogen peroxide solution (1 part hydrogen peroxide to 9 parts water) for a few seconds. Rinse them thoroughly with clean water afterward.
3. Layer the Substrate and Stems: In your clean container, create a layer of the cardboard/coffee ground mixture. Then, place the enoki mushroom stems on top of the substrate. Cover the stems with another layer of the substrate, pressing down gently to ensure good contact.
4. Repeat Layers: Continue layering the substrate and stems until you’ve used all of your materials. The top layer should be a layer of the substrate.
5. Mist with Water: Lightly mist the top layer of the substrate with water to keep it moist.
Incubation and Colonization
Now, we need to create the perfect environment for the enoki mushrooms to colonize the substrate.
1. Seal the Container: Cover the container with a lid or seal the plastic bag. This will help maintain humidity.
2. Create Airflow: If using a sealed container, poke a few small holes in the lid to allow for some airflow. If using a plastic bag, leave it slightly open.
3. Find a Dark, Cool Place: Place the container in a dark, cool location with a temperature between 60-70掳F (15-21掳C). A closet, basement, or cupboard works well.
4. Monitor Moisture: Check the substrate every few days to ensure it remains moist. If it starts to dry out, mist it lightly with water.
5. Watch for Colonization: After a week or two, you should start to see white, fuzzy mycelium (the vegetative part of the mushroom) spreading throughout the substrate. This is a good sign that the enoki mushrooms are colonizing.
Fruiting
Once the substrate is fully colonized, it’s time to trigger fruiting, which is the process of the mushrooms actually growing.
1. Introduce Light: Move the container to a location with indirect light. Enoki mushrooms need some light to fruit properly.
2. Lower the Temperature: Lowering the temperature to around 50-60掳F (10-15掳C) can help stimulate fruiting. A refrigerator is often used for this step, but be careful not to let the substrate dry out.
3. Increase Humidity: Enoki mushrooms need high humidity to fruit. You can increase humidity by:
* Misting Regularly: Mist the substrate and the inside of the container with water several times a day.
* Creating a Humidity Tent: Place a clear plastic bag over the container to trap moisture. Make sure to leave some openings for airflow.
4. Wait for Pins: After a week or two, you should start to see tiny mushroom “pins” forming on the surface of the substrate. These are the beginnings of your enoki mushrooms!
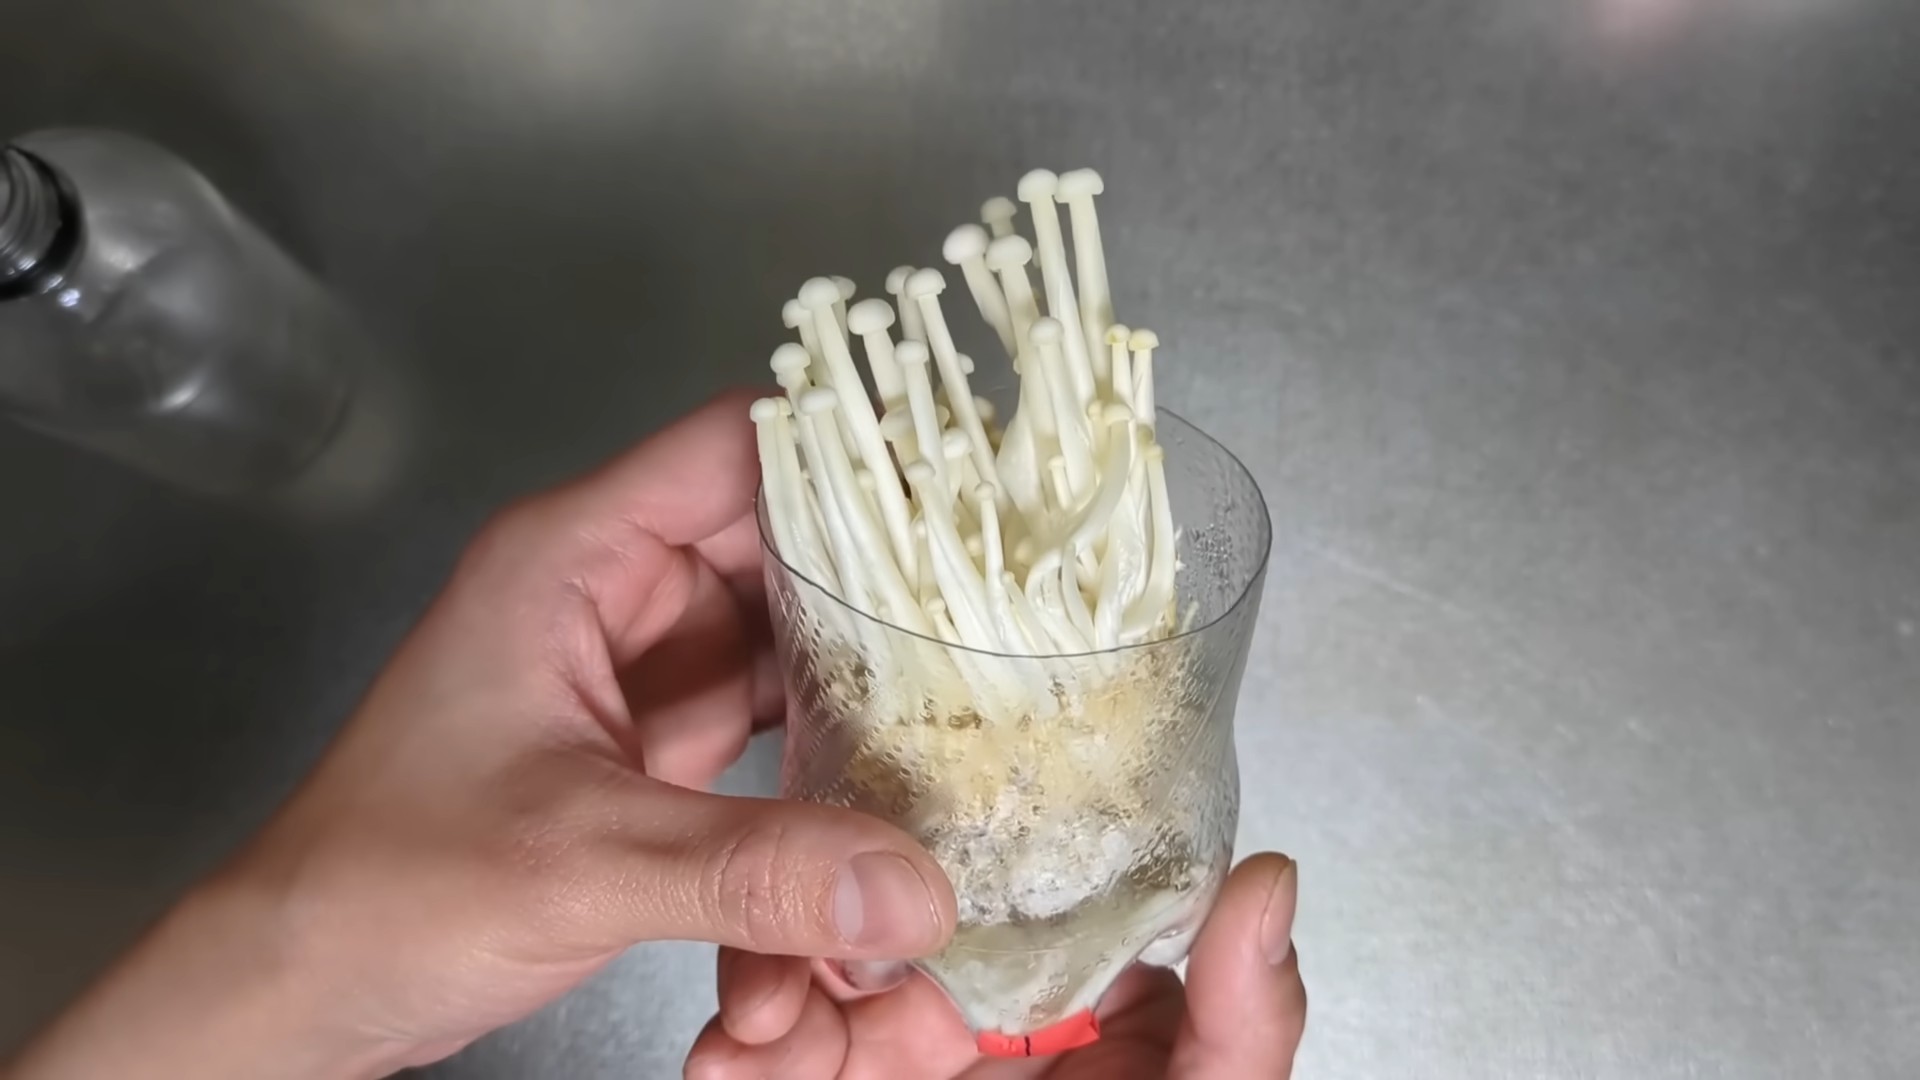
5. Encourage Elongation (Optional): For the classic long, thin enoki look, you can restrict light to the mushroom stems as they grow. This can be done by placing a cardboard tube or a dark plastic bottle (with the bottom cut off) over the growing mushrooms. This encourages them to stretch towards the light source at the top.
Harvesting
The moment you’ve been waiting for!
1. Harvest When Mature: Harvest the enoki mushrooms when they reach the desired size, typically a few inches long.
2. Cut at the Base: Use a clean knife or scissors to cut the mushrooms at the base of the cluster, near the substrate.
3. Enjoy Your Harvest: Your homegrown enoki mushrooms are now ready to be enjoyed! Use them in soups, salads, stir-fries, or any other dish that calls for these delicious fungi.
Troubleshooting
Sometimes, things don’t go exactly as planned. Here are some common issues and how to address them:
* Mold Contamination: If you see green, black, or other colored mold growing on the substrate, it’s likely contaminated. Unfortunately, you’ll need to discard the entire batch. To prevent mold, make sure to pasteurize the cardboard properly and maintain good hygiene.
* Substrate Drying Out: If the substrate is too dry, the mushrooms won’t grow properly. Mist it regularly with water to keep it moist.
* No Colonization: If you don’t see any mycelium growth after a few weeks, the enoki stems may not have been viable. Try again with a fresher batch of stems.
* Slow Growth: Mushroom growth can be slow, especially in cooler temperatures. Be patient and provide the right conditions.
Tips for Success
* Start with Fresh Stems: The fresher the enoki mushroom stems, the better the chances of success.
* Maintain Hygiene: Cleanliness is crucial to prevent contamination. Wash your hands and sterilize your equipment before starting.
* Control Temperature and Humidity: Enoki mushrooms thrive in cool, humid environments.
* Be Patient: Mushroom growing takes time, so don’t get discouraged if you don’t see results immediately.
* Experiment: Try different substrates and growing conditions to see what works best for you.
Growing your own enoki mushrooms is a fun and rewarding experience. With a little patience and effort, you can enjoy fresh, homegrown mushrooms right from your own home. Happy growing!

Conclusion
So, there you have it! Regrowing Enoki mushrooms at home isn’t just a fun experiment; it’s a rewarding way to reduce food waste, enjoy fresh, homegrown delicacies, and connect with the fascinating world of fungi. This simple DIY trick transforms kitchen scraps into a continuous supply of these delicate, flavorful mushrooms.
Why is this a must-try? Because it’s incredibly easy, cost-effective, and environmentally friendly. You’re essentially turning trash into treasure, minimizing your carbon footprint, and gaining access to a gourmet ingredient right in your own kitchen. Forget those expensive trips to the specialty grocery store; with a little patience and this straightforward method, you can have a steady stream of Enoki mushrooms whenever you desire.
But the fun doesn’t stop there! Feel free to experiment with different growing mediums. While the water method is the simplest, you can also try using a substrate of sawdust or coffee grounds for potentially even more robust growth. Consider varying the light exposure; while Enoki mushrooms prefer darkness, a little indirect light might encourage different growth patterns. You can also experiment with different containers. While a plastic bottle works perfectly well, you might find that a glass jar or even a repurposed mushroom growing kit offers unique advantages.
Don’t be afraid to get creative with your culinary applications, too. Enoki mushrooms are incredibly versatile. Add them to soups, stir-fries, salads, or even use them as a garnish for your favorite dishes. Their mild, slightly sweet flavor and delicate texture make them a perfect complement to a wide range of cuisines.
We wholeheartedly encourage you to try this DIY trick for regrowing Enoki mushrooms at home. It’s a fantastic project for individuals, families, and anyone interested in sustainable living. Once you’ve given it a go, we’d love to hear about your experience! Share your photos, tips, and any variations you’ve tried in the comments below. Let’s build a community of home mushroom growers and spread the word about this amazing way to enjoy fresh, delicious Enoki mushrooms while reducing waste. Happy growing!
Frequently Asked Questions (FAQ)
What exactly are Enoki mushrooms?
Enoki mushrooms, also known as Enokitake, are long, thin, white mushrooms with small caps. They are commonly used in Asian cuisine, particularly in soups and stir-fries. They have a mild, slightly sweet flavor and a delicate, crunchy texture when raw, becoming more tender when cooked. They are a good source of fiber, vitamins, and minerals.
How long does it take to regrow Enoki mushrooms?
The time it takes to regrow Enoki mushrooms can vary depending on environmental factors like temperature and humidity. Generally, you can expect to see new growth within 1-2 weeks. It may take 3-4 weeks to harvest a substantial amount of mushrooms. Patience is key!
What is the best environment for regrowing Enoki mushrooms?
Enoki mushrooms thrive in cool, humid environments. The ideal temperature range is between 55-65掳F (13-18掳C). Keep them in a dark or dimly lit area, as they prefer low light conditions. A basement, pantry, or even a covered area in your refrigerator can work well.
Can I use any type of water for regrowing Enoki mushrooms?
It’s best to use filtered or distilled water to avoid introducing contaminants that could inhibit growth or promote mold. Tap water can sometimes contain chlorine or other chemicals that may be harmful to the mushrooms.
How often should I change the water?
Change the water every 2-3 days to keep it fresh and prevent bacterial growth. This will help ensure the mushrooms have a clean and healthy environment to grow in.
What if I see mold growing?
If you notice mold growing, it’s important to address it immediately. Carefully remove the affected area and replace the water. You can also try gently rinsing the mushroom base with a diluted hydrogen peroxide solution (1 part hydrogen peroxide to 10 parts water). Ensure proper ventilation to prevent further mold growth. If the mold persists, it may be best to discard the attempt and start with a fresh mushroom base.
How many times can I regrow Enoki mushrooms from the same base?
You can typically regrow Enoki mushrooms from the same base several times, usually 2-3 harvests. However, the yield may decrease with each subsequent harvest. Eventually, the nutrient reserves in the base will be depleted, and it will no longer produce mushrooms.
Are there any specific containers that work best?
While a plastic bottle works well, you can also use glass jars, plastic containers, or even repurposed mushroom growing kits. The key is to choose a container that is clean, food-safe, and allows for adequate moisture retention. Make sure the container is tall enough to accommodate the growing mushrooms.
Can I use a different growing medium besides water?
Yes, you can experiment with different growing mediums such as sawdust, coffee grounds, or a mixture of both. These substrates can provide additional nutrients for the mushrooms and potentially lead to more robust growth. However, using these mediums may require more attention to moisture levels and ventilation to prevent mold growth.
How do I know when the Enoki mushrooms are ready to harvest?
The Enoki mushrooms are ready to harvest when they have reached your desired length and thickness. Typically, they are harvested when they are about 4-6 inches long. Gently pull or cut the mushrooms from the base, being careful not to damage the remaining mycelium.
Are there any risks associated with eating homegrown Enoki mushrooms?
While regrowing Enoki mushrooms at home is generally safe, it’s important to ensure they are grown in a clean environment and free from contaminants. Always wash the mushrooms thoroughly before consuming them. If you notice any unusual colors, odors, or textures, it’s best to discard them. If you have any concerns, consult with a mycologist or other expert.
Can I regrow Enoki mushrooms from store-bought mushrooms?
Yes, this DIY trick specifically focuses on regrowing Enoki mushrooms from the base of store-bought mushrooms. This is a great way to reduce food waste and enjoy fresh, homegrown mushrooms.
What do I do with the mushroom base after I can no longer regrow mushrooms from it?
Once the mushroom base is no longer producing mushrooms, you can compost it. It will break down and enrich your soil, providing valuable nutrients for your garden. This is a sustainable way to dispose of the mushroom base and further reduce waste.
Is regrowing Enoki mushrooms a good project for kids?
Yes, regrowing Enoki mushrooms can be a fun and educational project for kids. It teaches them about the life cycle of fungi, sustainable living, and the importance of reducing food waste. Supervise children closely and ensure they understand the importance of hygiene and cleanliness.

Leave a Comment