

Reliable Tomato Growing Setup: Are you dreaming of juicy, sun-ripened tomatoes bursting with flavor, straight from your own backyard? I know I am! But let’s be honest, sometimes growing tomatoes can feel like a battle against pests, diseases, and unpredictable weather. It doesn’t have to be that way! This article is your ultimate guide to creating a reliable tomato growing setup that will practically guarantee a bountiful harvest, even if you don’t have a green thumb (yet!).
For centuries, tomatoes have been a staple in cuisines around the world, from the vibrant sauces of Italy to the refreshing salsas of Mexico. Their journey from South America to our plates is a testament to their adaptability and deliciousness. But even with all that history, many gardeners still struggle to achieve consistent success with these beloved fruits.
That’s where this DIY guide comes in. We’ll explore simple, yet effective, techniques to build a reliable tomato growing setup that addresses common challenges. Imagine fewer wasted seedlings, less frustration, and more delicious tomatoes than you know what to do with! Whether you’re a seasoned gardener or just starting out, these tips and tricks will empower you to create the perfect environment for your tomato plants to thrive. Let’s get started and turn your tomato dreams into a delicious reality!
DIY Self-Watering Tomato Planter: Never Forget to Water Again!
Hey there, fellow gardening enthusiasts! Are you tired of the daily watering grind, especially during those scorching summer months? Do your tomato plants sometimes suffer from inconsistent moisture levels, leading to blossom end rot or cracked fruits? Well, I’ve got just the solution for you: a DIY self-watering tomato planter! This project is surprisingly simple, cost-effective, and will give your tomato plants a consistent supply of water, leading to healthier, happier, and more productive plants. Let’s get started!
What You’ll Need: The Supply List
Before we dive in, let’s gather all the necessary materials. Don’t worry, most of these are readily available at your local hardware store or even lying around your house.
* Two plastic storage bins: One large (at least 20 gallons) and one slightly smaller that can fit inside the larger one with a few inches of space all around. Think of it as a nesting doll situation, but with bins!
* A drill with various sized drill bits.
* PVC pipe (4-inch diameter): About 12-18 inches long. This will be our watering tube.
* PVC pipe cap: To fit the 4-inch PVC pipe.
* Landscape fabric or weed barrier cloth: Enough to line the smaller bin.
* Potting mix: A good quality potting mix specifically formulated for vegetables. Avoid using garden soil, as it can compact and hinder drainage.
* Optional: Mulch (straw, wood chips, etc.) to help retain moisture and suppress weeds.
* Optional: Fertilizer (slow-release or liquid) to provide essential nutrients.
* Measuring tape or ruler.
* Utility knife or scissors.
* Gloves (to protect your hands).
* Safety glasses (always a good idea when drilling!).
Building the Self-Watering Reservoir: The Foundation of Success
This is where the magic happens! We’ll be creating a reservoir in the bottom of the larger bin that will provide a constant source of water to your tomato plants.
1. Prepare the Larger Bin: Take your larger plastic storage bin and flip it upside down. We’re going to drill some holes in the bottom (which is now facing up) to create an overflow system.
2. Drill Overflow Holes: Using a drill bit that’s about 1/4 inch in diameter, drill three to four holes around the perimeter of the bottom of the bin. These holes will allow excess water to drain out, preventing the soil from becoming waterlogged. Space them evenly apart. I usually put them about 2-3 inches from the bottom edge.
3. Position the Smaller Bin: Place the smaller bin inside the larger bin. You should have a few inches of space between the two bins on all sides. This space will become our water reservoir.
4. Mark the PVC Pipe Location: With the smaller bin in place, decide where you want to position your PVC watering tube. I usually place it towards one side of the bin for easy access. Mark the location on the side of the smaller bin.
5. Drill the PVC Pipe Hole: Using a drill bit that’s slightly larger than the diameter of your PVC pipe, drill a hole through the side of the smaller bin at the marked location. Make sure the hole is large enough for the pipe to slide through easily, but not so large that it creates a significant gap.
6. Insert the PVC Pipe: Slide the PVC pipe through the hole you just drilled. The pipe should extend from the bottom of the larger bin (the reservoir) up to a few inches above the top of the smaller bin. This will allow you to easily add water to the reservoir.
7. Cap the PVC Pipe: Place the PVC pipe cap on top of the PVC pipe. This will prevent debris from falling into the reservoir.
Preparing the Planting Container: Creating the Perfect Environment
Now that we have our self-watering reservoir, it’s time to prepare the planting container for our tomato plants.
1. Line the Smaller Bin: Cut the landscape fabric or weed barrier cloth to fit inside the smaller bin. Make sure the fabric covers the entire inside surface, including the bottom and sides. This will prevent the potting mix from falling into the reservoir and clogging the overflow holes.
2. Secure the Fabric: You can secure the fabric to the sides of the bin using staples, duct tape, or even hot glue. Just make sure the fabric is securely attached so it doesn’t shift when you add the potting mix. I usually just overlap the fabric a bit and it stays in place with the weight of the soil.
3. Add Potting Mix: Fill the smaller bin with your chosen potting mix. Leave a few inches of space at the top of the bin to prevent the soil from overflowing when you water.
4. Water the Potting Mix: Thoroughly water the potting mix until it is evenly moist. This will help settle the soil and prepare it for planting.
Planting Your Tomato Plants: The Grand Finale
Finally, the moment we’ve all been waiting for! It’s time to plant our tomato plants in their new self-watering home.
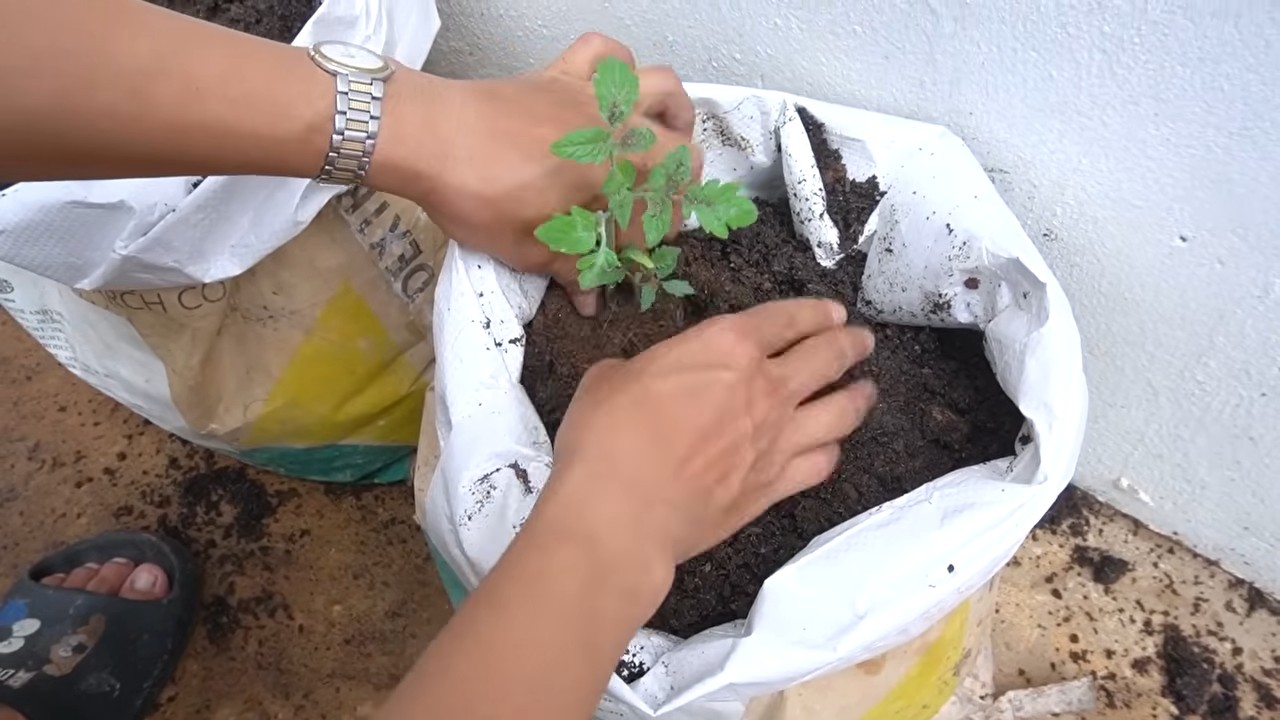
1. Dig Planting Holes: Dig holes in the potting mix large enough to accommodate the root balls of your tomato plants. Space the holes according to the recommended spacing for your chosen tomato variety.
2. Remove Tomato Plants from Containers: Gently remove your tomato plants from their nursery containers. Loosen the root balls slightly to encourage root growth.
3. Plant the Tomato Plants: Place the tomato plants in the holes you dug and backfill with potting mix. Gently firm the soil around the base of the plants.
4. Water the Plants: Water the newly planted tomato plants thoroughly. This will help settle the soil and ensure good contact between the roots and the potting mix.
5. Add Mulch (Optional): Apply a layer of mulch around the base of the tomato plants. This will help retain moisture, suppress weeds, and regulate soil temperature.
6. Fertilize (Optional): If you choose to fertilize, follow the instructions on the fertilizer package. You can use a slow-release fertilizer mixed into the potting mix or a liquid fertilizer applied regularly.
Maintaining Your Self-Watering Tomato Planter: Keeping Things Thriving
Now that your tomato plants are happily settled in their self-watering planter, it’s important to maintain it properly to ensure their continued health and productivity.
1. Watering the Reservoir: The key to this system is keeping the reservoir filled. Check the water level in the reservoir regularly, especially during hot weather. You can do this by simply looking down the PVC pipe. When the water level is low, add water until it reaches the overflow holes.
2. Fertilizing: Continue to fertilize your tomato plants according to the instructions on your chosen fertilizer.
3. Pruning: Prune your tomato plants regularly to remove suckers (the small shoots that grow between the main stem and the branches). This will help improve air circulation and encourage fruit production.
4. Support: As your tomato plants grow, they will need support. Use stakes, cages, or trellises to support the plants and prevent them from falling over.
5. Pest and Disease Control: Monitor your tomato plants regularly for signs of pests or diseases. Take appropriate action to control any problems that arise.
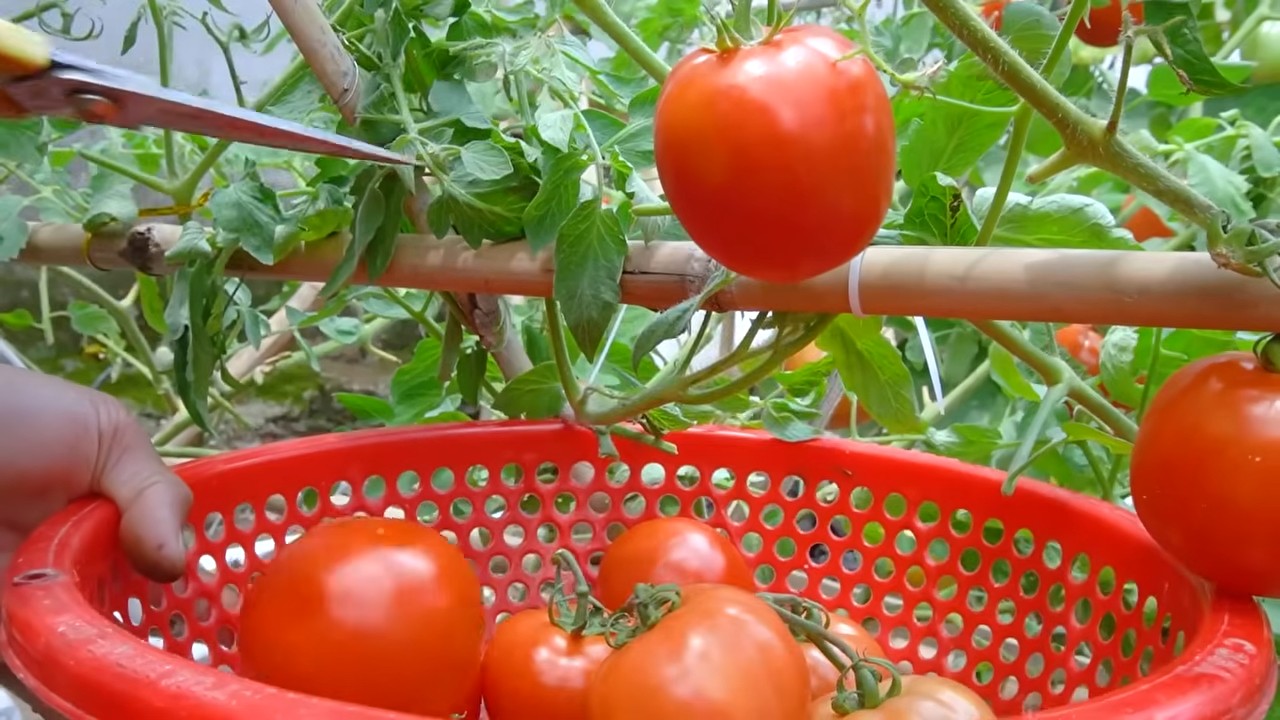
6. Harvesting: Harvest your tomatoes when they are ripe and fully colored. Enjoy the fruits of your labor!
Troubleshooting: Addressing Common Issues
Even with the best planning, sometimes things don’t go exactly as expected. Here are a few common issues you might encounter and how to address them:
* Blossom End Rot: This is caused by a calcium deficiency, often due to inconsistent watering. The self-watering planter should help prevent this, but you can also add calcium to the soil or use a calcium-rich fertilizer.
* Waterlogged Soil: If the soil is constantly soggy, it could be that the overflow holes are clogged. Check the holes and clear them if necessary. You might also need to adjust the amount of water you’re adding to the reservoir.
* Pests: Common tomato pests include aphids, whiteflies, and tomato hornworms. Use insecticidal soap or other appropriate methods to control these pests.
* Diseases: Tomato plants are susceptible to various diseases, such as early blight and late blight. Use disease-resistant varieties and practice good sanitation to prevent these diseases.
Tips and Tricks: Taking Your Planter to the Next Level
Here are a few extra tips and tricks to help you get the most out of your self-watering tomato planter:
* Choose the Right Tomato Variety: Some tomato varieties are better suited for container gardening than others. Look for determinate varieties, which are more compact and bushier.
* Use High-Quality Potting Mix: Don’t skimp on the potting mix! A good quality potting mix will provide the necessary nutrients and drainage for your tomato plants.
* Add Compost: Adding compost to the
Conclusion
So, there you have it! Building your own reliable tomato growing setup isn’t just a fun weekend project; it’s a game-changer for anyone serious about harvesting a bountiful crop of delicious, homegrown tomatoes. We’ve walked you through the steps, highlighted the benefits, and hopefully, inspired you to ditch the store-bought solutions and embrace the satisfaction of creating something truly your own.
Why is this a must-try? Because it puts you in control. You dictate the materials, the size, and the specific features that cater to your unique garden space and tomato-growing ambitions. No more settling for flimsy cages that topple over or expensive systems that don’t quite fit your needs. This DIY approach empowers you to build a robust, long-lasting structure that will support your tomato plants from seedling to harvest, year after year.
Beyond the practical advantages, there’s a certain joy in knowing you built something with your own hands. You’ll nurture your plants with even more care, knowing the effort you invested in their foundation. And let’s not forget the cost savings! By repurposing materials and building strategically, you can create a superior tomato growing setup for a fraction of the price of commercial alternatives.
Looking for variations? Absolutely! Consider adding a built-in watering system using PVC pipes and drip emitters for consistent hydration. You could also incorporate trellising elements for vining tomato varieties, maximizing vertical space and improving air circulation. For those in colder climates, think about adding a simple hoop house structure over your setup to extend the growing season. The possibilities are endless!
We’re confident that once you experience the difference a reliable tomato growing setup makes, you’ll never go back. Imagine plump, juicy tomatoes, bursting with flavor, all thanks to the sturdy support you provided. Picture yourself sharing your harvest with friends and family, proudly showcasing the fruits (literally!) of your labor.
Don’t delay! Gather your materials, roll up your sleeves, and embark on this rewarding DIY adventure. We’re eager to hear about your experiences. Share your photos, tips, and modifications in the comments below. Let’s build a community of passionate tomato growers, all empowered by the knowledge and skills to create the perfect environment for our beloved plants. Your journey to tomato-growing success starts now! Let us know how your **reliable tomato growing setup** is working for you!
Frequently Asked Questions (FAQ)
What are the best materials to use for building a tomato growing setup?
The best materials depend on your budget, aesthetic preferences, and the availability of resources. For the frame, consider using treated lumber, PVC pipes, or even repurposed metal pipes. Treated lumber offers durability and a natural look, while PVC pipes are lightweight, affordable, and easy to work with. Metal pipes provide exceptional strength and longevity. For the support structure, you can use wire mesh, nylon netting, or even sturdy twine. The key is to choose materials that are weather-resistant and strong enough to support the weight of mature tomato plants laden with fruit. Consider the size and weight of the tomato variety you plan to grow when selecting materials. Indeterminate varieties, which grow continuously, will require a more robust structure than determinate varieties, which reach a certain size and stop growing.
How tall should my tomato growing setup be?
The ideal height depends on the type of tomato you’re growing. Determinate varieties, which typically grow to a height of 3-4 feet, will require a shorter setup. Indeterminate varieties, which can reach heights of 6-8 feet or even more, will need a taller structure. It’s always better to err on the side of caution and build a taller setup than you think you’ll need, as tomato plants can often exceed expectations, especially with proper care and favorable growing conditions. Consider the mature height of the specific tomato variety you’re planting and add a foot or two for good measure.
How do I prevent my tomato plants from falling over, even with a support structure?
Even with a well-built support structure, tomato plants can sometimes become top-heavy and prone to falling over, especially during windy conditions or when laden with fruit. To prevent this, ensure that your support structure is firmly anchored in the ground. You can use stakes, rebar, or even concrete footings to provide additional stability. As the plants grow, regularly tie the stems to the support structure using soft twine or plant ties. Avoid using wire, as it can damage the stems. Prune the plants regularly to remove excess foliage and suckers, which can contribute to the plant’s overall weight and make it more susceptible to falling over.
Can I use this setup for other plants besides tomatoes?
Absolutely! While this setup is specifically designed for tomatoes, it can also be adapted for other vining or climbing plants, such as cucumbers, beans, peas, and even some types of squash. The key is to adjust the height and spacing of the support structure to accommodate the specific needs of the plant you’re growing. For example, cucumbers may require a wider spacing between the support wires or netting, while beans may benefit from a taller structure to maximize vertical growth.
How do I protect my tomato plants from pests and diseases within this setup?
A well-designed tomato growing setup can actually help to prevent pests and diseases by improving air circulation and reducing humidity around the plants. However, it’s still important to take proactive measures to protect your plants. Regularly inspect your plants for signs of pests or diseases, such as aphids, whiteflies, or leaf spot. Remove any affected leaves or plants immediately. Consider using organic pest control methods, such as insecticidal soap or neem oil, to control pests. To prevent diseases, ensure that your plants have adequate spacing and are not overcrowded. Water your plants at the base to avoid wetting the foliage, which can create a favorable environment for fungal diseases. You can also apply a copper-based fungicide as a preventative measure.
What if I don’t have a lot of space for a large tomato growing setup?
Even if you have limited space, you can still build a reliable tomato growing setup. Consider building a smaller, more compact structure that is tailored to your available space. You can also use vertical gardening techniques, such as trellising or growing tomatoes in hanging baskets, to maximize space utilization. Choose determinate tomato varieties, which are more compact and bushier than indeterminate varieties. These varieties are well-suited for container gardening and smaller spaces.
How do I ensure proper drainage in my tomato growing setup?
Proper drainage is essential for healthy tomato growth. If you’re growing tomatoes in containers, make sure that the containers have drainage holes at the bottom to allow excess water to escape. If you’re building a raised bed, ensure that the soil is well-draining and doesn’t become waterlogged after heavy rain. You can improve drainage by adding organic matter, such as compost or peat moss, to the soil. Avoid planting tomatoes in areas where water tends to accumulate.
How can I extend the growing season for my tomatoes using this setup?
You can extend the growing season for your tomatoes by adding a simple hoop house structure over your tomato growing setup. This will protect your plants from frost and cold temperatures, allowing you to start them earlier in the spring and continue harvesting them later in the fall. You can also use row covers or frost blankets to provide additional protection during cold snaps. Consider using heat mats or grow lights to warm the soil and provide supplemental light during the early stages of growth.

Leave a Comment