

Rooftop Swiss Chard Gardening: Imagine stepping onto your rooftop and harvesting vibrant, colorful Swiss chard leaves, ready to be tossed into a fresh salad or sautéed for a delicious side dish. Sounds dreamy, right? Well, it doesn’t have to be just a dream! This DIY guide will unlock the secrets to successfully growing Swiss chard right on your rooftop, even if you have limited space or gardening experience.
For centuries, rooftop gardens have been a staple in urban environments, providing fresh produce and a touch of nature amidst concrete jungles. From the hanging gardens of Babylon to the modern-day green roofs, the concept of cultivating plants in elevated spaces has always held a certain allure. Swiss chard, with its striking colors and nutritional benefits, is an excellent choice for rooftop gardens, offering both beauty and sustenance.
Why should you try this DIY trick? Because everyone deserves access to fresh, healthy food, and rooftop Swiss chard gardening empowers you to take control of your food source. Plus, it’s a fantastic way to reduce your carbon footprint, beautify your living space, and enjoy the therapeutic benefits of gardening. I’m excited to share my tips and tricks to help you create a thriving rooftop Swiss chard oasis. Let’s get started!

Dein eigener Dachgarten: Schweizer Mangold anbauen!
Hey Leute! Habt ihr auch genug von teurem Gemüse aus dem Supermarkt? Oder einfach Lust, eure eigenen, frischen Zutaten direkt vor der Haustür (oder eben auf dem Dach!) anzubauen? Dann seid ihr hier genau richtig! Ich zeige euch, wie ihr ganz einfach Schweizer Mangold auf eurem Dachgarten anbauen könnt. Es ist einfacher als ihr denkt und das Ergebnis ist super lecker und gesund!
Ist ein Dachgarten überhaupt geeignet?
Bevor wir loslegen, sollten wir kurz klären, ob euer Dach überhaupt für einen Garten geeignet ist. Hier sind ein paar wichtige Punkte:
* Tragfähigkeit: Das ist das A und O! Ein Dachgarten kann ganz schön schwer werden, besonders wenn die Erde nass ist. Informiert euch unbedingt, ob euer Dach das Gewicht tragen kann. Im Zweifelsfall fragt einen Statiker!
* Abdichtung: Ein Dachgarten darf natürlich nicht zu Wasserschäden führen. Überprüft, ob euer Dach gut abgedichtet ist und ob es eine Drainage gibt.
* Zugang: Wie kommt ihr auf das Dach? Ist der Zugang sicher und einfach? Ihr müsst ja regelmäßig gießen und ernten.
* Sonneneinstrahlung: Schweizer Mangold braucht Sonne, aber nicht zu viel. Ein halbschattiger Standort ist ideal. Achtet darauf, wie viel Sonne euer Dach bekommt.
* Wind: Auf dem Dach kann es ganz schön windig sein. Überlegt euch, wie ihr eure Pflanzen vor starkem Wind schützen könnt.
Wenn ihr diese Punkte geklärt habt und euer Dach geeignet ist, dann kann es losgehen!
Was ihr für euren Dachgarten braucht:
Hier ist eine Liste mit allen Materialien und Werkzeugen, die ihr für euren Dachgarten benötigt:
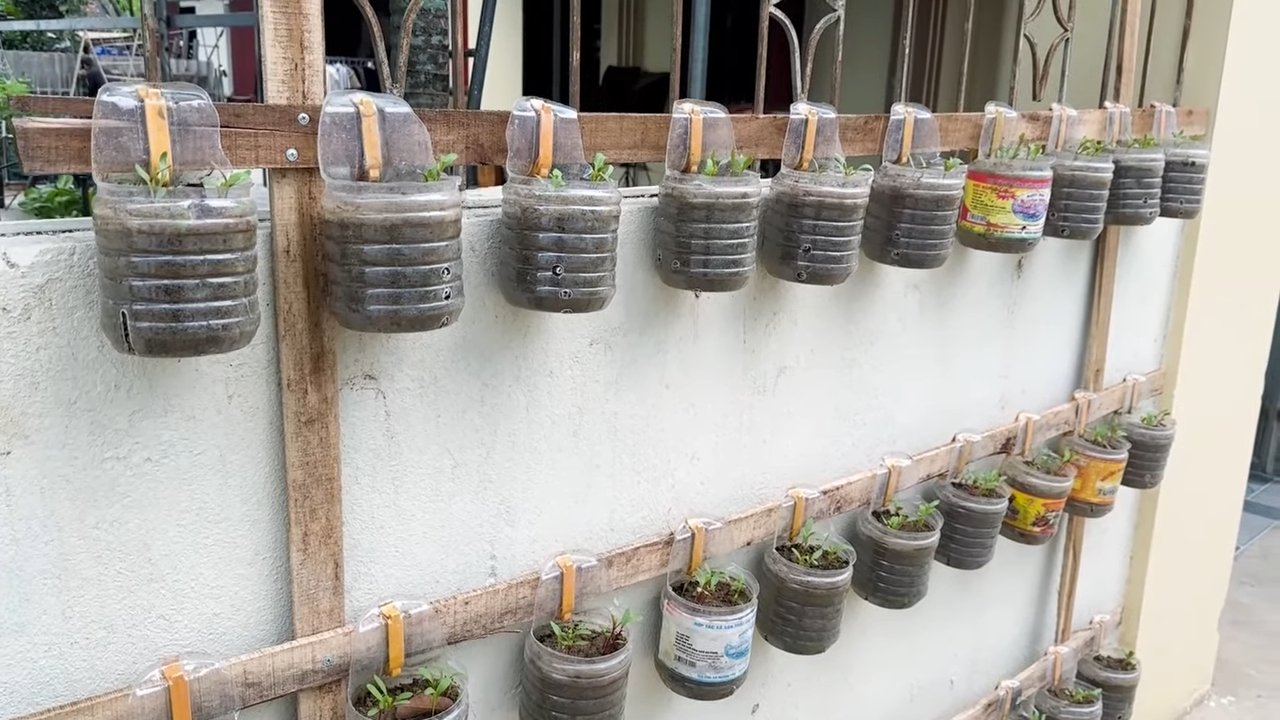
* Pflanzgefäße: Wählt Pflanzgefäße, die groß genug für Schweizer Mangold sind. Sie sollten mindestens 30 cm tief sein. Ihr könnt Töpfe, Kübel oder auch Hochbeete verwenden. Achtet darauf, dass die Gefäße Drainagelöcher haben.
* Drainagematerial: Blähton, Kies oder Tonscherben sorgen für eine gute Drainage und verhindern Staunässe.
* Pflanzerde: Verwendet hochwertige Pflanzerde, die gut Wasser speichert und Nährstoffe enthält. Spezielle Gemüseerde ist ideal.
* Schweizer Mangold Samen oder Jungpflanzen: Ihr könnt Mangold entweder aus Samen ziehen oder Jungpflanzen kaufen. Jungpflanzen sind einfacher, aber Samen sind günstiger.
* Gießkanne oder Gartenschlauch: Zum Gießen eurer Pflanzen.
* Gartenschere: Zum Ernten und Ausputzen der Pflanzen.
* Dünger: Organischer Dünger ist ideal für Schweizer Mangold.
* Handschuhe: Zum Schutz eurer Hände.
* Schaufel oder Pflanzkelle: Zum Einpflanzen der Samen oder Jungpflanzen.
* Eventuell Windschutz: Je nach Lage eures Daches.
Schritt-für-Schritt Anleitung: Schweizer Mangold anbauen
Jetzt geht’s ans Eingemachte! Hier ist eine detaillierte Anleitung, wie ihr Schweizer Mangold auf eurem Dachgarten anbauen könnt:
1. Vorbereitung der Pflanzgefäße
1. Reinigung: Reinigt eure Pflanzgefäße gründlich, bevor ihr sie befüllt. So vermeidet ihr, dass Krankheiten oder Schädlinge übertragen werden.
2. Drainage: Füllt eine Schicht Drainagematerial (Blähton, Kies oder Tonscherben) auf den Boden der Pflanzgefäße. Diese Schicht sollte etwa 5-10 cm dick sein. Das sorgt für eine gute Drainage und verhindert Staunässe.
3. Erde einfüllen: Füllt die Pflanzgefäße mit Pflanzerde. Lasst etwa 5 cm Platz bis zum Rand. Die Erde sollte locker und luftig sein.
2. Aussaat oder Einpflanzen
Hier habt ihr zwei Möglichkeiten: Entweder ihr zieht den Mangold aus Samen oder ihr kauft Jungpflanzen.
Aussaat:
1. Aussaatzeitpunkt: Schweizer Mangold kann ab April direkt ins Freie gesät werden.
2. Aussaattiefe: Drückt die Samen etwa 2-3 cm tief in die Erde.
3. Abstand: Lasst zwischen den Samen etwa 5-10 cm Platz.
4. Gießen: Gießt die Erde vorsichtig an, damit die Samen nicht weggeschwemmt werden.
5. Feuchtigkeit: Haltet die Erde feucht, aber nicht nass.
6. Keimung: Die Samen keimen in der Regel innerhalb von 1-2 Wochen.
Einpflanzen von Jungpflanzen:
1. Vorbereitung: Lockert die Erde in den Pflanzgefäßen auf.
2. Pflanzlöcher: Grabt kleine Pflanzlöcher, die etwas größer sind als die Wurzelballen der Jungpflanzen.
3. Einsetzen: Setzt die Jungpflanzen vorsichtig in die Pflanzlöcher.
4. Abstand: Lasst zwischen den Pflanzen etwa 20-30 cm Platz.
5. Anhäufeln: Füllt die Pflanzlöcher mit Erde auf und drückt sie leicht an.
6. Gießen: Gießt die Pflanzen gründlich an.
3. Pflege des Schweizer Mangolds
Die Pflege von Schweizer Mangold ist relativ einfach. Hier sind die wichtigsten Punkte:
1. Gießen: Gießt die Pflanzen regelmäßig, besonders bei trockenem Wetter. Die Erde sollte immer leicht feucht sein, aber nicht nass. Vermeidet Staunässe. Am besten gießt ihr morgens oder abends, wenn die Sonne nicht so stark scheint.
2. Düngen: Düngt die Pflanzen regelmäßig mit organischem Dünger. Beginnt etwa 2-3 Wochen nach der Aussaat oder dem Einpflanzen. Wiederholt das Düngen alle 2-3 Wochen.
3. Unkraut entfernen: Entfernt regelmäßig Unkraut, damit der Mangold genügend Platz und Nährstoffe hat.
4. Schädlinge und Krankheiten: Achtet auf Schädlinge und Krankheiten. Blattläuse können ein Problem sein. Ihr könnt sie mit einem Wasserstrahl abspritzen oder mit einem biologischen Schädlingsbekämpfungsmittel behandeln.
5. Ausputzen: Entfernt regelmäßig welke oder beschädigte Blätter. Das fördert das Wachstum der Pflanze.
6. Windschutz: Wenn euer Dach sehr windig ist, solltet ihr eure Pflanzen mit einem Windschutz schützen. Das kann zum Beispiel eine Hecke oder ein Zaun sein.
4. Ernte des Schweizer Mangolds
Das ist der schönste Teil! Wenn die Blätter groß genug sind (etwa 20-30 cm), könnt ihr mit der Ernte beginnen.
1. Erntezeitpunkt: Schweizer Mangold kann den ganzen Sommer über geerntet werden.
2. Erntemethode: Schneidet die äußeren Blätter mit einer Gartenschere ab. Lasst die inneren Blätter stehen, damit die Pflanze weiterwachsen kann.
3. Regelmäßige Ernte: Erntet den Mangold regelmäßig, damit er nicht zu groß und zäh wird.
4. Lagerung: Schweizer Mangold ist nicht lange haltbar. Am besten verarbeitet ihr ihn direkt nach der Ernte. Im Kühlschrank hält er sich etwa 2-3 Tage.
Tipps und Tricks für den erfolgreichen Dachgarten
Hier sind noch ein paar zusätzliche Tipps, die euch helfen werden, euren Dachgarten erfolgreich zu gestalten:
* Sortenwahl: Es gibt verschiedene Sorten von Schweizer Mangold. Wählt eine Sorte, die euch schmeckt und die gut zu eurem Standort passt. Es gibt Sorten mit roten, gelben oder weißen Stielen.
* Mischkultur: Schweizer Mangold verträgt sich gut mit anderen Gemüsesorten wie Kohlrabi, Radieschen oder Salat.
* Bodenverbesserung: Wenn euer Boden nicht optimal ist, könnt ihr ihn mit Kompost oder Hornspänen verbessern.
* Schnecken: Schnecken können ein Problem sein. Ihr könnt Schneckenkorn verwenden oder Schneckenzäune aufstellen.
* Sonnenschutz: Wenn euer Dach sehr sonnig ist, solltet ihr eure Pflanzen mit einem Sonnenschutz schützen. Das kann zum Beispiel ein Sonnensegel oder ein Schattiernetz sein.
* Winterharte Sorten
Conclusion
So, there you have it! Transforming your rooftop into a thriving Swiss chard garden is not only achievable, but it’s also incredibly rewarding. We’ve walked you through the essentials, from choosing the right containers and soil to understanding the specific needs of Swiss chard. But why is this DIY project a must-try?
Firstly, growing your own Swiss chard offers unparalleled freshness and flavor. Imagine stepping onto your rooftop and harvesting vibrant, crisp leaves just moments before adding them to your salad, stir-fry, or soup. The taste difference compared to store-bought produce is remarkable. Secondly, it’s an incredibly sustainable practice. You’re reducing your carbon footprint by eliminating transportation and packaging, and you’re controlling the use of pesticides and herbicides. Plus, it’s a fantastic way to connect with nature, even in the heart of the city.
But the benefits extend beyond taste and sustainability. Rooftop gardening can also improve your mental well-being. The act of nurturing plants, watching them grow, and harvesting your own food can be incredibly therapeutic and stress-relieving. It’s a chance to escape the hustle and bustle of urban life and find a moment of peace and tranquility.
And let’s not forget the aesthetic appeal! A rooftop Swiss chard garden can transform a drab, unused space into a vibrant, green oasis. The colorful leaves of Swiss chard, ranging from bright red and yellow to deep green and white, add a touch of beauty and charm to any rooftop.
Ready to take your rooftop garden to the next level? Consider these variations:
* Companion Planting: Plant Swiss chard alongside other vegetables and herbs that thrive in similar conditions. Marigolds can help deter pests, while beans can fix nitrogen in the soil, benefiting your Swiss chard.
* Succession Planting: Extend your harvest season by planting Swiss chard seeds every few weeks. This ensures a continuous supply of fresh leaves throughout the growing season.
* Vertical Gardening: If you’re short on space, explore vertical gardening options. Trellises or hanging planters can maximize your growing area and add visual interest to your rooftop garden.
* Different Varieties: Experiment with different varieties of Swiss chard to find your favorites. ‘Bright Lights’ offers a mix of colorful stems, while ‘Fordhook Giant’ produces large, dark green leaves.
Ultimately, creating a rooftop Swiss chard garden is an investment in your health, your well-being, and the environment. It’s a project that offers tangible rewards, from fresh, delicious produce to a beautiful, sustainable outdoor space.
We encourage you to embrace this DIY adventure and experience the joy of growing your own food. Don’t be afraid to experiment, learn from your mistakes, and adapt the techniques to suit your specific rooftop conditions.
And most importantly, we want to hear about your experiences! Share your photos, tips, and challenges in the comments below. Let’s create a community of rooftop Swiss chard gardeners and inspire others to transform their urban spaces into thriving green havens. Your success story could be the inspiration someone else needs to start their own rooftop garden journey. So, get your hands dirty, embrace the challenge, and enjoy the delicious rewards of your very own rooftop Swiss chard garden!
Frequently Asked Questions (FAQ)
What are the best containers for growing Swiss chard on a rooftop?
Choosing the right containers is crucial for successful rooftop Swiss chard gardening. Opt for containers that are at least 12 inches deep and wide to accommodate the plant’s root system. Consider the weight of the containers, especially when filled with soil and water, to ensure your rooftop can support them. Lightweight materials like plastic or fiberglass are good options. Make sure the containers have drainage holes to prevent waterlogging, which can lead to root rot. Fabric pots are also a great choice as they allow for excellent drainage and aeration. Remember to consider the overall aesthetic of your rooftop garden when selecting containers.
How often should I water my rooftop Swiss chard?
Watering frequency depends on several factors, including the weather, the type of container, and the soil composition. Generally, Swiss chard needs consistent moisture, especially during hot and dry periods. Check the soil moisture regularly by sticking your finger about an inch deep into the soil. If it feels dry, it’s time to water. Water deeply until water drains out of the drainage holes. Avoid overwatering, as this can lead to root rot. In hot weather, you may need to water daily, while in cooler weather, you may only need to water every few days. Consider using a soaker hose or drip irrigation system to deliver water directly to the roots and minimize water waste.
What kind of soil is best for rooftop Swiss chard?
Swiss chard thrives in well-draining, fertile soil that is rich in organic matter. A good potting mix specifically designed for vegetables is an excellent choice. Avoid using garden soil, as it can be too heavy and compact for containers. Amend the potting mix with compost or other organic matter to improve drainage, aeration, and nutrient content. A slightly acidic to neutral pH (around 6.0 to 7.0) is ideal for Swiss chard. You can test the soil pH using a soil testing kit and adjust it accordingly. Regularly replenish the soil with compost or other organic matter to maintain its fertility.
How do I protect my rooftop Swiss chard from pests and diseases?
Rooftop gardens can be susceptible to pests and diseases, but there are several steps you can take to protect your Swiss chard. Regularly inspect your plants for signs of pests, such as aphids, slugs, or caterpillars. Handpick pests off the plants or use a strong stream of water to dislodge them. Introduce beneficial insects, such as ladybugs or lacewings, to control pest populations. Use organic pest control methods, such as neem oil or insecticidal soap, if necessary. Ensure good air circulation around the plants to prevent fungal diseases. Remove any diseased leaves promptly to prevent the spread of infection. Consider using row covers to protect your plants from pests and harsh weather conditions.
When is the best time to harvest my rooftop Swiss chard?
You can begin harvesting Swiss chard leaves as soon as they are large enough to eat, typically when they are about 6-8 inches long. Harvest the outer leaves first, leaving the inner leaves to continue growing. This allows for continuous harvesting throughout the growing season. Use a sharp knife or scissors to cut the leaves near the base of the plant. Avoid pulling the leaves, as this can damage the plant. Harvest in the morning when the leaves are crisp and fresh. Swiss chard is best eaten fresh, but it can also be stored in the refrigerator for several days.
Can I grow Swiss chard on my rooftop in the winter?
Whether you can grow Swiss chard on your rooftop in the winter depends on your climate. Swiss chard is a cool-season crop that can tolerate light frost. In mild climates, you may be able to grow Swiss chard throughout the winter with minimal protection. In colder climates, you may need to provide additional protection, such as a cold frame or greenhouse. You can also grow Swiss chard indoors under grow lights. Choose a variety that is known to be cold-hardy. Mulch around the plants to insulate the soil and protect the roots from freezing.
How do I fertilize my rooftop Swiss chard?
Swiss chard benefits from regular fertilization, especially when grown in containers. Use a balanced fertilizer specifically designed for vegetables. Follow the instructions on the fertilizer label for application rates and frequency. You can also use organic fertilizers, such as compost tea or fish emulsion. Avoid over-fertilizing, as this can lead to excessive leaf growth and reduced flavor. Side-dress the plants with compost or other organic matter every few weeks to provide a slow-release source of nutrients. Monitor the plants for signs of nutrient deficiencies, such as yellowing leaves, and adjust your fertilization accordingly.
What if my Swiss chard bolts (goes to seed)?
Bolting is when a plant prematurely flowers and sets seed, often due to stress from heat or lack of water. While bolted Swiss chard leaves can become bitter, you can still harvest them. To prevent bolting, keep the soil consistently moist, provide shade during the hottest part of the day, and harvest regularly. If your Swiss chard does bolt, you can cut off the flower stalks to encourage more leaf production. You can also save the seeds for planting next season.


Leave a Comment