

Shaped Yellow Watermelon Growing: Ever dreamt of slicing into a perfectly square, sunshine-yellow watermelon you grew yourself? It sounds like something out of a futuristic farm, doesn’t it? But trust me, it’s totally achievable, and I’m here to show you how! For centuries, gardeners have experimented with manipulating the shapes of fruits and vegetables, often as a symbol of prosperity or simply for the sheer novelty of it. In some Asian cultures, perfectly shaped fruits are even given as gifts, representing good fortune and meticulous care.
But beyond the cool factor, why would you want to grow a shaped yellow watermelon? Well, think about it: they’re easier to store in the fridge, they make incredible conversation starters at summer barbecues, and they’re just plain fun! Plus, this DIY project is a fantastic way to get kids interested in gardening and where their food comes from. Let’s be honest, getting a child excited about eating a square watermelon is a lot easier than convincing them to try a regular one!
This article will guide you through the simple steps of shaped yellow watermelon growing, from selecting the right variety to choosing the perfect mold. I’ll share my tried-and-true tips and tricks to ensure your watermelon not only takes on the desired shape but also thrives and produces a delicious, juicy harvest. So, grab your gardening gloves, and let’s get shaping!
Geformte gelbe Wassermelone selber ziehen: Ein DIY-Projekt für den Sommer
Hallo liebe Gartenfreunde! Habt ihr euch jemals gefragt, wie man diese coolen, geformten Wassermelonen bekommt, die man manchmal sieht? Ich habe mich das auch gefragt und beschlossen, es einfach selbst auszuprobieren! Es ist ein bisschen Arbeit, aber das Ergebnis ist einfach fantastisch und ein echter Hingucker auf jeder Gartenparty. In diesem Artikel zeige ich euch Schritt für Schritt, wie ihr eure eigene gelbe Wassermelone in einer besonderen Form ziehen könnt. Los geht’s!
Was du brauchst:
* Gelbe Wassermelonensamen: Achtet darauf, eine Sorte zu wählen, die für eure Region geeignet ist. Ich empfehle eine frühe Sorte, damit ihr auch wirklich eine reife Melone ernten könnt.
* Anzuchttöpfe und Anzuchterde: Für den Start im Haus.
* Gartenerde: Gute, nährstoffreiche Erde für das Beet.
* Kompost oder organischer Dünger: Wassermelonen sind Starkzehrer und brauchen ordentlich Futter.
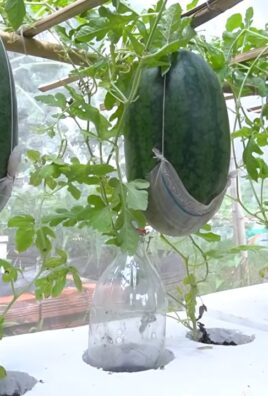
* Eine Form: Hier wird es spannend! Ihr könnt eine spezielle Wassermelonenform kaufen (z.B. in Würfelform, Herzform oder Sternform). Alternativ könnt ihr auch eine stabile, durchsichtige Plastikbox oder einen Behälter mit Löchern verwenden. Achtet darauf, dass die Form groß genug ist, um die wachsende Melone aufzunehmen, aber nicht zu groß, damit sie nicht zu viel Platz hat.
* Geduld: Das Wichtigste überhaupt!
Phase 1: Die Anzucht
1. Samen vorbereiten: Um die Keimung zu beschleunigen, könnt ihr die Samen vor dem Einpflanzen für 24 Stunden in lauwarmes Wasser legen. Das weicht die harte Schale auf und erleichtert das Keimen.
2. Aussaat: Füllt die Anzuchttöpfe mit Anzuchterde und drückt sie leicht an. Legt in jeden Topf ein bis zwei Samen und bedeckt sie mit etwa einem Zentimeter Erde. Gießt die Erde vorsichtig an, sodass sie feucht, aber nicht nass ist.
3. Standort: Stellt die Anzuchttöpfe an einen warmen, hellen Ort. Eine Fensterbank über der Heizung ist ideal. Die Keimung dauert in der Regel 7-14 Tage.
4. Pflege: Haltet die Erde feucht, aber vermeidet Staunässe. Sobald die Keimlinge zwei bis drei Blätter haben, könnt ihr die schwächeren entfernen, sodass nur der stärkste Keimling pro Topf übrig bleibt.
Phase 2: Vorbereitung des Beetes
1. Standortwahl: Wassermelonen lieben die Sonne! Wählt einen sonnigen, warmen und windgeschützten Standort für euer Beet.
2. Bodenvorbereitung: Lockert die Erde gründlich auf und entfernt Unkraut. Mischt reichlich Kompost oder organischen Dünger unter die Erde, um sie mit Nährstoffen anzureichern. Wassermelonen brauchen einen gut durchlässigen Boden, damit keine Staunässe entsteht.
3. Pflanzabstand: Plant die Wassermelonen mit ausreichend Abstand zueinander. Ich empfehle einen Abstand von mindestens 80 cm bis 1 Meter zwischen den Pflanzen, damit sie genügend Platz zum Wachsen haben.
Phase 3: Das Auspflanzen
1. Zeitpunkt: Wartet mit dem Auspflanzen, bis keine Frostgefahr mehr besteht. In der Regel ist das Mitte Mai der Fall. Die Bodentemperatur sollte mindestens 15 Grad Celsius betragen.
2. Vorsichtiges Auspflanzen: Nehmt die Keimlinge vorsichtig aus den Anzuchttöpfen und pflanzt sie in das vorbereitete Beet. Achtet darauf, die Wurzeln nicht zu beschädigen.
3. Angießen: Gießt die Pflanzen nach dem Auspflanzen gründlich an.
Phase 4: Die Formgebung
1. Der richtige Zeitpunkt: Das ist der kniffligste Teil! Ihr müsst den richtigen Zeitpunkt erwischen, um die Form anzubringen. Wartet, bis die Wassermelone etwa die Größe einer Faust hat. Sie sollte noch klein genug sein, um in die Form zu passen, aber schon groß genug, um nicht mehr so empfindlich zu sein.
2. Vorsichtiges Einsetzen: Öffnet die Form vorsichtig und legt die Wassermelone hinein. Achtet darauf, die Melone nicht zu beschädigen. Schließt die Form vorsichtig und sichert sie, damit sie nicht aufgeht.
3. Die Form fixieren: Je nach Form müsst ihr sie eventuell mit Stützen oder Schnüren fixieren, damit sie nicht verrutscht oder umkippt. Achtet darauf, dass die Form stabil steht und die Melone nicht unnötig belastet wird.
4. Belüftung: Wenn ihr eine geschlossene Form verwendet, achtet darauf, dass sie ausreichend belüftet ist, um Schimmelbildung zu vermeiden. Ihr könnt kleine Löcher in die Form bohren oder sie regelmäßig öffnen, um frische Luft hineinzulassen.
Phase 5: Die Pflege während des Wachstums
1. Gießen: Wassermelonen brauchen viel Wasser, besonders während der Fruchtbildung. Gießt regelmäßig und gründlich, aber vermeidet Staunässe. Am besten gießt ihr morgens, damit die Blätter über Tag abtrocknen können.
2. Düngen: Düngt die Wassermelonen regelmäßig mit einem organischen Dünger oder Kompost. Das sorgt für ein gesundes Wachstum und eine gute Fruchtbildung.
3. Unkraut entfernen: Haltet das Beet unkrautfrei, damit die Wassermelonen nicht um Nährstoffe konkurrieren müssen.
4. Kontrolle: Kontrolliert die Pflanzen regelmäßig auf Schädlinge und Krankheiten. Bei Bedarf könnt ihr biologische Pflanzenschutzmittel einsetzen.
5. Die Form im Auge behalten: Überprüft regelmäßig, ob die Form noch richtig sitzt und ob die Melone genügend Platz hat. Wenn die Melone zu groß wird, müsst ihr die Form eventuell anpassen oder entfernen.
Phase 6: Die Ernte
1. Der richtige Zeitpunkt: Der Zeitpunkt der Ernte ist entscheidend für den Geschmack der Wassermelone. Es gibt verschiedene Anzeichen, die euch verraten, wann die Melone reif ist:
* Die Ranke, die der Melone am nächsten ist, wird braun und trocken.
* Die Stelle, an der die Melone auf dem Boden liegt, wird gelblich.
* Wenn ihr auf die Melone klopft, sollte sie hohl klingen.
2. Vorsichtiges Ernten: Schneidet die Melone vorsichtig mit einem scharfen Messer oder einer Gartenschere ab. Achtet darauf, die Pflanze nicht zu beschädigen.
3. Genießen: Jetzt könnt ihr eure selbst gezogene, geformte gelbe Wassermelone genießen! Sie ist nicht nur ein Hingucker, sondern schmeckt auch noch fantastisch.
Zusätzliche Tipps und Tricks:
* Bestäubung: Wassermelonen sind auf die Bestäubung durch Bienen und andere Insekten angewiesen. Wenn ihr wenig Insekten in eurem Garten habt, könnt ihr die Blüten auch von Hand bestäuben. Nehmt dazu einen weichen Pinsel und übertragt den Pollen von den männlichen auf die weiblichen Blüten.
* Mulchen: Mulcht das Beet mit Stroh oder Rasenschnitt, um die Feuchtigkeit im Boden zu halten und Unkrautwachstum zu reduzieren.
* Sortenwahl: Es gibt viele verschiedene Sorten von gelben Wassermelonen. Informiert euch vor dem Kauf über die Eigenschaften der einzelnen Sorten und wählt eine Sorte, die für eure Bedürfnisse geeignet ist. Einige Sorten sind besonders süß, andere sind besonders resistent gegen Krankheiten.
* Experimentieren: Seid kreativ und experimentiert mit verschiedenen Formen und Materialien. Ihr könnt zum Beispiel auch eine alte Plastikflasche oder einen Joghurtbecher als Form verwenden.
Ich hoffe, diese Anleitung hilft euch dabei, eure eigene geformte gelbe Wassermelone zu ziehen. Es ist ein spannendes Projekt, das viel Freude bereitet und mit einem einzigartigen Ergebnis belohnt wird. Viel Erfolg und guten Appetit!
Conclusion
So, there you have it! Transforming an ordinary watermelon into a uniquely shaped, vibrant yellow masterpiece is not just a fun gardening project; it’s a conversation starter, a delightful gift, and a testament to the wonders of nature and a little human ingenuity. This DIY trick, focusing on growing a shaped yellow watermelon, is a must-try for several compelling reasons.
First and foremost, it elevates the humble watermelon from a simple summer treat to a stunning visual spectacle. Imagine the look on your friends’ and family’s faces when you present them with a perfectly square or heart-shaped yellow watermelon! It’s an instant wow factor that adds a touch of whimsy and sophistication to any gathering.
Secondly, this project is incredibly rewarding. From carefully selecting your yellow watermelon seeds to nurturing the growing fruit within its custom mold, you’ll witness the magic of nature unfold before your very eyes. The anticipation builds as the watermelon slowly takes shape, culminating in the triumphant moment when you finally remove the mold to reveal your creation. It’s a truly satisfying experience that connects you to the earth and the cycle of life.
Thirdly, shaping watermelons opens up a world of creative possibilities. While we’ve focused on squares and hearts, don’t let your imagination stop there! Experiment with different mold shapes, sizes, and even patterns. You could try creating star-shaped watermelons for a Fourth of July celebration, or even personalize them with initials or names for special occasions. The only limit is your creativity.
Variations and Suggestions:
* Mold Materials: While plastic molds are readily available, you can also experiment with creating your own molds from wood, metal, or even sturdy cardboard. Just ensure the material is food-safe and won’t leach any harmful chemicals into the watermelon.
* Watermelon Varieties: While this guide focuses on yellow watermelons, the same technique can be applied to red or orange varieties. Consider experimenting with different watermelon types to see which ones work best for shaping.
* Support Systems: As the watermelon grows and becomes heavier, it’s crucial to provide adequate support to prevent the vine from breaking. Use slings, trellises, or other support structures to keep the fruit safely suspended.
* Sunlight Management: Ensure the shaped watermelon receives adequate sunlight for optimal growth and ripening. You may need to adjust the position of the mold or the surrounding foliage to maximize sun exposure.
* Pest Control: Keep a close eye on your watermelon plants for any signs of pests or diseases. Implement appropriate pest control measures to protect your crop and ensure a healthy harvest.
We wholeheartedly encourage you to embark on this exciting gardening adventure and try growing your own shaped yellow watermelon. It’s a fun, rewarding, and visually stunning project that will bring joy to your garden and delight to your table.
Don’t forget to document your progress and share your experiences with us! We’d love to see your creations and hear about any tips or tricks you discover along the way. Share your photos and stories on social media using #ShapedYellowWatermelon and let’s inspire others to get their hands dirty and grow something amazing!
Frequently Asked Questions (FAQ)
What is the best time to start growing shaped yellow watermelons?
The ideal time to start growing shaped yellow watermelons is typically in late spring or early summer, after the last frost has passed and the soil has warmed up. Watermelons thrive in warm temperatures and require a long growing season of at least 70-90 days. Starting early in the season allows the watermelons ample time to mature and develop their desired shape before the first frost arrives. Check your local climate and planting guidelines for the most accurate timing in your region.
Where can I find yellow watermelon seeds?
Yellow watermelon seeds are readily available from various sources, including online seed retailers, garden centers, and nurseries. Look for reputable seed companies that specialize in heirloom or unique watermelon varieties. Some popular yellow watermelon varieties include ‘Yellow Doll,’ ‘Yellow Crimson,’ and ‘Buttercup Yellow.’ When purchasing seeds, ensure they are fresh and viable for optimal germination rates.
What type of mold should I use for shaping my watermelon?
The most common type of mold used for shaping watermelons is a clear, food-grade plastic mold. These molds are specifically designed to withstand the weight and pressure of the growing watermelon without cracking or breaking. You can find these molds online or at specialty gardening stores. Ensure the mold is appropriately sized for the watermelon variety you are growing. Alternatively, you can create your own molds from wood, metal, or sturdy cardboard, but make sure the materials are food-safe and won’t leach any harmful chemicals into the fruit.
How do I know when to place the mold around the watermelon?
The optimal time to place the mold around the watermelon is when the fruit is approximately the size of a softball or slightly larger. At this stage, the watermelon is still actively growing and can easily conform to the shape of the mold. Avoid placing the mold too early, as the watermelon may not have enough room to expand, or too late, as the fruit may already be too large and resistant to shaping. Gently slide the mold around the watermelon, ensuring it is centered and securely fastened.
How long does it take for the watermelon to take the shape of the mold?
The time it takes for the watermelon to fully take the shape of the mold depends on several factors, including the watermelon variety, the size of the mold, and the growing conditions. Generally, it takes about 2-3 weeks for the watermelon to completely fill the mold and assume its desired shape. Monitor the watermelon’s progress regularly and adjust the mold if necessary.
How do I prevent the watermelon from rotting inside the mold?
To prevent the watermelon from rotting inside the mold, ensure adequate ventilation and drainage. Drill small holes in the mold to allow air to circulate and prevent moisture buildup. Avoid overwatering the watermelon plants, as excessive moisture can contribute to rot. Regularly inspect the watermelon for any signs of decay or disease and take appropriate action if necessary.
How do I know when the shaped yellow watermelon is ripe and ready to harvest?
Determining when a shaped yellow watermelon is ripe and ready to harvest can be tricky, as the traditional indicators, such as thumping the fruit, may not be as reliable due to the mold. Look for the following signs:
* The tendril closest to the watermelon stem should be brown and dry.
* The bottom of the watermelon, where it rests on the ground, should be a creamy yellow color.
* The watermelon should sound hollow when tapped.
* The skin should be slightly dull and waxy.
If you are unsure, it is better to err on the side of caution and harvest the watermelon slightly early rather than letting it overripen and rot inside the mold.
Can I reuse the mold for multiple watermelons?
Yes, you can reuse the mold for multiple watermelons, provided it is in good condition and free from cracks or damage. After harvesting a shaped watermelon, thoroughly clean the mold with soap and water to remove any residue or debris. Allow the mold to dry completely before using it again. Store the mold in a cool, dry place when not in use.
What are some common problems I might encounter when growing shaped watermelons?
Some common problems you might encounter when growing shaped watermelons include:
* Pest infestations: Watermelons are susceptible to various pests, such as aphids, squash bugs, and vine borers. Implement appropriate pest control measures to protect your crop.
* Diseases: Watermelons can be affected by fungal diseases, such as powdery mildew and anthracnose. Ensure good air circulation and avoid overwatering to prevent disease outbreaks.
* Cracking: The watermelon may crack if it grows too quickly or if the mold is too tight. Choose a mold that is appropriately sized for the watermelon variety and monitor the fruit’s growth regularly.
* Rotting: As mentioned earlier, watermelons can rot inside the mold if there is inadequate ventilation or drainage. Ensure the mold has drainage holes and avoid overwatering.
By being aware of these potential problems and taking proactive measures, you can increase your chances of successfully growing shaped yellow watermelons.

Leave a Comment