

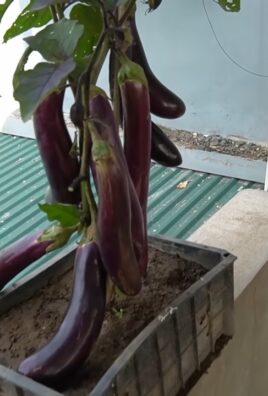
Soil bags for bigger carrots – sounds like magic, right? Well, it’s not quite magic, but it’s the closest thing you’ll get to a gardening miracle! Have you ever dreamt of pulling enormous, vibrant orange carrots straight from your backyard, the kind that make your neighbors green with envy? I know I have! For centuries, gardeners have strived to cultivate the perfect carrot, a symbol of abundance and healthy eating, and now, I’m going to share a simple DIY trick that can help you achieve just that.
The secret? Ditching the traditional garden bed and embracing the humble soil bag. Why, you ask? Because carrots need loose, well-draining soil to thrive and grow long and straight. Rocky or compacted soil can lead to stunted, forked, and frankly, disappointing carrots. This DIY method allows you to create the ideal growing environment, regardless of your existing soil conditions. Plus, it’s a fantastic solution for those with limited space or poor soil quality.
This article will guide you step-by-step on how to use soil bags for bigger carrots, ensuring you harvest a bumper crop of these delicious root vegetables. Get ready to transform your carrot-growing game and enjoy the satisfaction of growing your own impressive, homegrown carrots!
DIY: Karottenanbau in Säcken – So bekommst du riesige Rüben!
Hallo liebe Gartenfreunde! Habt ihr auch genug von kleinen, krummen Karotten aus dem eigenen Garten? Ich kenne das nur zu gut! Aber keine Sorge, ich habe da einen Trick auf Lager, mit dem ihr garantiert riesige, kerzengerade Karotten ernten werdet: Karottenanbau in Säcken! Klingt komisch? Ist aber genial!
Warum Säcke? Ganz einfach: Karotten brauchen tiefgründigen, lockeren Boden, um sich optimal entwickeln zu können. In normalen Gartenbeeten ist das oft schwierig zu erreichen. In Säcken können wir die Bodenbedingungen perfekt kontrollieren und den Karotten den idealen Wachstumsraum bieten. Außerdem ist es eine super platzsparende Lösung, ideal für Balkone oder kleine Gärten.
Hier ist eine detaillierte Anleitung, wie ihr eure eigenen Karottensäcke anlegt:
Was du brauchst:
* Säcke: Stabile, reißfeste Säcke. Alte Jutesäcke, Futtersäcke oder auch große Pflanzsäcke sind ideal. Achtet darauf, dass sie mindestens 60 cm tief sind, besser noch 80 cm oder mehr, damit die Karotten genug Platz zum Wachsen haben.
* Erde: Spezielle Karottenerde oder eine Mischung aus Gartenerde, Sand und Kompost. Karotten mögen lockeren, gut durchlässigen Boden. Vermeidet zu viel Stickstoff, da dies zu üppigem Grünwachstum, aber kleinen Karotten führt.
* Sand: Quarzsand oder Spielsand. Sorgt für eine gute Drainage und verhindert Staunässe.
* Kompost: Reifer Kompost liefert wichtige Nährstoffe und verbessert die Bodenstruktur.
* Karottensamen: Wählt eine Sorte, die für den Anbau in Säcken geeignet ist. Lange, schlanke Sorten wie ‘Nantaise’ oder ‘Amsterdam Forcing’ sind eine gute Wahl.
* Gießkanne oder Schlauch: Zum Bewässern der Säcke.
* Schere oder Messer: Zum Zuschneiden der Säcke (falls nötig).
* Optional: Drainagematerial wie Kies oder Blähton für den Boden der Säcke.
* Optional: Mulchmaterial wie Stroh oder Holzhackschnitzel, um die Feuchtigkeit im Boden zu halten und Unkraut zu unterdrücken.
Schritt-für-Schritt-Anleitung:
1. Säcke vorbereiten:
* Zuerst solltet ihr die Säcke gründlich reinigen, falls sie gebraucht sind.
* Wenn ihr Jutesäcke verwendet, könnt ihr sie vor dem Befüllen etwas anfeuchten, damit sie sich besser formen lassen.
* Falls die Säcke keine Löcher am Boden haben, solltet ihr ein paar Löcher hineinschneiden, um Staunässe zu vermeiden.
* Stellt die Säcke an den Ort, wo ihr die Karotten anbauen möchtet. Gefüllte Säcke sind schwer zu transportieren!
2. Drainage anlegen (optional):
* Auf den Boden der Säcke könnt ihr eine Schicht Drainagematerial wie Kies oder Blähton geben. Das sorgt für eine bessere Drainage und verhindert Staunässe. Ich mache das meistens, weil es einfach sicherer ist.
3. Erde mischen:
* Mischt die Erde, den Sand und den Kompost in einem Verhältnis von etwa 2:1:1. Das bedeutet, zwei Teile Erde, ein Teil Sand und ein Teil Kompost.
* Achtet darauf, dass die Mischung locker und krümelig ist.
* Vermeidet Klumpen und Steine.
4. Säcke befüllen:
* Füllt die Säcke mit der Erdmischung.
* Lasst oben etwa 10-15 cm Platz, damit ihr beim Gießen nicht alles überschwemmt.
* Drückt die Erde leicht an.
5. Aussaat:
* Befeuchtet die Erde gründlich.
* Sät die Karottensamen in Reihen oder breitwürfig aus.
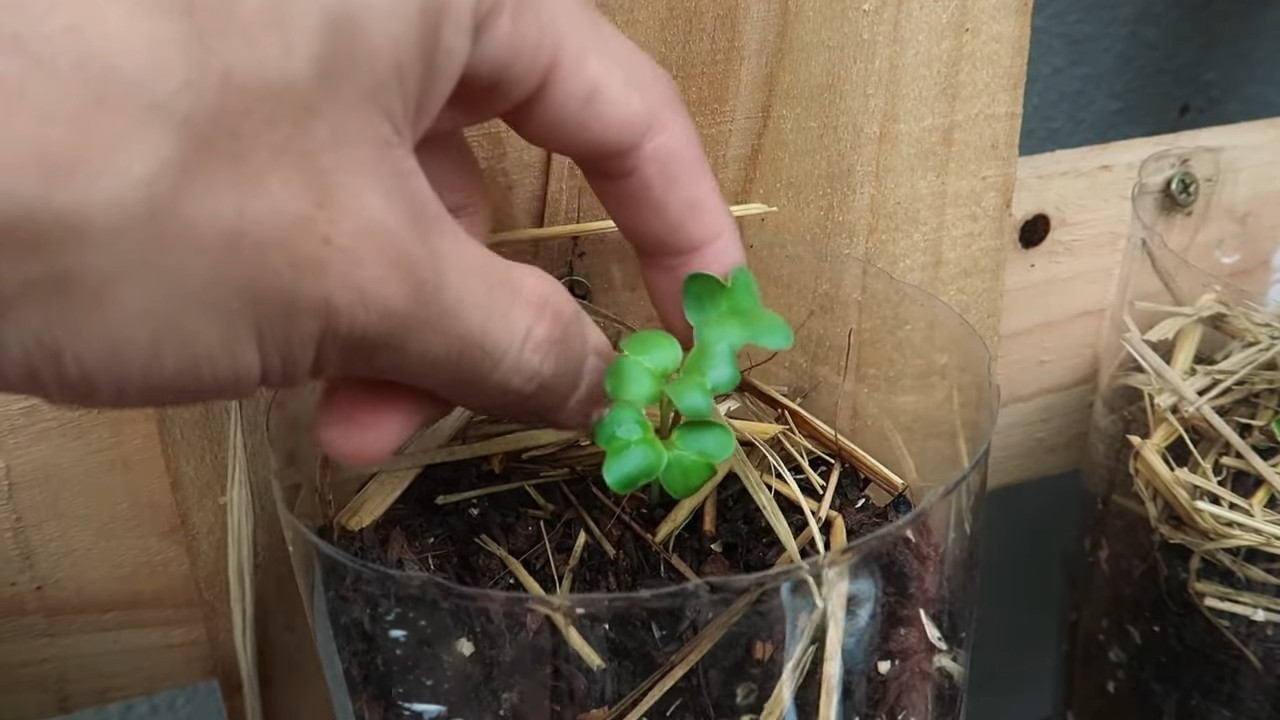
* Achtet auf den Abstand zwischen den Samen. Auf der Packung steht meistens, wie viel Abstand empfohlen wird. Ich säe sie meistens etwas dichter und pikiere sie später, wenn sie zu eng stehen.
* Bedeckt die Samen mit einer dünnen Schicht Erde (etwa 0,5-1 cm).
* Drückt die Erde leicht an.
6. Bewässerung:
* Gießt die Säcke vorsichtig, damit die Samen nicht weggeschwemmt werden.
* Haltet die Erde feucht, aber nicht nass.
* Vermeidet Staunässe.
7. Standort:
* Stellt die Säcke an einen sonnigen Standort. Karotten brauchen mindestens 6 Stunden Sonne pro Tag.
8. Pflege:
* Haltet die Erde feucht.
* Jätet regelmäßig Unkraut.
* Düngt die Karotten nach Bedarf. Ich verwende meistens einen organischen Gemüsedünger.
* Pikiert die Karotten, wenn sie zu eng stehen. Das bedeutet, ihr entfernt einige der kleinen Pflänzchen, damit die anderen genug Platz zum Wachsen haben.
9. Ernte:
* Die Erntezeit hängt von der Sorte ab.
* In der Regel sind Karotten nach etwa 70-80 Tagen erntereif.
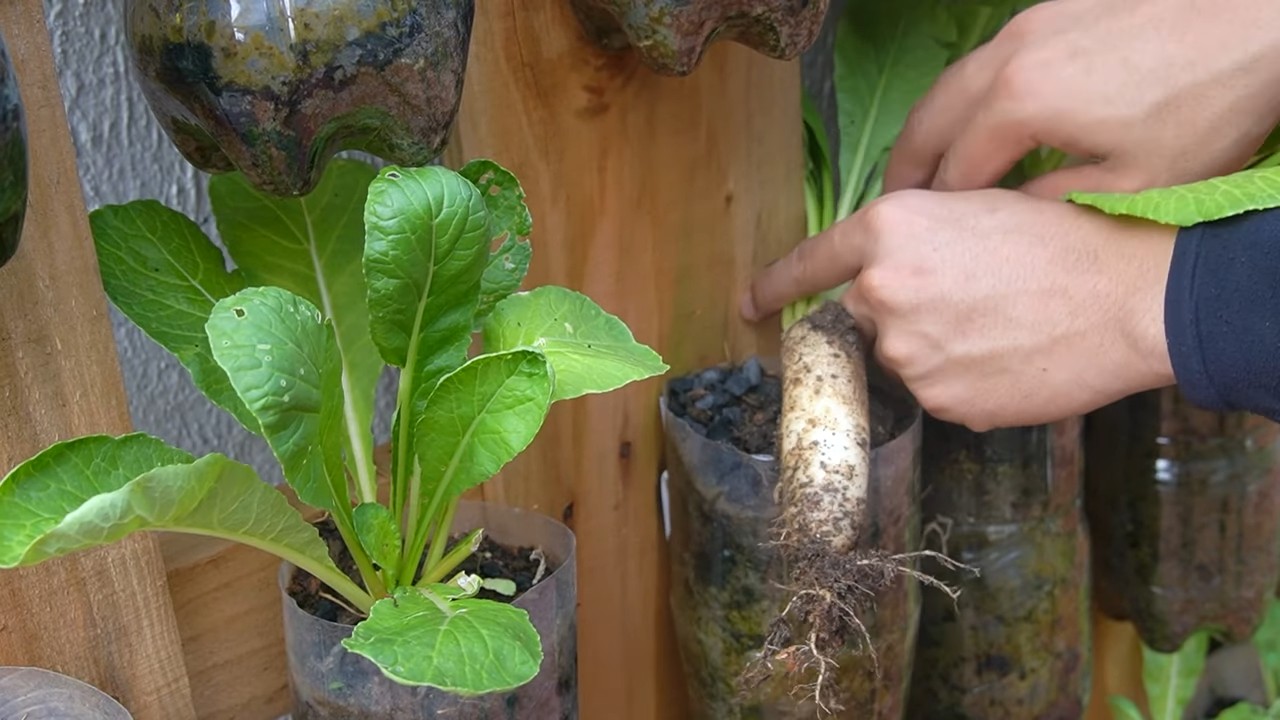
* Zieht die Karotten vorsichtig aus der Erde.
* Wenn die Erde zu trocken ist, könnt ihr sie vorher etwas anfeuchten, damit die Karotten leichter herauskommen.
Zusätzliche Tipps und Tricks:
* Sortenwahl: Wählt Sorten, die für den Anbau in Säcken geeignet sind. Kurze bis mittellange Sorten sind oft besser geeignet als lange Sorten.
* Fruchtfolge: Baut Karotten nicht jedes Jahr am selben Standort an. Eine Fruchtfolge hilft, Krankheiten und Schädlinge zu vermeiden.
* Mischkultur: Pflanzt Karotten zusammen mit anderen Pflanzen, die sich gegenseitig unterstützen. Gute Nachbarn für Karotten sind zum Beispiel Zwiebeln, Knoblauch, Salat und Ringelblumen.
* Schädlinge: Karotten können von verschiedenen Schädlingen befallen werden, wie zum Beispiel der Karottenfliege. Schützt eure Karotten mit einem Insektenschutznetz.
* Bewässerung: Achtet darauf, dass die Erde gleichmäßig feucht ist. Vermeidet Staunässe, da dies zu Wurzelfäule führen kann.
* Düngung: Düngt die Karotten regelmäßig mit einem organischen Gemüsedünger. Vermeidet zu viel Stickstoff, da dies zu üppigem Grünwachstum, aber kleinen Karotten führt.
* Mulchen: Mulcht die Erde um die Karotten herum mit Stroh oder Holzhackschnitzeln. Das hält die Feuchtigkeit im Boden und unterdrückt Unkraut.
Herausforderungen und Lösungen:
* Sack kippt um: Um das Umkippen der Säcke zu verhindern, könnt ihr sie an einem windgeschützten Ort aufstellen oder sie mit Steinen beschweren.
* Schädlinge: Karottenfliegen sind ein häufiges Problem. Ein Insektenschutznetz hilft, die Fliegen fernzuhalten. Nematoden können ebenfalls ein Problem sein. Hier helfen spezielle Nematodenmittel.
* Wurzelbildung: Wenn die Karotten nicht richtig wachsen, kann das an verdichtetem Boden liegen. Lockert die Erde regelmäßig auf und sorgt für eine gute Drainage.
* Gießen: Zu viel oder zu wenig Wasser kann das Wachstum beeinträchtigen. Achtet auf eine gleichmäßige Bewässerung und vermeidet Staunässe.
H3: Die richtige Erde für Karotten im Sack
Die Wahl der richtigen Erde ist entscheidend für den Erfolg beim Karottenanbau im Sack. Karotten bevorzugen einen lockeren, gut durchlässigen und sandigen Boden. Hier sind einige Optionen und Tipps:
* Spezielle Karottenerde: Im Handel gibt es spezielle Karottenerde, die bereits die richtige Zusammensetzung hat. Diese Erde ist oft etwas teurer, aber sie ist eine gute Wahl, wenn ihr sichergehen wollt, dass eure Karotten die optimalen Bedingungen haben.
* Eigene Erdmischung: Ihr könnt auch eure eigene Erdmischung herstellen. Mischt dazu Gartenerde, Sand
Conclusion
So, there you have it! Creating your own soil bags for bigger carrots isn’t just a quirky gardening hack; it’s a game-changer that can revolutionize your carrot harvest. We’ve explored the reasons why this DIY approach is superior to traditional in-ground planting, focusing on improved drainage, enhanced soil control, and the ability to create the perfect growing environment for those coveted, long, and luscious carrots.
Think about it: no more battling rocky soil, no more stunted, forked carrots, and no more back-breaking digging in compacted earth. Instead, you’ll have a neatly contained, easily manageable growing space where your carrots can thrive. The freedom to customize your soil mix is a huge advantage, allowing you to provide the exact nutrients and texture your carrots need for optimal growth. Imagine the satisfaction of pulling up those perfectly formed, vibrant orange carrots, knowing you crafted the ideal conditions for their success.
But the benefits extend beyond just bigger carrots. This method also offers greater flexibility in terms of location. Whether you have limited garden space, poor soil quality, or simply want to keep your carrots closer to your kitchen for easy harvesting, soil bags provide a portable and adaptable solution. You can even move them indoors during unexpected frosts or extreme weather conditions, protecting your precious crop from harm.
This DIY trick is a must-try for any gardener who’s serious about growing impressive carrots.
Now, let’s talk about variations. While we’ve focused on using burlap bags for their breathability and natural aesthetic, you can experiment with other materials. Heavy-duty plastic bags with drainage holes can work well, especially if you’re on a budget. Just be sure to choose a dark color to prevent algae growth and consider adding extra drainage holes to prevent waterlogging. Another variation is to create tiered soil bags, allowing you to grow multiple rows of carrots in a vertical space. This is a great option for maximizing your yield in a small area. You can also incorporate companion planting by adding herbs like rosemary or sage around the base of your soil bags to deter pests and attract beneficial insects.
Don’t be afraid to get creative and adapt this method to suit your specific needs and preferences. The key is to provide your carrots with a well-draining, nutrient-rich soil environment that allows them to grow long and straight.
We’re confident that once you try this DIY soil bag method, you’ll be amazed by the results. The difference in size, shape, and overall quality of your carrots will be undeniable. So, gather your supplies, mix your soil, and get ready to experience the joy of growing truly exceptional carrots.
We encourage you to try this DIY trick and share your experience with us! Post photos of your soil bags and your impressive carrot harvest on social media using #DIYCarrotBags and tag us so we can see your success. We’re eager to hear your tips, tricks, and variations on this method. Let’s build a community of carrot-growing enthusiasts and share our knowledge to help everyone achieve bigger, better, and more delicious carrots! Happy gardening!
Frequently Asked Questions (FAQ)
What type of soil mix is best for growing carrots in soil bags?
The ideal soil mix for carrots in soil bags is a well-draining, loose, and nutrient-rich blend. A good starting point is a mix of equal parts compost, peat moss (or coconut coir as a sustainable alternative), and sand or perlite. Compost provides essential nutrients, peat moss or coconut coir helps retain moisture, and sand or perlite improves drainage. You can also add a slow-release fertilizer specifically formulated for root vegetables to ensure your carrots have a steady supply of nutrients throughout their growing season. Avoid using heavy clay soil, as it can compact and hinder root development. Consider testing your soil pH and amending it if necessary to achieve a slightly acidic to neutral pH (around 6.0 to 7.0).
How big should the soil bags be for growing carrots?
The size of your soil bags will depend on the variety of carrots you’re growing. For shorter varieties like Nantes or Chantenay, a bag that is at least 12 inches deep and 12 inches in diameter should be sufficient. However, for longer varieties like Imperator, you’ll need a bag that is at least 18 inches deep and 12 inches in diameter. The wider the bag, the more room the carrots will have to grow without being crowded. Remember that carrots need space to develop properly, so don’t overcrowd them in a small bag. It’s always better to err on the side of larger rather than smaller.
How often should I water my carrots grown in soil bags?
Watering frequency will depend on the weather conditions, the type of soil mix you’re using, and the size of your soil bags. Generally, you should water your carrots when the top inch of soil feels dry to the touch. Water deeply and thoroughly, ensuring that the entire soil bag is moistened. Avoid overwatering, as this can lead to root rot. During hot, dry weather, you may need to water daily, while during cooler, wetter weather, you may only need to water every few days. A good way to check if your carrots need water is to stick your finger into the soil near the base of the plants. If the soil feels dry, it’s time to water.
What are some common pests and diseases that affect carrots grown in soil bags, and how can I prevent them?
Common pests that affect carrots include carrot rust flies, aphids, and nematodes. Diseases include leaf blight and root rot. To prevent these problems, start with healthy, disease-free seeds. Use a well-draining soil mix to prevent root rot. Practice crop rotation to avoid the buildup of pests and diseases in the soil. Cover your soil bags with row covers to protect your carrots from carrot rust flies. Inspect your plants regularly for signs of pests or diseases and take action promptly. You can use organic pest control methods such as insecticidal soap or neem oil to control aphids and other pests. For diseases, remove infected leaves and improve air circulation around your plants.
Can I reuse the soil from my soil bags for future carrot crops?
While you can technically reuse the soil, it’s generally not recommended for growing carrots again in the same bags the following season. Carrots are heavy feeders, meaning they deplete the soil of nutrients. Reusing the soil without amending it will likely result in smaller, less healthy carrots. Additionally, reusing soil can increase the risk of pest and disease problems. If you do choose to reuse the soil, be sure to amend it with plenty of compost and other organic matter to replenish nutrients and improve soil structure. You can also sterilize the soil by baking it in the oven or solarizing it to kill any harmful pathogens. However, it’s often easier and more effective to simply start with fresh soil each year. You can use the old soil in other parts of your garden or compost it.
How do I harvest carrots from soil bags?
Harvesting carrots from soil bags is relatively easy. Simply grasp the base of the carrot near the soil line and gently pull upwards. If the carrot is resistant, try loosening the soil around it with a trowel or garden fork. Avoid pulling too hard, as this can break the carrot. Once you’ve harvested your carrots, brush off any excess soil and store them in a cool, dark place. You can also store them in the refrigerator in a plastic bag or container.
What are the benefits of using soil bags compared to traditional in-ground planting for carrots?
Soil bags offer several advantages over traditional in-ground planting for carrots. They provide better drainage, which is essential for preventing root rot. They allow you to control the soil composition, ensuring that your carrots have the ideal growing environment. They are portable, allowing you to move your carrots to different locations as needed. They can help prevent soilborne pests and diseases. And they can make harvesting easier. Ultimately, using soil bags can lead to bigger, healthier, and more delicious carrots.
Leave a Comment