

Grow Garlic at Home – and unlock a world of flavor and satisfaction right in your backyard (or even on your windowsill!). Have you ever imagined the joy of harvesting your own plump, pungent garlic bulbs, knowing exactly where they came from and how they were grown? I’m here to tell you, it’s easier than you think, and incredibly rewarding!
Garlic has been cultivated for thousands of years, with evidence suggesting its use dates back to ancient civilizations in Asia and the Middle East. It wasn’t just a culinary staple; garlic was revered for its medicinal properties, believed to ward off evil spirits, and even given to athletes for enhanced performance. From the pyramids of Egypt to the kitchens of Italy, garlic has a rich and fascinating history.
But why should *you* bother to grow garlic at home? Well, store-bought garlic can sometimes lack the robust flavor of freshly grown cloves. Plus, you have complete control over the growing process, ensuring it’s organic and free from harmful pesticides. In this article, I’m going to share some simple DIY tricks and hacks that will empower you to cultivate a thriving garlic patch, no matter your gardening experience. Get ready to enjoy the unparalleled taste of homegrown garlic and impress your friends and family with your newfound green thumb!
Grow Your Own Garlic: A Beginner’s Guide to a Bountiful Harvest
Hey there, fellow garden enthusiasts! I’m so excited to share my experience with growing garlic at home. It’s surprisingly easy, incredibly rewarding, and nothing beats the flavor of fresh, homegrown garlic. Plus, you’ll have plenty to share with friends and family (or keep it all for yourself – I won’t judge!). This guide will walk you through every step, from choosing the right garlic to harvesting your delicious bulbs.
Choosing Your Garlic and Preparing for Planting
Before we get our hands dirty, let’s talk about the most important part: selecting your garlic. Not all garlic is created equal, and the variety you choose will significantly impact your success.
* Hardneck vs. Softneck: This is the first big decision. Hardneck garlic is generally more flavorful and cold-hardy, making it ideal for colder climates. It also produces a flower stalk called a scape, which is edible and delicious! Softneck garlic, on the other hand, is better suited for warmer climates and stores for a longer period. It’s the kind you often see braided.
* Source Matters: Resist the urge to plant garlic from the grocery store. While tempting, it’s often treated with chemicals to prevent sprouting and may not be suited to your local climate. Instead, source your garlic from a local farmer’s market, garden center, or reputable online seed supplier. Look for certified disease-free bulbs.
* Choosing the Right Variety: Research garlic varieties that thrive in your region. Some popular hardneck varieties include ‘German Extra Hardy,’ ‘Music,’ and ‘Chesnok Red.’ For softneck, ‘California Early’ and ‘Silverskin’ are good choices.
* Preparing the Soil: Garlic loves well-drained, fertile soil. Amend your soil with plenty of compost or well-rotted manure before planting. This will provide the nutrients your garlic needs to flourish. Aim for a slightly acidic to neutral pH (around 6.0-7.0).
* Sunlight is Key: Garlic needs at least 6 hours of sunlight per day. Choose a sunny spot in your garden where it will receive ample light.
Planting Your Garlic: A Step-by-Step Guide
Now for the fun part! Planting garlic is a simple process, but timing is crucial. You want to plant in the fall, typically 4-6 weeks before the ground freezes. This allows the garlic to establish roots before winter sets in.
1. Separate the Cloves: Gently separate the cloves from the bulb, leaving the papery skin intact. Plant only the largest, healthiest cloves, as these will produce the biggest bulbs. Don’t separate them too far in advance, as they can dry out. I usually do this right before planting.
2. Prepare the Planting Bed: Rake the soil smooth and remove any rocks or debris. Create rows that are about 6-8 inches apart.
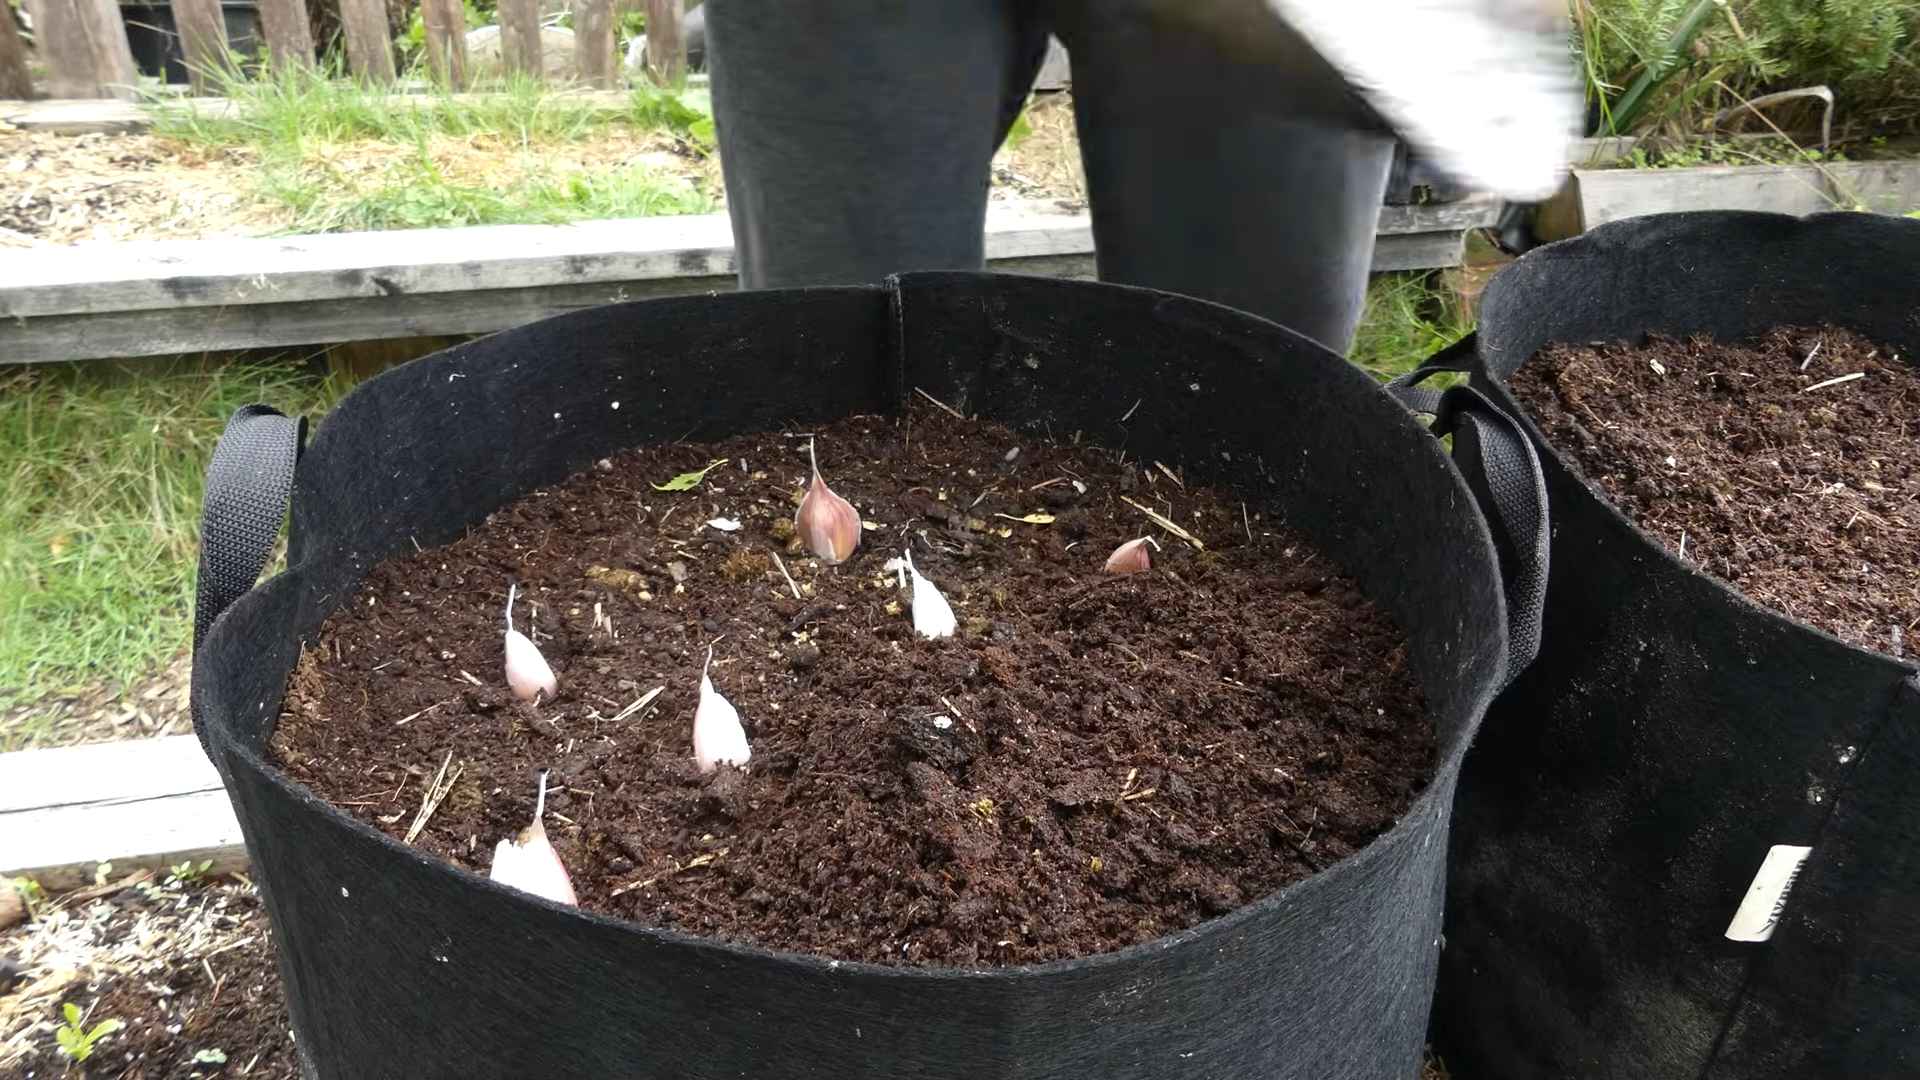
3. Plant the Cloves: Dig holes that are about 2-3 inches deep and 6 inches apart within the rows. Place each clove pointed-end up (the pointy end is where the sprout will emerge).
4. Cover with Soil: Gently cover the cloves with soil and pat it down lightly.
5. Water Thoroughly: Water the planting bed well to help settle the soil and encourage root growth.
6. Mulch, Mulch, Mulch!: Apply a thick layer of mulch (straw, shredded leaves, or wood chips) over the planting bed. This will help insulate the soil, retain moisture, suppress weeds, and prevent soil erosion. I prefer straw because it breaks down nicely and adds organic matter to the soil.
Caring for Your Garlic: From Winter Dormancy to Spring Growth
Once your garlic is planted, it’s time to let nature do its thing. But there are a few things you can do to help it along the way.
* Winter Care: During the winter months, your garlic will be dormant. The mulch will protect it from extreme cold and prevent the soil from heaving during freeze-thaw cycles.
* Spring Awakening: As the weather warms up in the spring, you’ll start to see green shoots emerging from the soil. This is a sign that your garlic is waking up!
* Watering: Water your garlic regularly, especially during dry periods. Aim to keep the soil consistently moist, but not waterlogged.
* Weeding: Keep the planting bed free of weeds, as they can compete with your garlic for nutrients and water. Hand-pull weeds carefully to avoid disturbing the garlic roots.
* Fertilizing: Garlic is a heavy feeder, so it benefits from regular fertilization. In the spring, side-dress your garlic with a balanced organic fertilizer or compost tea. Avoid over-fertilizing, as this can lead to excessive foliage growth at the expense of bulb development.
* Scape Removal (Hardneck Garlic): If you’re growing hardneck garlic, you’ll notice a flower stalk (scape) emerging in late spring or early summer. Remove the scapes as soon as they start to curl. This will redirect the plant’s energy towards bulb development, resulting in larger, more flavorful garlic. Don’t throw the scapes away! They’re delicious sautéed, grilled, or used in pesto.
Harvesting Your Garlic: Timing is Everything
Harvesting garlic at the right time is crucial for optimal flavor and storage.
* When to Harvest: The best time to harvest garlic is when the lower leaves start to turn yellow and brown, but the top leaves are still green. This usually happens in mid-summer (July or August, depending on your climate).
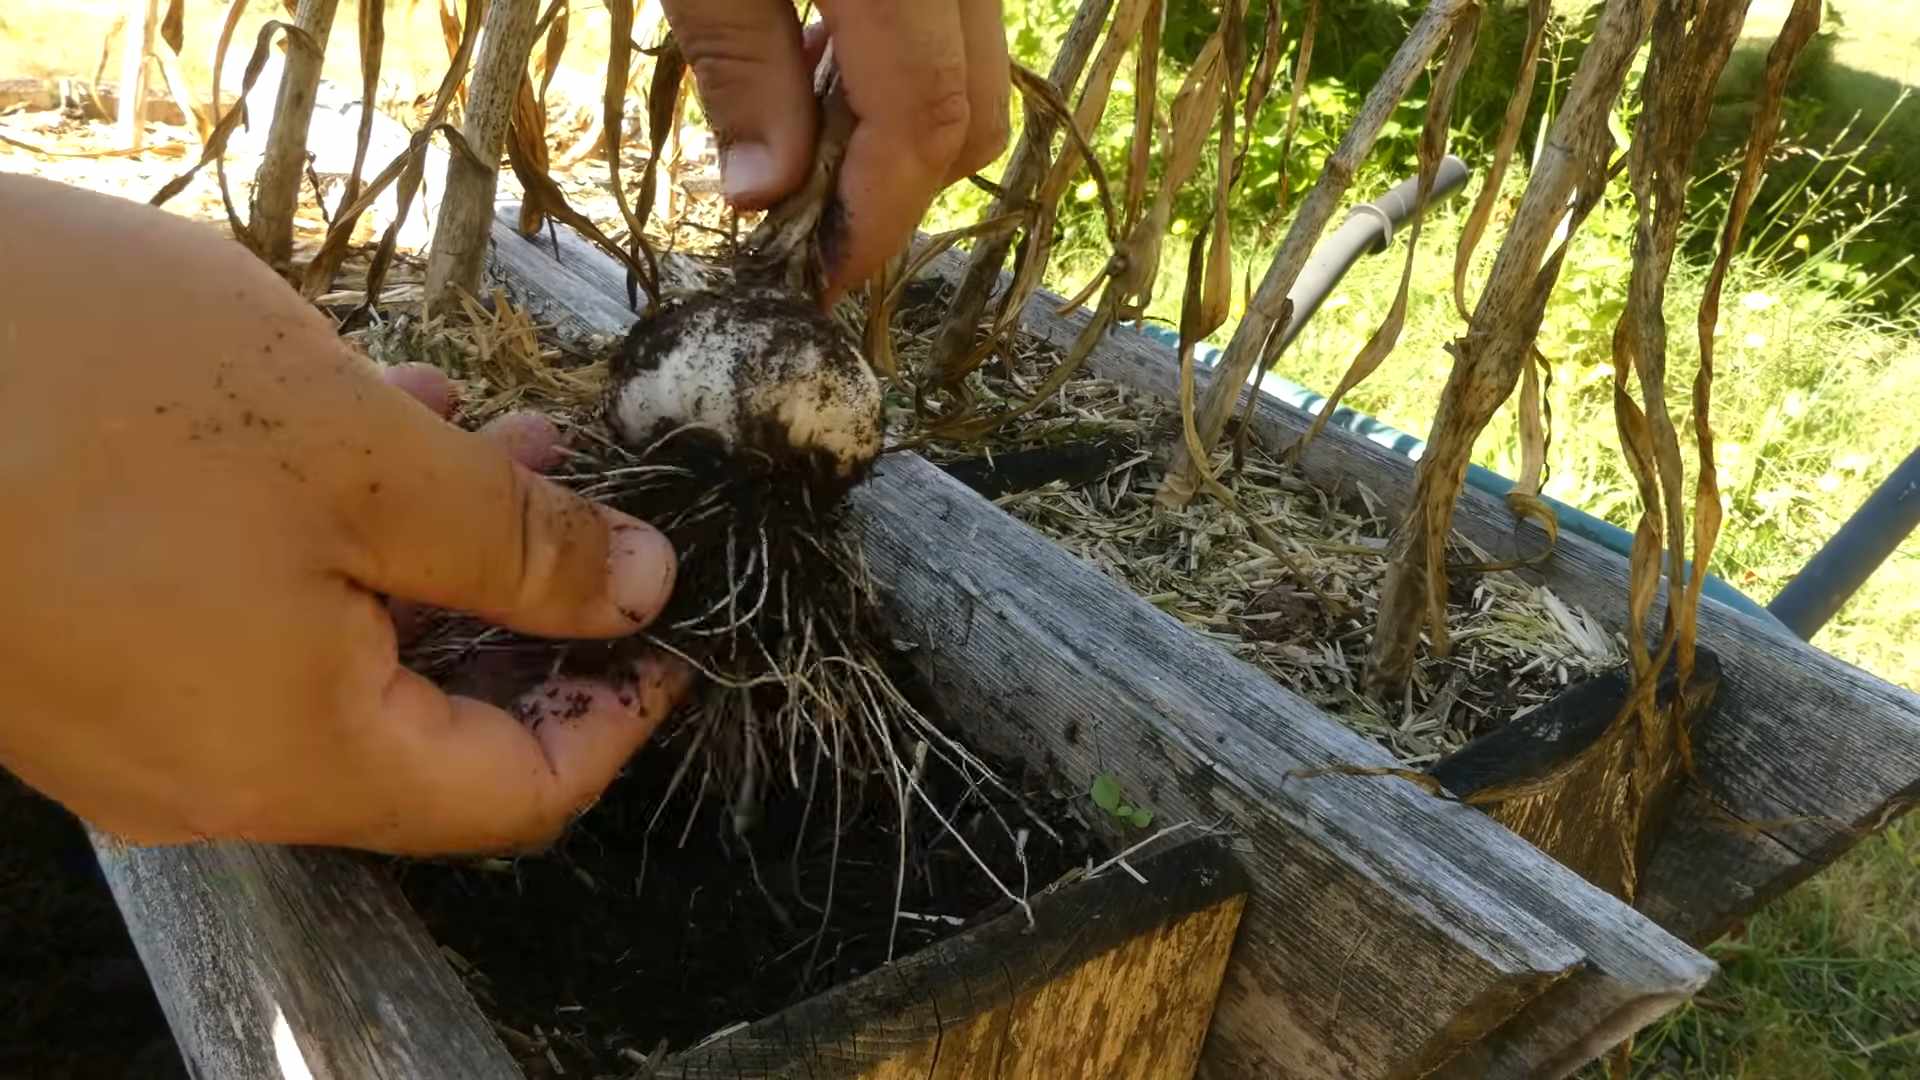
* How to Harvest: Loosen the soil around the garlic bulbs with a garden fork or trowel. Gently lift the bulbs from the ground, being careful not to damage them.
* Handle with Care: Brush off any excess soil, but don’t wash the bulbs.
Curing and Storing Your Garlic: Ensuring a Long-Lasting Supply
Curing is an essential step in preserving your garlic and ensuring it stores well.
1. Curing Process: Tie the garlic plants together in bundles of 4-6 bulbs and hang them in a well-ventilated, dry, and shady place for 2-4 weeks. You can also spread the bulbs out on screens or racks.
2. Signs of Proper Curing: The bulbs are properly cured when the necks are dry and tight, the outer skins are papery, and the cloves are firm.
3. Trimming and Storing: Once the garlic is cured, trim the roots and cut the stalks about 1-2 inches above the bulb. Store the bulbs in a cool, dry, and dark place, such as a pantry or basement. Avoid storing garlic in the refrigerator, as this can cause it to sprout.
4. Braiding Softneck Garlic: If you grew softneck garlic, you can braid the stalks together for a decorative and functional storage method. There are many tutorials online that can guide you through the braiding process.
Troubleshooting Common Garlic Problems
Even with the best care, you might encounter a few challenges along the way. Here are some common problems and how to address them:
* Garlic Rust: This fungal disease causes orange spots on the leaves. Improve air circulation by spacing plants properly and removing infected leaves. You can also use a copper-based fungicide if necessary.
* Onion Maggots: These pests can damage the roots of garlic plants. Use row covers to prevent adult flies from laying eggs near the plants. You can also apply beneficial nematodes to the soil to control the larvae.
* White Rot: This soilborne fungal disease causes the bulbs to rot. Avoid planting garlic in areas where white rot has been a problem in the past. Improve soil drainage and rotate crops regularly.
* Poor Bulb Development: This can be caused by a variety of factors, including insufficient sunlight, poor soil fertility, or improper watering. Make sure your garlic is getting enough sunlight, amend the soil with compost or fertilizer, and water regularly.
Enjoying Your Homegrown Garlic
Congratulations! You’ve successfully grown your own garlic. Now it’s time to enjoy the fruits (or rather, bulbs) of your labor. Use your homegrown garlic in all your favorite recipes, from pasta sauces and stir-fries to roasted vegetables and garlic bread. You can also preserve it by pickling, roasting, or making garlic confit.
Growing garlic is a rewarding experience that connects you to the earth and provides you with a delicious and healthy ingredient. So, get out there and start planting! I promise you won’t regret it. Happy gardening!
Conclusion
So, there you have it! Growing garlic at home is not only surprisingly simple, but it’s also incredibly rewarding. Imagine the satisfaction of harvesting your own plump, flavorful bulbs, knowing exactly where they came from and how they were grown. Forget those bland, imported cloves from the supermarket; with this DIY trick, you’ll be enjoying the robust, pungent taste of homegrown garlic in all your favorite dishes.
This isn’t just about saving a few dollars (though that’s certainly a perk!). It’s about connecting with your food, understanding the growing process, and adding a touch of green to your life, even if you only have a small balcony or windowsill. The flavor difference alone is reason enough to give it a try. Homegrown garlic boasts a depth and complexity that store-bought varieties simply can’t match.
Beyond the basic method, there are plenty of ways to experiment and personalize your garlic-growing journey. Try different varieties of garlic to discover your favorite flavor profiles. Softneck varieties are great for braiding, while hardneck varieties produce delicious scapes that can be used in pesto or stir-fries. You can also experiment with different soil mixes and fertilizers to see what works best in your specific environment. Consider companion planting with herbs like rosemary or thyme to deter pests and enhance the flavor of your garlic.
Don’t be intimidated if you’ve never gardened before. Growing garlic is a fantastic entry point into the world of home gardening. It’s relatively low-maintenance, and the results are well worth the effort. Plus, it’s a great conversation starter! Imagine sharing your homegrown garlic with friends and family, or gifting them a beautiful braid of your own harvest.
We wholeheartedly encourage you to give this DIY trick a try. You’ll be amazed at how easy it is to grow your own delicious garlic. And once you taste the difference, you’ll never go back to store-bought again.
So, grab some garlic cloves, prepare your soil, and get ready to experience the joy of growing your own food. We’re confident that you’ll be thrilled with the results.
Don’t forget to share your experiences with us! We’d love to hear about your successes, your challenges, and any tips or tricks you discover along the way. Post photos of your garlic plants, share your favorite recipes using your homegrown garlic, and let us know what varieties you’re growing. Together, we can create a community of garlic-growing enthusiasts and spread the word about this simple and rewarding DIY project. Let’s all enjoy the amazing flavor of grow garlic at home!
Frequently Asked Questions (FAQ)
What kind of garlic should I plant?
The best type of garlic to plant depends on your climate. There are two main types: hardneck and softneck. Hardneck varieties are more cold-hardy and generally do better in colder climates. They also produce scapes, which are edible flower stalks. Softneck varieties are more adaptable to warmer climates and are known for their long storage life. They are also the type most commonly used for braiding. Your local nursery or garden center can advise you on the best varieties for your area. Elephant garlic, while technically a type of leek, is often grown like garlic and produces very large, mild-flavored cloves.
When is the best time to plant garlic?
The ideal time to plant garlic is in the fall, about 4-6 weeks before the ground freezes. This allows the cloves to establish roots before winter sets in. In warmer climates, you can plant garlic in late winter or early spring. The key is to give the cloves enough time to develop roots before the weather gets too hot.
How do I prepare the soil for planting garlic?
Garlic prefers well-drained soil that is rich in organic matter. Before planting, amend the soil with compost or well-rotted manure. This will provide the garlic with the nutrients it needs to grow. Ensure the soil is loose and free of rocks or debris. A slightly acidic to neutral pH is ideal.
How deep and how far apart should I plant the garlic cloves?
Plant the garlic cloves about 2 inches deep and 6 inches apart. Pointy side up! If you are planting in rows, space the rows about 12 inches apart. This gives the garlic plants enough room to grow and allows for good air circulation.
How much water does garlic need?
Garlic needs consistent moisture, especially during the growing season. Water deeply when the soil feels dry to the touch. Avoid overwatering, as this can lead to rot. During the winter months, reduce watering, but don’t let the soil dry out completely.
How do I know when the garlic is ready to harvest?
Garlic is typically ready to harvest in the summer, when the lower leaves start to turn yellow and brown. The scapes (if you’re growing hardneck varieties) will also begin to curl. To check if the bulbs are ready, carefully dig up a bulb and examine it. The bulb should be plump and the cloves should be well-defined.
How do I cure garlic after harvesting?
After harvesting, cure the garlic in a well-ventilated, dry place for 2-3 weeks. This allows the outer layers of the bulb to dry and harden, which helps to prevent rot and prolongs storage life. You can cure garlic by hanging it in braids or laying it out on screens or racks.
How do I store garlic?
Store cured garlic in a cool, dry, and dark place. A temperature between 60-70°F (15-21°C) is ideal. Properly cured and stored garlic can last for several months. Avoid storing garlic in the refrigerator, as this can cause it to sprout.
Can I grow garlic in containers?
Yes, you can grow garlic in containers. Choose a large container that is at least 12 inches deep and wide. Use a well-draining potting mix and follow the same planting and watering guidelines as for growing garlic in the ground. Container-grown garlic may need more frequent watering and fertilization.
What are some common pests and diseases that affect garlic?
Some common pests that affect garlic include aphids, thrips, and nematodes. Diseases that can affect garlic include white rot, bulb rot, and downy mildew. To prevent pests and diseases, practice good sanitation, such as removing plant debris and rotating crops. You can also use organic pest control methods, such as insecticidal soap or neem oil.
Can I eat the garlic scapes?
Yes! Garlic scapes are a delicious and versatile ingredient. They have a mild garlic flavor and can be used in pesto, stir-fries, soups, and salads. Harvest the scapes when they start to curl, but before they become too tough.
What if my garlic doesn’t form bulbs?
There are several reasons why garlic might not form bulbs. Common causes include planting too late, not providing enough water or nutrients, or growing the wrong variety for your climate. Make sure to plant in the fall, provide adequate water and fertilizer, and choose a variety that is well-suited to your growing conditions.
Is it really worth it to grow my own garlic?
Absolutely! The flavor of homegrown garlic is far superior to store-bought garlic. Plus, you’ll have the satisfaction of knowing exactly where your food came from and how it was grown. Growing garlic is also a great way to connect with nature and add a touch of green to your life. Give it a try – you won’t be disappointed!
Leave a Comment