

Stain Removal Magic Trick: Ever feel like your favorite clothes are under attack from rogue spills and mysterious marks? I know I have! It’s frustrating to watch a beloved garment slowly succumb to the inevitable stains of everyday life. But what if I told you there’s a way to fight back, a secret weapon in your laundry arsenal that can banish those blemishes like a true magician?
For generations, resourceful homemakers have passed down stain removal secrets, often whispered from mother to daughter, grandmother to grandchild. These weren’t just cleaning tips; they were survival skills! Think about it – before the age of readily available detergents, knowing how to lift a stubborn stain was crucial for preserving precious fabrics and maintaining a respectable appearance. These time-tested methods are the foundation of our modern stain-fighting knowledge.
That’s why I’m so excited to share this DIY stain removal magic trick with you. In today’s fast-paced world, we don’t always have time (or the budget!) for expensive dry cleaning or specialized stain removers. This simple, effective technique uses ingredients you probably already have in your pantry, offering a quick and affordable solution to common stain emergencies. Imagine the satisfaction of rescuing your favorite shirt from a coffee spill or saving your child’s artwork-covered pants! This DIY trick will empower you to tackle stains with confidence, keeping your clothes looking their best and saving you money in the process. So, let’s dive in and unlock the secrets to stain-free living!
DIY Waterless Tomato Growing: A Guide to Self-Sufficient Tomatoes
Hey there, fellow gardening enthusiasts! Are you tired of constantly watering your tomato plants, especially during those scorching summer months? Do you dream of a garden that practically takes care of itself? Well, you’ve come to the right place! I’m going to share my secrets for growing delicious, juicy tomatoes with minimal watering – sometimes even *no* watering after the initial planting! This method, often called “waterless tomato growing” or “dry farming,” is all about encouraging deep root growth and selecting the right varieties. It’s a game-changer, trust me.
Understanding the Waterless Tomato Growing Concept
Before we dive into the nitty-gritty, let’s understand the basic principle. The key to waterless tomato growing is to encourage the plant to develop a deep, extensive root system. When the roots reach deep into the soil, they can access moisture that’s unavailable to plants with shallow roots. This deep moisture is often enough to sustain the plant throughout the growing season, even during dry spells. We achieve this by:
- Choosing drought-tolerant tomato varieties: Some varieties are naturally better suited to dry conditions than others.
- Preparing the soil properly: Ensuring good drainage and adding plenty of organic matter helps retain moisture deep down.
- Deep watering at planting: This encourages the roots to grow downwards in search of water.
- Mulching heavily: Mulch helps retain moisture in the soil and suppresses weeds.
- Avoiding frequent shallow watering: This discourages deep root growth.
Choosing the Right Tomato Varieties
Not all tomatoes are created equal when it comes to drought tolerance. Some varieties are simply better equipped to handle dry conditions. Here are a few of my favorites:
- ‘San Marzano’: This Italian plum tomato is known for its excellent flavor and drought tolerance. It’s perfect for making sauces and pastes.
- ‘Amish Paste’: Another great paste tomato with good drought resistance. It produces large, meaty fruits.
- ‘Black Krim’: This heirloom tomato is prized for its rich, smoky flavor and ability to withstand dry conditions.
- ‘Cherokee Purple’: A popular heirloom with a complex flavor and good drought tolerance.
- ‘Roma’: A classic paste tomato that’s reliable and relatively drought-tolerant.
- ‘Early Girl’: While not *as* drought-tolerant as some others, ‘Early Girl’ is a good choice for shorter growing seasons and can still benefit from this method.
Remember to check the specific characteristics of the variety you choose, as drought tolerance can vary depending on the growing conditions. Local nurseries are a great resource for finding varieties that thrive in your area.
Preparing the Soil: The Foundation for Success
Proper soil preparation is absolutely crucial for waterless tomato growing. You need to create an environment that encourages deep root growth and retains moisture deep down.
Improving Soil Drainage
Tomatoes hate soggy feet! Good drainage is essential to prevent root rot and other problems. If your soil is heavy clay, you’ll need to amend it to improve drainage. Here’s what I do:
- Dig a large hole: At least 2 feet wide and 2 feet deep for each tomato plant.
- Amend the soil: Mix the soil you removed with plenty of organic matter, such as compost, well-rotted manure, or leaf mold. I usually aim for a 50/50 mix.
- Add drainage material: If your soil is particularly heavy, consider adding a layer of gravel or coarse sand to the bottom of the hole to improve drainage.
- Backfill the hole: Fill the hole with the amended soil, making sure it’s loose and well-aerated.
Adding Organic Matter
Organic matter is the key to moisture retention and healthy soil. It acts like a sponge, holding water and releasing it slowly to the plant’s roots. It also improves soil structure, aeration, and nutrient availability.
- Incorporate compost: Work plenty of compost into the soil before planting. I like to use a mix of different types of compost, such as worm castings, mushroom compost, and homemade compost.
- Add well-rotted manure: Manure is a great source of nutrients and organic matter. Make sure it’s well-rotted to avoid burning the plants.
- Use leaf mold: Leaf mold is a fantastic soil amendment that’s rich in nutrients and helps retain moisture.
Planting Your Tomatoes: The Deep Watering Technique
The planting process is where the “waterless” aspect really begins. The goal is to give your tomato plants a deep, thorough watering at planting to encourage deep root growth.
- Dig a deep hole: Dig a hole that’s deep enough to bury the bottom third of the tomato plant’s stem. Tomatoes can grow roots from their stems, so burying part of the stem will encourage more root growth.
- Remove the lower leaves: Remove any leaves that will be buried below the soil line.
- Plant the tomato: Place the tomato plant in the hole and backfill with soil, gently firming it around the stem.
- Water deeply: This is the most important step! Water the plant thoroughly, soaking the soil around the roots. I usually use a watering can or hose and water slowly until the water starts to pool on the surface. You want the water to penetrate deep into the soil.
- Mulch heavily: Apply a thick layer of mulch around the base of the plant, leaving a few inches of space around the stem. I like to use straw, hay, wood chips, or shredded leaves. The mulch will help retain moisture in the soil, suppress weeds, and regulate soil temperature.
Mulching: The Moisture-Retaining Magic
Mulch is your best friend in waterless tomato growing. It acts as a barrier, preventing water from evaporating from the soil surface. It also suppresses weeds, which compete with your tomato plants for water and nutrients.
Choosing the Right Mulch
There are many different types of mulch to choose from, each with its own advantages and disadvantages. Here are a few of my favorites:
- Straw: Straw is a great all-around mulch that’s readily available and relatively inexpensive. It decomposes slowly and provides good moisture retention.
- Hay: Hay is similar to straw but contains more nutrients. However, it can also contain weed seeds, so be sure to use weed-free hay.
- Wood chips: Wood chips are a long-lasting mulch that’s good for suppressing weeds. However, they can tie up nitrogen in the soil, so you may need to add some nitrogen fertilizer.
- Shredded leaves: Shredded leaves are a great free mulch that’s rich in nutrients. They decompose quickly, so you may need to reapply them throughout the growing season.
- Compost: Compost can also be used as a mulch. It provides nutrients to the soil and helps retain moisture.
Applying the Mulch
Apply a thick layer of mulch around the base of your tomato plants, leaving a few inches of space around the stem to prevent rot. I usually aim for a layer that’s 3-4 inches thick. Replenish the mulch as needed throughout the growing season.
Watering (or Not Watering!) After Planting
This is where the “waterless” part comes in. After the initial deep watering at planting, you should avoid watering your tomato plants unless they show signs of stress. Signs of stress include wilting leaves, stunted growth, and blossom end rot.
When to Water (If Necessary)
If your tomato plants are showing signs of stress, water them deeply and infrequently. Water deeply enough to soak the soil around the roots, but avoid watering too often, as this can discourage deep root growth. I usually water only when the top inch or two of soil is dry to the touch.
Dealing with Blossom End Rot
Blossom end rot is a common problem in tomatoes that’s caused by a calcium deficiency. However, it’s often not a lack of calcium in the soil, but rather an inability of the plant to absorb calcium due to inconsistent watering. To prevent blossom end rot, water your tomato plants consistently, especially during hot, dry weather. You can also add calcium to the soil by incorporating bone meal or crushed eggshells.
Pruning and Support
Pruning and supporting your tomato plants can also help them thrive in dry conditions.
Pruning
Pruning helps improve air circulation, which can reduce the risk of disease. It also helps direct the plant’s energy towards fruit production. I usually prune my tomato plants by removing the suckers that grow between the main stem and the branches.
Support
Supporting your tomato plants with stakes, cages, or trellises helps keep the fruit off the ground, which can prevent rot and pest problems
Conclusion
So, there you have it! This simple yet incredibly effective stain removal magic trick is a game-changer for anyone who’s ever despaired over a stubborn stain. We’ve all been there – that moment of dread when a splash of coffee, a smear of grease, or a rogue pen mark threatens to ruin a beloved garment or cherished piece of furniture. But with this easy DIY solution, you can breathe a sigh of relief and tackle those stains head-on.
What makes this method a must-try? It’s the combination of simplicity, affordability, and effectiveness. You likely already have the necessary ingredients in your pantry or laundry room, saving you a trip to the store and the expense of specialized stain removers. Plus, the gentle nature of the ingredients means it’s safe for a wide range of fabrics and surfaces, minimizing the risk of damage.
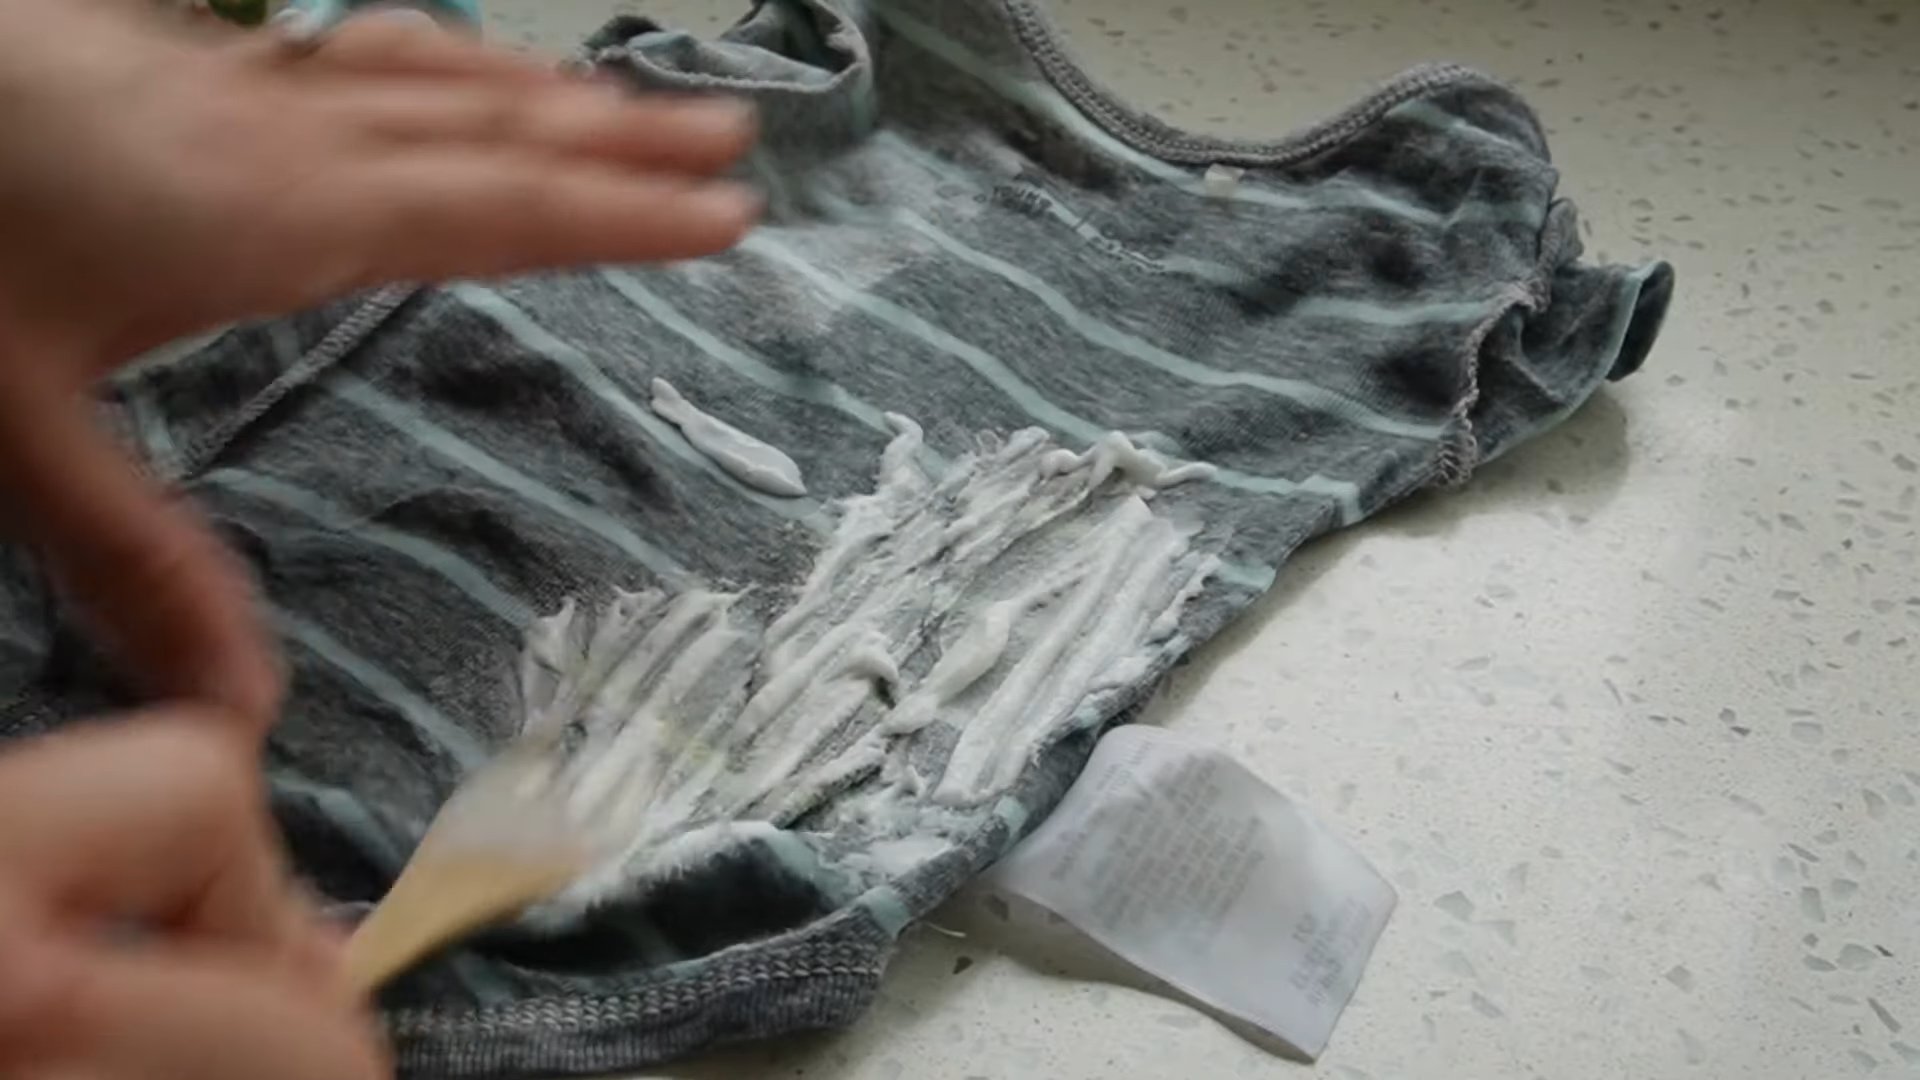
But the real magic lies in its ability to lift even seemingly impossible stains. The combination of the cleaning agent and the blotting technique works synergistically to draw the stain out of the fibers, leaving your items looking fresh and clean.
Looking to customize this stain-fighting powerhouse? Here are a few suggestions and variations to consider:
* **For delicate fabrics:** Dilute the solution with a bit more water to make it even gentler. You can also test it on an inconspicuous area first to ensure colorfastness.
* **For stubborn grease stains:** Add a drop or two of dish soap to the solution for extra degreasing power.
* **For colored stains (like berries or wine):** A small amount of hydrogen peroxide (test in an inconspicuous area first!) can help to lift the color.
* **For upholstery:** Be extra careful not to oversaturate the fabric. Use a clean cloth to blot up any excess moisture.
* **Pre-treating:** For particularly stubborn stains, consider pre-treating the area by applying the solution and letting it sit for 15-20 minutes before blotting.
This stain removal magic trick isn’t just a quick fix; it’s a sustainable solution that empowers you to care for your belongings and extend their lifespan. By avoiding harsh chemicals and wasteful single-use products, you’re also making a more environmentally conscious choice.
We’re confident that this DIY stain removal method will become your go-to solution for all your stain-related woes. But don’t just take our word for it – try it out for yourself! We encourage you to experiment with the variations, adapt the technique to your specific needs, and discover the stain-fighting power that awaits you.
And most importantly, we want to hear about your experiences! Share your before-and-after photos, your tips and tricks, and your success stories in the comments below. Let’s build a community of stain-fighting experts and help each other keep our homes and wardrobes looking their best. Your feedback will not only help other readers but also inspire us to continue sharing valuable DIY solutions. So go ahead, give this stain removal magic trick a try, and let us know what you think!
Frequently Asked Questions (FAQ)
What types of stains does this stain removal trick work best on?
This DIY stain removal method is effective on a wide range of common stains, including coffee, tea, juice, food spills, grease, ink (from pens), and even some types of makeup. However, its effectiveness can vary depending on the age and severity of the stain, as well as the type of fabric or surface. Fresh stains are generally easier to remove than older, set-in stains. For particularly stubborn stains, you may need to repeat the process or try a combination of techniques. It’s always a good idea to test the solution on an inconspicuous area first to ensure colorfastness.
What ingredients do I need for this stain removal trick?
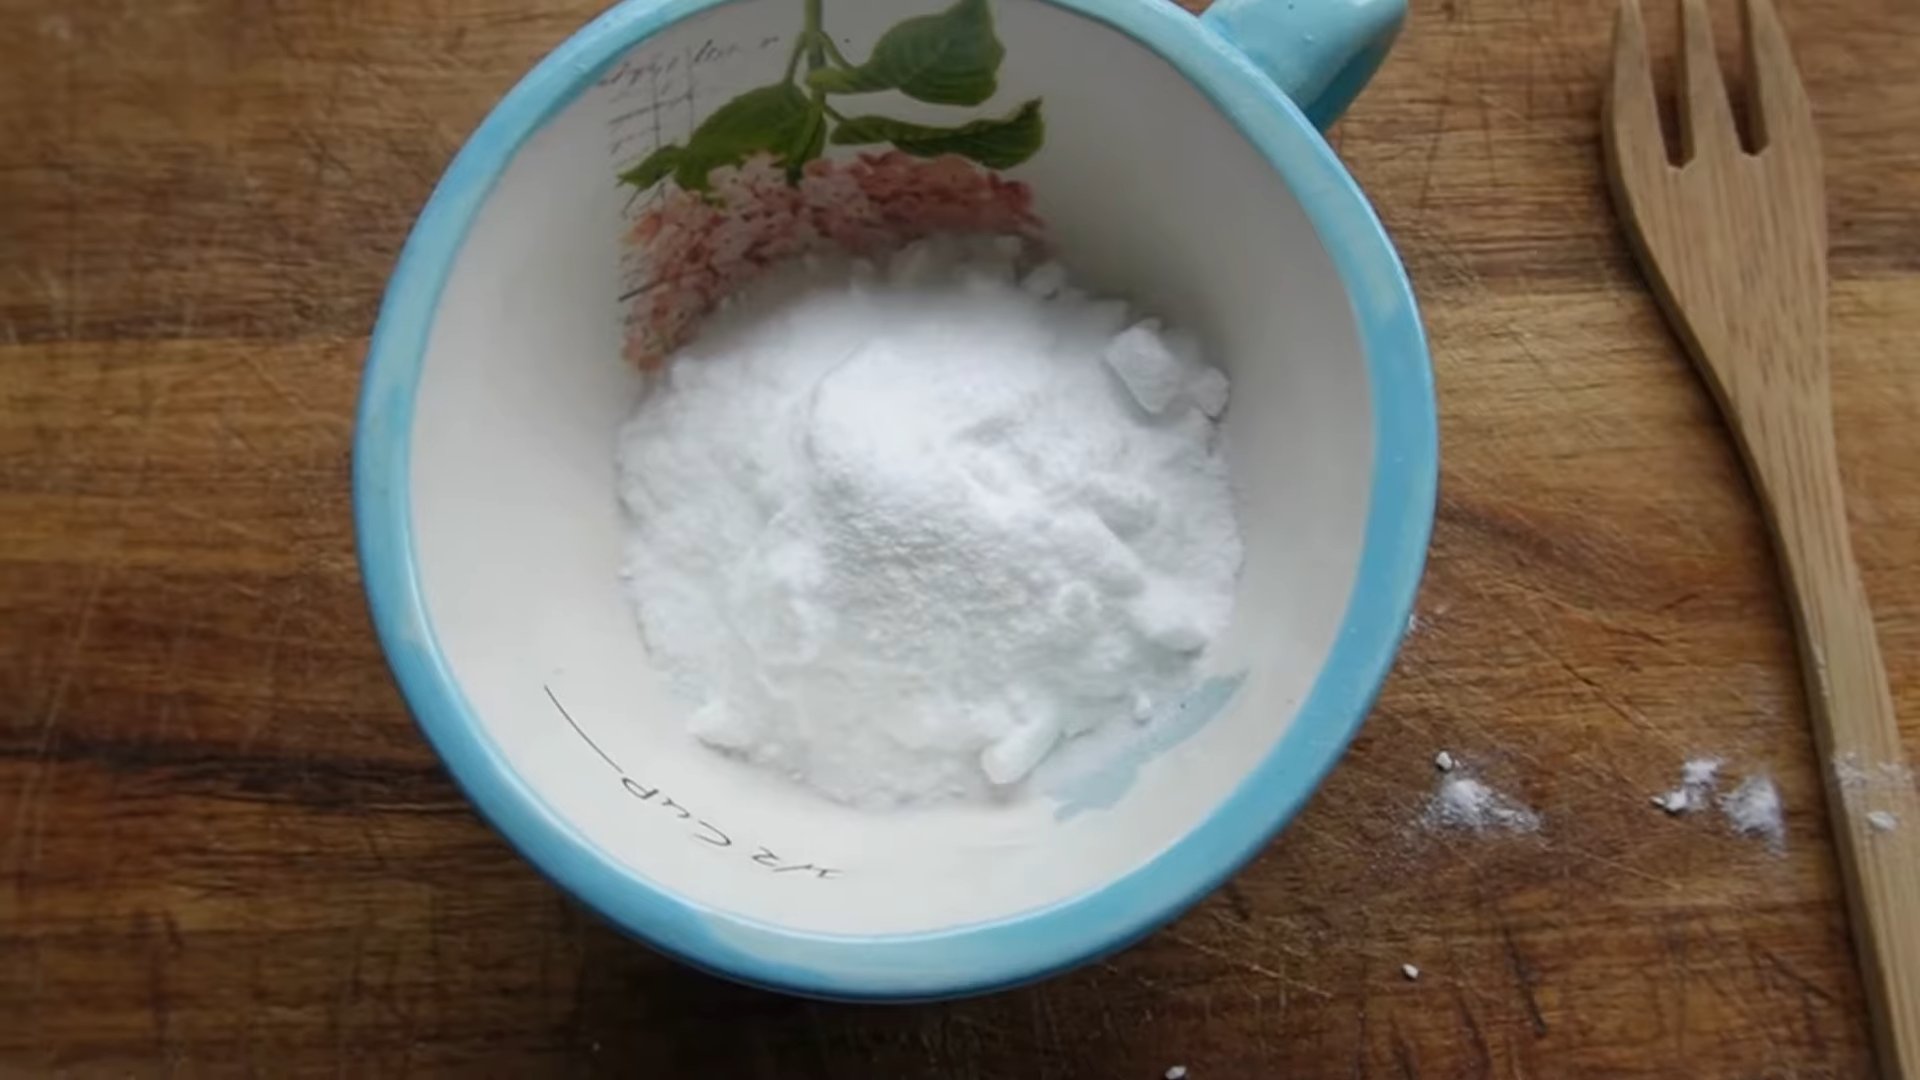
The beauty of this method is its simplicity. You typically only need a few common household ingredients, such as:
* Water
* A mild cleaning agent (like dish soap, laundry detergent, or white vinegar)
* Clean cloths or paper towels
The specific cleaning agent you choose will depend on the type of stain and the fabric or surface you’re treating. For example, dish soap is excellent for grease stains, while white vinegar can be effective for removing odors and brightening fabrics.
Is this stain removal trick safe for all types of fabrics?
While this method is generally safe for most fabrics, it’s always best to exercise caution and test the solution on an inconspicuous area first, especially when dealing with delicate fabrics like silk, wool, or linen. Avoid using harsh chemicals or abrasive cleaners, as these can damage the fibers and cause discoloration. If you’re unsure about the suitability of a particular cleaning agent, consult the care label on the garment or furniture.
How do I perform a spot test?
A spot test is a crucial step to ensure that the stain removal solution doesn’t damage or discolor the fabric. To perform a spot test, apply a small amount of the solution to a hidden area of the fabric, such as an inside seam or the underside of a cushion. Let it sit for a few minutes, then blot it with a clean cloth. Check for any signs of color change, fading, or damage. If everything looks good, you can proceed with treating the stain.
How long should I let the solution sit on the stain?
The amount of time you let the solution sit on the stain will depend on the severity of the stain and the type of fabric. For fresh, light stains, a few minutes may be sufficient. For older, more stubborn stains, you may need to let the solution sit for 15-20 minutes, or even longer. However, be careful not to let the solution dry on the fabric, as this can make the stain more difficult to remove.
What is the best way to blot the stain?
Blotting is a key technique in this stain removal method. Instead of rubbing the stain, which can spread it and damage the fibers, gently blot the area with a clean cloth or paper towel. Start from the outside of the stain and work your way towards the center, using a fresh section of the cloth for each blot. This will help to lift the stain out of the fabric without spreading it.
What if the stain doesn’t come out completely after the first try?
Don’t be discouraged if the stain doesn’t disappear completely after the first attempt. Some stains require multiple treatments. Repeat the process as needed, allowing the solution to sit for a longer period of time each time. You can also try using a different cleaning agent or a combination of techniques. For particularly stubborn stains, you may need to consult a professional cleaner.
Can this stain removal trick be used on upholstery?
Yes, this stain removal trick can be used on upholstery, but it’s important to be extra careful not to oversaturate the fabric. Use a clean cloth to blot the stain, and avoid pouring the solution directly onto the upholstery. After treating the stain, use a clean, dry cloth to blot up any excess moisture. You can also use a fan or hairdryer to speed up the drying process.
How do I prevent stains from setting in?
The best way to deal with stains is to prevent them from setting in in the first place. Treat stains as soon as possible, before they have a chance to dry and become more difficult to remove. Blot up spills immediately with a clean cloth or paper towel. Avoid rubbing the stain, as this can spread it and damage the fibers. You can also use stain-resistant sprays or treatments to protect your fabrics and furniture.
Where can I share my experience and tips with this stain removal trick?
We encourage you to share your experiences, tips, and success stories in the comments section below the article. Your feedback will not only help other readers but also inspire us to continue sharing valuable DIY solutions. We’re excited to hear about your stain-fighting adventures!

Leave a Comment