

Soil Free Rosemary Growing: Imagine fresh, fragrant rosemary sprigs always at your fingertips, ready to elevate your culinary creations. What if I told you that you don’t even need soil to achieve this? That’s right! We’re diving into the fascinating world of hydroponics and other soil-free methods to cultivate this beloved herb right in your home.
For centuries, rosemary has been cherished not only for its culinary uses but also for its medicinal and symbolic significance. From ancient Greece, where it was believed to enhance memory, to traditional folk remedies across the Mediterranean, rosemary has deep roots in human history. Now, we’re bringing this ancient herb into the modern age with innovative, soil-free techniques.
Why should you embrace soil free rosemary growing? Well, for starters, it’s incredibly space-saving, perfect for apartment dwellers or anyone with limited outdoor space. Plus, it eliminates common soil-borne pests and diseases, leading to healthier, more vibrant plants. And let’s be honest, it’s just plain cool! I’m excited to share these simple, step-by-step DIY tricks that will have you harvesting your own rosemary in no time. Get ready to ditch the dirt and unlock the secrets to thriving rosemary, the easy way!
Growing Rosemary Without Soil: A DIY Hydroponic Adventure!
Hey there, fellow plant enthusiasts! Ever wanted to grow rosemary but dreaded dealing with soil, pests, and inconsistent watering? Well, I’ve got a fantastic solution for you: hydroponics! Growing rosemary hydroponically is surprisingly easy, rewarding, and lets you enjoy fresh, fragrant rosemary year-round, regardless of your outdoor space. I’m going to walk you through my tried-and-true method for creating a simple, yet effective, hydroponic rosemary setup. Let’s get started!
What You’ll Need
Before we dive into the step-by-step instructions, let’s gather all the necessary materials. Trust me, having everything ready beforehand will make the process much smoother.
* **Rosemary Cuttings:** You can either take cuttings from an existing rosemary plant or purchase them from a nursery. Look for healthy, vibrant green stems that are about 4-6 inches long.
* **Net Pots:** These are small, plastic pots with holes that allow the roots to grow out and into the nutrient solution. I recommend 2-3 inch net pots.
* **Hydroponic Growing Medium:** This provides support for the cuttings and helps retain moisture around the roots. I prefer using rockwool cubes, but you can also use coco coir or clay pebbles.
* **Hydroponic Nutrient Solution:** This is the food for your rosemary! You’ll need a balanced nutrient solution specifically formulated for herbs or leafy greens. I use a two-part nutrient solution for better control.
* **A Container:** This will hold the nutrient solution and the net pots. A dark-colored plastic tub or bucket works perfectly. The size will depend on how many rosemary plants you want to grow.
* **Air Pump and Air Stone:** These are essential for oxygenating the nutrient solution, which is crucial for healthy root development.
* **pH Meter and pH Up/Down Solutions:** Maintaining the correct pH level is vital for nutrient absorption.
* **Grow Lights (Optional):** If you don’t have a sunny spot, you’ll need grow lights to provide adequate light for your rosemary.
* **Measuring Cups and Spoons:** For accurately measuring the nutrient solution.
* **Scissors or Pruning Shears:** For taking rosemary cuttings.
* **Water:** Distilled or filtered water is best.
* **Rooting Hormone (Optional):** This can help speed up the rooting process.
Taking Rosemary Cuttings
The first step is to obtain rosemary cuttings. This is a crucial step, so pay close attention!
1. **Choose Healthy Stems:** Select healthy, vibrant green stems from a mature rosemary plant. Avoid stems that are woody or have flowers.
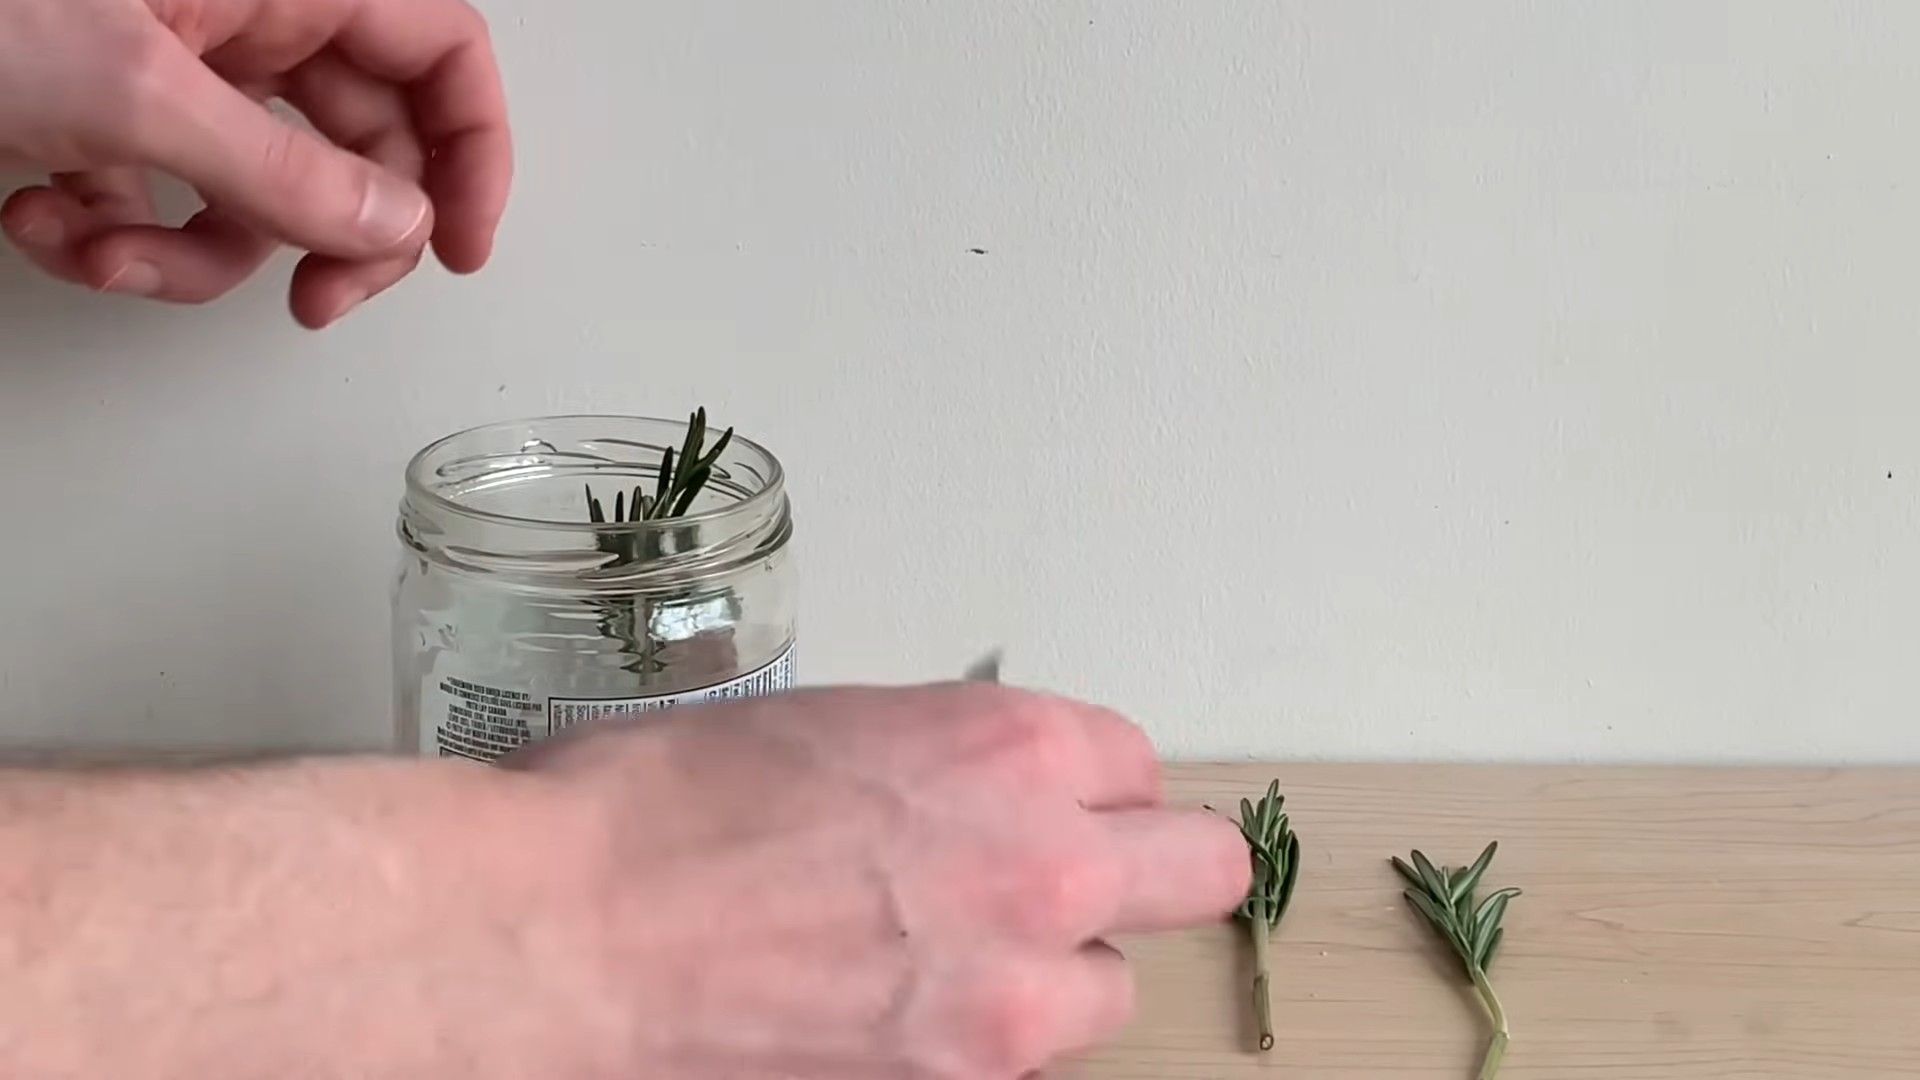
2. **Cut the Stems:** Using clean scissors or pruning shears, cut the stems at a 45-degree angle, about 4-6 inches long.
3. Remove Lower Leaves: Remove the leaves from the bottom inch or two of the stem. This will prevent them from rotting when submerged in water or the growing medium.
4. **Optional: Rooting Hormone:** Dip the cut end of each stem into rooting hormone powder or liquid. This will encourage root development. I find it helps, but it’s not strictly necessary.
Preparing the Growing Medium and Net Pots
Now, let’s get the growing medium and net pots ready for the cuttings.
1. **Soak the Growing Medium:** If you’re using rockwool cubes or coco coir, soak them in water for at least 30 minutes. This will hydrate the medium and remove any dust or debris.
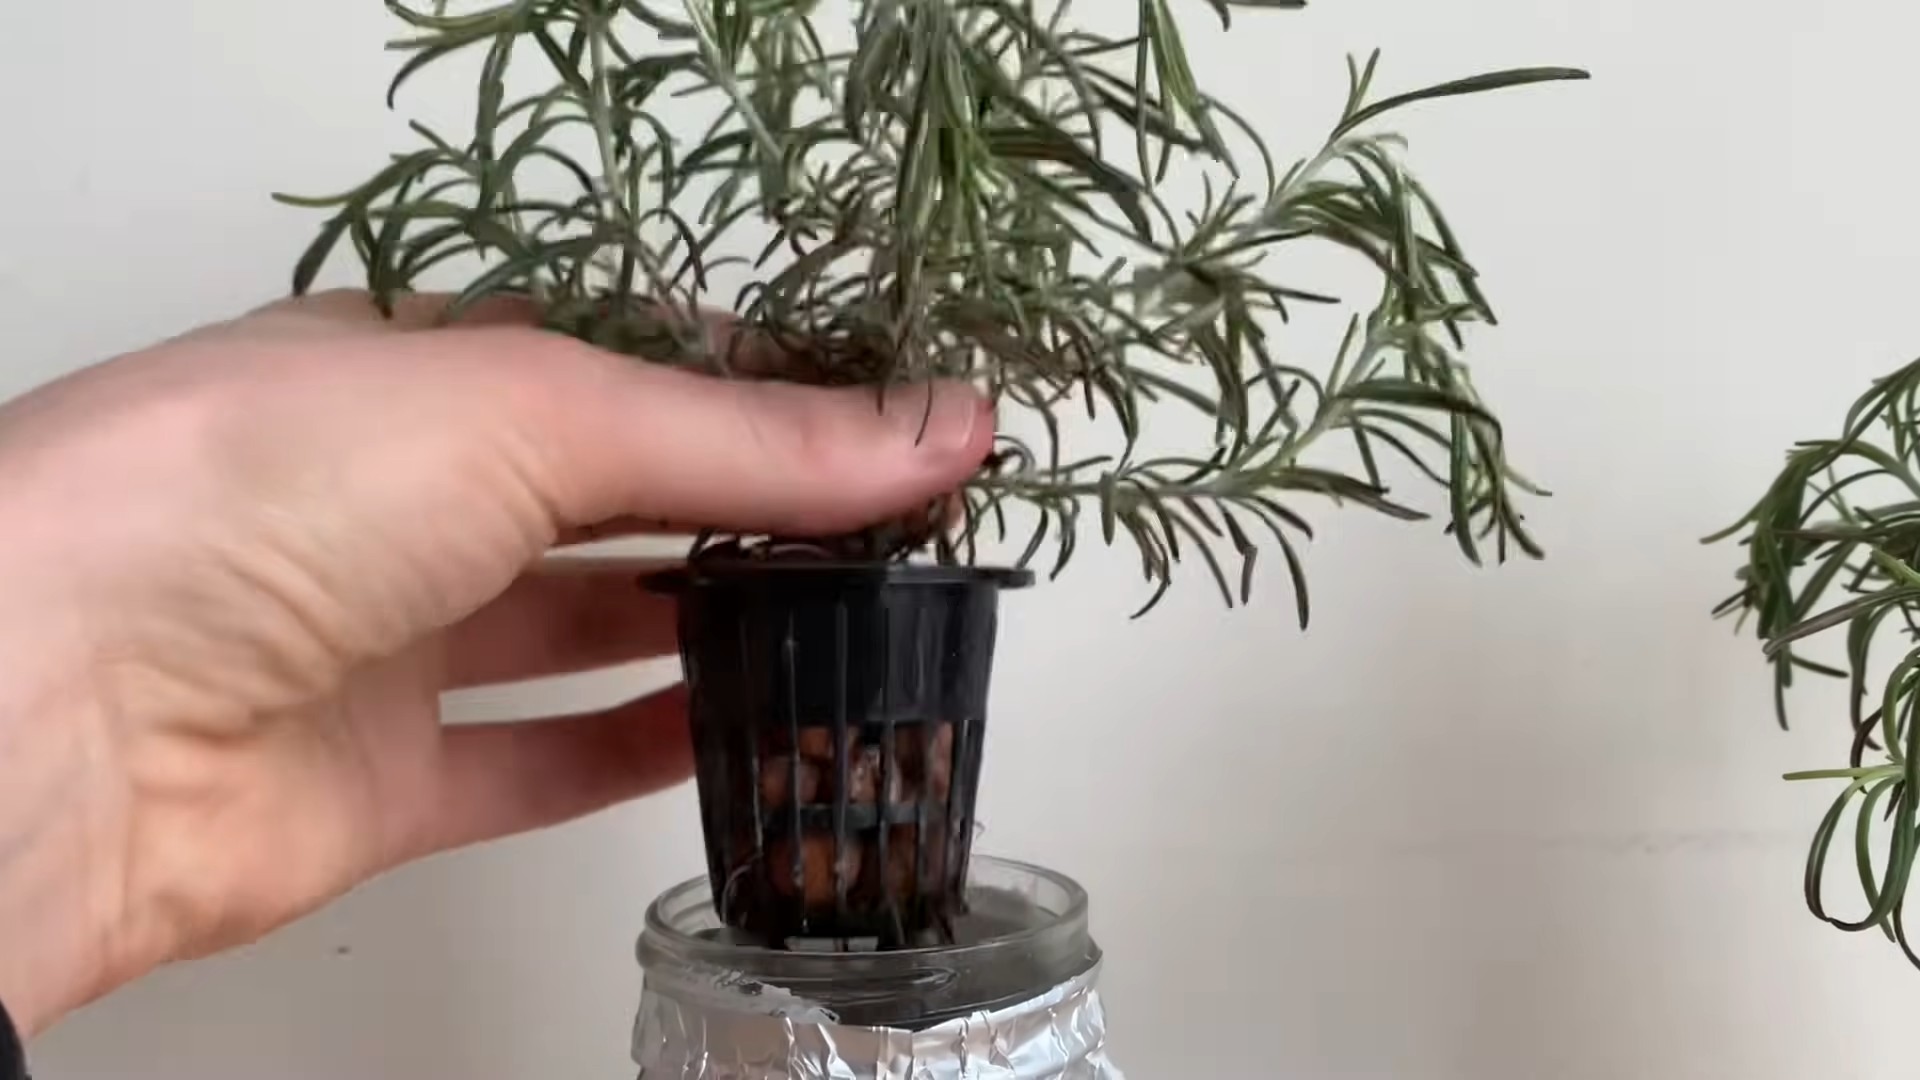
2. **Prepare the Net Pots:** Gently squeeze the excess water from the growing medium. Then, carefully insert the growing medium into the net pots. Make sure it’s snug but not too tightly packed.
3. **Insert the Cuttings:** Create a small hole in the center of the growing medium in each net pot. Gently insert the rosemary cutting into the hole, ensuring that the cut end is buried in the medium.
Setting Up the Hydroponic System
This is where the magic happens! Let’s assemble the hydroponic system.
1. **Prepare the Container:** Clean the container thoroughly with soap and water. Rinse well to remove any soap residue.
2. **Add Nutrient Solution:** Fill the container with water, leaving a few inches of space at the top. Add the hydroponic nutrient solution according to the manufacturer’s instructions. I always start with a slightly weaker solution than recommended, especially for young cuttings.
3. **Check and Adjust pH:** Use a pH meter to check the pH of the nutrient solution. Rosemary prefers a pH between 5.5 and 6.5. Adjust the pH as needed using pH up or pH down solutions. Add small amounts at a time and recheck the pH after each addition.
4. **Place the Net Pots:** Place the net pots into the container, ensuring that the bottom of the net pots are submerged in the nutrient solution. The water level should be high enough to keep the growing medium moist but not completely saturated.
5. **Install the Air Pump and Air Stone:** Place the air stone at the bottom of the container and connect it to the air pump with tubing. Turn on the air pump to oxygenate the nutrient solution. You should see bubbles rising from the air stone.
Providing Light and Care
Now that your hydroponic rosemary system is set up, it’s time to provide the necessary light and care.
1. **Light:** Rosemary needs at least 6 hours of sunlight per day. If you don’t have a sunny spot, use grow lights. Position the grow lights about 12-18 inches above the plants.
2. **Watering:** The hydroponic system takes care of most of the watering, but you’ll need to monitor the water level in the container and add more nutrient solution as needed. I usually check the water level every few days.
3. **Nutrient Solution:** Change the nutrient solution every 1-2 weeks. This will prevent the buildup of salts and ensure that your rosemary plants are getting the nutrients they need.
4. **pH Monitoring:** Check the pH of the nutrient solution regularly and adjust as needed.
5. **Pruning:** Prune your rosemary plants regularly to encourage bushier growth. You can harvest the pruned stems for cooking or other uses.
6. Pest Control: While hydroponics reduces the risk of soilborne pests, it’s still possible for pests to infest your rosemary plants. Inspect your plants regularly for signs of pests and take action if necessary. Insecticidal soap or neem oil can be effective treatments.
Troubleshooting
Even with the best care, you might encounter some problems along the way. Here are a few common issues and how to address them:
* **Yellowing Leaves:** This could be a sign of nutrient deficiency, overwatering, or incorrect pH. Check the pH and nutrient levels and adjust as needed. Make sure the growing medium isn’t waterlogged.
* **Slow Growth:** This could be due to insufficient light, low nutrient levels, or incorrect pH. Provide more light, adjust the nutrient solution, and check the pH.
* **Root Rot:** This is caused by a lack of oxygen in the nutrient solution. Make sure your air pump and air stone are working properly. You may also need to change the nutrient solution more frequently.
* **Pests:** Inspect your plants regularly for pests and take action if necessary.
Harvesting Your Rosemary
After a few weeks, your rosemary plants should be well-established and ready for harvesting.
1. **Harvesting:** Simply snip off stems as needed using clean scissors or pruning shears.
2. **Enjoy!:** Use your fresh rosemary in your favorite recipes, or dry it for later use.
Tips for Success
Here are a few extra tips to help you succeed with hydroponic rosemary:
* Start with Healthy Cuttings: The healthier the cuttings, the better the chances of success.
* Use a Balanced Nutrient Solution: A balanced nutrient solution is essential for healthy growth.
* Maintain the Correct pH: The correct pH is crucial for nutrient absorption.
* Provide Adequate Light: Rosemary needs plenty of light to thrive.
* Don’t Overwater: Overwatering can lead to root rot.
* Be Patient: It takes time for rosemary cuttings to root and grow.
Growing rosemary hydroponically is a fun and rewarding experience. With a little bit of effort, you can enjoy fresh, fragrant rosemary year-round. So, give it a try and see for yourself! I hope this guide has been helpful. Happy growing!
Conclusion
So, there you have it! Growing rosemary without soil might seem unconventional, but it’s a surprisingly effective and rewarding method, especially if you’re short on space, battling pesky soil-borne diseases, or simply looking for a cleaner, more controlled growing environment. This DIY trick isn’t just about novelty; it’s about unlocking a new level of accessibility and convenience in herb gardening.
Why is this a must-try? Because it simplifies the process. No more worrying about soil composition, drainage issues, or the constant threat of root rot. The water-based nutrient solution provides rosemary with everything it needs to thrive, allowing you to focus on other aspects of plant care, like light and humidity. Plus, the visual appeal of the roots suspended in water is undeniably captivating, turning your rosemary plant into a living piece of art.
But don’t stop there! Experiment with different nutrient solutions to see what works best for your rosemary. Some gardeners swear by specific hydroponic blends, while others prefer a more organic approach using diluted seaweed extract or compost tea. You can also play around with the type of container you use. Clear glass jars are ideal for monitoring root growth, but opaque containers can help prevent algae buildup. Consider adding an air stone to your setup to further oxygenate the water and promote healthy root development.
Variations to Consider:
* Hydroponic Systems: While this guide focuses on a simple water-based setup, you can easily adapt it to a more sophisticated hydroponic system like a Kratky or Deep Water Culture (DWC) setup. These systems offer even greater control over nutrient delivery and oxygenation.
* Propagation: Use this soil-free method to propagate rosemary cuttings. Simply place the cut end of a rosemary stem in water, and watch as roots emerge within a few weeks. This is a fantastic way to expand your rosemary collection without spending a dime.
* Indoor Herb Garden: Combine your soil-free rosemary with other herbs like mint, basil, and oregano in a shared water reservoir to create a thriving indoor herb garden. Just be sure to choose herbs with similar nutrient requirements.
We wholeheartedly encourage you to give this DIY trick a try. It’s a fun, educational, and ultimately rewarding experience that will provide you with a constant supply of fresh, fragrant rosemary. Once you’ve experienced the ease and benefits of growing rosemary without soil, you might never go back to traditional methods!
Don’t be shy – share your experiences with us! We’d love to hear about your successes, challenges, and any variations you’ve tried. Post photos of your soil-free rosemary plants on social media using #SoilFreeRosemary and tag us so we can see your amazing creations. Let’s build a community of soil-free rosemary enthusiasts!
Frequently Asked Questions (FAQ)
What exactly is soil-free rosemary growing, and why should I consider it?
Soil-free rosemary growing, often referred to as hydroponics or water culture, involves cultivating rosemary plants without using traditional soil as a growing medium. Instead, the roots are suspended in water or an inert medium like perlite or coco coir, and a nutrient-rich solution provides the necessary elements for growth. You should consider it because it offers several advantages: reduced risk of soil-borne diseases, better control over nutrient delivery, faster growth rates in some cases, and a cleaner, more space-efficient growing environment. It’s also a fascinating way to observe root development.
What kind of container is best for growing rosemary without soil?
The best container depends on your aesthetic preferences and practical considerations. Clear glass jars or vases are excellent for monitoring root growth and adding a visual appeal. However, clear containers can also promote algae growth, so you might need to clean them more frequently. Opaque containers, such as plastic buckets or ceramic pots, prevent algae growth but make it harder to observe the roots. Regardless of the material, ensure the container is clean and food-grade if possible. The size should be adequate to accommodate the root system as it develops.
What type of water should I use for my soil-free rosemary?
It’s best to use filtered or distilled water for your soil-free rosemary. Tap water can contain chlorine, chloramine, and other minerals that can be harmful to plants, especially in a closed system like hydroponics. If you must use tap water, let it sit out for 24 hours to allow the chlorine to evaporate. Rainwater is also a good option, but make sure it’s collected from a clean source and filtered to remove any debris.
How often should I change the water and nutrient solution?
The frequency of water and nutrient solution changes depends on the size of your container, the growth rate of your rosemary, and the concentration of the nutrient solution. As a general rule, change the water and nutrient solution every 1-2 weeks. If you notice the water becoming cloudy or algae growth, change it more frequently. It’s also a good idea to top off the water level as needed to ensure the roots are always submerged.
What kind of nutrients does rosemary need when grown without soil?
Rosemary needs a balanced nutrient solution containing macronutrients (nitrogen, phosphorus, potassium) and micronutrients (iron, manganese, zinc, copper, boron, molybdenum). You can purchase commercially available hydroponic nutrient solutions specifically formulated for herbs or vegetables. Alternatively, you can create your own nutrient solution using individual nutrient salts. Follow the instructions on the nutrient solution packaging carefully, and start with a lower concentration to avoid nutrient burn.
How much light does soil-free rosemary need?
Rosemary needs at least 6-8 hours of direct sunlight per day to thrive. If you’re growing your rosemary indoors, you’ll need to supplement with artificial lighting. LED grow lights are a good option because they’re energy-efficient and provide the full spectrum of light that plants need. Place the grow light about 6-12 inches above the rosemary plant.
How do I prevent algae growth in my soil-free rosemary setup?
Algae growth is a common problem in soil-free growing systems. To prevent algae growth, use an opaque container, keep the water level low enough to prevent light from reaching the roots, and change the water and nutrient solution regularly. You can also add a small amount of hydrogen peroxide to the water to kill algae.
Can I grow other herbs alongside rosemary in a soil-free system?
Yes, you can grow other herbs alongside rosemary in a soil-free system, but it’s important to choose herbs with similar nutrient requirements and growth habits. Good companions for rosemary include thyme, sage, and oregano. Avoid growing herbs that require very different pH levels or nutrient concentrations.
What are some common problems I might encounter when growing rosemary without soil, and how can I fix them?
Some common problems include nutrient deficiencies (yellowing leaves, stunted growth), algae growth, root rot (caused by poor oxygenation), and pest infestations. To address nutrient deficiencies, adjust the concentration of the nutrient solution. To prevent algae growth, use an opaque container and change the water regularly. To prevent root rot, ensure the water is well-oxygenated by using an air stone or changing the water frequently. To control pests, use insecticidal soap or neem oil.
How do I transition a rosemary plant from soil to a soil-free system?
Transitioning a rosemary plant from soil to a soil-free system requires careful handling to minimize stress. Gently remove the plant from its pot and wash away as much soil as possible from the roots. Be careful not to damage the roots during this process. You may need to soak the roots in water to loosen the soil. Once the roots are clean, place the plant in your soil-free setup and provide it with a diluted nutrient solution. Monitor the plant closely for signs of stress, such as wilting or yellowing leaves. It may take a few weeks for the plant to adjust to its new environment.


Leave a Comment