

Toilet grout cleaning hacks – sounds glamorous, right? Okay, maybe not. But trust me, mastering these simple DIY tricks can transform your bathroom from “meh” to “marvelous” without breaking the bank or spending hours scrubbing. For generations, keeping a clean and hygienic home has been a cornerstone of well-being, and the bathroom, often a breeding ground for grime, demands special attention. Think about it: our ancestors used natural remedies and ingenious techniques to maintain cleanliness long before fancy cleaning products existed. We’re simply carrying on that tradition, but with a modern twist!
Let’s face it, nobody enjoys scrubbing toilet grout. It’s a tedious task that often feels like a losing battle against stubborn stains and mildew. But what if I told you there are easy, effective, and even fun ways to tackle this chore? This article is your ultimate guide to toilet grout cleaning hacks that will save you time, money, and a whole lot of elbow grease. We’ll explore simple DIY solutions using ingredients you probably already have in your pantry, turning a dreaded chore into a manageable and even satisfying accomplishment. Get ready to say goodbye to grimy grout and hello to a sparkling clean toilet!
DIY Toilet Grout Cleaning Hacks: Sparkling Clean Without Breaking a Sweat!
Okay, let’s face it: cleaning toilet grout is nobody’s favorite chore. It’s grimy, it’s often stained, and it just feels…icky. But don’t despair! I’ve got some tried-and-true DIY hacks that will have your toilet grout looking sparkling clean in no time. We’re talking about banishing that mildew and grime without harsh chemicals or back-breaking scrubbing (well, maybe a *little* scrubbing, but I promise it’ll be worth it!).
Here’s the lowdown on how we’re going to tackle this project:
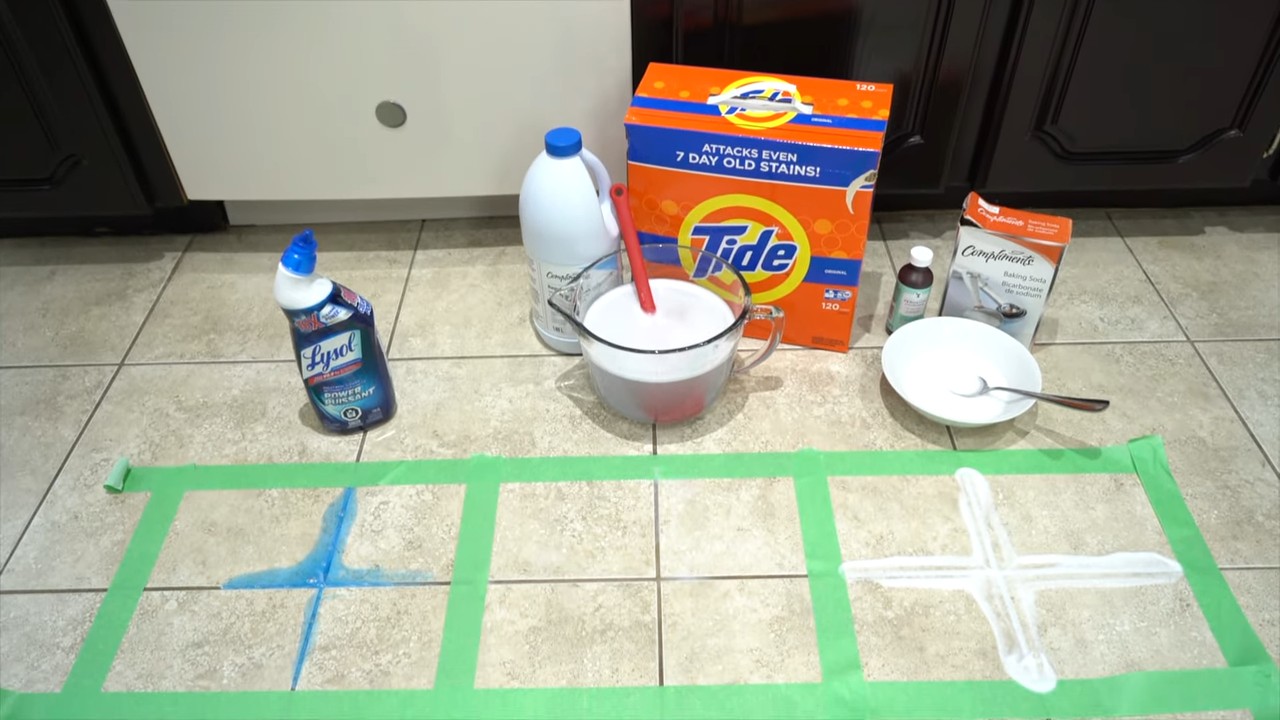
* **Gather Your Supplies:** Preparation is key! Having everything you need within reach will make the whole process smoother.
* **Choose Your Weapon (Cleaning Solution):** We’ll explore several effective DIY cleaning solutions, from baking soda paste to vinegar power.
* **Apply and Let it Work:** Patience is a virtue, especially when it comes to grout. We’ll let our chosen solution soak in to loosen the grime.
* **Scrub-a-dub-dub:** Time to get down and dirty (well, not *too* dirty!). We’ll use the right tools and techniques to scrub away the stains.
* **Rinse and Repeat (If Necessary):** Sometimes, stubborn stains need a second go-around.
* **Seal the Deal (Optional):** Prevent future staining by sealing your grout.
Choosing Your Cleaning Solution: The Arsenal of DIY Cleaners
Before we dive into the scrubbing, let’s decide which cleaning solution is best for your situation. I’m going to give you a few options, each with its own strengths and weaknesses.
1. **Baking Soda Paste:** This is my go-to for mild to moderate staining. It’s gentle, non-toxic, and surprisingly effective.
* **Pros:** Safe for most surfaces, readily available, inexpensive.
* **Cons:** May not be strong enough for heavily stained grout, requires some scrubbing.
2. **Vinegar and Baking Soda:** This dynamic duo creates a fizzing action that helps lift dirt and grime. Be careful when mixing, as it can create pressure in a closed container.
* **Pros:** Powerful cleaning action, good for removing mildew and mold.
* **Cons:** Can have a strong odor, may etch some natural stone surfaces (test in an inconspicuous area first!).
3. **Hydrogen Peroxide:** A mild bleaching agent that can help lighten stains.
* **Pros:** Effective for whitening grout, relatively gentle.
* **Cons:** Can take longer to work than other solutions, may not remove all types of stains.
4. **Bleach Solution (Use with Caution!):** This is the heavy-duty option for severely stained grout. *Always* wear gloves and eye protection when working with bleach, and ensure proper ventilation. *Never* mix bleach with ammonia, as this creates toxic fumes.
* **Pros:** Highly effective for removing stains and killing mold.
* **Cons:** Harsh chemicals, can damage some surfaces, requires extreme caution.
Step-by-Step Guide to Sparkling Toilet Grout
Okay, let’s get started! I’m going to walk you through the process using the baking soda paste method, but you can easily adapt these steps to whichever cleaning solution you choose.
1. **Gather Your Supplies:** Before you even think about touching that grout, make sure you have everything you need. This will save you time and frustration later. Here’s what I recommend:
* Baking soda
* Water
* Small bowl or container
* Old toothbrush or grout brush
* Spray bottle filled with water
* Gloves (trust me, you’ll want these!)
* Eye protection (especially if using bleach or vinegar)
* Paper towels or a clean cloth
2. **Prepare the Baking Soda Paste:** In your bowl, mix baking soda with a small amount of water until you form a thick paste. You want it to be thick enough to stick to the grout, but not so thick that it’s difficult to spread. I usually start with about 1/4 cup of baking soda and add water a teaspoon at a time until I reach the desired consistency.
3. **Apply the Paste to the Grout:** Using your finger (with a glove on, of course!), the toothbrush, or a small spatula, apply the baking soda paste liberally to the grout lines. Make sure you cover all the stained areas. Don’t be shy – the more paste you apply, the better it will work.
4. **Let it Sit (The Waiting Game):** This is the most important part! Let the baking soda paste sit on the grout for at least 30 minutes. For heavily stained grout, you can let it sit for several hours, or even overnight. The longer it sits, the more time it has to break down the dirt and grime. I usually set a timer so I don’t forget about it.
5. **Scrub-a-dub-dub (The Fun Part!):** Now it’s time to get scrubbing! Using your old toothbrush or grout brush, scrub the grout lines vigorously. You’ll probably see the paste start to turn gray or brown as it lifts the dirt. Don’t be afraid to put some elbow grease into it! For stubborn stains, you may need to scrub in a circular motion.
6. **Rinse Away the Grime:** Once you’ve scrubbed all the grout lines, use your spray bottle filled with water to rinse away the baking soda paste. You can also use a damp cloth or sponge to wipe away any remaining residue. Make sure you rinse thoroughly to remove all traces of the paste.
7. **Dry and Inspect:** Use paper towels or a clean cloth to dry the grout lines. Now, take a good look and see how you did! If there are still some stains remaining, don’t worry – we can repeat the process.
8. **Repeat if Necessary:** For stubborn stains, you may need to repeat steps 3-7. Sometimes, it takes a couple of applications to completely remove all the grime. Don’t give up!
9. **Consider a Vinegar Rinse (Optional):** After rinsing away the baking soda paste, you can give the grout a final rinse with a diluted vinegar solution (1 part vinegar to 1 part water). This will help to remove any remaining residue and leave the grout looking even cleaner. Just be sure to rinse thoroughly with water afterwards.
10. **Seal the Grout (Optional but Recommended):** Once your grout is clean and dry, you can seal it to help prevent future staining. Grout sealers create a barrier that prevents dirt and moisture from penetrating the grout. You can find grout sealers at most hardware stores. Follow the instructions on the product label for application. I highly recommend this step, as it will save you a lot of time and effort in the long run.
Alternative Cleaning Solutions: When Baking Soda Isn’t Enough
Okay, so maybe the baking soda paste didn’t quite do the trick. Don’t worry, I’ve got a few more tricks up my sleeve! Here’s how to use the other cleaning solutions I mentioned earlier:
Vinegar and Baking Soda Method:
1. **Sprinkle Baking Soda:** Sprinkle baking soda liberally over the grout lines.
2. **Spray with Vinegar:** Spray the baking soda with white vinegar. It will fizz!
3. **Let it Fizz:** Let the mixture fizz for about 5-10 minutes.
4. **Scrub and Rinse:** Scrub with a toothbrush or grout brush, then rinse thoroughly with water.
Hydrogen Peroxide Method:
1. **Apply Hydrogen Peroxide:** Pour or spray hydrogen peroxide (3% solution) directly onto the grout lines.
2. **Let it Sit:** Let it sit for at least 10-15 minutes.
3. **Scrub and Rinse:** Scrub with a toothbrush or grout brush, then rinse thoroughly with water.
Bleach Solution Method (Use with Extreme Caution!):
1. **Prepare Bleach Solution:** Mix bleach with water in a well-ventilated area. I recommend a ratio of 1 part bleach to 10 parts water. *Always* wear gloves and eye protection.
2. **Apply Bleach Solution:** Carefully apply the bleach solution to the grout lines using a toothbrush or grout brush.
3. **Let it Sit:** Let it sit for no more than 5-10 minutes.
4. **Scrub and Rinse:** Scrub with a toothbrush or grout brush, then rinse *thoroughly* with water. Make sure to rinse multiple times to remove all traces of bleach.
Tips and Tricks for Grout Cleaning Success
* **Ventilation is Key:** Always ensure proper ventilation when cleaning, especially when using vinegar or bleach. Open windows and doors to allow fresh air to circulate.
* **Test in an Inconspicuous Area:** Before using any cleaning solution, test it in a small, inconspicuous area to make sure it doesn’t damage the surface.
* **Use the Right Tools:** A
Conclusion
So, there you have it! No more battling stubborn stains and unsightly discoloration in your bathroom. This simple, yet incredibly effective, DIY toilet grout cleaning hack is a game-changer for anyone looking to achieve a sparkling clean bathroom without resorting to harsh chemicals or expensive professional services. We’ve shown you how to harness the power of readily available household ingredients to create a potent cleaning solution that tackles even the most ingrained grime.
Why is this a must-try? Because it’s cost-effective, environmentally friendly, and delivers remarkable results. Think about the money you’ll save on commercial grout cleaners, many of which contain harsh chemicals that can be harmful to your health and the environment. This DIY method allows you to control exactly what goes into your cleaning solution, ensuring a safer and healthier home. Plus, the satisfaction of seeing your grout transform from dingy to dazzling is incredibly rewarding.
But don’t just take our word for it! We encourage you to experiment with variations to find what works best for your specific needs. For instance, if you’re dealing with particularly stubborn stains, you could try adding a small amount of borax to the paste for extra cleaning power. Alternatively, for a more fragrant cleaning experience, a few drops of your favorite essential oil, like tea tree or lavender, can be added to the solution. Remember to always test any new cleaning solution in an inconspicuous area first to ensure it doesn’t damage the grout or surrounding tiles.
This toilet grout cleaning hack is more than just a cleaning method; it’s a pathway to a cleaner, healthier, and more enjoyable bathroom experience. Imagine stepping into your bathroom and being greeted by gleaming grout lines, free from the unsightly stains that once plagued your space. This is the power of a simple DIY solution, and it’s within your reach.
We are confident that this DIY toilet grout cleaning hack will become a staple in your cleaning routine. It’s easy to implement, requires minimal effort, and delivers exceptional results. So, ditch the expensive and harsh chemicals, and embrace the power of this simple, yet effective, cleaning solution.
Now, it’s your turn! We urge you to give this DIY toilet grout cleaning hack a try and experience the difference for yourself. And most importantly, we want to hear about your results! Share your before-and-after photos, your tips and tricks, and any variations you’ve discovered in the comments section below. Let’s create a community of clean bathroom enthusiasts, all sharing our knowledge and experiences to help each other achieve sparkling clean grout. Your feedback is invaluable, and it will help us refine and improve this cleaning method for everyone. So, grab your supplies, roll up your sleeves, and get ready to transform your bathroom grout! We can’t wait to see your amazing results!
Frequently Asked Questions (FAQ)
What exactly makes this DIY toilet grout cleaning hack so effective?
The effectiveness of this DIY hack lies in the combination of ingredients used. Baking soda acts as a mild abrasive, gently scrubbing away surface dirt and grime without damaging the grout. Hydrogen peroxide is a powerful oxidizing agent that helps to bleach and lift stains, effectively removing discoloration. The combination of these two ingredients creates a paste that clings to the grout, allowing the cleaning agents to penetrate deep into the pores and break down stubborn stains. The paste consistency also prevents the solution from running down the tiles, ensuring maximum contact time for optimal cleaning. Furthermore, the DIY nature of the solution allows you to adjust the consistency and strength based on the severity of the staining, providing a customized cleaning experience.
Is this DIY toilet grout cleaning hack safe for all types of grout?
While this DIY cleaning hack is generally safe for most types of grout, it’s always a good idea to test it in an inconspicuous area first, especially if you have colored or antique grout. Some types of grout may be more porous or sensitive to certain cleaning agents. To test, apply a small amount of the paste to a hidden area of grout and let it sit for the recommended time. Then, rinse it off and check for any discoloration or damage. If you notice any adverse effects, discontinue use and consult a professional cleaner. For epoxy grout, which is known for its durability and stain resistance, this method is generally safe and effective. However, always err on the side of caution and test before applying to the entire area.
How often should I use this DIY toilet grout cleaning hack?
The frequency of cleaning depends on the amount of traffic and moisture in your bathroom. For bathrooms that are used frequently or have poor ventilation, you may need to clean the grout more often, perhaps once a week or every other week. For less frequently used bathrooms, cleaning once a month may be sufficient. Regular cleaning will prevent the buildup of dirt and grime, making it easier to maintain clean grout lines. In addition to this DIY cleaning hack, you can also wipe down the grout lines after each shower to prevent the growth of mold and mildew.
Can I use vinegar instead of hydrogen peroxide?
While vinegar is a popular cleaning agent, it’s not recommended for grout cleaning. Vinegar is acidic and can actually damage grout over time, causing it to weaken and crumble. Hydrogen peroxide is a much gentler and more effective option for cleaning grout without causing damage. If you’re looking for a natural alternative to hydrogen peroxide, you could try using lemon juice, which has mild bleaching properties. However, lemon juice is also acidic, so it’s important to dilute it with water and test it in an inconspicuous area first.
What if the stains are really stubborn and don’t come off with the first application?
For particularly stubborn stains, you may need to repeat the application of the DIY cleaning paste. After the first application, rinse the grout thoroughly and inspect the remaining stains. If necessary, apply a fresh batch of the paste and let it sit for a longer period of time, up to an hour. You can also try using a stiffer brush to scrub the grout more vigorously. For extremely stubborn stains, you may need to consider using a commercial grout cleaner that is specifically designed for removing tough stains. However, always follow the manufacturer’s instructions carefully and wear appropriate safety gear, such as gloves and eye protection.
How can I prevent grout from getting stained in the first place?
Prevention is key to maintaining clean grout lines. Here are a few tips to prevent grout from getting stained:
* Ventilate your bathroom: Proper ventilation will help to reduce moisture buildup, which can lead to the growth of mold and mildew.
* Wipe down the grout lines after each shower: This will prevent the buildup of soap scum and other residues.
* Seal your grout: Applying a grout sealer will create a protective barrier that prevents stains from penetrating the grout.
* Clean spills immediately: Wipe up any spills as soon as they occur to prevent them from soaking into the grout.
* Use a squeegee after showering: A squeegee can help remove excess water from the shower walls and floor, reducing the risk of mold and mildew growth.
What type of brush is best for scrubbing the grout?
A stiff-bristled brush is ideal for scrubbing grout. You can use a grout brush, a toothbrush, or even a small scrub brush. Look for a brush with bristles that are strong enough to scrub away dirt and grime, but not so abrasive that they will damage the grout. An electric toothbrush with a small brush head can also be very effective for cleaning grout, especially in hard-to-reach areas.
Can I use this DIY toilet grout cleaning hack on other surfaces besides grout?
While this DIY cleaning hack is primarily designed for cleaning grout, it can also be used on other surfaces, such as tile, porcelain, and ceramic. However, it’s important to test it in an inconspicuous area first to ensure that it doesn’t damage the surface. Avoid using this cleaning hack on delicate surfaces, such as marble or natural stone, as it may scratch or etch the surface.
Is it safe to use this DIY toilet grout cleaning hack if I have allergies or sensitivities?
If you have allergies or sensitivities, it’s important to take precautions when using this DIY cleaning hack. Wear gloves and a mask to protect your skin and respiratory system from irritation. Ensure that the area is well-ventilated to avoid inhaling any fumes. If you experience any adverse reactions, such as skin irritation or difficulty breathing, discontinue use and consult a doctor. You can also try using alternative cleaning agents that are specifically designed for people with allergies or sensitivities.

Leave a Comment