

Year Round Asparagus Growing might seem like a pipe dream, especially if you live in a region with harsh winters. But what if I told you that with a few clever tricks and a little DIY ingenuity, you could be enjoying fresh, homegrown asparagus spears all year long? Forget those sad, imported stalks from the grocery store – imagine the vibrant green goodness gracing your plate, even in the dead of winter!
Asparagus has been cultivated for centuries, with evidence suggesting its use dating back to ancient Egypt and Rome. The Romans, in particular, were huge fans, even developing methods to preserve it for out-of-season enjoyment. While they didn’t quite achieve year-round harvests like we’re aiming for, their dedication speaks volumes about the vegetable’s enduring appeal.
Let’s face it, waiting for spring to enjoy fresh asparagus can feel like an eternity. This DIY guide is your key to unlocking a continuous supply of this delicious and nutritious vegetable. Whether you’re a seasoned gardener or just starting out, these tips and tricks will empower you to extend your harvest and enjoy the fruits (or rather, vegetables!) of your labor throughout the entire year. Plus, mastering year round asparagus growing is a fantastic way to become more self-sufficient and reduce your reliance on store-bought produce. So, grab your gardening gloves, and let’s get started!
Growing Asparagus Year-Round: A DIY Guide
Hey there, fellow gardening enthusiasts! Ever dreamt of harvesting fresh, delicious asparagus spears all year long? Well, dream no more! While asparagus is traditionally a spring crop, with a little planning and some clever techniques, you can extend your harvest and enjoy this delectable vegetable almost year-round. I’m going to walk you through how to achieve this, step-by-step.
Understanding Asparagus and Its Growth Cycle
Before we dive into the nitty-gritty, let’s quickly understand asparagus. It’s a perennial plant, meaning it lives for many years. It has a dormant period in the winter and actively grows in the spring and summer. The spears we eat are the young shoots that emerge from the crown (the plant’s base).
To achieve year-round harvests, we’ll be manipulating this natural cycle using a combination of techniques: succession planting, forcing, and indoor growing.
Materials You’ll Need
* Asparagus crowns (1-year-old are best) – I recommend ‘Jersey Knight’ for its high yield and disease resistance.
* Large containers (at least 18 inches in diameter and depth)
* Well-draining potting mix (a mix of compost, peat moss, and perlite works well)
* Grow lights (if growing indoors)
* Heating mat (optional, for faster germination)
* Garden trowel
* Watering can or hose
* Fertilizer (balanced, slow-release)
* Mulch (straw or wood chips)
* A cool, dark space (like a basement or garage) for forcing
Section 1: Succession Planting for Extended Outdoor Harvests
Succession planting is the key to extending your outdoor asparagus harvest. The idea is simple: plant asparagus crowns at different times to stagger their production.
Here’s the plan:
* Early Spring Planting: Plant your first batch of crowns as soon as the ground is workable in early spring (usually March or April).
* Late Spring Planting: Plant a second batch of crowns about 4-6 weeks after the first planting.
* Summer Planting: Plant a third batch of crowns in late summer (August or September).
By staggering your plantings, you’ll have a continuous supply of asparagus spears throughout the spring and summer.
Step-by-Step Instructions for Outdoor Planting:
1. Prepare the Soil: Asparagus needs well-drained soil that’s rich in organic matter. Amend your soil with compost or well-rotted manure before planting. Aim for a slightly acidic soil pH (around 6.5-7.0). I always test my soil before planting anything!
2. Dig Trenches: Dig trenches that are about 6-8 inches deep and 12 inches wide. Space the trenches about 3-4 feet apart.
3. Plant the Crowns: Place the asparagus crowns in the trenches, spacing them about 12-18 inches apart. Make sure the buds (the little points where the spears will emerge) are facing upwards.
4. Cover the Crowns: Gently cover the crowns with about 2 inches of soil. As the spears emerge, gradually fill in the trench with more soil until it’s level with the surrounding ground.
5. Water Thoroughly: Water the newly planted crowns thoroughly.
6. Mulch: Apply a layer of mulch around the plants to help retain moisture and suppress weeds.
7. Fertilize: Fertilize the asparagus plants with a balanced, slow-release fertilizer according to the package instructions. I usually fertilize in the spring and again in the fall.
8. Patience is Key: Resist the urge to harvest any spears during the first year. This allows the plants to establish a strong root system. In the second year, you can harvest lightly for a few weeks. By the third year, you can harvest more heavily for a longer period.
Section 2: Forcing Asparagus for Winter Harvests
Forcing asparagus involves tricking the plants into thinking it’s spring, even in the dead of winter. This allows you to harvest spears indoors during the colder months.
Here’s how it works:
1. Choose Your Crowns: Select mature asparagus crowns (at least 3 years old) that have had a full growing season outdoors. These crowns will have stored up enough energy to produce spears during forcing.
2. Prepare the Crowns: In the fall, after the foliage has died back, carefully dig up the crowns. Trim the roots back to about 6-8 inches.
3. Chill the Crowns: Place the crowns in a cool, dark place (like a basement or garage) for at least 8-10 weeks. The temperature should be between 35-45°F (2-7°C). This chilling period is essential for breaking dormancy. I usually wrap the roots in damp burlap to prevent them from drying out.
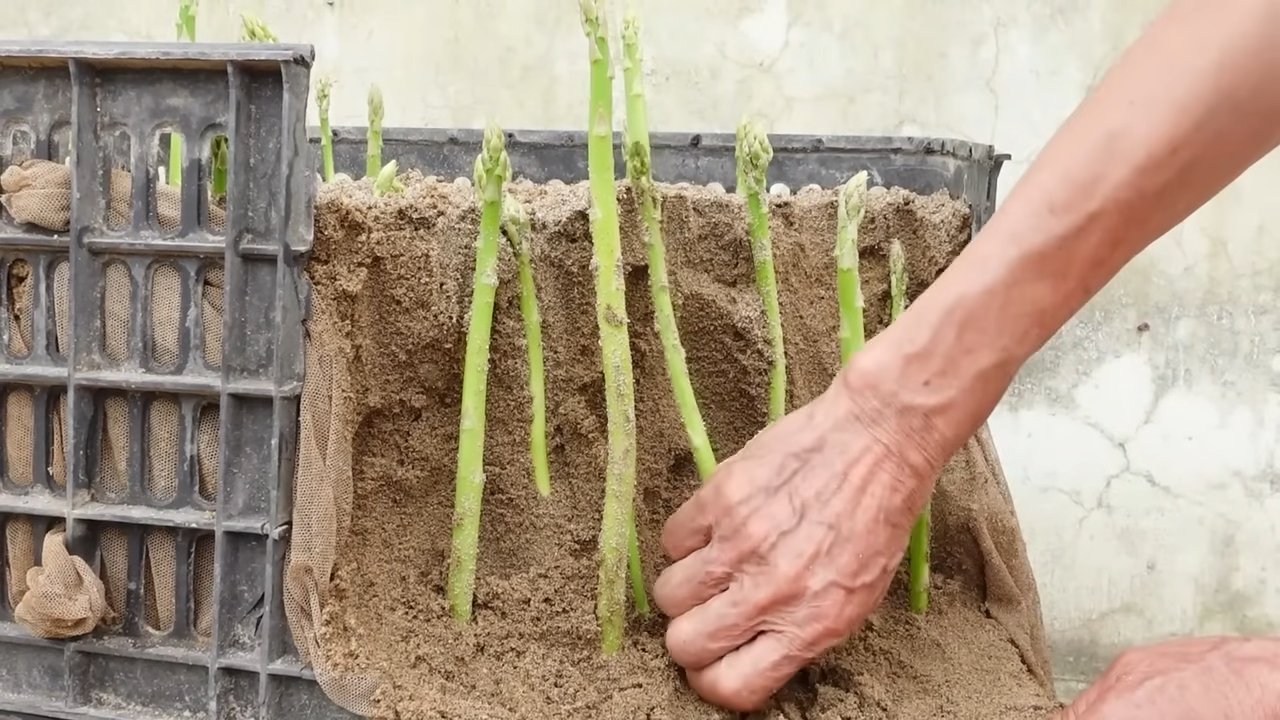
4. Plant in Containers: After the chilling period, plant the crowns in large containers filled with well-draining potting mix. Plant them at the same depth as they were growing outdoors.
5. Water and Warmth: Water the containers thoroughly and place them in a warm, bright location. A temperature of around 65-75°F (18-24°C) is ideal. You can use a heating mat to speed up the process.
6. Provide Light: If you don’t have enough natural light, supplement with grow lights. Asparagus needs at least 12-14 hours of light per day to produce spears.
7. Harvest the Spears: The spears should start to emerge within a few weeks. Harvest them when they are about 6-8 inches tall. Simply snap them off at the base.
8. Rest the Crowns: After you’ve harvested for a few weeks, the crowns will be exhausted. Discard them or plant them back outdoors in the spring to recover. They won’t be suitable for forcing again for at least a year.
Section 3: Indoor Asparagus Growing for Continuous Harvests
Growing asparagus indoors allows you to have a continuous supply of spears, regardless of the season. This requires a bit more effort and space, but the rewards are well worth it.
Here’s the process:
1. Choose the Right Variety: Select asparagus varieties that are well-suited for container growing, such as ‘Jersey Knight’ or ‘Purple Passion’.
2. Select Large Containers: Use large containers (at least 18 inches in diameter and depth) with drainage holes.
3. Prepare the Potting Mix: Use a well-draining potting mix that’s rich in organic matter.
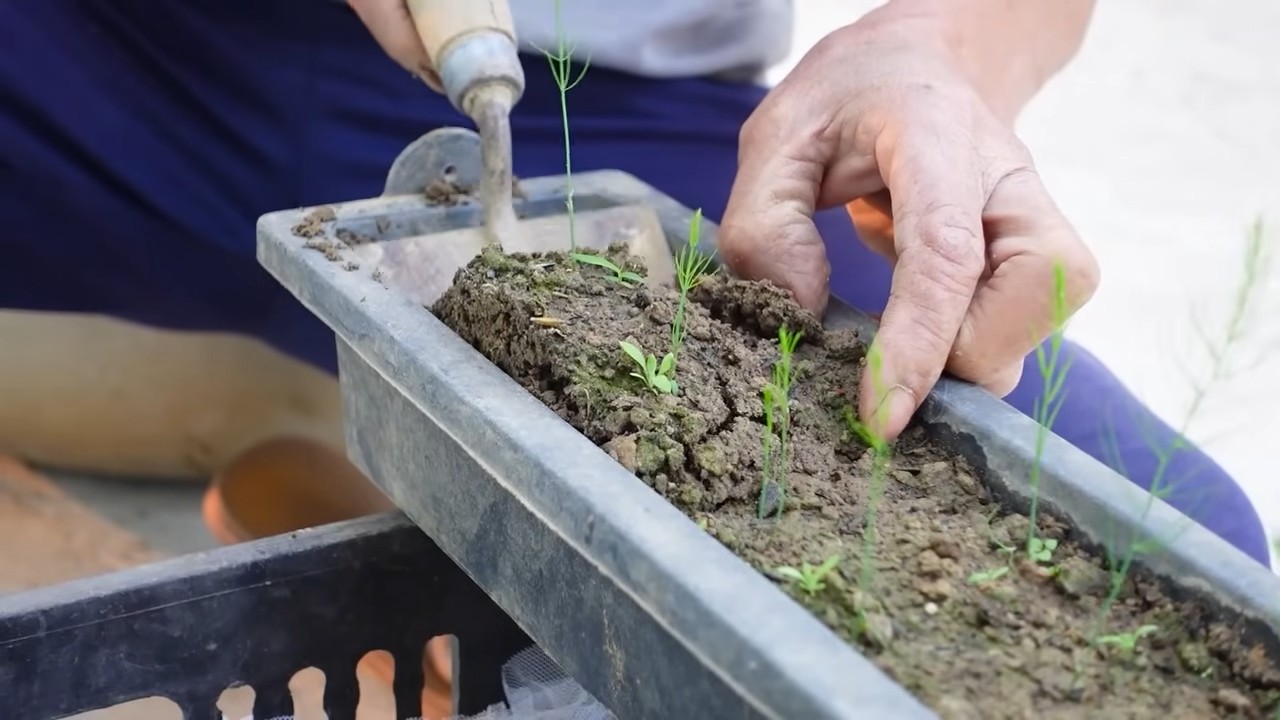
4. Plant the Crowns: Plant the asparagus crowns in the containers, spacing them about 12-18 inches apart. Make sure the buds are facing upwards.
5. Provide Adequate Light: Asparagus needs at least 12-14 hours of light per day to thrive indoors. Use grow lights to supplement natural light, especially during the winter months. I use full-spectrum LED grow lights for best results.
6. Water Regularly: Water the asparagus plants regularly, keeping the soil moist but not waterlogged.
7. Fertilize Regularly: Fertilize the asparagus plants with a balanced, slow-release fertilizer every few weeks.
8. Maintain Temperature: Maintain a consistent temperature of around 65-75°F (18-24°C).
9. Pollination (If Necessary): Asparagus is dioecious, meaning it has separate male and female plants. If you want to produce seeds, you’ll need both male and female plants. You may need to hand-pollinate the female flowers to ensure fruit set.
10. Harvesting: In the first year, don’t harvest any spears. In the second year, harvest lightly for a few weeks. From the third year onwards, you can harvest more heavily for a longer period.
11. Dormancy Period: Even when growing indoors, asparagus plants need a dormant period. In the fall, reduce watering and stop fertilizing. Allow the foliage to die back naturally. You can then cut back the dead foliage and move the containers to a cooler location (around 50-60°F or 10-15°C) for a few weeks. After the dormant period, resume watering and fertilizing to encourage new growth.
Troubleshooting Tips
* Yellowing Foliage: This could be a sign of overwatering, underwatering, or nutrient deficiency. Adjust your watering schedule and fertilize as needed.
* Thin Spears: This could be a sign that the plants are not getting enough nutrients or light. Fertilize and provide more light.
* Pests and Diseases: Asparagus is generally pest-resistant, but it can be susceptible to asparagus beetles and fungal diseases. Inspect your plants regularly and treat any problems promptly. I prefer
Conclusion
So, there you have it! Mastering the art of year-round asparagus growing is not just a pipe dream; it’s an achievable reality with a little planning and the right techniques. We’ve explored the secrets to extending your asparagus harvest far beyond its typical spring window, allowing you to enjoy this delectable vegetable fresh from your garden throughout the year.
Why is this a must-try? Imagine the satisfaction of serving up tender, homegrown asparagus in the dead of winter, a vibrant green reminder of warmer days. Think of the savings on your grocery bill, and the reduced reliance on commercially grown produce that may have traveled hundreds or even thousands of miles to reach your plate. But beyond the practical benefits, year-round asparagus growing offers a deeper connection to your food and the natural world. It’s a rewarding experience that allows you to nurture life and reap the delicious rewards of your labor.
This DIY trick is a game-changer for any gardener who loves fresh asparagus.
But don’t stop there! Experiment with different asparagus varieties to find the ones that thrive best in your local climate and growing conditions. Consider incorporating companion planting techniques to further enhance your asparagus bed’s health and productivity. Try different mulching materials to optimize soil temperature and moisture retention. The possibilities are endless!
For those in colder climates, consider building a simple cold frame or using row covers to provide extra protection during the harshest winter months. If you have limited space, explore container gardening options for growing asparagus indoors or on a patio. Remember, the key to success is observation and adaptation. Pay attention to your plants’ needs and adjust your techniques accordingly.
We’ve armed you with the knowledge and inspiration to embark on your year-round asparagus growing adventure. Now, it’s time to get your hands dirty! Don’t be afraid to experiment, learn from your mistakes, and celebrate your successes. We are confident that with a little effort, you’ll be enjoying fresh, homegrown asparagus all year long.
We are incredibly excited to hear about your experiences! Share your tips, tricks, and triumphs in the comments below. Let’s build a community of year-round asparagus growers and inspire others to embrace this rewarding challenge. What varieties have you found most successful? What challenges have you faced, and how did you overcome them? Your insights will be invaluable to fellow gardeners.
So, go ahead, give it a try! Unlock the secrets of year-round asparagus growing and savor the taste of homegrown goodness all year long. We can’t wait to hear your stories!
Frequently Asked Questions (FAQ)
What are the best asparagus varieties for year-round growing?
The best asparagus varieties for year-round growing depend largely on your climate. However, some varieties are known for their adaptability and resilience. ‘Jersey Knight’ is a popular choice for its high yields and disease resistance. ‘Millennium’ is another excellent option, known for its cold hardiness and long lifespan. ‘Purple Passion’ is a unique variety with a sweeter flavor and beautiful purple stalks, but it may be less cold-hardy than other varieties. Consider your local climate and growing conditions when selecting your asparagus varieties. Researching varieties that are known to thrive in your specific region is always a good starting point. Local nurseries and agricultural extension offices can provide valuable insights.
How do I protect my asparagus plants during the winter months?
Protecting your asparagus plants during the winter is crucial for year-round growing. In colder climates, mulching heavily with straw, leaves, or wood chips can help insulate the soil and protect the crowns from freezing temperatures. A thick layer of mulch (4-6 inches) will help maintain a more consistent soil temperature. You can also use cold frames or row covers to provide additional protection. Cold frames are mini-greenhouses that trap heat and shield plants from harsh weather. Row covers are lightweight fabrics that can be draped over plants to provide insulation and protection from frost. For container-grown asparagus, consider moving the pots to a sheltered location, such as a garage or shed, during the coldest periods. Remember to water sparingly during the winter months, as the plants will be dormant and require less moisture.
How often should I water my asparagus plants?
Asparagus plants need consistent moisture, especially during the growing season. Water deeply and regularly, especially during dry spells. Aim to keep the soil consistently moist but not waterlogged. Overwatering can lead to root rot, so it’s important to ensure good drainage. During the dormant winter months, reduce watering significantly. The soil should be allowed to dry out slightly between waterings. A good rule of thumb is to water only when the top inch of soil feels dry to the touch. The frequency of watering will depend on factors such as your climate, soil type, and the age of your plants. Young asparagus plants require more frequent watering than established plants.
What kind of soil is best for asparagus?
Asparagus thrives in well-drained, fertile soil with a slightly acidic to neutral pH (6.0-7.0). Amend heavy clay soils with organic matter, such as compost or well-rotted manure, to improve drainage and aeration. Sandy soils can also benefit from the addition of organic matter to improve water retention. Before planting, conduct a soil test to determine the pH and nutrient levels. Amend the soil as needed based on the test results. Asparagus is a heavy feeder, so it’s important to provide adequate nutrients. Incorporate a slow-release fertilizer into the soil at planting time and side-dress with compost or fertilizer during the growing season.
How long does it take for asparagus plants to mature and produce a harvest?
Asparagus plants typically take 2-3 years to mature and produce a substantial harvest. During the first year, allow the plants to establish themselves and focus on developing a strong root system. Avoid harvesting any spears during the first year. In the second year, you can harvest a few spears, but limit the harvest to a few weeks. In the third year and beyond, you can harvest spears for a longer period, typically 6-8 weeks in the spring. After the harvest period, allow the ferns to grow and replenish the plant’s energy reserves for the following year. Proper care and maintenance during the establishment phase are crucial for ensuring a bountiful harvest in the years to come.
Can I grow asparagus in containers?
Yes, you can grow asparagus in containers, but it requires careful planning and attention. Choose a large container (at least 18 inches in diameter and 24 inches deep) to accommodate the plant’s extensive root system. Use a well-draining potting mix and ensure that the container has drainage holes. Water regularly and fertilize as needed. Container-grown asparagus may require more frequent watering and fertilization than asparagus grown in the ground. During the winter months, protect the container from freezing temperatures by moving it to a sheltered location or wrapping it with insulation. Container growing is a great option for those with limited space or poor soil conditions.
How do I deal with common asparagus pests and diseases?
Asparagus is susceptible to several pests and diseases, including asparagus beetles, asparagus rust, and crown rot. Regularly inspect your plants for signs of infestation or disease. Handpick asparagus beetles and their larvae. Use insecticidal soap or neem oil to control infestations. To prevent asparagus rust, choose rust-resistant varieties and ensure good air circulation. Avoid overhead watering, which can create a humid environment that favors rust development. Crown rot is a fungal disease that can be caused by poor drainage or overwatering. Improve drainage and avoid overwatering to prevent crown rot. Remove and destroy any infected plants to prevent the spread of the disease. Crop rotation can also help to reduce the risk of soilborne diseases.
What is the best way to harvest asparagus?
Harvest asparagus spears when they are 6-8 inches tall and about as thick as your finger. Use a sharp knife to cut the spears at ground level. Avoid damaging the crown or surrounding spears. Harvest spears every day or every other day during the peak harvest season. Stop harvesting when the spears become thin and spindly, indicating that the plant is starting to exhaust its energy reserves. Allow the ferns to grow and replenish the plant’s energy for the following year. Proper harvesting techniques are essential for maximizing yield and maintaining the health of your asparagus plants.
Leave a Comment